Operating Instructions
Page 6
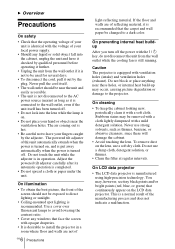
... touching the lens. B Overview Precautions On safety • Check that the operating voltage of your unit is identical with the voltage of your local power supply. • Should any windows that face the screen with opaque draperies. • It is desirable to install the projector in operation. Stubborn stains may occur, causing picture degradation or damage to the projector. Do not use a soft...
... touching the lens. B Overview Precautions On safety • Check that the operating voltage of your unit is identical with the voltage of your local power supply. • Should any windows that face the screen with opaque draperies. • It is desirable to install the projector in operation. Stubborn stains may occur, causing picture degradation or damage to the projector. Do not use a soft...
Operating Instructions
Page 8
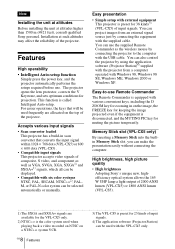
... for 38 kinds3) (VPL-CX5) of input signals. You can use the supplied Remote Commander as the wireless mouse by connecting the projector to -use . You can project images from an external signal source just by using the application software (Projector Station)4) supplied with the projector from a computer operated with the supplied cable. High brightness, high picture quality • High brightness Adopting Sony's unique new, highefficiency optical system allows the 165 W UHP lamp a light output of 2000 ANSI lumen (VPL-CX5) or 1800 ANSI...
... for 38 kinds3) (VPL-CX5) of input signals. You can use the supplied Remote Commander as the wireless mouse by connecting the projector to -use . You can project images from an external signal source just by using the application software (Projector Station)4) supplied with the projector from a computer operated with the supplied cable. High brightness, high picture quality • High brightness Adopting Sony's unique new, highefficiency optical system allows the 165 W UHP lamp a light output of 2000 ANSI lumen (VPL-CX5) or 1800 ANSI...
Operating Instructions
Page 10
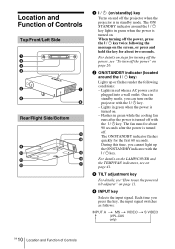
... key, the input signal switches as follows: INPUT A t MS t VIDEO t S VIDEO (VPL-CX5 only) 10 GB Location and Function of Controls Top/Front/Left Side 1 TILT 2 3 4 5 7 6 8 Rear/Right Side/Bottom qd qf 9 0 qg qa qh qs qj t 1 I / 1 (on/standby) key Turns on and off the projector when the projector is turned on. Each time you cannot light up or flashes under the following the message on the screen, or press...
... key, the input signal switches as follows: INPUT A t MS t VIDEO t S VIDEO (VPL-CX5 only) 10 GB Location and Function of Controls Top/Front/Left Side 1 TILT 2 3 4 5 7 6 8 Rear/Right Side/Bottom qd qf 9 0 qg qa qh qs qj t 1 I / 1 (on/standby) key Turns on and off the projector when the projector is turned on. Each time you cannot light up or flashes under the following the message on the screen, or press...
Operating Instructions
Page 11
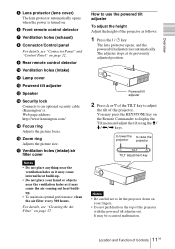
Overview 5 Lens protector (lens cover) The lens protector automatically opens when the power is turned on. 6 Front remote control detector 7 Ventilation holes (exhaust) 8 Connector/Control panel For details, see "Cleaning the Air Filter" on page 12. 9 Rear remote control detector 0 Ventilation holes (intake) qa Lamp cover qs Powered tilt adjuster qd Speaker qf Security lock Connects to an optional security cable (Kensington's). qh Zoom ring Adjusts the picture size. For details, see "Connector Panel" and "Control Panel" on page 37. You...
Overview 5 Lens protector (lens cover) The lens protector automatically opens when the power is turned on. 6 Front remote control detector 7 Ventilation holes (exhaust) 8 Connector/Control panel For details, see "Cleaning the Air Filter" on page 12. 9 Rear remote control detector 0 Ventilation holes (intake) qa Lamp cover qs Powered tilt adjuster qd Speaker qf Security lock Connects to an optional security cable (Kensington's). qh Zoom ring Adjusts the picture size. For details, see "Connector Panel" and "Control Panel" on page 37. You...
Operating Instructions
Page 12
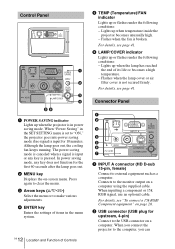
... 41. 6 LAMP/COVER indicator Lights up or flashes under the following conditions: - When "Power Saving" in the SET SETTING menu is set to "ON," the projector goes into power saving mode if no signal is in the menu system. 12 GB Location and Function of its life or becomes a high temperature. - When inputting a component or 15k RGB signal, use an optional cable. Control Panel ACCESS AUDIO INPUT A POWER SAVING MENU VIDEO S VIDEO TEMP/FAN PUSH ENTER LAMP/COVER ACCESS AUDIO INPUT A 1 POWER SAVING MENU 2 PUSH ENTER VIDEO S VIDEO TEMP/FAN 3 LAMP/COVER 4 56 1 POWER SAVING...
... 41. 6 LAMP/COVER indicator Lights up or flashes under the following conditions: - When "Power Saving" in the SET SETTING menu is set to "ON," the projector goes into power saving mode if no signal is in the menu system. 12 GB Location and Function of its life or becomes a high temperature. - When inputting a component or 15k RGB signal, use an optional cable. Control Panel ACCESS AUDIO INPUT A POWER SAVING MENU VIDEO S VIDEO TEMP/FAN PUSH ENTER LAMP/COVER ACCESS AUDIO INPUT A 1 POWER SAVING MENU 2 PUSH ENTER VIDEO S VIDEO TEMP/FAN 3 LAMP/COVER 4 56 1 POWER SAVING...
Operating Instructions
Page 13
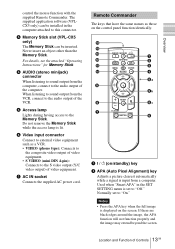
... be installed in the SET SETTING menu is displayed on the screen. Used when "Smart APA" in the computer attached to "On." Normally set to the audio output of video equipment. 7 AC IN socket Connects the supplied AC power cord. For details, see the attached "Operating Instructions" for Memory Stick. 4 AUDIO (stereo minijack) connector When listening to sound output from the computer, connect to the Memory Stick. Remote Commander The keys...
... be installed in the SET SETTING menu is displayed on the screen. Used when "Smart APA" in the computer attached to "On." Normally set to the audio output of video equipment. 7 AC IN socket Connects the supplied AC power cord. For details, see the attached "Operating Instructions" for Memory Stick. 4 AUDIO (stereo minijack) connector When listening to sound output from the computer, connect to the Memory Stick. Remote Commander The keys...
Operating Instructions
Page 14
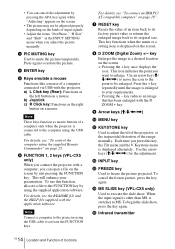
... page 18". 7 RESET key Resets the value of input signals. • Adjust the items "Dot Phase," "H Size" and "Shift" in the INPUT SETTING menu when you want to the FUNCTION key by using the supplied Remote Commander" on page 25. 6 FUNCTION 1, 2 keys (VPL-CX5 only) When you connect the projector with the application software. • You can open a file on the screen. +: Pressing the + key once displays the icon. Use an arrow key...
... page 18". 7 RESET key Resets the value of input signals. • Adjust the items "Dot Phase," "H Size" and "Shift" in the INPUT SETTING menu when you want to the FUNCTION key by using the supplied Remote Commander" on page 25. 6 FUNCTION 1, 2 keys (VPL-CX5 only) When you connect the projector with the application software. • You can open a file on the screen. +: Pressing the + key once displays the icon. Use an arrow key...
Operating Instructions
Page 17
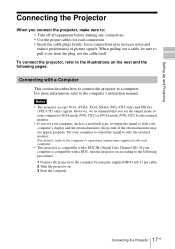
... (VPL-CX5 only) and SXGA+ (VPL-CX5 only) signals. However, we recommend that you set your computer to XGA mode (VPL-CX5) or SVGA mode (VPL-CS5) for each connection. • Insert the cable plugs firmly; If your computer. • This projector is compatible with a DDC, turn the projector on . 3 Start the computer. 17 Connecting the Projector GB Connecting with a DDC2B (Digital Data Channel 2B). Set your computer to output the signal to the computer's operating instructions supplied...
... (VPL-CX5 only) and SXGA+ (VPL-CX5 only) signals. However, we recommend that you set your computer to XGA mode (VPL-CX5) or SVGA mode (VPL-CS5) for each connection. • Insert the cable plugs firmly; If your computer. • This projector is compatible with a DDC, turn the projector on . 3 Start the computer. 17 Connecting the Projector GB Connecting with a DDC2B (Digital Data Channel 2B). Set your computer to output the signal to the computer's operating instructions supplied...
Operating Instructions
Page 18
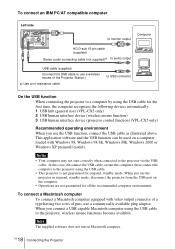
...ACCESS AUDIO INPUT A POWER SAVING MENU VIDEO S VIDEO TEMP/FAN PUSH ENTER LAMP/COVER to monitor output HD D-sub 15-pin cable (supplied) Stereo audio connecting cable (not supplied)a) to audio output Computer USB cable (supplied) (Connect the USB cable to a computer by using the USB cable for the first time, the computer recognizes the following devices automatically. 1 USB hub (general use) (VPL-CX5 only) 2 USB human interface device (wireless mouse function) 3 USB human interface device (projector control function) (VPL-CX5 only) Recommended operating environment When you use the USB...
...ACCESS AUDIO INPUT A POWER SAVING MENU VIDEO S VIDEO TEMP/FAN PUSH ENTER LAMP/COVER to monitor output HD D-sub 15-pin cable (supplied) Stereo audio connecting cable (not supplied)a) to audio output Computer USB cable (supplied) (Connect the USB cable to a computer by using the USB cable for the first time, the computer recognizes the following devices automatically. 1 USB hub (general use) (VPL-CX5 only) 2 USB human interface device (wireless mouse function) 3 USB human interface device (projector control function) (VPL-CX5 only) Recommended operating environment When you use the USB...
Operating Instructions
Page 25
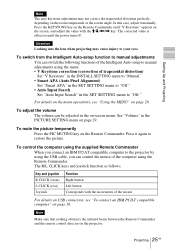
Press the KEYSTONE key on the Remote Commander until "V Keystone" appears on the room temperature or the screen angle. Setting Up and Projecting Note The auto keystone adjustment may not correct the trapezoidal distortion perfectly, depending on the screen, and adjust the value with the M/m/ In this case, adjust it manually.
Press the KEYSTONE key on the Remote Commander until "V Keystone" appears on the room temperature or the screen angle. Setting Up and Projecting Note The auto keystone adjustment may not correct the trapezoidal distortion perfectly, depending on the screen, and adjust the value with the M/m/ In this case, adjust it manually.
Operating Instructions
Page 28
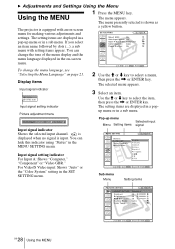
...Input-A Signal Sel.: Computer Color System: Auto Power Saving: On To change the tone of the menu display and the menu language displayed in a sub menu. For Video/S Video input: Shows "Auto" or the "Color System" setting in a sub menu. The menu appears. B Adjustments and Settings Using the Menu Using the MENU The projector is equipped with setting items appear. Display items Input signal indicator Video NTSC 3.58 Input signal setting indicator Picture adjustment menu Contrast Input signal indicator Shows the selected input channel. Sub menu Menu Setting items PICTURE SETTING ADJUST...
...Input-A Signal Sel.: Computer Color System: Auto Power Saving: On To change the tone of the menu display and the menu language displayed in a sub menu. For Video/S Video input: Shows "Auto" or the "Color System" setting in a sub menu. The menu appears. B Adjustments and Settings Using the Menu Using the MENU The projector is equipped with setting items appear. Display items Input signal indicator Video NTSC 3.58 Input signal setting indicator Picture adjustment menu Contrast Input signal indicator Shows the selected input channel. Sub menu Menu Setting items PICTURE SETTING ADJUST...
Operating Instructions
Page 32
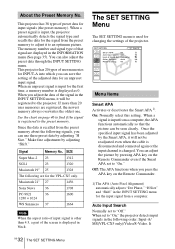
... 4:3, a part of the screen is used for changing the settings of preset data for the VPL-CX5 only. Signal Memory No. SIZE Super Mac-2 23 1312 SGI-1 23 1320 Macintosh 19" 25 1328 The following signals, you press the APA key on the Remote Commander even if the Smart APA set to the projector. The SET SETTING Menu The SET SETTING menu is displayed in black. SET SETTING Input A S m a r t A PA : On Auto Input Search: Off Input-A Signal Sel.: Computer Color System: Auto Power...
... 4:3, a part of the screen is used for changing the settings of preset data for the VPL-CX5 only. Signal Memory No. SIZE Super Mac-2 23 1312 SGI-1 23 1320 Macintosh 19" 25 1328 The following signals, you press the APA key on the Remote Commander even if the Smart APA set to the projector. The SET SETTING Menu The SET SETTING menu is displayed in black. SET SETTING Input A S m a r t A PA : On Auto Input Search: Off Input-A Signal Sel.: Computer Color System: Auto Power...
Operating Instructions
Page 33
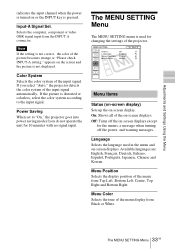
... power, and warning messages. Menu Position Selects the display position of the menu from Black or White. Selects the computer, component or video GBR signal input from the INPUT A connector. Adjustments and Settings Using the Menu indicates the input channel when the power is turned on or the INPUT key is distorted or colorless, select the color system according to "On," the projector goes into power saving mode if you select "Auto," the projector detects the color...
... power, and warning messages. Menu Position Selects the display position of the menu from Black or White. Selects the computer, component or video GBR signal input from the INPUT A connector. Adjustments and Settings Using the Menu indicates the input channel when the power is turned on or the INPUT key is distorted or colorless, select the color system according to "On," the projector goes into power saving mode if you select "Auto," the projector detects the color...
Operating Instructions
Page 34
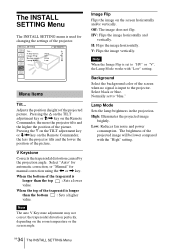
... "High" setting. 34 GB The INSTALL SETTING Menu Lamp Mode Sets the lamp brightness in the projection. Image Flip Flips the image on the room temperature or the screen angle. H: Flips the image horizontally. Low: Reduces fan noise and power consumption. Pressing the f on the TILT adjustment key or M/, key on the Remote Commander, the less the projector tilts and the lower the position of the projected picture. High: Illuminates the projected image brightly. Note When the Image Flip is input to "blue...
... "High" setting. 34 GB The INSTALL SETTING Menu Lamp Mode Sets the lamp brightness in the projection. Image Flip Flips the image on the room temperature or the screen angle. H: Flips the image horizontally. Low: Reduces fan noise and power consumption. Pressing the f on the TILT adjustment key or M/, key on the Remote Commander, the less the projector tilts and the lower the position of the projected picture. High: Illuminates the projected image brightly. Note When the Image Flip is input to "blue...
Operating Instructions
Page 36
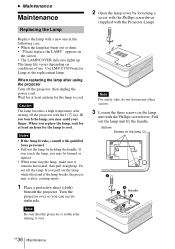
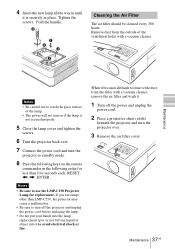
... replacing the lamp after turning off the projector, then unplug the power cord. Do not tilt the lamp. When you may scald your finger. Note For safety sake, do not loosen any other screws. 3 Loosen the three screws on the lamp (3) Handle GB 36 Maintenance appears on the screen • The LAMP/COVER indicator lights up . Caution The lamp becomes a high temperature after using the projector Turn off the projector with qualified Sony...
... replacing the lamp after turning off the projector, then unplug the power cord. Do not tilt the lamp. When you may scald your finger. Note For safety sake, do not loosen any other screws. 3 Loosen the three screws on the lamp (3) Handle GB 36 Maintenance appears on the screen • The LAMP/COVER indicator lights up . Caution The lamp becomes a high temperature after using the projector Turn off the projector with qualified Sony...
Operating Instructions
Page 37
... • Be careful not to standby mode. 8 Press the following keys on the remote commander in place. Cleaning the Air Filter The air filter should be cleaned every 300 hours. Tighten the screws. 4 Insert the new lamp all the way in until it is not secured properly. 5 Close the lamp cover and tighten the screws. 6 Turn the projector back over. 7 Connect the power cord and turn the projector to touch the glass surface of...
... • Be careful not to standby mode. 8 Press the following keys on the remote commander in place. Cleaning the Air Filter The air filter should be cleaned every 300 hours. Tighten the screws. 4 Insert the new lamp all the way in until it is not secured properly. 5 Close the lamp cover and tighten the screws. 6 Turn the projector back over. 7 Connect the power cord and turn the projector to touch the glass surface of...
Operating Instructions
Page 39
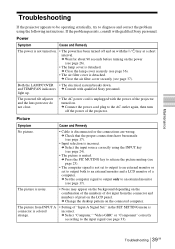
... lamp cover is colored strange. • Setting of the projector turned on with the power of "Input-A Signal Sel." c Select the input source correctly using the following instructions. c Change the desktop pattern on the power (see page 17). c Close the air filter cover securely (see page 17). • Input selection is incorrect. Both the LAMP/COVER • The electrical system breaks down. The picture from the connector and numbers of a computer. c Close the lamp cover...
... lamp cover is colored strange. • Setting of the projector turned on with the power of "Input-A Signal Sel." c Select the input source correctly using the following instructions. c Change the desktop pattern on the power (see page 17). c Close the air filter cover securely (see page 17). • Input selection is incorrect. Both the LAMP/COVER • The electrical system breaks down. The picture from the connector and numbers of a computer. c Close the lamp cover...
Operating Instructions
Page 41
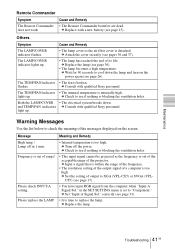
... the lamp and turn on the screen. c Replace with a new battery (see if nothing is too high. c Turn off in the SET SETTING menu is out of the acceptable range of the projector. Others Symptom Cause and Remedy The LAMP/COVER indicator flashes. • The lamp cover or the air filter cover is unusually high. The TEMP/FAN indicator • The internal temperature is detached. Frequency is out of range! • This input signal cannot be projected as...
... the lamp and turn on the screen. c Replace with a new battery (see if nothing is too high. c Turn off in the SET SETTING menu is out of the acceptable range of the projector. Others Symptom Cause and Remedy The LAMP/COVER indicator flashes. • The lamp cover or the air filter cover is unusually high. The TEMP/FAN indicator • The internal temperature is detached. Frequency is out of range! • This input signal cannot be projected as...
Operating Instructions
Page 44
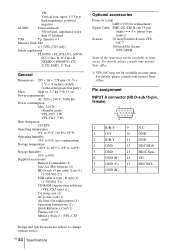
... 90% Supplied accessories Remote Commander (1) Size AA (R6) batteries (2) HD D-sub 15 pin cable (2 m) (1) (1-791-992-21) USB cable A type - For details, please consult your nearest Sony office. For details, please consult your nearest Sony office. 1) VPS-50C may not be available in some areas. B type (1) (1-790-081-31) CD-ROM (Application software) (VPL-CX5 only) (1) Carrying case (1) AC power cord (1) Air filter (for replacement) Signal Cable SMF-402...
... 90% Supplied accessories Remote Commander (1) Size AA (R6) batteries (2) HD D-sub 15 pin cable (2 m) (1) (1-791-992-21) USB cable A type - For details, please consult your nearest Sony office. For details, please consult your nearest Sony office. 1) VPS-50C may not be available in some areas. B type (1) (1-790-081-31) CD-ROM (Application software) (VPL-CX5 only) (1) Carrying case (1) AC power cord (1) Air filter (for replacement) Signal Cable SMF-402...
Operating Instructions
Page 48
... Lamp replacement .......... 36 Lamp Timer 35 Language 33 selecting the menu language 21 Location and function of controls connector panel .......... 12 control panel 12 rear/right side/bottom . 10 Remote Commander .. 13 top/front/left side ........ 10 M Menu clearing the menu display 29 INFORMATION Menu 35 INPUT SETTING menu 31 INSTALL SETTING menu 34 MENU SETTING menu 33 PICTURE SETTING menu 29 SET SETTING menu . 32 using the menu 28 Menu Color 33 Menu Position 33 Message caution 42 warning 41 O Optional accessories ...... 44 P Picture Mode 29 Pin assignment 44 Power turn...
... Lamp replacement .......... 36 Lamp Timer 35 Language 33 selecting the menu language 21 Location and function of controls connector panel .......... 12 control panel 12 rear/right side/bottom . 10 Remote Commander .. 13 top/front/left side ........ 10 M Menu clearing the menu display 29 INFORMATION Menu 35 INPUT SETTING menu 31 INSTALL SETTING menu 34 MENU SETTING menu 33 PICTURE SETTING menu 29 SET SETTING menu . 32 using the menu 28 Menu Color 33 Menu Position 33 Message caution 42 warning 41 O Optional accessories ...... 44 P Picture Mode 29 Pin assignment 44 Power turn...


