Operating Instructions
Page 5
.../Front/Left Side 10 Rear/Right Side/Bottom 10 Control Panel 12 Connector Panel 12 Remote Commander 13 Setting Up and Projecting Installing the Projector 16 Connecting the Projector 17 Connecting with a Computer ......17 Connecting with a VCR or 15k RGB/Component Equipment 19 Selecting the Menu Language ..........21 Projecting 23 Effective Tools...
.../Front/Left Side 10 Rear/Right Side/Bottom 10 Control Panel 12 Connector Panel 12 Remote Commander 13 Setting Up and Projecting Installing the Projector 16 Connecting the Projector 17 Connecting with a Computer ......17 Connecting with a VCR or 15k RGB/Component Equipment 19 Selecting the Menu Language ..........21 Projecting 23 Effective Tools...
Operating Instructions
Page 6
... GB Precautions light-reflecting material. Stubborn stains may be removed with a cloth lightly dampened with a soft cloth. To remove dust on the LCD data projector. The powered tilt adjuster of the manufacturing process and does not indicate a malfunction. Do not touch the unit while the adjuster is in ..., even if the unit itself . • The wall outlet should not be exposed to have it checked by the adjuster. On LCD data projector • The LCD data projector is completed. • Do not spread a cloth or paper under the unit. Never pull the cord itself has been turned off....
... GB Precautions light-reflecting material. Stubborn stains may be removed with a cloth lightly dampened with a soft cloth. To remove dust on the LCD data projector. The powered tilt adjuster of the manufacturing process and does not indicate a malfunction. Do not touch the unit while the adjuster is in ..., even if the unit itself . • The wall outlet should not be exposed to have it checked by the adjuster. On LCD data projector • The LCD data projector is completed. • Do not spread a cloth or paper under the unit. Never pull the cord itself has been turned off....
Operating Instructions
Page 7
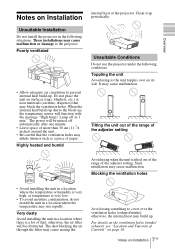
...) that the ventilation holes may block the ventilation holes. Highly heated and humid Unsuitable Conditions Do not use the projector under the following situations. Very dusty Avoid installing the unit in the following conditions. Unsuitable Installation Do not install the...filter will function with the message "High temp.! For details on the ventilation holes (intake/ exhaust), see "Location and Function of the projector. Such installation may rise rapidly. otherwise, the internal heat may cause raising the Avoid using when the unit is a lot of paper....
...) that the ventilation holes may block the ventilation holes. Highly heated and humid Unsuitable Conditions Do not use the projector under the following situations. Very dusty Avoid installing the unit in the following conditions. Unsuitable Installation Do not install the...filter will function with the message "High temp.! For details on the ventilation holes (intake/ exhaust), see "Location and Function of the projector. Such installation may rise rapidly. otherwise, the internal heat may cause raising the Avoid using when the unit is a lot of paper....
Operating Instructions
Page 8
...the supplied Remote Commander as VGA, SVGA, XGA, SXGA1) and SXGA+1) signals, which all can be used when 4) The application software (Projector Station) playing back a video recorded on NTSC on the top of the projector. Memory Stick slot (VPL-CX5 only) By inserting a Memory Stick into ... higher than 1500 m (4921 feet), consult qualified Sony personel. For easier operations, the keys that converts the input signal within 1024 × 768 dots (VPL-CX5) or 800 × 600 dots (VPL-CS5) . • Compatible input signals This projector accepts video signals of composite, S video, and ...
...the supplied Remote Commander as VGA, SVGA, XGA, SXGA1) and SXGA+1) signals, which all can be used when 4) The application software (Projector Station) playing back a video recorded on NTSC on the top of the projector. Memory Stick slot (VPL-CX5 only) By inserting a Memory Stick into ... higher than 1500 m (4921 feet), consult qualified Sony personel. For easier operations, the keys that converts the input signal within 1024 × 768 dots (VPL-CX5) or 800 × 600 dots (VPL-CS5) . • Compatible input signals This projector accepts video signals of composite, S video, and ...
Operating Instructions
Page 9
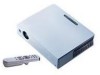
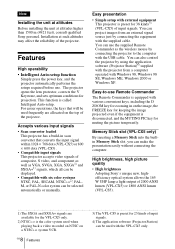
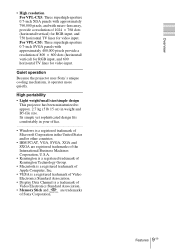
...a trademark of Video Electronics Standard Association. • Memory Stick and are trademarks of Sony Corporation. 9 Features GB Overview High portability • Light weight/small size/simple design This projector has been miniaturized to approx. 2.7 kg (5 lb 15 oz) in the United ...VPL-CX5: Three superhigh-aperture 0.7-inch XGA panels with approximately 790,000 pixels, and with approximately 480,000 pixels provide a resolution of 800 × 600 dots (horizontal/ vertical) for RGB input, and 600 horizontal TV lines for video input. Quiet operation Because the projector uses Sony...
...a trademark of Video Electronics Standard Association. • Memory Stick and are trademarks of Sony Corporation. 9 Features GB Overview High portability • Light weight/small size/simple design This projector has been miniaturized to approx. 2.7 kg (5 lb 15 oz) in the United ...VPL-CX5: Three superhigh-aperture 0.7-inch XGA panels with approximately 790,000 pixels, and with approximately 480,000 pixels provide a resolution of 800 × 600 dots (horizontal/ vertical) for RGB input, and 600 horizontal TV lines for video input. Quiet operation Because the projector uses Sony...
Operating Instructions
Page 10
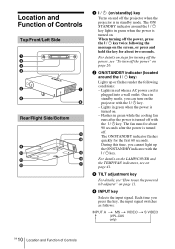
... indicators, see on page 41. 3 TILT adjustment key For details, see "To turn on steps for the first 60 seconds. For details on the projector with the I / 1 key. The ON/ STANDBY indicator around the I / 1 key lights in green while the cooling fan runs after the power...) key Turns on and off the power" on . - During this time, you press the key, the input signal switches as follows: INPUT A t MS t VIDEO t S VIDEO (VPL-CX5 only) 10 GB Location and Function of Controls Top/Front/Left Side 1 TILT 2 3 4 5 7 6 8 Rear/Right Side/Bottom qd qf 9 0 qg qa qh qs qj t ...
... indicators, see on page 41. 3 TILT adjustment key For details, see "To turn on steps for the first 60 seconds. For details on the projector with the I / 1 key. The ON/ STANDBY indicator around the I / 1 key lights in green while the cooling fan runs after the power...) key Turns on and off the power" on . - During this time, you press the key, the input signal switches as follows: INPUT A t MS t VIDEO t S VIDEO (VPL-CX5 only) 10 GB Location and Function of Controls Top/Front/Left Side 1 TILT 2 3 4 5 7 6 8 Rear/Right Side/Bottom qd qf 9 0 qg qa qh qs qj t ...
Operating Instructions
Page 11
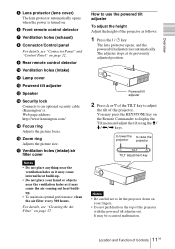
...Powered tilt adjuster 2 Press f or F of the TILT key to use the powered tilt adjuster To adjust the height Adjust the height of the projector. qh Zoom ring Adjusts the picture size. You may cause the air coming out heat buildup. • To maintain optimal performance, clean the air ... as follows: 1 Press the I / 1 key The lens protector opens, and the powered tilt adjuster rises automatically. How to adjust the tilt of the projector as it may press the KEYSTONE key on page 12. 9 Rear remote control detector 0 Ventilation holes (intake) qa Lamp cover qs Powered tilt adjuster qd...
...Powered tilt adjuster 2 Press f or F of the TILT key to use the powered tilt adjuster To adjust the height Adjust the height of the projector. qh Zoom ring Adjusts the picture size. You may cause the air coming out heat buildup. • To maintain optimal performance, clean the air ... as follows: 1 Press the I / 1 key The lens protector opens, and the powered tilt adjuster rises automatically. How to adjust the tilt of the projector as it may press the KEYSTONE key on page 12. 9 Rear remote control detector 0 Ventilation holes (intake) qa Lamp cover qs Powered tilt adjuster qd...
Operating Instructions
Page 12
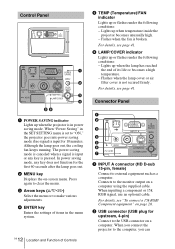
... output on page 20. 2 USB connector (USB plug for upstream, 4-pin) Connect to external equipment such as a computer. Lights up when the projector is pressed. Control Panel ACCESS AUDIO INPUT A POWER SAVING MENU VIDEO S VIDEO TEMP/FAN PUSH ENTER LAMP/COVER ACCESS AUDIO INPUT A 1 POWER SAVING... an optional cable. For details, see page 41. For details, see page 41. 6 LAMP/COVER indicator Lights up when temperature inside the projector becomes unusually high. - When you can Fashes when the fan is not secured firmly. Although the lamp goes out, the cooling fan keeps...
... output on page 20. 2 USB connector (USB plug for upstream, 4-pin) Connect to external equipment such as a computer. Lights up when the projector is pressed. Control Panel ACCESS AUDIO INPUT A POWER SAVING MENU VIDEO S VIDEO TEMP/FAN PUSH ENTER LAMP/COVER ACCESS AUDIO INPUT A 1 POWER SAVING... an optional cable. For details, see page 41. For details, see page 41. 6 LAMP/COVER indicator Lights up when temperature inside the projector becomes unusually high. - When you can Fashes when the fan is not secured firmly. Although the lamp goes out, the cooling fan keeps...
Operating Instructions
Page 14
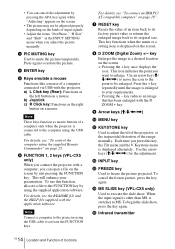
... image at a desired location on the screen. 8 D ZOOM (Digital Zoom) +/- Note These keys function as mouse buttons of a computer only when the projector is displayed on the screen. +: Pressing the + key once displays the icon. Press again to restore the picture. 4 ENTER key 5 Keys emulate a ... picture may not be adjusted properly depending on the screen by using the supplied Remote Commander" on page 25. 6 FUNCTION 1, 2 keys (VPL-CX5 only) When you connect the projector with a computer, you can open a file on the kinds of input signals. • Adjust the items "Dot Phase," "H Size" ...
... image at a desired location on the screen. 8 D ZOOM (Digital Zoom) +/- Note These keys function as mouse buttons of a computer only when the projector is displayed on the screen. +: Pressing the + key once displays the icon. Press again to restore the picture. 4 ENTER key 5 Keys emulate a ... picture may not be adjusted properly depending on the screen by using the supplied Remote Commander" on page 25. 6 FUNCTION 1, 2 keys (VPL-CX5 only) When you connect the projector with a computer, you can open a file on the kinds of input signals. • Adjust the items "Dot Phase," "H Size" ...
Operating Instructions
Page 15
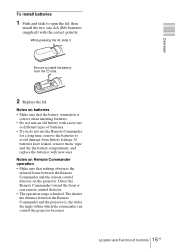
... Remote Commander and the remote control detector on batteries • Make sure that nothing obstructs the infrared beam between the Remote Commander and the projector is limited. Direct the Remote Commander toward the front or rear remote control detector. • The operation range is , the wider the... angle within which the commander can control the projector becomes. 15 Location and Function of batteries. • If you do not use the Remote Commander for a long time, remove the batteries ...
... Remote Commander and the remote control detector on batteries • Make sure that nothing obstructs the infrared beam between the Remote Commander and the projector is limited. Direct the Remote Commander toward the front or rear remote control detector. • The operation range is , the wider the... angle within which the commander can control the projector becomes. 15 Location and Function of batteries. • If you do not use the Remote Commander for a long time, remove the batteries ...
Operating Instructions
Page 16
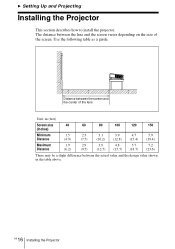
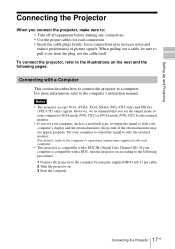
... may be a slight difference between the lens and the screen varies depending on the size of the screen. B Setting Up and Projecting Installing the Projector This section describes how to install the projector. The distance between the actual value and the design value shown in the table above. 16 GB Installing the...
... may be a slight difference between the lens and the screen varies depending on the size of the screen. B Setting Up and Projecting Installing the Projector This section describes how to install the projector. The distance between the actual value and the design value shown in the table above. 16 GB Installing the...
Operating Instructions
Page 17
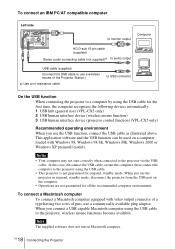
...the supplied HD D-sub 15 pin cable. 2 Turn the projector on the next and the following procedures. 1 Connect the projector to the following pages. Notes • The projector accepts VGA, SVGA, XGA, SXGA (VPL-CX5 only) and SXGA+ (VPL-CX5 only) signals. When pulling out a cable, be sure to... pull it out from the plug, not the cable itself To connect the projector, refer to the ...
...the supplied HD D-sub 15 pin cable. 2 Turn the projector on the next and the following procedures. 1 Connect the projector to the following pages. Notes • The projector accepts VGA, SVGA, XGA, SXGA (VPL-CX5 only) and SXGA+ (VPL-CX5 only) signals. When pulling out a cable, be sure to... pull it out from the plug, not the cable itself To connect the projector, refer to the ...
Operating Instructions
Page 18
... first time, the computer recognizes the following devices automatically. 1 USB hub (general use) (VPL-CX5 only) 2 USB human interface device (wireless mouse function) 3 USB human interface device (projector control function) (VPL-CX5 only) Recommended operating environment When you use a wireless mouse or the Projector Station.) a) Use a no-resistance cable. Notes • Your computer may not start...
... first time, the computer recognizes the following devices automatically. 1 USB hub (general use) (VPL-CX5 only) 2 USB human interface device (wireless mouse function) 3 USB human interface device (projector control function) (VPL-CX5 only) Recommended operating environment When you use a wireless mouse or the Projector Station.) a) Use a no-resistance cable. Notes • Your computer may not start...
Operating Instructions
Page 19
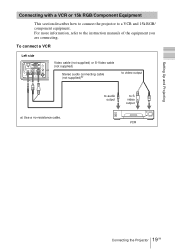
... a VCR and 15k RGB/ component equipment. Setting Up and Projecting Connecting with a VCR or 15k RGB/Component Equipment This section describes how to connect the projector to S video output VCR 19 Connecting the...
... a VCR and 15k RGB/ component equipment. Setting Up and Projecting Connecting with a VCR or 15k RGB/Component Equipment This section describes how to connect the projector to S video output VCR 19 Connecting the...

Operating Instructions
Page 20
... you connect the unit to the input signal. • When you input the external sync signal from 15k RGB/component equipment. 20 GB Connecting the Projector setting in the INPUT SETTING menu according to 15k RGB or component video equipment, select video GBR or component with the "Input-A Signal Sel."
... you connect the unit to the input signal. • When you input the external sync signal from 15k RGB/component equipment. 20 GB Connecting the Projector setting in the INPUT SETTING menu according to 15k RGB or component video equipment, select video GBR or component with the "Input-A Signal Sel."
Operating Instructions
Page 21
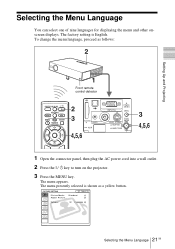
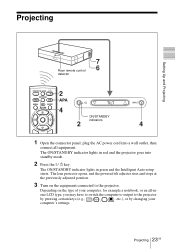
.../FAN PUSH ENTER LAMP/COVER 1 Open the connector panel, then plug the AC power cord into a wall outlet. 2 Press the I / 1 key to turn on the projector. 3 Press the MENU key. Selecting the Menu Language You can select one of nine languages for displaying the menu and other onscreen displays. The menu...
.../FAN PUSH ENTER LAMP/COVER 1 Open the connector panel, then plug the AC power cord into a wall outlet. 2 Press the I / 1 key to turn on the projector. 3 Press the MENU key. Selecting the Menu Language You can select one of nine languages for displaying the menu and other onscreen displays. The menu...
Operating Instructions
Page 23
... the type of your computer, for example a notebook, or an all equipment. Projecting 23 GB The ON/STANDBY indicator lights in red and the projector goes into standby mode. 2 Press the I / 1 KEYSTONE INPUT APA MENU PIC ENTER MUTING TILT ON/STANDBY indicators 2 4 1 Open the ...plug the AC power cord into a wall outlet, then connect all -inone LCD type, you may have to switch the computer to output to the projector. Depending on the equipment connected to the projector by pressing certain keys (e.g., / LCD VGA , / , etc.), or by changing your computer's settings. Projecting ...
... the type of your computer, for example a notebook, or an all equipment. Projecting 23 GB The ON/STANDBY indicator lights in red and the projector goes into standby mode. 2 Press the I / 1 KEYSTONE INPUT APA MENU PIC ENTER MUTING TILT ON/STANDBY indicators 2 4 1 Open the ...plug the AC power cord into a wall outlet, then connect all -inone LCD type, you may have to switch the computer to output to the projector. Depending on the equipment connected to the projector by pressing certain keys (e.g., / LCD VGA , / , etc.), or by changing your computer's settings. Projecting ...
Operating Instructions
Page 24
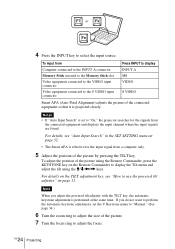
... from a computer only. 5 Adjust the position of the picture by pressing the TILT key. F7 or Fx Fn 4 Press the INPUT key to "On," the projector searches for the input signal from the connected equipment and displays the input channel where the input signals are found. To input from Press INPUT...
... from a computer only. 5 Adjust the position of the picture by pressing the TILT key. F7 or Fx Fn 4 Press the INPUT key to "On," the projector searches for the input signal from the connected equipment and displays the input channel where the input signals are found. To input from Press INPUT...
Operating Instructions
Page 25
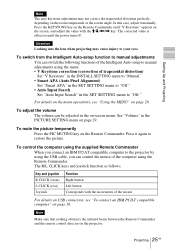
Press the KEYSTONE key on the Remote Commander until "V Keystone" appears on the room temperature or the screen angle. Setting Up and Projecting Note The auto keystone adjustment may not correct the trapezoidal distortion perfectly, depending on the screen, and adjust the value with the M/m/ In this case, adjust it manually.
Press the KEYSTONE key on the Remote Commander until "V Keystone" appears on the room temperature or the screen angle. Setting Up and Projecting Note The auto keystone adjustment may not correct the trapezoidal distortion perfectly, depending on the screen, and adjust the value with the M/m/ In this case, adjust it manually.
Operating Instructions
Page 26
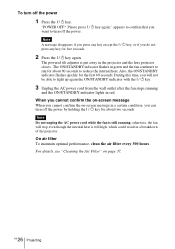
... power cord from the wall outlet after the fan stops running ; For details, see "Cleaning the Air Filter" on -screen message in a breakdown of the projector. GB 26 Projecting appears to confirm that you do not press any key except the I / 1 key again." Note A message disappears if you press any key... the fan continues to run for about two seconds. Note Do not unplug the AC power cord while the fan is put away in the projector and the lens protector closes.
... power cord from the wall outlet after the fan stops running ; For details, see "Cleaning the Air Filter" on -screen message in a breakdown of the projector. GB 26 Projecting appears to confirm that you do not press any key except the I / 1 key again." Note A message disappears if you press any key... the fan continues to run for about two seconds. Note Do not unplug the AC power cord while the fan is put away in the projector and the lens protector closes.


