Quick Start Guide
Page 2
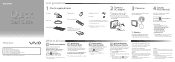
... downloading updates from Windows Update and VAIO Update for more information, click the icon located at the lower right corner of a system failure. What to launch the software. On-screen manuals: 1 Click Start and Help and Support. 2 Click Use my VAIO. 3 Select your computer's efficiency, security, and functionality. For details, refer to reduce heat. With the VAIO Care software, you can restore your computer is easy to factory-installed settings in hard disk drive...
... downloading updates from Windows Update and VAIO Update for more information, click the icon located at the lower right corner of a system failure. What to launch the software. On-screen manuals: 1 Click Start and Help and Support. 2 Click Use my VAIO. 3 Select your computer's efficiency, security, and functionality. For details, refer to reduce heat. With the VAIO Care software, you can restore your computer is easy to factory-installed settings in hard disk drive...

Recovery, Backup and Troubleshooting Guide
Page 1
... restore your computer back to the Internet, download and install the latest updates using the external optical disc drive or USB flash drive, press the F11 key several times before the VAIO logo screen disappears. Recovering your computer will need will be displayed during the Recovery Media creation process. 1 Connect your computer to its original factory condition, follow one of your data stored on -screen instructions. To perform the custom recovery, select Tools and click Start...
... restore your computer back to the Internet, download and install the latest updates using the external optical disc drive or USB flash drive, press the F11 key several times before the VAIO logo screen disappears. Recovering your computer will need will be displayed during the Recovery Media creation process. 1 Connect your computer to its original factory condition, follow one of your data stored on -screen instructions. To perform the custom recovery, select Tools and click Start...

Recovery, Backup and Troubleshooting Guide
Page 2
... your computer from Recovery Media if you install a software driver. To find the nearest center or agent, see the onscreen User Guide. If the problem persists, it means the installed battery pack is displayed in "To recover from the recovery area again, or use the features, click Start, Control Panel, System and Security, and Backup and Restore. The password is plugged into a power source and turned on -screen User Guide. Launch VAIO Care and...
... your computer from Recovery Media if you install a software driver. To find the nearest center or agent, see the onscreen User Guide. If the problem persists, it means the installed battery pack is displayed in "To recover from the recovery area again, or use the features, click Start, Control Panel, System and Security, and Backup and Restore. The password is plugged into a power source and turned on -screen User Guide. Launch VAIO Care and...

Safety Information
Page 2
... INACCURATE. Software specifications are located on the bottom, the back panel, or inside the battery compartment of license agreements enclosed with this manual or the information contained herein at any machine-readable form without prior written approval. SONY ELECTRONICS INC. SONY CANNOT WARRANT THAT THE FUNCTIONS DESCRIBED IN THIS GUIDE WILL BE UNINTERRUPTED OR ERROR-FREE. Model Number: Serial Number: Notice © 2011 Sony Electronics Inc. Sony Electronics Inc...
... INACCURATE. Software specifications are located on the bottom, the back panel, or inside the battery compartment of license agreements enclosed with this manual or the information contained herein at any machine-readable form without prior written approval. SONY ELECTRONICS INC. SONY CANNOT WARRANT THAT THE FUNCTIONS DESCRIBED IN THIS GUIDE WILL BE UNINTERRUPTED OR ERROR-FREE. Model Number: Serial Number: Notice © 2011 Sony Electronics Inc. Sony Electronics Inc...

Safety Information
Page 4
... cloth-covered surfaces such as radiators or air ducts; The socket-outlet shall be installed near a pacemaker, make sure the power indicator light is unlit before putting the computer into a bag or a carrying case. ❑ When holding the computer, be sure to malfunction. ❑ If using the genuine Sony AC adapter that is provided with the power button or the power switch does...
... cloth-covered surfaces such as radiators or air ducts; The socket-outlet shall be installed near a pacemaker, make sure the power indicator light is unlit before putting the computer into a bag or a carrying case. ❑ When holding the computer, be sure to malfunction. ❑ If using the genuine Sony AC adapter that is provided with the power button or the power switch does...
User Guide
Page 2
... the HDMI/VIDEO Input Function 72 Using the Remote Commander 77 Using "Memory Stick 80 Using Other Modules / Memory Cards 87 Using the Internet 91 Using the Network (LAN 92 Using the Wireless LAN 93 Using the BLUETOOTH Function 98 Using Peripheral Devices 103 Connecting External Speakers or Headphones ........104 Connecting an External Display 105 Selecting Display Modes 112 Using the Multiple Monitors Function 113 Connecting an External Microphone 115 Connecting a USB Device 116 Connecting an i.LINK Device 118 Customizing Your VAIO Computer 120 Setting the Password 121 Using...
... the HDMI/VIDEO Input Function 72 Using the Remote Commander 77 Using "Memory Stick 80 Using Other Modules / Memory Cards 87 Using the Internet 91 Using the Network (LAN 92 Using the Wireless LAN 93 Using the BLUETOOTH Function 98 Using Peripheral Devices 103 Connecting External Speakers or Headphones ........104 Connecting an External Display 105 Selecting Display Modes 112 Using the Multiple Monitors Function 113 Connecting an External Microphone 115 Connecting a USB Device 116 Connecting an i.LINK Device 118 Customizing Your VAIO Computer 120 Setting the Password 121 Using...
User Guide
Page 5
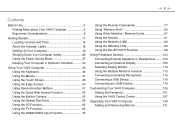
... of components connection, set-up information, etc. ❑ Recovery, Backup and Troubleshooting Guide ❑ Enjoying 3D: Information Guide (On selected models only) ❑ Safety Information - Printed Documentation ❑ Quick Start Guide - Before Use > Finding More about Your VAIO Computer n5 N Finding More about Your VAIO Computer This section provides support information about your VAIO computer. 1. Safety guidelines and owner information. ✍ Before activating the wireless functions...
... of components connection, set-up information, etc. ❑ Recovery, Backup and Troubleshooting Guide ❑ Enjoying 3D: Information Guide (On selected models only) ❑ Safety Information - Printed Documentation ❑ Quick Start Guide - Before Use > Finding More about Your VAIO Computer n5 N Finding More about Your VAIO Computer This section provides support information about your VAIO computer. 1. Safety guidelines and owner information. ✍ Before activating the wireless functions...

User Guide
Page 8
... location. In Store Service & Support (available in USA only) Make an appointment with the setup of the problem 5. In order to find it at our site, you are looking for your new VAIO computer, system optimization, data rescue, and any repair service you might need. Visit the web site at a U.S. The serial number is the last 7 digits of the number below the barcode. 3 The operating...
... location. In Store Service & Support (available in USA only) Make an appointment with the setup of the problem 5. In order to find it at our site, you are looking for your new VAIO computer, system optimization, data rescue, and any repair service you might need. Visit the web site at a U.S. The serial number is the last 7 digits of the number below the barcode. 3 The operating...
User Guide
Page 18
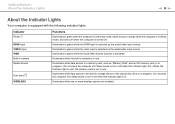
... in use . Illuminates while one or more wireless options are enabled. Illuminates in green while the Quick Web Access function is turned off. Getting Started > About the Indicator Lights n 18 N About the Indicator Lights Your computer is equipped with the following indicator lights: Indicator Power 1 HDMI input VIDEO input WEB Built-in camera Media Access Disc drive WIRELESS Functions Illuminates in green while the computer is in Normal mode, blinks...
... in use . Illuminates while one or more wireless options are enabled. Illuminates in green while the Quick Web Access function is turned off. Getting Started > About the Indicator Lights n 18 N About the Indicator Lights Your computer is equipped with the following indicator lights: Indicator Power 1 HDMI input VIDEO input WEB Built-in camera Media Access Disc drive WIRELESS Functions Illuminates in green while the computer is in Normal mode, blinks...

User Guide
Page 37
... while the wireless keyboard is properly connected with the VAIO Control Center for more information. H Volume control buttons Increase (+) or decrease (-) the volume. Press to make the view look smaller and further away (zoom out). K E key* Ejects the optical disc drive tray when used in upper case. See the help file included with your computer; J Windows key* Displays the Start menu. L Applications key* Displays a context-sensitive shortcut menu (if any). and blinks for about...
... while the wireless keyboard is properly connected with the VAIO Control Center for more information. H Volume control buttons Increase (+) or decrease (-) the volume. Press to make the view look smaller and further away (zoom out). K E key* Ejects the optical disc drive tray when used in upper case. See the help file included with your computer; J Windows key* Displays the Start menu. L Applications key* Displays a context-sensitive shortcut menu (if any). and blinks for about...

User Guide
Page 39
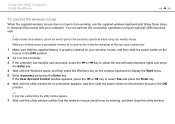
... Type without the keyboard (On-Screen Keyboard) check box, and click OK. 4 Enter the Windows password with your computer. While your wireless keyboard. You can use the supplied wireless mouse and follow these steps to start the computer. Using Your VAIO Computer > Using the Keyboard n 39 N To connect the wireless keyboard When the supplied wireless keyboard does not seem to be working , do not need an optional USB keyboard. ! When the power-on password is set on the computer, however, the on-screen keyboard...
... Type without the keyboard (On-Screen Keyboard) check box, and click OK. 4 Enter the Windows password with your computer. While your wireless keyboard. You can use the supplied wireless mouse and follow these steps to start the computer. Using Your VAIO Computer > Using the Keyboard n 39 N To connect the wireless keyboard When the supplied wireless keyboard does not seem to be working , do not need an optional USB keyboard. ! When the power-on password is set on the computer, however, the on-screen keyboard...
User Guide
Page 44
... the connection operations as well. ! You can perform the connection operations using your wireless mouse is successfully working, do not need to perform the connection operations before the utility window appears. 7 Wait until the Windows starts, and then press the Windows key on the wireless keyboard to display the Start menu. 5 Enter wconnect and press the Enter key. Using Your VAIO Computer > Using the Mouse n 44 N To connect the wireless mouse When the supplied wireless mouse does not seem to be working, and then close the utility window.
... the connection operations as well. ! You can perform the connection operations using your wireless mouse is successfully working, do not need to perform the connection operations before the utility window appears. 7 Wait until the Windows starts, and then press the Windows key on the wireless keyboard to display the Start menu. 5 Enter wconnect and press the Enter key. Using Your VAIO Computer > Using the Mouse n 44 N To connect the wireless mouse When the supplied wireless mouse does not seem to be working, and then close the utility window.
User Guide
Page 58
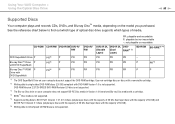
..., dual-layer discs with the capacity of media. Blu-ray Disc™ Drive P with DVD SuperMulti PR*6 P PR PR PR PR PR P PR*5 Blu-ray Disc™ ROM P PR*6 P PR PR PR PR PR P P Drive with DVD-RAM Version 1.0 is not supported. DVD-RAM Version 2.2/12X-SPEED DVD-RAM Revision 5.0 disc is not supported. *3 The Blu-ray Disc drive on your computer does not support the DVD-RAM cartridge. Use non-cartridge discs or discs with a removable cartridge...
..., dual-layer discs with the capacity of media. Blu-ray Disc™ Drive P with DVD SuperMulti PR*6 P PR PR PR PR PR P PR*5 Blu-ray Disc™ ROM P PR*6 P PR PR PR PR PR P P Drive with DVD-RAM Version 1.0 is not supported. DVD-RAM Version 2.2/12X-SPEED DVD-RAM Revision 5.0 disc is not supported. *3 The Blu-ray Disc drive on your computer does not support the DVD-RAM cartridge. Use non-cartridge discs or discs with a removable cartridge...

User Guide
Page 60
... computer while the optical disc drive is writing data to a disc. ❑ Do not plug or unplug the power cord or the AC adapter while the optical disc drive is available on writing data to a disc ❑ Only use the VAIO Update, see Updating Your Computer (page 30). ❑ Depending on how to play DVDs created with the DVD+R DL, DVD-R DL, DVD+R, DVD+RW, DVD-R, DVD-RW, or DVD-RAM media. ❑ When your...
... computer while the optical disc drive is writing data to a disc. ❑ Do not plug or unplug the power cord or the AC adapter while the optical disc drive is available on writing data to a disc ❑ Only use the VAIO Update, see Updating Your Computer (page 30). ❑ Depending on how to play DVDs created with the DVD+R DL, DVD-R DL, DVD+R, DVD+RW, DVD-R, DVD-RW, or DVD-RAM media. ❑ When your...

User Guide
Page 103
Using Peripheral Devices > Using Peripheral Devices You can add functionality to your VAIO computer by using the various ports on the computer. ❑ Connecting External Speakers or Headphones (page 104) ❑ Connecting an External Display (page 105) ❑ Selecting Display Modes (page 112) ❑ Using the Multiple Monitors Function (page 113) ❑ Connecting an External Microphone (page 115) ❑ Connecting a USB Device (page 116) ❑ Connecting an i.LINK Device (page 118) n 103 N
Using Peripheral Devices > Using Peripheral Devices You can add functionality to your VAIO computer by using the various ports on the computer. ❑ Connecting External Speakers or Headphones (page 104) ❑ Connecting an External Display (page 105) ❑ Selecting Display Modes (page 112) ❑ Using the Multiple Monitors Function (page 113) ❑ Connecting an External Microphone (page 115) ❑ Connecting a USB Device (page 116) ❑ Connecting an i.LINK Device (page 118) n 103 N

User Guide
Page 107
... hear sound from the device connected to the HDMI OUTPUT port, you need to change the sound output device? (page 187). 1 Plug the power cord of your TV (1) into an AC outlet. 2 Plug one end of the TV to external input. 4 Set up the TV configuration system. ! Always use the device driver provided by Sony is used, the image will not be displayed and the audio will not be heard. Using Peripheral Devices > Connecting an External Display n 107 N Connecting...
... hear sound from the device connected to the HDMI OUTPUT port, you need to change the sound output device? (page 187). 1 Plug the power cord of your TV (1) into an AC outlet. 2 Plug one end of the TV to external input. 4 Set up the TV configuration system. ! Always use the device driver provided by Sony is used, the image will not be displayed and the audio will not be heard. Using Peripheral Devices > Connecting an External Display n 107 N Connecting...
User Guide
Page 109
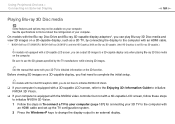
... viewing 3D images. ✍ See the manual that came with your 3D TV for connecting your 3D TV to the computer with a 3D-capable LCD screen, you can play Blu-ray 3D Disc media and view 3D images on the computer. On models not equipped with an HDMI cable and set up the TV configuration system. 2 Press the Windows+P keys to change the display output to...
... viewing 3D images. ✍ See the manual that came with your 3D TV for connecting your 3D TV to the computer with a 3D-capable LCD screen, you can play Blu-ray 3D Disc media and view 3D images on the computer. On models not equipped with an HDMI cable and set up the TV configuration system. 2 Press the Windows+P keys to change the display output to...

User Guide
Page 110
... 3D Disc media 1 Follow the steps in the initialization wizard. After the settings are complete, playback of the 3D-demo video automatically starts. Using Peripheral Devices > Connecting an External Display n 110 N 3 Right-click on the desktop and select NVIDIA Control Panel. 4 Select an item for connecting your computer is equipped with a 3D-capable LCD screen, skip steps 3 to 5. 3 Click Start, All Programs, and VAIO Control Center. 4 Click Display and HDMI Resolution Setting Configuration...
... 3D Disc media 1 Follow the steps in the initialization wizard. After the settings are complete, playback of the 3D-demo video automatically starts. Using Peripheral Devices > Connecting an External Display n 110 N 3 Right-click on the desktop and select NVIDIA Control Panel. 4 Select an item for connecting your computer is equipped with a 3D-capable LCD screen, skip steps 3 to 5. 3 Click Start, All Programs, and VAIO Control Center. 4 Click Display and HDMI Resolution Setting Configuration...

User Guide
Page 130
See the specifications to install a new memory module. ❑ You should not install it yourself, if you purchased. Upgrading Your VAIO Computer > n 130 N Upgrading Your VAIO Computer Your VAIO computer and memory modules use high precision components and electronic connectors technology. For assistance, contact an authorized Sony service/support center. To find out about Your VAIO Computer (page 5). The type of module and the amount of the warranty during your...
See the specifications to install a new memory module. ❑ You should not install it yourself, if you purchased. Upgrading Your VAIO Computer > n 130 N Upgrading Your VAIO Computer Your VAIO computer and memory modules use high precision components and electronic connectors technology. For assistance, contact an authorized Sony service/support center. To find out about Your VAIO Computer (page 5). The type of module and the amount of the warranty during your...
User Guide
Page 178
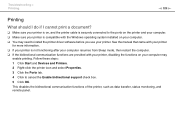
...: 1 Click Start and Devices and Printers. 2 Right-click the printer icon and select Properties. 3 Click the Ports tab. 4 Click to install the printer driver software before you use your printer. This disables the bidirectional communication functions of the printer, such as data transfer, status monitoring, and remote panel. Troubleshooting > Printing n 178 N Printing What should I do if I cannot print a document? ❑ Make sure your...
...: 1 Click Start and Devices and Printers. 2 Right-click the printer icon and select Properties. 3 Click the Ports tab. 4 Click to install the printer driver software before you use your printer. This disables the bidirectional communication functions of the printer, such as data transfer, status monitoring, and remote panel. Troubleshooting > Printing n 178 N Printing What should I do if I cannot print a document? ❑ Make sure your...


