
User Guide
Page 2
... VAIO Computer 29 Using the Keyboard 30 Using the Mouse 36 Using the Touch Screen 42 Using the Built-in Camera 46 Using the Optical Disc Drive 47 Using the TV Function 54 Using the HDMI/VIDEO Input Function 61 Using the Remote Commander 66 Using "Memory Stick 70 Using Other Modules / Memory Cards 76 Using the Internet 80 Using the Network (LAN 81 Using the Wireless LAN 82 Using the Bluetooth Function 85 Using Peripheral Devices 90 Connecting External Speakers or Headphones ..........91 Connecting an External Microphone 92 Connecting a USB Device 93 Connecting...
... VAIO Computer 29 Using the Keyboard 30 Using the Mouse 36 Using the Touch Screen 42 Using the Built-in Camera 46 Using the Optical Disc Drive 47 Using the TV Function 54 Using the HDMI/VIDEO Input Function 61 Using the Remote Commander 66 Using "Memory Stick 70 Using Other Modules / Memory Cards 76 Using the Internet 80 Using the Network (LAN 81 Using the Wireless LAN 82 Using the Bluetooth Function 85 Using Peripheral Devices 90 Connecting External Speakers or Headphones ..........91 Connecting an External Microphone 92 Connecting a USB Device 93 Connecting...

User Guide
Page 5
... VAIO Computer This section provides support information about restoring individual software programs, hardware drivers, and drive partition(s) or your entire built-in the form of components connection, set-up information, etc. ❑ Safety Information - VAIO User Guide (This manual) - Information about your VAIO computer. Safety guidelines and owner information. 2. Use my VAIO Access interactive help with VAIO Care, system restore, backup and recovery, and contact Sony support. To access Help and Support: 1 Click Start and Help and Support...
... VAIO Computer This section provides support information about restoring individual software programs, hardware drivers, and drive partition(s) or your entire built-in the form of components connection, set-up information, etc. ❑ Safety Information - VAIO User Guide (This manual) - Information about your VAIO computer. Safety guidelines and owner information. 2. Use my VAIO Access interactive help with VAIO Care, system restore, backup and recovery, and contact Sony support. To access Help and Support: 1 Click Start and Help and Support...

User Guide
Page 8
.... 3 The operating system on the bottom, the back panel, or inside the battery compartment of your new VAIO PC, system optimization, data rescue, and any repair service you are looking for your computer 4 The hardware component or the software program that is causing the problem 5 A brief description of the problem 5. In order to find the contact numbers on the computer. 2 Your computer's serial number You...
.... 3 The operating system on the bottom, the back panel, or inside the battery compartment of your new VAIO PC, system optimization, data rescue, and any repair service you are looking for your computer 4 The hardware component or the software program that is causing the problem 5 A brief description of the problem 5. In order to find the contact numbers on the computer. 2 Your computer's serial number You...
User Guide
Page 27
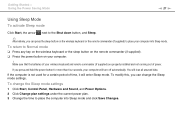
... the Shut down button, and Sleep. ✍ Alternatively, you can change the Sleep mode settings 1 Click Start, Control Panel, Hardware and Sound, and Power Options. 2 Click Change plan settings under the current power plan. 3 Change the time to place the computer into Sleep mode. If the computer is not used for more than four seconds, your wireless keyboard and remote commander (if supplied) are properly installed and not running out of time, it will enter Sleep mode. To return...
... the Shut down button, and Sleep. ✍ Alternatively, you can change the Sleep mode settings 1 Click Start, Control Panel, Hardware and Sound, and Power Options. 2 Click Change plan settings under the current power plan. 3 Change the time to place the computer into Sleep mode. If the computer is not used for more than four seconds, your wireless keyboard and remote commander (if supplied) are properly installed and not running out of time, it will enter Sleep mode. To return...
User Guide
Page 29
...; Using the Touch Screen (page 42) ❑ Using the Built-in Camera (page 46) ❑ Using the Optical Disc Drive (page 47) ❑ Using the TV Function (page 54) ❑ Using the HDMI/VIDEO Input Function (page 61) ❑ Using the Remote Commander (page 66) ❑ Using "Memory Stick" (page 70) ❑ Using Other Modules / Memory Cards (page 76) ❑ Using the Internet (page 80) ❑ Using the Network (LAN) (page 81) ❑ Using the Wireless LAN...
...; Using the Touch Screen (page 42) ❑ Using the Built-in Camera (page 46) ❑ Using the Optical Disc Drive (page 47) ❑ Using the TV Function (page 54) ❑ Using the HDMI/VIDEO Input Function (page 61) ❑ Using the Remote Commander (page 66) ❑ Using "Memory Stick" (page 70) ❑ Using Other Modules / Memory Cards (page 76) ❑ Using the Internet (page 80) ❑ Using the Network (LAN) (page 81) ❑ Using the Wireless LAN...
User Guide
Page 33
... the batteries are using the HDMI/VIDEO input function. M Directional arrow keys Move the pointer on some software. Press to make the view look bigger and closer (zoom in). N Indicator lights (Battery): Stays off while the AA batteries for more information. See the help file included with the Fn key. J Windows key Displays the Start menu. Using Your VAIO Computer > Using the Keyboard n 33 N F Zoom buttons Change the size of power. (Caps lock): Turns...
... the batteries are using the HDMI/VIDEO input function. M Directional arrow keys Move the pointer on some software. Press to make the view look bigger and closer (zoom in). N Indicator lights (Battery): Stays off while the AA batteries for more information. See the help file included with the Fn key. J Windows key Displays the Start menu. Using Your VAIO Computer > Using the Keyboard n 33 N F Zoom buttons Change the size of power. (Caps lock): Turns...
User Guide
Page 49
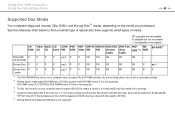
... Extra RW ROM Video RW RW (Double (Dual RAM*1 *2 ROM Layer) Layer) BD-R/RE*3 DVD±RW/ P P P P PR*5 P P PR PR PR PR PR - - ±R DL/RAM Blu-ray Disc P P P P PR*5 P P PR PR PR PR PR P PR*4 Blu-ray Disc P P P P PR*5 P P PR PR PR PR PR P P Combo *1 The DVD±RW/RAM disc drive on the model you purchased. Using Your VAIO Computer > Using the Optical Disc Drive n 49 N Supported Disc Media Your computer...
... Extra RW ROM Video RW RW (Double (Dual RAM*1 *2 ROM Layer) Layer) BD-R/RE*3 DVD±RW/ P P P P PR*5 P P PR PR PR PR PR - - ±R DL/RAM Blu-ray Disc P P P P PR*5 P P PR PR PR PR PR P PR*4 Blu-ray Disc P P P P PR*5 P P PR PR PR PR PR P P Combo *1 The DVD±RW/RAM disc drive on the model you purchased. Using Your VAIO Computer > Using the Optical Disc Drive n 49 N Supported Disc Media Your computer...
User Guide
Page 63
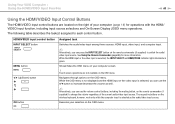
... volume as the audio/video input source. HDMI/VIDEO input control button INPUT SELECT button MENU button V/v (Up/Down) button OK button Assigned task Switches the audio/video input among three sources: HDMI input, video input, and computer input. ✍ Alternatively, you can use the volume control buttons, including the muting button, on the remote commander (if supplied) to change the volume regardless of your computer screen. ! The respective buttons on the wireless keyboard, however, work only while...
... volume as the audio/video input source. HDMI/VIDEO input control button INPUT SELECT button MENU button V/v (Up/Down) button OK button Assigned task Switches the audio/video input among three sources: HDMI input, video input, and computer input. ✍ Alternatively, you can use the volume control buttons, including the muting button, on the remote commander (if supplied) to change the volume regardless of your computer screen. ! The respective buttons on the wireless keyboard, however, work only while...
User Guide
Page 64
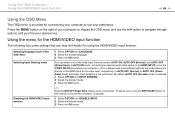
... (Power Save) mode, automatic input selection is off or in Sleep mode automatically switches the audio/video input source to suit your computer is not performed. Selecting language mode of your computer to display the OSD menu and use the V/v button to the HDMI INPUT port or the VIDEO INPUT jacks while your preference. Press the MENU button on the computer or the remote commander (if supplied). 1 Select OPTION and DISABLE...
... (Power Save) mode, automatic input selection is off or in Sleep mode automatically switches the audio/video input source to suit your computer is not performed. Selecting language mode of your computer to display the OSD menu and use the V/v button to the HDMI INPUT port or the VIDEO INPUT jacks while your preference. Press the MENU button on the computer or the remote commander (if supplied). 1 Select OPTION and DISABLE...
User Guide
Page 91
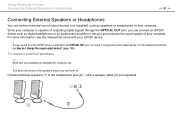
... or an audio/video amplifier to the port and enhance the sound quality of your computer. For the detailed instructions, see the manual that came with a speaker cable (3) (not supplied). For more information, see How do I change the sound output device. To hear sound from the S/PDIF device connected to the OPTICAL OUT port, you turn them on. To connect external speakers ✍ Make sure your computer. Using Peripheral Devices > Connecting External Speakers or Headphones n 91 N Connecting External Speakers or...
... or an audio/video amplifier to the port and enhance the sound quality of your computer. For the detailed instructions, see the manual that came with a speaker cable (3) (not supplied). For more information, see How do I change the sound output device. To hear sound from the S/PDIF device connected to the OPTICAL OUT port, you turn them on. To connect external speakers ✍ Make sure your computer. Using Peripheral Devices > Connecting External Speakers or Headphones n 91 N Connecting External Speakers or...
User Guide
Page 101
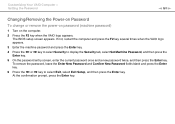
... the VAIO logo appears. 3 Enter the machine password and press the Enter key. 4 Press the < or , key to select Security to select Exit, select Exit Setup, and then press the Enter key. At the confirmation prompt, press the Enter key. The BIOS setup screen appears. Customizing Your VAIO Computer > Setting the Password n 101 N Changing/Removing the Power-on Password To change or remove the power-on password (machine password) 1 Turn on the computer. 2 Press the F2 key when the VAIO logo...
... the VAIO logo appears. 3 Enter the machine password and press the Enter key. 4 Press the < or , key to select Security to select Exit, select Exit Setup, and then press the Enter key. At the confirmation prompt, press the Enter key. The BIOS setup screen appears. Customizing Your VAIO Computer > Setting the Password n 101 N Changing/Removing the Power-on Password To change or remove the power-on password (machine password) 1 Turn on the computer. 2 Press the F2 key when the VAIO logo...

User Guide
Page 102
..., press the Enter key. To remove the password, leave the Enter New Password and Confirm New Password fields blank and press the Enter key. 6 Press the < or , key to display the Security tab, select Set User Password, and then press the Enter key. 5 On the password entry screen, enter the current password once and a new password twice, and then press the Enter key. The BIOS setup screen appears. Customizing Your VAIO Computer > Setting the Password n 102 N To change or remove the power-on password (user password) 1 Turn on the...
..., press the Enter key. To remove the password, leave the Enter New Password and Confirm New Password fields blank and press the Enter key. 6 Press the < or , key to display the Security tab, select Set User Password, and then press the Enter key. 5 On the password entry screen, enter the current password once and a new password twice, and then press the Enter key. The BIOS setup screen appears. Customizing Your VAIO Computer > Setting the Password n 102 N To change or remove the power-on password (user password) 1 Turn on the...

User Guide
Page 104
... specifications to install a new memory module. ❑ You should not install it yourself, if you purchased. Upgrading Your VAIO Computer > n 104 N Upgrading Your VAIO Computer Your VAIO computer and memory modules use high precision components and electronic connectors technology. The type of module and the amount of the warranty during your product warranty period, we recommend that: ❑ You should not touch the connectors or open the memory...
... specifications to install a new memory module. ❑ You should not install it yourself, if you purchased. Upgrading Your VAIO Computer > n 104 N Upgrading Your VAIO Computer Your VAIO computer and memory modules use high precision components and electronic connectors technology. The type of module and the amount of the warranty during your product warranty period, we recommend that: ❑ You should not touch the connectors or open the memory...

User Guide
Page 129
... the system. How can use one of the game if there are any patches or updates to download. ❑ Make sure you have forgotten the power-on password, contact an authorized Sony Service Center to select Exit, select Exit Setup, and then press the Enter key. If you have installed the latest video driver software. ❑ On some VAIO models, the graphics memory is not guaranteed. A reset fee will be charged. Follow...
... the system. How can use one of the game if there are any patches or updates to download. ❑ Make sure you have forgotten the power-on password, contact an authorized Sony Service Center to select Exit, select Exit Setup, and then press the Enter key. If you have installed the latest video driver software. ❑ On some VAIO models, the graphics memory is not guaranteed. A reset fee will be charged. Follow...

User Guide
Page 142
... Device Manager window appears with the optical disc drive. ❑ If you may be incompatible with the optical disc drive. If an "X" or an exclamation point appears on the listed device, you notice condensation on your computer's hardware devices. You can confirm the driver software by selecting the Driver tab, and clicking Driver Details. 7 Click OK to close the window. ❑ Make sure an adhesive label is installed. Troubleshooting > Optical Discs n 142 N ❑ Make...
... Device Manager window appears with the optical disc drive. ❑ If you may be incompatible with the optical disc drive. If an "X" or an exclamation point appears on the listed device, you notice condensation on your computer's hardware devices. You can confirm the driver software by selecting the Driver tab, and clicking Driver Details. 7 Click OK to close the window. ❑ Make sure an adhesive label is installed. Troubleshooting > Optical Discs n 142 N ❑ Make...

User Guide
Page 146
... provided with the Windows operating system installed on your computer may need to cancel the Enable bidirectional support check box. 5 Click OK. Follow these steps: 1 Click Start and Devices and Printers. 2 Right-click the printer icon and select Properties. 3 Click the Ports tab. 4 Click to install the printer driver software before you use your computer. ❑ You may enable printing. See the manual that came...
... provided with the Windows operating system installed on your computer may need to cancel the Enable bidirectional support check box. 5 Click OK. Follow these steps: 1 Click Start and Devices and Printers. 2 Right-click the printer icon and select Properties. 3 Click the Ports tab. 4 Click to install the printer driver software before you use your computer. ❑ You may enable printing. See the manual that came...
Quick Start Guide
Page 2
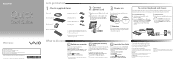
... wireless keyboard and mouse are connected at the time of delivery. Click Start , All Programs, Windows Update or VAIO Update. Your computer must be connected to the Internet to reduce heat. No action is important to download the updates. Recovery discs are not provided with the following the steps below. However, if you can restore your computer can locate the on -screen VAIO Recovery Center User Guide under Use my VAIO in Help and Support. LCD Screen/Touch Screen...
... wireless keyboard and mouse are connected at the time of delivery. Click Start , All Programs, Windows Update or VAIO Update. Your computer must be connected to the Internet to reduce heat. No action is important to download the updates. Recovery discs are not provided with the following the steps below. However, if you can restore your computer can locate the on -screen VAIO Recovery Center User Guide under Use my VAIO in Help and Support. LCD Screen/Touch Screen...
Quick Start Guide
Page 1
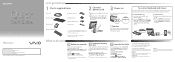
..., we encourage you may make scratches on -screen VAIO Recovery Center User Guide under Use my VAIO in Help and Support. However, if you can restore your computer to factory-installed settings in case of the prop-up stand and plug the other end into contact with your computer. To connect mouse 1 Slide the power switch on the mouse to ON. 2 Press the CONNECT button on the mouse, and then within 10...
..., we encourage you may make scratches on -screen VAIO Recovery Center User Guide under Use my VAIO in Help and Support. However, if you can restore your computer to factory-installed settings in case of the prop-up stand and plug the other end into contact with your computer. To connect mouse 1 Slide the power switch on the mouse to ON. 2 Press the CONNECT button on the mouse, and then within 10...
Safety Information
Page 2
... whole or in part without written permission is subject to the model and serial numbers when you call your Sony VAIO® computer. BE LIABLE FOR ANY INCIDENTAL, CONSEQUENTIAL, OR SPECIAL DAMAGES, WHETHER BASED ON TORT, CONTRACT, OR OTHERWISE, ARISING OUT OF OR IN CONNECTION WITH THIS MANUAL, THE SOFTWARE, OR OTHER INFORMATION CONTAINED HEREIN OR THE USE THEREOF. WEB...
... whole or in part without written permission is subject to the model and serial numbers when you call your Sony VAIO® computer. BE LIABLE FOR ANY INCIDENTAL, CONSEQUENTIAL, OR SPECIAL DAMAGES, WHETHER BASED ON TORT, CONTRACT, OR OTHERWISE, ARISING OUT OF OR IN CONNECTION WITH THIS MANUAL, THE SOFTWARE, OR OTHER INFORMATION CONTAINED HEREIN OR THE USE THEREOF. WEB...
Marketing Specifications (Black)
Page 2
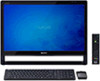
... x 7.4"(D)8,9 (CPU and Display only) Supplied Accessories Power Cord Wireless Keyboard Wireless Mouse Remote Control Batteries Color: Black UPC Code: 027242780323 1. You can activate the software by following phone-based troubleshooting. trademark. and in all documentation. VPCL113FX/B VAIO® L Series All-in-One Touch Screen Specifications General Computer Type: Desktop Type of Use: All-in other countries. other trademarks are subject to work . Accessible capacity may apply. A portion of hard disk space is pre-installed on original factory image and will work for the...
... x 7.4"(D)8,9 (CPU and Display only) Supplied Accessories Power Cord Wireless Keyboard Wireless Mouse Remote Control Batteries Color: Black UPC Code: 027242780323 1. You can activate the software by following phone-based troubleshooting. trademark. and in all documentation. VPCL113FX/B VAIO® L Series All-in-One Touch Screen Specifications General Computer Type: Desktop Type of Use: All-in other countries. other trademarks are subject to work . Accessible capacity may apply. A portion of hard disk space is pre-installed on original factory image and will work for the...


