
User Guide
Page 3
n3 N Precautions 114 Handling the LCD Screen 115 Using the Power Source 116 Handling Your Computer 117 Handling the Built-in Camera 120 Handling Discs 121 Using the Battery Pack 122 Using ...
n3 N Precautions 114 Handling the LCD Screen 115 Using the Power Source 116 Handling Your Computer 117 Handling the Built-in Camera 120 Handling Discs 121 Using the Battery Pack 122 Using ...

User Guide
Page 4
... Before Use Congratulations on your purchase of your computer, visit the Sony online support web sites at the following URLs: ❑ For customers in USA http://esupport.sony.com/EN/VAIO/ ❑ For customers in Canada http://www.sony.ca/support/ ❑ For customers in Spanish-speaking Latin American ...Some features, options, and supplied items may find out about the configuration of this Sony VAIO® computer, and welcome to provide state-of your computer. You may not be available on -screen User Guide. To find differences in this User Guide is intended for users of ...
... Before Use Congratulations on your purchase of your computer, visit the Sony online support web sites at the following URLs: ❑ For customers in USA http://esupport.sony.com/EN/VAIO/ ❑ For customers in Canada http://www.sony.ca/support/ ❑ For customers in Spanish-speaking Latin American ...Some features, options, and supplied items may find out about the configuration of this Sony VAIO® computer, and welcome to provide state-of your computer. You may not be available on -screen User Guide. To find differences in this User Guide is intended for users of ...
User Guide
Page 5
... factory settings - On-screen Documentation ❑ Help and Support - Information about your VAIO computer. Printed Documentation ❑ Quick Start Guide - VAIO Recovery Center User Guide - Use my VAIO Access interactive help with Internet and wireless setup, security setup, personalizing your VAIO computer with VAIO Care, system restore, backup and recovery, and contact Sony support. VAIO User Guide (This...
... factory settings - On-screen Documentation ❑ Help and Support - Information about your VAIO computer. Printed Documentation ❑ Quick Start Guide - VAIO Recovery Center User Guide - Use my VAIO Access interactive help with Internet and wireless setup, security setup, personalizing your VAIO computer with VAIO Care, system restore, backup and recovery, and contact Sony support. VAIO User Guide (This...
User Guide
Page 6
... Utility Help (Selected models only) - See the specifications to access the help files from the help files - May be available on -screen guide: 1 Click Start, All Programs, and SmartWi Connection Utility. 2 Click SmartWi Connection Utility Help. Information about configuration of your computer.... Before Use > Finding More about Your VAIO Computer n6 N ❑ Program help menu on your computer. To access this on your computer. Features and options may be able...
... Utility Help (Selected models only) - See the specifications to access the help files from the help files - May be available on -screen guide: 1 Click Start, All Programs, and SmartWi Connection Utility. 2 Click SmartWi Connection Utility Help. Information about configuration of your computer.... Before Use > Finding More about Your VAIO Computer n6 N ❑ Program help menu on your computer. To access this on your computer. Features and options may be able...

User Guide
Page 10
... can reduce eye strain and muscle fatigue by adjusting the tilt of the monitor. Use indirect lighting to the proper position. Make sure the display screen is at a comfortable viewing distance. Choose a location where windows and lights do not cause glare and reflection on the display. When using an external display...
... can reduce eye strain and muscle fatigue by adjusting the tilt of the monitor. Use indirect lighting to the proper position. Make sure the display screen is at a comfortable viewing distance. Choose a location where windows and lights do not cause glare and reflection on the display. When using an external display...

User Guide
Page 12
... on the following pages. Front A Built-in MOTION EYE camera (page 38) B Built-in MOTION EYE camera indicator (page 18) C Built-in microphone (monaural) D LCD screen (page 115) E Built-in speakers (stereo) F Keyboard (page 30) G Touch pad (page 32) H Fingerprint sensor*1 (page 70) I Memory Stick slot*2 (page 46) J Media Access indicator...
... on the following pages. Front A Built-in MOTION EYE camera (page 38) B Built-in MOTION EYE camera indicator (page 18) C Built-in microphone (monaural) D LCD screen (page 115) E Built-in speakers (stereo) F Keyboard (page 30) G Touch pad (page 32) H Fingerprint sensor*1 (page 70) I Memory Stick slot*2 (page 46) J Media Access indicator...

User Guide
Page 20
Installing the Battery Pack To install the battery pack 1 Turn off the computer and close the LCD screen lid. 2 Slide the battery LOCK switch (1) inward. n 20 N Getting Started > Using the Battery Pack Using the Battery Pack The battery pack supplied with your computer is not fully charged at the time of delivery.
Installing the Battery Pack To install the battery pack 1 Turn off the computer and close the LCD screen lid. 2 Slide the battery LOCK switch (1) inward. n 20 N Getting Started > Using the Battery Pack Using the Battery Pack The battery pack supplied with your computer is not fully charged at the time of delivery.
User Guide
Page 26
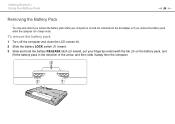
... on the battery pack, and lift the battery pack in Sleep mode. To remove the battery pack 1 Turn off the computer and close the LCD screen lid. 2 Slide the battery LOCK switch (1) inward. 3 Slide and hold the battery RELEASE latch (2) inward, put your computer is in the direction of the arrow...
... on the battery pack, and lift the battery pack in Sleep mode. To remove the battery pack 1 Turn off the computer and close the LCD screen lid. 2 Slide the battery LOCK switch (1) inward. 3 Slide and hold the battery RELEASE latch (2) inward, put your computer is in the direction of the arrow...

User Guide
Page 28
Your computer must be connected to the Internet to install the latest updates on your computer with the following software applications so that the computer can run more efficiently. ❑ Windows Update Click Start, All Programs, and Windows Update and then follow the on-screen instructions. ❑ VAIO Update 4 Click Start, All Programs, VAIO Update 4, and VAIO Update Options and then follow the on-screen instructions. ! Getting Started > Updating Your Computer n 28 N Updating Your Computer Be sure to download the updates.
Your computer must be connected to the Internet to install the latest updates on your computer with the following software applications so that the computer can run more efficiently. ❑ Windows Update Click Start, All Programs, and Windows Update and then follow the on-screen instructions. ❑ VAIO Update 4 Click Start, All Programs, VAIO Update 4, and VAIO Update Options and then follow the on-screen instructions. ! Getting Started > Updating Your Computer n 28 N Updating Your Computer Be sure to download the updates.

User Guide
Page 30
... intensity, keep pressing the Fn+F4 keys or press the Fn+F4 keys and then the M or , key. Changes the size of your computer screen, an external display, and simultaneous output to both. Changes the volume level. To make the view look bigger and closer (zoom in speakers and the... headphones. Using Your VAIO Computer > Using the Keyboard n 30 N Using the Keyboard Your keyboard has additional keys that perform model-specific tasks. To make the view look smaller...
... intensity, keep pressing the Fn+F4 keys or press the Fn+F4 keys and then the M or , key. Changes the size of your computer screen, an external display, and simultaneous output to both. Changes the volume level. To make the view look bigger and closer (zoom in speakers and the... headphones. Using Your VAIO Computer > Using the Keyboard n 30 N Using the Keyboard Your keyboard has additional keys that perform model-specific tasks. To make the view look smaller...
User Guide
Page 32
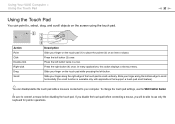
...to place the pointer (2) on the touch pad while pressing the left button. In many applications, this action displays a shortcut menu. Using Your VAIO Computer > Using the Touch Pad Using the Touch Pad You can disable/enable the touch pad while a mouse is available only with applications that ...support a touch pad scroll feature). ✍ You can point to, select, drag, and scroll objects on the screen using the touch pad. n 32 N Action Point Click Double-click Right-click Drag Scroll Description Slide your finger on an item or object.
...to place the pointer (2) on the touch pad while pressing the left button. In many applications, this action displays a shortcut menu. Using Your VAIO Computer > Using the Touch Pad Using the Touch Pad You can disable/enable the touch pad while a mouse is available only with applications that ...support a touch pad scroll feature). ✍ You can point to, select, drag, and scroll objects on the screen using the touch pad. n 32 N Action Point Click Double-click Right-click Drag Scroll Description Slide your finger on an item or object.
User Guide
Page 49
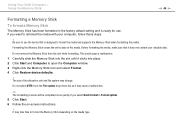
... may take time to reformat the media with your valuable data. It may change. Formatting the Memory Stick erases the entire data on -screen instructions. ! If you select Quick Format in the factory default setting and is designed to open the Computer window. 3 Right-click the... Memory Stick icon and select Format. 4 Click Restore device defaults. ! Do not select NTFS from the slot while formatting. Using Your VAIO Computer > Using the Memory Stick n 49 N Formatting a Memory Stick To format a Memory Stick The Memory Stick has been formatted in Format options. 5 ...
... may take time to reformat the media with your valuable data. It may change. Formatting the Memory Stick erases the entire data on -screen instructions. ! If you select Quick Format in the factory default setting and is designed to open the Computer window. 3 Right-click the... Memory Stick icon and select Format. 4 Click Restore device defaults. ! Do not select NTFS from the slot while formatting. Using Your VAIO Computer > Using the Memory Stick n 49 N Formatting a Memory Stick To format a Memory Stick The Memory Stick has been formatted in Format options. 5 ...
User Guide
Page 53
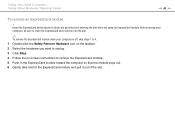
... toward the computer so that the module pops out. 6 Gently take hold of the ExpressCard module and pull it out of the slot. Using Your VAIO Computer > Using Other Modules / Memory Cards n 53 N To remove an ExpressCard module ! Before moving your computer, be sure to insert the ExpressCard slot protector into..., skip steps 1 to 4. 1 Double-click the Safely Remove Hardware icon on the taskbar. 2 Select the hardware you want to unplug. 3 Click Stop. 4 Follow the on-screen instructions to block any particles from entering the slot when not using an ExpressCard module.
... toward the computer so that the module pops out. 6 Gently take hold of the ExpressCard module and pull it out of the slot. Using Your VAIO Computer > Using Other Modules / Memory Cards n 53 N To remove an ExpressCard module ! Before moving your computer, be sure to insert the ExpressCard slot protector into..., skip steps 1 to 4. 1 Double-click the Safely Remove Hardware icon on the taskbar. 2 Select the hardware you want to unplug. 3 Click Stop. 4 Follow the on-screen instructions to block any particles from entering the slot when not using an ExpressCard module.

User Guide
Page 59
... n 59 N ! Your computer does not work with party lines, cannot be connected to a coin-operated telephone, and may not work properly. Using Your VAIO Computer > Using the Internet To connect a telephone cable ! The following procedure applies to the Internet under Network and Internet. If you connect a telephone cable ... modem only. 1 Click Start and Control Panel. 2 Click Connect to models with multiple telephone lines or a private branch exchange (PBX). on -screen instructions. Some of the phone cable (1) into the modem port 2 Plug the other end into the wall jack (2).
... n 59 N ! Your computer does not work with party lines, cannot be connected to a coin-operated telephone, and may not work properly. Using Your VAIO Computer > Using the Internet To connect a telephone cable ! The following procedure applies to the Internet under Network and Internet. If you connect a telephone cable ... modem only. 1 Click Start and Control Panel. 2 Click Connect to models with multiple telephone lines or a private branch exchange (PBX). on -screen instructions. Some of the phone cable (1) into the modem port 2 Plug the other end into the wall jack (2).

User Guide
Page 62
Using Your VAIO Computer > Using the Wireless LAN n 62 N To use the wireless LAN function To use the wireless LAN function. Be sure to set up the wireless ... IEEE 802.11n draft standard, using Windows Help and Support to set up and use the wireless LAN function, you first need to turn on -screen guide: 1 Click Start, All Programs, and SmartWi Connection Utility. 2 Click SmartWi Connection Utility Help. ❑ On models without the SmartWi Connection Utility Search for more...
Using Your VAIO Computer > Using the Wireless LAN n 62 N To use the wireless LAN function To use the wireless LAN function. Be sure to set up the wireless ... IEEE 802.11n draft standard, using Windows Help and Support to set up and use the wireless LAN function, you first need to turn on -screen guide: 1 Click Start, All Programs, and SmartWi Connection Utility. 2 Click SmartWi Connection Utility Help. ❑ On models without the SmartWi Connection Utility Search for more...

User Guide
Page 65
Using Your VAIO Computer > Using the Bluetooth Function n 65 N Using the Bluetooth Function You can transfer data between your computer. See the specifications to find out about the ... information using Windows Help and Support to set up and use the Bluetooth function, you first need to 33 feet (10 meters) in this on-screen guide: 1 Click Start, All Programs, and SmartWi Connection Utility. 2 Click SmartWi Connection Utility Help. ❑ On models without cables at a range of your computer. To...
Using Your VAIO Computer > Using the Bluetooth Function n 65 N Using the Bluetooth Function You can transfer data between your computer. See the specifications to find out about the ... information using Windows Help and Support to set up and use the Bluetooth function, you first need to 33 feet (10 meters) in this on-screen guide: 1 Click Start, All Programs, and SmartWi Connection Utility. 2 Click SmartWi Connection Utility Help. ❑ On models without cables at a range of your computer. To...

User Guide
Page 71
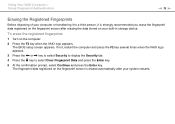
... you must register your fingerprint(s) in your computer. ✍ Set the Windows password on your system using the Power-on -screen instructions. ✍ For detailed information, see the help file. Using Your VAIO Computer > Using Fingerprint Authentication n 71 N Registering a Fingerprint To use for the Power-on Security feature later. 1 Click Start, All...
... you must register your fingerprint(s) in your computer. ✍ Set the Windows password on your system using the Power-on -screen instructions. ✍ For detailed information, see the help file. Using Your VAIO Computer > Using Fingerprint Authentication n 71 N Registering a Fingerprint To use for the Power-on Security feature later. 1 Click Start, All...
User Guide
Page 74
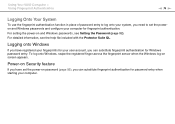
Using Your VAIO Computer > Using Fingerprint Authentication n 74 N Logging Onto Your System To use the fingerprint authentication function in place of password entry to set the poweron and ... to log onto your system, you can substitute fingerprint authentication for password entry when starting your computer for fingerprint authentication. For setting the power-on screen appears.
Using Your VAIO Computer > Using Fingerprint Authentication n 74 N Logging Onto Your System To use the fingerprint authentication function in place of password entry to set the poweron and ... to log onto your system, you can substitute fingerprint authentication for password entry when starting your computer for fingerprint authentication. For setting the power-on screen appears.
User Guide
Page 76
The BIOS setup screen appears. If not, restart the computer and press the F2 key several times when the VAIO logo appears. 3 Press the < or , key to select Security to display the Security tab. 4 Press the m key to a third person, it to select...the Enter key. 5 At the confirmation prompt, select Continue and press the Enter key. The fingerprint data registered on your system restarts. Using Your VAIO Computer > Using Fingerprint Authentication n 76 N Erasing the Registered Fingerprints Before disposing of your computer or transferring it is strongly recommended you erase the ...
The BIOS setup screen appears. If not, restart the computer and press the F2 key several times when the VAIO logo appears. 3 Press the < or , key to select Security to display the Security tab. 4 Press the m key to a third person, it to select...the Enter key. 5 At the confirmation prompt, select Continue and press the Enter key. The fingerprint data registered on your system restarts. Using Your VAIO Computer > Using Fingerprint Authentication n 76 N Erasing the Registered Fingerprints Before disposing of your computer or transferring it is strongly recommended you erase the ...

User Guide
Page 82
If you can select either your computer screen or the connected display to use as the primary monitor. See the specifications to find out about the configuration of your computer screen and the external display at the same time, see Using the Multiple Monitors Function (page 84) for selecting a display depends on your computer. The procedure for more information. Using Peripheral Devices > Selecting Display Modes n 82 N Selecting Display Modes When an external display is connected, you want to work on the video controller used in the computer.
If you can select either your computer screen or the connected display to use as the primary monitor. See the specifications to find out about the configuration of your computer screen and the external display at the same time, see Using the Multiple Monitors Function (page 84) for selecting a display depends on your computer. The procedure for more information. Using Peripheral Devices > Selecting Display Modes n 82 N Selecting Display Modes When an external display is connected, you want to work on the video controller used in the computer.


