

2006 VAIO Accessories Guide
Page 1
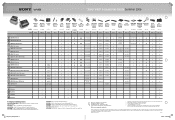
Sony® VAIO® Accessories Guide Summer 2006 FE AX AR FS FJ Neoprene Protection Leather ... Sport Carrying Messenger Case Bag VGP-AMB8 VGP-AMB9 Ladies Leather Tote VGP-AML1 Notebook 512MB Backpack Memory VGP-CCP3/H VGP-XXXX 1GB Memory Bluetooth® GPS Receiver3 Stylus (2-Pack) VGP-MM1GA VGP-BGU1 VGP-ST1 Price $22.99 ...VGN-S360/P, S200, S100 series VGP-AMC1 VGN-TX800, TX700, TX600 Series VGN-T300 Series VGN-T200 Series, T100 series VGN-UX180P Desktops RB Series RC Series VA Series XL Series $89.99 • • • $149.99 • • •...
Sony® VAIO® Accessories Guide Summer 2006 FE AX AR FS FJ Neoprene Protection Leather ... Sport Carrying Messenger Case Bag VGP-AMB8 VGP-AMB9 Ladies Leather Tote VGP-AML1 Notebook 512MB Backpack Memory VGP-CCP3/H VGP-XXXX 1GB Memory Bluetooth® GPS Receiver3 Stylus (2-Pack) VGP-MM1GA VGP-BGU1 VGP-ST1 Price $22.99 ...VGN-S360/P, S200, S100 series VGP-AMC1 VGN-TX800, TX700, TX600 Series VGN-T300 Series VGN-T200 Series, T100 series VGN-UX180P Desktops RB Series RC Series VA Series XL Series $89.99 • • • $149.99 • • •...
2006 VAIO Accessories Guide
Page 2
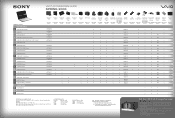
...P1029_ACC_Sum06_Final.indd 2 5/25/06 12:06:25 PM Sony, VAIO, Sony logo, VAIO logo, Sony Style, and i.Link are trademarks of Sony used only to hard drive capacity. Printed in . Sony® VAIO® Accessories Guide Summer 2006 FE AX AR FS FJ Memory Card Adapter Wireless Keyboard & Mouse Privacy Filter Mouse ..., S400, S370, S380 Series VGN-S360/P, S200, S100 series VGN-TX800, TX700, TX600 Series VGN-T300 Series VGN-T200 Series, T100 series VGN-UX180P Desktops RB Series RC Series VA Series XL Series $39.99 • • $149.99 $69.99 $79.99 • • • ...
...P1029_ACC_Sum06_Final.indd 2 5/25/06 12:06:25 PM Sony, VAIO, Sony logo, VAIO logo, Sony Style, and i.Link are trademarks of Sony used only to hard drive capacity. Printed in . Sony® VAIO® Accessories Guide Summer 2006 FE AX AR FS FJ Memory Card Adapter Wireless Keyboard & Mouse Privacy Filter Mouse ..., S400, S370, S380 Series VGN-S360/P, S200, S100 series VGN-TX800, TX700, TX600 Series VGN-T300 Series VGN-T200 Series, T100 series VGN-UX180P Desktops RB Series RC Series VA Series XL Series $39.99 • • $149.99 $69.99 $79.99 • • • ...
VAIO Accessories Guide Spring 2006
Page 1
VAIO® ACCESSORIES GUIDE SPRING 2006 T TX S SZ B BX FJ FS FE A AX SERIES: Model # NOTEBOOKS... VGN-S360/P, S200, S100 Series VGN-TX600, TX700 Series VGN-T300 Series VGN-T200 Series, T100 Series DESKTOPS VGC-RB Series VGC-RC Series VGC-VA Series Neoprene Case VGP-XXXX $22.99 Portfolio Case Protection Case Leather Protection Case Protection Case Carrying Case...99 $279.99 Portable 80GB1 Hard Drive w/Security External DVD±RW Drive2 VGP-UHDM08 PCGA-DDRW3 $299.99 $399.99 Memory Card Adapter VGP-MCA10 $39.99 Privacy Filter VGP-XXXX $89.99 VGP-AMC2 ($24.99) VGP-AMC2 ($24.99)...
VAIO® ACCESSORIES GUIDE SPRING 2006 T TX S SZ B BX FJ FS FE A AX SERIES: Model # NOTEBOOKS... VGN-S360/P, S200, S100 Series VGN-TX600, TX700 Series VGN-T300 Series VGN-T200 Series, T100 Series DESKTOPS VGC-RB Series VGC-RC Series VGC-VA Series Neoprene Case VGP-XXXX $22.99 Portfolio Case Protection Case Leather Protection Case Protection Case Carrying Case...99 $279.99 Portable 80GB1 Hard Drive w/Security External DVD±RW Drive2 VGP-UHDM08 PCGA-DDRW3 $299.99 $399.99 Memory Card Adapter VGP-MCA10 $39.99 Privacy Filter VGP-XXXX $89.99 VGP-AMC2 ($24.99) VGP-AMC2 ($24.99)...
Safety Information
Page 2
... to DVD, CLIÉ, DVgate Plus, Handycam, MagicGate, Memory Stick, Memory Stick Duo, the Memory Stick logo, OpenMG, MICROMV, SonicStage, ImageStation, ATRAC3, and i.LINK are trademarks or registered trademarks of Sony. Certain product(s) included with participating financial institutions. Important information for Canadian customers: Your new VAIO computer includes certain software versions or upgrades, and Internet services...
... to DVD, CLIÉ, DVgate Plus, Handycam, MagicGate, Memory Stick, Memory Stick Duo, the Memory Stick logo, OpenMG, MICROMV, SonicStage, ImageStation, ATRAC3, and i.LINK are trademarks or registered trademarks of Sony. Certain product(s) included with participating financial institutions. Important information for Canadian customers: Your new VAIO computer includes certain software versions or upgrades, and Internet services...

User Guide
Page 8
... from and to SmartMedia or xD-Picture Card media. 4 CompactFlash® and Microdrive memory card reader Reads and writes data from the illustrations shown in this section. Front panel Your computer may vary from and to connect compatible peripheral devices. The location of the controls, ports..., and jacks may not be equipped with all of your VAIO® Computer enables access to drives, memory card readers, ports and jacks that enable you to CompactFlash and Microdrive media. About the Front Panel The front panel...
... from and to SmartMedia or xD-Picture Card media. 4 CompactFlash® and Microdrive memory card reader Reads and writes data from the illustrations shown in this section. Front panel Your computer may vary from and to connect compatible peripheral devices. The location of the controls, ports..., and jacks may not be equipped with all of your VAIO® Computer enables access to drives, memory card readers, ports and jacks that enable you to CompactFlash and Microdrive media. About the Front Panel The front panel...
User Guide
Page 9
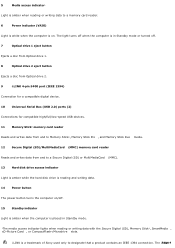
...Sony used only to a Secure Digital (SD) or MultiMediaCard (MMC). 13 Hard disk drive access indicator Light is amber while the hard disk drive is reading and writing data. 14 Power button The power button turns the computer on . The light turns off when the computer...-Picture Card , or CompactFlash®/Microdrive slots. 5 Media access indicator1 Light is amber when reading or writing data to a memory card reader. 6 Power indicator (VAIO) Light is white when the computer is on /off . 7 Optical drive 1 eject button Ejects a disc from Optical drive 1. 8 Optical drive 2 eject ...
...Sony used only to a Secure Digital (SD) or MultiMediaCard (MMC). 13 Hard disk drive access indicator Light is amber while the hard disk drive is reading and writing data. 14 Power button The power button turns the computer on . The light turns off when the computer...-Picture Card , or CompactFlash®/Microdrive slots. 5 Media access indicator1 Light is amber when reading or writing data to a memory card reader. 6 Power indicator (VAIO) Light is white when the computer is on /off . 7 Optical drive 1 eject button Ejects a disc from Optical drive 1. 8 Optical drive 2 eject ...

User Guide
Page 10
To open or handle roughly. Before connecting compatible i.LINK devices to the documentation that covers memory card readers, USB and i.LINK® ports. Opening the front panel cov er Page 10 Refer to your compatible i.LINK device for information on the... software programs, operating system, and compatible i.LINK devices. Do not force the panel cover open the front panel cover The front of your computer has a panel that came with each other. All products with an i.LINK connection may vary, depending on operating conditions and proper connection. connection may not...
To open or handle roughly. Before connecting compatible i.LINK devices to the documentation that covers memory card readers, USB and i.LINK® ports. Opening the front panel cov er Page 10 Refer to your compatible i.LINK device for information on the... software programs, operating system, and compatible i.LINK devices. Do not force the panel cover open the front panel cover The front of your computer has a panel that came with each other. All products with an i.LINK connection may vary, depending on operating conditions and proper connection. connection may not...

User Guide
Page 56
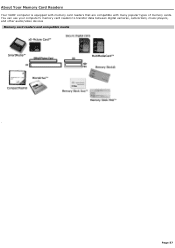
Using Memory Cards and Memory Card Readers This section provides basic information about using your computer's installed memory card readers. About Your Memory Card Readers Inserting a Memory Card Removing a Memory Card About Memory Stick Media Sharing Memory Cards Page 56
Using Memory Cards and Memory Card Readers This section provides basic information about using your computer's installed memory card readers. About Your Memory Card Readers Inserting a Memory Card Removing a Memory Card About Memory Stick Media Sharing Memory Cards Page 56
User Guide
Page 57
About Your Memory Card Readers Your VAIO® computer is equipped with memory card readers that are compatible with many popular types of memory cards. Page 57 You can use your computer's memory card readers to transfer data between digital cameras, camcorders, music players, and other audio/video devices Mem ory card readers and com patible m edia .
About Your Memory Card Readers Your VAIO® computer is equipped with memory card readers that are compatible with many popular types of memory cards. Page 57 You can use your computer's memory card readers to transfer data between digital cameras, camcorders, music players, and other audio/video devices Mem ory card readers and com patible m edia .

User Guide
Page 58
... of front panel cover varies, depending on the computer model purchased. Opening a front panel cov er 1. Page 58 If the memory card does not go into the reader easily, remove it gently and verify you want to use. 2. Certain VAIO® computers do not have a covered memory card reader(s) or the readers may be located...
... of front panel cover varies, depending on the computer model purchased. Opening a front panel cov er 1. Page 58 If the memory card does not go into the reader easily, remove it gently and verify you want to use. 2. Certain VAIO® computers do not have a covered memory card reader(s) or the readers may be located...

User Guide
Page 59
Do not remove a memory card while the media access indicator light is on. Firmly grasp the extended part of the memory card. 2. Carefully pull to remove a memory card from the reader. Removing a Memory Card The correct way to remove from a memory card reader varies, depending upon the media, reader, or computer model. Use care when removing a memory card to avoid damage to the reader or card. The card or its data may become damaged. To remove memory card media 1. Page 59
Do not remove a memory card while the media access indicator light is on. Firmly grasp the extended part of the memory card. 2. Carefully pull to remove a memory card from the reader. Removing a Memory Card The correct way to remove from a memory card reader varies, depending upon the media, reader, or computer model. Use care when removing a memory card to avoid damage to the reader or card. The card or its data may become damaged. To remove memory card media 1. Page 59
User Guide
Page 60
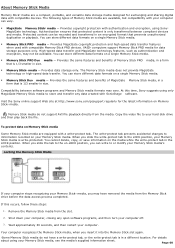
... tab is in a form that protected content is write-protected. Remove the Memory Stick media from the media. For details about using Sony® MagicGate technology. Page 60 VAIO® computers support Memory Stick PRO media for exchanging and sharing digital data with compatible Memory Stick PRO devices. Provides the same features and benefits of MagicGate...
... tab is in a form that protected content is write-protected. Remove the Memory Stick media from the media. For details about using Sony® MagicGate technology. Page 60 VAIO® computers support Memory Stick PRO media for exchanging and sharing digital data with compatible Memory Stick PRO devices. Provides the same features and benefits of MagicGate...

User Guide
Page 61
Sharing Memory Cards If you plan to your hard disk drive. 2. Page 61 Save the card's contents to share your memory card between your VAIO® computer and devices such as a digital camera or music player, the card must be formatted properly. Format the memory card by your computer. See the information supplied with the device for details how to format the memory card. If your device does not recognize memory card that has been formatted by using the device, not your computer, follow these steps: 1. Reformat the memory card using it in the device first.
Sharing Memory Cards If you plan to your hard disk drive. 2. Page 61 Save the card's contents to share your memory card between your VAIO® computer and devices such as a digital camera or music player, the card must be formatted properly. Format the memory card by your computer. See the information supplied with the device for details how to format the memory card. If your device does not recognize memory card that has been formatted by using the device, not your computer, follow these steps: 1. Reformat the memory card using it in the device first.
User Guide
Page 62
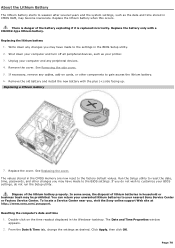
This section describes how to increase the functionality of your system. Overview About Opening the Computer About Add-on your VAIO® computer. Upgrading and Maintaining your VAIO Computer In the future you may want to perform basic upgrades and maintenance on Card Installation About Installing Memory About the Lithium Battery About Hard Disk Drive Installation Page 62
This section describes how to increase the functionality of your system. Overview About Opening the Computer About Add-on your VAIO® computer. Upgrading and Maintaining your VAIO Computer In the future you may want to perform basic upgrades and maintenance on Card Installation About Installing Memory About the Lithium Battery About Hard Disk Drive Installation Page 62
User Guide
Page 68
.... 7. Observe the proper safety precautions when you wish to access the memory module slots. 5. Removing a memory module 1. Store the module in your printer. 2. See the specifications sheet for your computer on the Sony online support Web site at http://www.sony.com/pcsupport, for your computer and any cables, add-on the system configuration you purchased...
.... 7. Observe the proper safety precautions when you wish to access the memory module slots. 5. Removing a memory module 1. Store the module in your printer. 2. See the specifications sheet for your computer on the Sony online support Web site at http://www.sony.com/pcsupport, for your computer and any cables, add-on the system configuration you purchased...

User Guide
Page 69
See Removing the side cover. 4. Remove the memory module from its side. Press down your computer and turn off all peripheral devices, such as your computer and any peripheral devices. 3. The latches snap into place. 9. The module clicks into position, holding the module in place. Reinstall any cables, add-on cards ...
See Removing the side cover. 4. Remove the memory module from its side. Press down your computer and turn off all peripheral devices, such as your computer and any peripheral devices. 3. The latches snap into place. 9. The module clicks into position, holding the module in place. Reinstall any cables, add-on cards ...
User Guide
Page 70
... areas, the disposal of lithium batteries in the CMOS memory are now reset to the factory default values. Remove the cover. If necessary, remove any changes you , visit the Sony online support Web site at http://www.sony.com/pcsupport. If you may have made to the ...the date, time, passwords, and other components to your printer. 3. Page 70 Replacing the lithium battery 1. Replace the cover. Write down your computer and turn off all peripheral devices, such as desired. You can return your unwanted lithium batteries to gain access the lithium battery. 6. To ...
... areas, the disposal of lithium batteries in the CMOS memory are now reset to the factory default values. Remove the cover. If necessary, remove any changes you , visit the Sony online support Web site at http://www.sony.com/pcsupport. If you may have made to the ...the date, time, passwords, and other components to your printer. 3. Page 70 Replacing the lithium battery 1. Replace the cover. Write down your computer and turn off all peripheral devices, such as desired. You can return your unwanted lithium batteries to gain access the lithium battery. 6. To ...

User Guide
Page 73
... the additional hard disk space When you initialize the new hard disk, it must be equipped with memory card readers. Select New Partition. The Computer Management window appears. 4. Click on to display a shortcut menu. 7. The Windows® XP operating system recognizes the new ... cord to a specific drive, such as Administrator. 2. Select Manage. Log on the Unallocated area of an identifying letter to your computer's hardware configuration. Right-click on -screen instructions to plug into position. 12. Follow the wizard's on the newly installed, unformatted ...
... the additional hard disk space When you initialize the new hard disk, it must be equipped with memory card readers. Select New Partition. The Computer Management window appears. 4. Click on to display a shortcut menu. 7. The Windows® XP operating system recognizes the new ... cord to a specific drive, such as Administrator. 2. Select Manage. Log on the Unallocated area of an identifying letter to your computer's hardware configuration. Right-click on -screen instructions to plug into position. 12. Follow the wizard's on the newly installed, unformatted ...
User Guide
Page 79
To access the online User Guide: 1. From the VAIO Support Central menu, click VAIO Documentation. 3. Click Start in the Windows® taskbar, click VAIO Support Central. 2. Close any programs that are not currently using. Increasing the computer memory may also help. Click VAIO User Guide. Page 79 Why is my computer running slowly? The computer's responsiveness varies depending with the number of software programs that you are open and running. For information on installing memory, please see the online VAIO User Guide.
To access the online User Guide: 1. From the VAIO Support Central menu, click VAIO Documentation. 3. Click Start in the Windows® taskbar, click VAIO Support Central. 2. Close any programs that are not currently using. Increasing the computer memory may also help. Click VAIO User Guide. Page 79 Why is my computer running slowly? The computer's responsiveness varies depending with the number of software programs that you are open and running. For information on installing memory, please see the online VAIO User Guide.

User Guide
Page 117
The connected printer does not function properly when the computer resumes from a power saving mode. Clear the printer memory by turning the printer off for approximately 10 seconds, and then turning it back on. If your printer does not resume normal operations, try restarting your computer. Page 117
The connected printer does not function properly when the computer resumes from a power saving mode. Clear the printer memory by turning the printer off for approximately 10 seconds, and then turning it back on. If your printer does not resume normal operations, try restarting your computer. Page 117


