Dimensions Diagram
Page 1
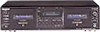
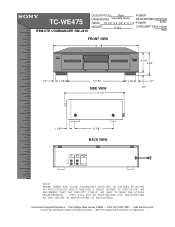
... and specifications subject to change without notice. • Non-metric weights and measurements are approximate. SONY WILL NOT BE RESPONSIBLE FOR INACCURACIES IN THE DESIGN OR MANUFACTURE OF ENCLOSURES . TC-WE475 REMOTE COMMANDER RM-J910 DESCRIPTION: Dual POWER DIMENSIONS Cassette Deck REQUIREMENTS1: 20VAC (WHD): 16 7/8" X 4 3/4" X 11 1/4" POWER 60Hz WEIGHT: 11 lbs CONSUMPTION:11 Watts (max) FRONT...
... and specifications subject to change without notice. • Non-metric weights and measurements are approximate. SONY WILL NOT BE RESPONSIBLE FOR INACCURACIES IN THE DESIGN OR MANUFACTURE OF ENCLOSURES . TC-WE475 REMOTE COMMANDER RM-J910 DESCRIPTION: Dual POWER DIMENSIONS Cassette Deck REQUIREMENTS1: 20VAC (WHD): 16 7/8" X 4 3/4" X 11 1/4" POWER 60Hz WEIGHT: 11 lbs CONSUMPTION:11 Watts (max) FRONT...

Operating Instructions (primary manual)
Page 1
4-232-596-12 (1) Stereo Cassette Deck Operating Instructions TC-WE675 TC-WE475 © 2001 Sony Corporation
4-232-596-12 (1) Stereo Cassette Deck Operating Instructions TC-WE675 TC-WE475 © 2001 Sony Corporation
Operating Instructions (primary manual)
Page 7
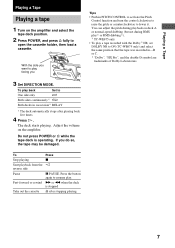
...POWER or A while the tape deck is stopped Take out the cassette A after playing back five times. 4 Press H. The deck starts playing. You can adjust the pitch during playback on deck A or normal-speed dubbing (but not during RMS play 2) or RMS dubbing 2)). 2) TC-WE675 only • To play ...back Set to open the cassette holder, then load a cassette. Playing a Tape Playing a Tape Playing a tape 1 Turn on the amplifier and select the tape deck position. 2 Press POWER, and press A fully to One side ...
...POWER or A while the tape deck is stopped Take out the cassette A after playing back five times. 4 Press H. The deck starts playing. You can adjust the pitch during playback on deck A or normal-speed dubbing (but not during RMS play 2) or RMS dubbing 2)). 2) TC-WE675 only • To play ...back Set to open the cassette holder, then load a cassette. Playing a Tape Playing a Tape Playing a tape 1 Turn on the amplifier and select the tape deck position. 2 Press POWER, and press A fully to One side ...
Operating Instructions (primary manual)
Page 8
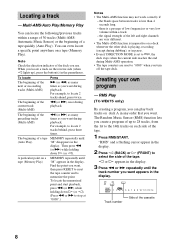
... any order that you can play back tracks on a deck whenever the other deck is playing, recording (except during Multi-AMS operation. • The tape counters are reset to "0000" when you want appears in the display. RMS Play (TC-WE675 only) By creating a program, you want , then press RESET ... 11 12 13 14 Track number Side of the preceding tracks (Multi-AMS) m (or M) as many times as you turn off the tape deck. The beginning of the cassette 8 To locate the memorized point and start playback, press m (or M) while holding down H (or h). (Press m or M to memorize the point. ...
... any order that you can play back tracks on a deck whenever the other deck is playing, recording (except during Multi-AMS operation. • The tape counters are reset to "0000" when you want appears in the display. RMS Play (TC-WE675 only) By creating a program, you want , then press RESET ... 11 12 13 14 Track number Side of the preceding tracks (Multi-AMS) m (or M) as many times as you turn off the tape deck. The beginning of the cassette 8 To locate the memorized point and start playback, press m (or M) while holding down H (or h). (Press m or M to memorize the point. ...
Operating Instructions (primary manual)
Page 10
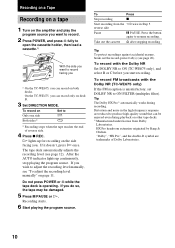
...2 Press POWER, and press A fully to open the cassette holder, then load a cassette. 1) With the side you want to resume recording. To record on both decks. Do not press POWER or A while the tape deck is unsatisfactory, set DOLBY NR to ON (TC-WE675 only), and select B or C before you ...response are trademarks of reverse side. 4 Press z REC. On the TC-WE475, you can be damaged. 5 Press X PAUSE or H. After the AUTO indicator lights up for recording on deck B. 3 Set DIRECTION MODE. The tape deck automatically adjusts the recording level (see page 20). HX Pro headroom ...
...2 Press POWER, and press A fully to open the cassette holder, then load a cassette. 1) With the side you want to resume recording. To record on both decks. Do not press POWER or A while the tape deck is unsatisfactory, set DOLBY NR to ON (TC-WE675 only), and select B or C before you ...response are trademarks of reverse side. 4 Press z REC. On the TC-WE475, you can be damaged. 5 Press X PAUSE or H. After the AUTO indicator lights up for recording on deck B. 3 Set DIRECTION MODE. The tape deck automatically adjusts the recording level (see page 20). HX Pro headroom ...
Operating Instructions (primary manual)
Page 11
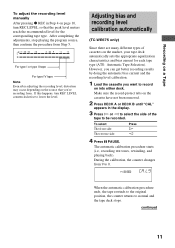
...the tape rewinds to the original position, the counter returns to be recorded. Make sure the record-protect tabs on the cassette have not been removed. 2 Press DECK A or DECK B until "CAL" appears in Step 4 on page 10, turn REC LEVEL counterclockwise to lower the level. After ... Tape To adjust the recording level manually After pressing z REC in the display. 3 Press H or h to select the side of cassettes on into either deck. Adjusting bias and recording level calibration automatically (TC-WE675 only) Since there are many different types of the tape to normal and the tape...
...the tape rewinds to the original position, the counter returns to be recorded. Make sure the record-protect tabs on the cassette have not been removed. 2 Press DECK A or DECK B until "CAL" appears in Step 4 on page 10, turn REC LEVEL counterclockwise to lower the level. After ... Tape To adjust the recording level manually After pressing z REC in the display. 3 Press H or h to select the side of cassettes on into either deck. Adjusting bias and recording level calibration automatically (TC-WE675 only) Since there are many different types of the tape to normal and the tape...
Operating Instructions (primary manual)
Page 12
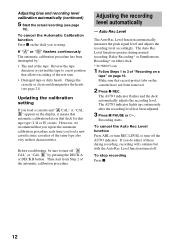
... in that deck for that record-protect tabs on the deck you do either of "Recording on a tape" on either deck. * TC-WE675 only 1 Follow Steps 1 to a new position that you repeat the automatic calibration procedure each time you load a new cassette since cassettes of the tape.... Recording starts. Adjusting bias and recording level calibration automatically (continued) 5 Start the actual recording (see page 21). Change the cassette or clean and demagnetize the heads (see page 10). Auto Rec Level The Auto Rec Level function automatically measures the peak signal level...
... in that deck for that record-protect tabs on the deck you do either of "Recording on a tape" on either deck. * TC-WE675 only 1 Follow Steps 1 to a new position that you repeat the automatic calibration procedure each time you load a new cassette since cassettes of the tape.... Recording starts. Adjusting bias and recording level calibration automatically (continued) 5 Start the actual recording (see page 21). Change the cassette or clean and demagnetize the heads (see page 10). Auto Rec Level The Auto Rec Level function automatically measures the peak signal level...
Operating Instructions (primary manual)
Page 14
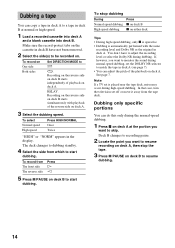
...monitor the sound during dubbing. If, however, you want to dubbing standby. 4 Select the side from the tape deck. Recording on the reverse side on the cassette in deck B at the portion you want to start dubbing. In that case, turn the television set is automatically performed ... the dubbing speed. To record from Press The front side H The reverse side h 5 Press X PAUSE on deck A at normal or high speed. 1 Load a recorded cassette into deck A and a blank cassette into deck B. See page 7. Note If a TV set off or move it away from which to skip. RELAY. Dubbing ...
...monitor the sound during dubbing. If, however, you want to dubbing standby. 4 Select the side from the tape deck. Recording on the reverse side on the cassette in deck B at the portion you want to start dubbing. In that case, turn the television set is automatically performed ... the dubbing speed. To record from Press The front side H The reverse side h 5 Press X PAUSE on deck A at normal or high speed. 1 Load a recorded cassette into deck A and a blank cassette into deck B. See page 7. Note If a TV set off or move it away from which to skip. RELAY. Dubbing ...
Operating Instructions (primary manual)
Page 15
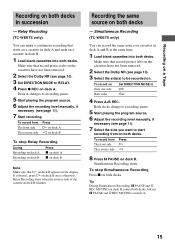
... starts. To record from on . To record on both decks. To stop Relay Recording During Recording on deck A Recording on deck B Press x on deck A x on deck B Note Make sure that starts on a cassette in deck A and ends on both decks in succession - If it doesn't, press H on both decks. Simultaneous Recording (TC-WE675 only) You can make a continuous recording that...
... starts. To record from on . To record on both decks. To stop Relay Recording During Recording on deck A Recording on deck B Press x on deck A x on deck B Note Make sure that starts on a cassette in deck A and ends on both decks in succession - If it doesn't, press H on both decks. Simultaneous Recording (TC-WE675 only) You can make a continuous recording that...
Operating Instructions (primary manual)
Page 16
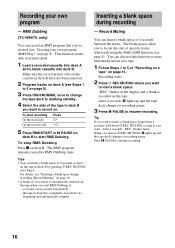
... of 10 seconds is completely rewound to resume recording. Tips • You can record an RMS program that you load a new cassette into deck B. the tape in the display and a blank is recorded on the tape. The blank spaces allow you want to locate the ... W REC MUTING where you start RMS Dubbing if: - RMS Dubbing (TC-WE675 only) You can insert a blank space of "Recording on a tape" on page 10. This function works only at normal speed. 1 Load a recorded cassette into deck A and a blank cassette into deck B. - The RMS program remains even after Step 4. you 've created...
... of 10 seconds is completely rewound to resume recording. Tips • You can record an RMS program that you load a new cassette into deck B. the tape in the display and a blank is recorded on the tape. The blank spaces allow you want to locate the ... W REC MUTING where you start RMS Dubbing if: - RMS Dubbing (TC-WE675 only) You can insert a blank space of "Recording on a tape" on page 10. This function works only at normal speed. 1 Load a recorded cassette into deck A and a blank cassette into deck B. - The RMS program remains even after Step 4. you 've created...
Operating Instructions (primary manual)
Page 17
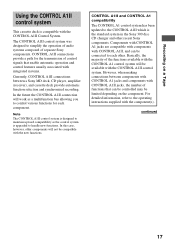
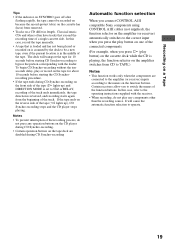
...controlled may be limited depending on a Tape Using the CONTROL A1II control system This cassette deck is upgraded to control various functions for each other recent Sony components. CONTROL A1II and CONTROL A1 compatibility The CONTROL A1 control system has been ...component(s). continued 17 For detailed information, refer to each component. However, when making connections between a Sony MD deck, CD player, amplifier (receiver), and cassette deck provide automatic function selection and synchronized recording. Note The CONTROL A1II control system is the standard system ...
...controlled may be limited depending on a Tape Using the CONTROL A1II control system This cassette deck is upgraded to control various functions for each other recent Sony components. CONTROL A1II and CONTROL A1 compatibility The CONTROL A1 control system has been ...component(s). continued 17 For detailed information, refer to each component. However, when making connections between a Sony MD deck, CD player, amplifier (receiver), and cassette deck provide automatic function selection and synchronized recording. Note The CONTROL A1II control system is the standard system ...
Operating Instructions (primary manual)
Page 18
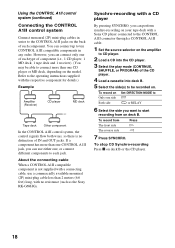
...to the CONTROL A1II connector through a CONTROL A1II cable. 1 Set the source selector on deck B. Synchro-recording with a Sony CD player connected to the CONTROL A1II jacks on the back of the CD player. 4 Load a cassette into the CD player. 3 Select the play mode (CONTINUE, SHUFFLE, or PROGRAM) ...of each component. About the connecting cable When a CONTROL A1II compatible component is no resistance (such as the Sony RK-G69HG). To record from on the amplifier to CD player. 2 Load a CD into deck B. 5 Select the side(s) to be able to connect more than one CD player or MD...
...to the CONTROL A1II connector through a CONTROL A1II cable. 1 Set the source selector on deck B. Synchro-recording with a Sony CD player connected to the CONTROL A1II jacks on the back of the CD player. 4 Load a cassette into the CD player. 3 Select the play mode (CONTINUE, SHUFFLE, or PROGRAM) ...of each component. About the connecting cable When a CONTROL A1II compatible component is no resistance (such as the Sony RK-G69HG). To record from on the amplifier to CD player. 2 Load a CD into deck B. 5 Select the side(s) to be able to connect more than one CD player or MD...
Operating Instructions (primary manual)
Page 19
...the CD Synchrorecording procedure. • If the tape ends during CD Synchro-recording Automatic function selection When you connect CONTROL A1II compatible Sony components using CONTROL A1II cables (not supplied), the function selector on the amplifier (or receiver) automatically switches to the correct input ...• Tracks on a CD differ in the middle of the function buttons. Certain receivers allow you press H (play button) on the cassette deck while the CD is playing, the function selector on the amplifier switches from CD to TAPE.) Notes • This function works only when the...
...the CD Synchrorecording procedure. • If the tape ends during CD Synchro-recording Automatic function selection When you connect CONTROL A1II compatible Sony components using CONTROL A1II cables (not supplied), the function selector on the amplifier (or receiver) automatically switches to the correct input ...• Tracks on a CD differ in the middle of the function buttons. Certain receivers allow you press H (play button) on the cassette deck while the CD is playing, the function selector on the amplifier switches from CD to TAPE.) Notes • This function works only when the...
Operating Instructions (primary manual)
Page 20
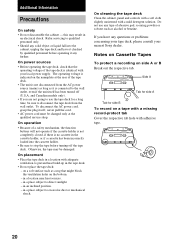
... your nearest Sony dealer. On placement • Place the tape deck in the tape deck. • Do not place the tape deck: - in an inclined position. - If you are not going to disconnect the tape deck from the AC power source (mains) as long as it is no cassette in a... mild detergent solution. in a location near heat sources. - in the cassette holder, or if a cassette has been incorrectly loaded into the cabinet, unplug the tape deck and have any questions or problems concerning your tape deck, please consult your local power supply. On power sources • Before ...
... your nearest Sony dealer. On placement • Place the tape deck in the tape deck. • Do not place the tape deck: - in an inclined position. - If you are not going to disconnect the tape deck from the AC power source (mains) as long as it is no cassette in a... mild detergent solution. in a location near heat sources. - in the cassette holder, or if a cassette has been incorrectly loaded into the cabinet, unplug the tape deck and have any questions or problems concerning your tape deck, please consult your local power supply. On power sources • Before ...
Operating Instructions (primary manual)
Page 21
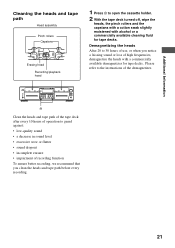
...refer to the instructions of high frequencies, demagnetize the heads with alcohol or a commercially available cleaning fluid for tape decks. A Clean the heads and tape path of the tape deck after every 10 hours of operation to guard against: • low-quality sound • a decrease in sound... Cleaning the heads and tape path Head assembly Pinch rollers Capstans Erasing head Recording/playback head 1 Press A to open the cassette holder. 2 With the tape deck turned off, wipe the heads, the pinch rollers and the capstans with a cotton swab slightly moistened with a commercially available ...
...refer to the instructions of high frequencies, demagnetize the heads with alcohol or a commercially available cleaning fluid for tape decks. A Clean the heads and tape path of the tape deck after every 10 hours of operation to guard against: • low-quality sound • a decrease in sound... Cleaning the heads and tape path Head assembly Pinch rollers Capstans Erasing head Recording/playback head 1 Press A to open the cassette holder. 2 With the tape deck turned off, wipe the heads, the pinch rollers and the capstans with a cotton swab slightly moistened with a commercially available ...
Operating Instructions (primary manual)
Page 22
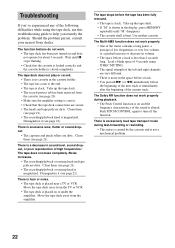
... tape slack. • The record-protect tab has been removed from the amplifier. There is hum or noise. • The tape deck is noise in the cassette holder. • The tape has come to turn off the function. There is a decrease in the display, press MEMORY repeatedly until ...X stops flashing. • Check that the tape deck connections are secure. • The heads and tape path are very different. • There is placed near a TV or VCR. Should the problem persist, consult your nearest Sony dealer.
... tape slack. • The record-protect tab has been removed from the amplifier. There is hum or noise. • The tape deck is noise in the cassette holder. • The tape has come to turn off the function. There is a decrease in the display, press MEMORY repeatedly until ...X stops flashing. • Check that the tape deck connections are secure. • The heads and tape path are very different. • There is placed near a TV or VCR. Should the problem persist, consult your nearest Sony dealer.


