
Limited Warranty (US Only)
Page 1
... this Product (including any part of the Product, including the antenna. For your authorized dealer, call : Sony Customer Information Services Center 1-800-222-7669 or visit the Sony Web Site: www.sony.com For an accessory or part not available from state to you . 4-557-172-02 General Stereo/Hifi Components/Tape Decks ® CD Players/Mini Disc Players/Audio Systems Hifi Audio LIMITED WARRANTY Sony Electronics Inc. ("Sony") warrants this Product...
... this Product (including any part of the Product, including the antenna. For your authorized dealer, call : Sony Customer Information Services Center 1-800-222-7669 or visit the Sony Web Site: www.sony.com For an accessory or part not available from state to you . 4-557-172-02 General Stereo/Hifi Components/Tape Decks ® CD Players/Mini Disc Players/Audio Systems Hifi Audio LIMITED WARRANTY Sony Electronics Inc. ("Sony") warrants this Product...
Marketing Specifications
Page 2
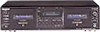
... Output(s): 1 (Front) Control A-1 II Interface: 1 (Rear) Power Power Requirements: AC 120V, 60 Hz Power Consumption (in Operation): 18W Dimensions Weight: 7 lbs 4 oz (3.3kg) Measurements: 17" x 4 3/4" x 11 1/2" (430 x 120 x 305 mm) Supplied Accessories Instruction Manual UPC Code: 027242584419 ©2004 Sony Electronics Inc. All other trademarks are property of Sony. Nonmetric weights and measures are subject to change without notice. Features and specifications are approximate. TC-WE475 Sony...
... Output(s): 1 (Front) Control A-1 II Interface: 1 (Rear) Power Power Requirements: AC 120V, 60 Hz Power Consumption (in Operation): 18W Dimensions Weight: 7 lbs 4 oz (3.3kg) Measurements: 17" x 4 3/4" x 11 1/2" (430 x 120 x 305 mm) Supplied Accessories Instruction Manual UPC Code: 027242584419 ©2004 Sony Electronics Inc. All other trademarks are property of Sony. Nonmetric weights and measures are subject to change without notice. Features and specifications are approximate. TC-WE475 Sony...

Operating Instructions (primary manual)
Page 2
... THE U.S.A. This symbol is connected. - Owner's Record The model and serial numbers are designed to operate this equipment does cause harmful interference to radio or television reception, which the receiver is intended to alert the user to the presence of important operating and maintenance (servicing) instructions in a residential installation. Model No Serial No INFORMATION This equipment has been tested and found to comply with...
... THE U.S.A. This symbol is connected. - Owner's Record The model and serial numbers are designed to operate this equipment does cause harmful interference to radio or television reception, which the receiver is intended to alert the user to the presence of important operating and maintenance (servicing) instructions in a residential installation. Model No Serial No INFORMATION This equipment has been tested and found to comply with...
Operating Instructions (primary manual)
Page 4
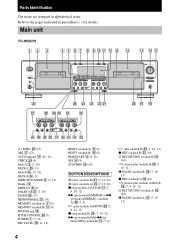
... qj (12) AUTO indicator qg (10, 12) CHECK wf (9) Deck A 3 (7, 20) DECK A wd (11) Deck B qf (10, 20) DECK B 9 (11) DIRECTION MODE 2 (7, 10) Display qs DISPLAY 8 (9) DOLBY NR ej (7, 10) FADER w; (13) HIGH/NORMAL qd (14) MEMORY (on deck A) 7 (8) MEMORY (on deck B) qa (8) PHONES jack qk PITCH CONTROL wh (7) POWER 1 (7, 10) REC LEVEL qh (11, 12) RESET (on deck A) 6 (8) RESET (on deck B) q; (8) RMS/START 4 (8, 16) SET 5 (9) SYNCHRO ql (18) BUTTON DESCRIPTIONS A (eject...
... qj (12) AUTO indicator qg (10, 12) CHECK wf (9) Deck A 3 (7, 20) DECK A wd (11) Deck B qf (10, 20) DECK B 9 (11) DIRECTION MODE 2 (7, 10) Display qs DISPLAY 8 (9) DOLBY NR ej (7, 10) FADER w; (13) HIGH/NORMAL qd (14) MEMORY (on deck A) 7 (8) MEMORY (on deck B) qa (8) PHONES jack qk PITCH CONTROL wh (7) POWER 1 (7, 10) REC LEVEL qh (11, 12) RESET (on deck A) 6 (8) RESET (on deck B) q; (8) RMS/START 4 (8, 16) SET 5 (9) SYNCHRO ql (18) BUTTON DESCRIPTIONS A (eject...
Operating Instructions (primary manual)
Page 5
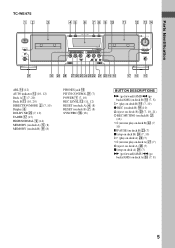
... ARL qf (12) AUTO indicator qs (10, 12) Deck A 3 (7, 20) Deck B qa (10, 20) DIRECTION MODE 2 (7, 10) Display 6 DOLBY NR wg (7, 10) FADER qj (13) HIGH/NORMAL 9 (14) MEMORY (on deck A) 5 (8) MEMORY (on deck B) 8 (8) PHONES jack qg PITCH CONTROL ea (7) POWER 1 (7, 10) REC LEVEL qd (11, 12) RESET (on deck A) 4 (8) RESET (on deck B) 7 (8) SYNCHRO qh (18) BUTTON DESCRIPTIONS M (go forward)/AMS/m (go back)/AMS (on deck B) q; (7, 8) H (play on deck B) qk (7, 10...
... ARL qf (12) AUTO indicator qs (10, 12) Deck A 3 (7, 20) Deck B qa (10, 20) DIRECTION MODE 2 (7, 10) Display 6 DOLBY NR wg (7, 10) FADER qj (13) HIGH/NORMAL 9 (14) MEMORY (on deck A) 5 (8) MEMORY (on deck B) 8 (8) PHONES jack qg PITCH CONTROL ea (7) POWER 1 (7, 10) REC LEVEL qd (11, 12) RESET (on deck A) 4 (8) RESET (on deck B) 7 (8) SYNCHRO qh (18) BUTTON DESCRIPTIONS M (go forward)/AMS/m (go back)/AMS (on deck B) q; (7, 8) H (play on deck B) qk (7, 10...
Operating Instructions (primary manual)
Page 7
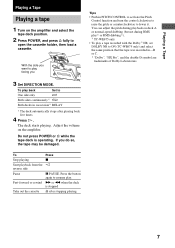
... the cassette A after playing back five times. 4 Press H. Press the button again to resume play a tape recorded with the Dolby 3) NR, set DOLBY NR to ON (TC-WE675 only) and select the same position that the tape was recorded in PITCH CONTROL to activate the Pitch Control function and turn the control clockwise to raise the pitch or counterclockwise to lower it. Playing a Tape Playing a Tape Playing a tape 1 Turn on the amplifier. The deck starts playing. Adjust the volume...
... the cassette A after playing back five times. 4 Press H. Press the button again to resume play a tape recorded with the Dolby 3) NR, set DOLBY NR to ON (TC-WE675 only) and select the same position that the tape was recorded in PITCH CONTROL to activate the Pitch Control function and turn the control clockwise to raise the pitch or counterclockwise to lower it. Playing a Tape Playing a Tape Playing a tape 1 Turn on the amplifier. The deck starts playing. Adjust the volume...
Operating Instructions (primary manual)
Page 8
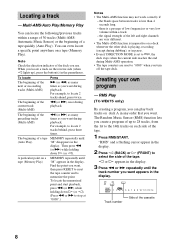
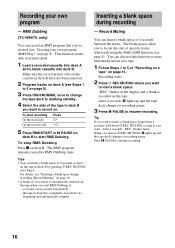
... DIRECTION MODE is set to s, the deck stops when the current side reaches the end during playback. The beginning of the cassette 8 The beginning of a tape (Auto Play) MEMORY repeatedly until the track number you want appears in the display. there is less than 4 seconds long. - For example, to memorize the point. Creating your own program - RMS Play (TC-WE675 only) By creating a program...
... DIRECTION MODE is set to s, the deck stops when the current side reaches the end during playback. The beginning of the cassette 8 The beginning of a tape (Auto Play) MEMORY repeatedly until the track number you want appears in the display. there is less than 4 seconds long. - For example, to memorize the point. Creating your own program - RMS Play (TC-WE675 only) By creating a program...
Operating Instructions (primary manual)
Page 10
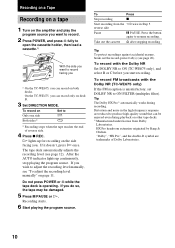
... level manually, see "To adjust the recording level manually" on deck B. 3 Set DIRECTION MODE. HX Pro headroom extension originated by Bang & Olufsen. "Dolby", "HX Pro", and the double-D symbol are reduced to produce high-quality sound that can record on both decks. Recording on a Tape Recording on a tape 1 Turn on the amplifier and play the program source you want to record. 2 Press POWER, and press A fully to open the cassette holder, then load a cassette...
... level manually, see "To adjust the recording level manually" on deck B. 3 Set DIRECTION MODE. HX Pro headroom extension originated by Bang & Olufsen. "Dolby", "HX Pro", and the double-D symbol are reduced to produce high-quality sound that can record on both decks. Recording on a Tape Recording on a tape 1 Turn on the amplifier and play the program source you want to record. 2 Press POWER, and press A fully to open the cassette holder, then load a cassette...
Operating Instructions (primary manual)
Page 11
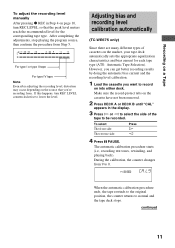
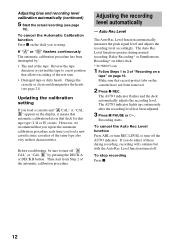
If this happens, turn REC LEVEL so that you want to normal and the tape deck stops. During the calibration, the counter changes from Step 5. CAL B REC CA. The automatic calibration procedure starts (i.e., recording test tones, rewinding, and playing back). Adjusting bias and recording level calibration automatically (TC-WE675 only) Since there are many different types of the tape to be recorded. However...
If this happens, turn REC LEVEL so that you want to normal and the tape deck stops. During the calibration, the counter changes from Step 5. CAL B REC CA. The automatic calibration procedure starts (i.e., recording test tones, rewinding, and playing back). Adjusting bias and recording level calibration automatically (TC-WE675 only) Since there are many different types of the tape to be recorded. However...
Operating Instructions (primary manual)
Page 12
... deck for that record-protect tabs on the deck you're using. Make sure that tape type (I, II or IV) exists. However, we recommend that automatic calibration data in their characteristics. The Auto Rec Level function operates during recording, recording will continue but with the Auto Rec Level function turned off. Updating the calibration setting If you load a cassette and "A CAL" or "CAL B" appears in the display...
... deck for that record-protect tabs on the deck you're using. Make sure that tape type (I, II or IV) exists. However, we recommend that automatic calibration data in their characteristics. The Auto Rec Level function operates during recording, recording will continue but with the Auto Rec Level function turned off. Updating the calibration setting If you load a cassette and "A CAL" or "CAL B" appears in the display...

Operating Instructions (primary manual)
Page 13
... completed, "REC" flashes in and out - The recording level does not decrease for some time. Fading in the display and the deck pauses. The program source level is not working. Turn REC LEVEL - During a quiet passage in a program source such as classical music, the recording level may not work properly when you don't want the track to be adjusted properly due to start . The Auto Rec Level function may not...
... completed, "REC" flashes in and out - The recording level does not decrease for some time. Fading in the display and the deck pauses. The program source level is not working. Turn REC LEVEL - During a quiet passage in a program source such as classical music, the recording level may not work properly when you don't want the track to be adjusted properly due to start . The Auto Rec Level function may not...
Operating Instructions (primary manual)
Page 14
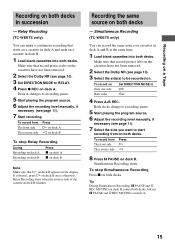
... the record-protect tabs on the cassette in the display. To record on deck A. Recording on the reverse side on deck B starts independently of playback on One side Both sides Set DIRECTION MODE to g s. To select Press HIGH/NORMAL Normal speed Once High speed Twice "HIGH" or "NORM" appears in deck B have to adjust the recording level or select the Dolby NR during the...
... the record-protect tabs on the cassette in the display. To record on deck A. Recording on the reverse side on deck B starts independently of playback on One side Both sides Set DIRECTION MODE to g s. To select Press HIGH/NORMAL Normal speed Once High speed Twice "HIGH" or "NORM" appears in deck B have to adjust the recording level or select the Dolby NR during the...
Operating Instructions (primary manual)
Page 15
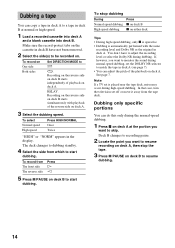
Simultaneous Recording (TC-WE675 only) You can make a continuous recording that record-protect tabs on the cassettes have not been removed. 2 Select the Dolby NR (see page 10). 3 Set DIRECTION MODE to recording pause. 5 Start playing the program source. 6 Adjust the recording level manually, if necessary (see page 10). 3 Select the side(s) to g s 4 Press A+B REC. Both decks change to recording pause. 5 Start playing the program source. 6 Adjust the recording level manually, if necessary (see...
Simultaneous Recording (TC-WE675 only) You can make a continuous recording that record-protect tabs on the cassettes have not been removed. 2 Select the Dolby NR (see page 10). 3 Set DIRECTION MODE to recording pause. 5 Start playing the program source. 6 Adjust the recording level manually, if necessary (see page 10). 3 Select the side(s) to g s 4 Press A+B REC. Both decks change to recording pause. 5 Start playing the program source. 6 Adjust the recording level manually, if necessary (see...
Operating Instructions (primary manual)
Page 16
... specific tracks afterwards using the Multi-AMS function (see "Inserting a blank space during recording - After 4 seconds, "REC" flashes faster. The RMS program remains even after Step 4. the tape in the display and a blank is recorded on the tape in deck B you want to 5 on . The blank spaces allow you load a new cassette into deck B. Recording your own program (RMS Play)" on page 10. "REC" flashes...
... specific tracks afterwards using the Multi-AMS function (see "Inserting a blank space during recording - After 4 seconds, "REC" flashes faster. The RMS program remains even after Step 4. the tape in the display and a blank is recorded on the tape in deck B you want to 5 on . The blank spaces allow you load a new cassette into deck B. Recording your own program (RMS Play)" on page 10. "REC" flashes...
Operating Instructions (primary manual)
Page 17
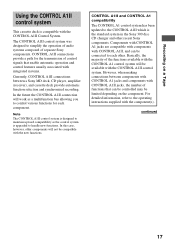
... the CONTROL A1II control system. Components with CONTROL A1 jacks are compatible with components with integrated systems. Currently, CONTROL A1II connections between components with CONTROL A1 jacks and components with CONTROL A1II jacks, the number of control signals that can be limited depending on a Tape Using the CONTROL A1II control system This cassette deck is the standard system in the Sony 300 disc CD changer and other . For detailed information, refer to simplify the operation of audio...
... the CONTROL A1II control system. Components with CONTROL A1 jacks are compatible with components with integrated systems. Currently, CONTROL A1II connections between components with CONTROL A1 jacks and components with CONTROL A1II jacks, the number of control signals that can be limited depending on a Tape Using the CONTROL A1II control system This cassette deck is the standard system in the Sony 300 disc CD changer and other . For detailed information, refer to simplify the operation of audio...
Operating Instructions (primary manual)
Page 18
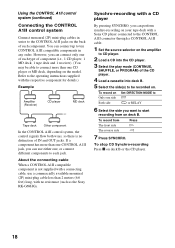
... player. 3 Select the play mode (CONTINUE, SHUFFLE, or PROGRAM) of each type of IN and OUT jacks. Synchro-recording with no distinction of component (i.e., 1 CD player, 1 MD deck, 1 tape deck and 1 receiver). (You may be recorded on the model. If a component has more than one CONTROL A1II jack, you can perform synchro-recording on your tape deck with a connecting cable, use either one CD player or MD deck, depending on . Refer to the operating instructions...
... player. 3 Select the play mode (CONTINUE, SHUFFLE, or PROGRAM) of each type of IN and OUT jacks. Synchro-recording with no distinction of component (i.e., 1 CD player, 1 MD deck, 1 tape deck and 1 receiver). (You may be recorded on the model. If a component has more than one CONTROL A1II jack, you can perform synchro-recording on your tape deck with a connecting cable, use either one CD player or MD deck, depending on . Refer to the operating instructions...
Operating Instructions (primary manual)
Page 19
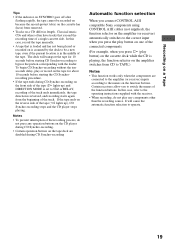
... tenseconds delay, play button) on the cassette deck while the CD is in length. Notes • To prevent interruption of the recording process, do not play any operation buttons on the CD player during CD Synchro-recording Automatic function selection When you connect CONTROL A1II compatible Sony components using CONTROL A1II cables (not supplied), the function selector on the amplifier (or receiver) automatically switches to the correct input when you press the play button on...
... tenseconds delay, play button) on the cassette deck while the CD is in length. Notes • To prevent interruption of the recording process, do not play any operation buttons on the CD player during CD Synchro-recording Automatic function selection When you connect CONTROL A1II compatible Sony components using CONTROL A1II cables (not supplied), the function selector on the amplifier (or receiver) automatically switches to the correct input when you press the play button on...
Operating Instructions (primary manual)
Page 20
... use the tape deck for side B To record on the bottom. - this may be changed only at the rear of a safety mechanism, the function buttons will not operate if the cassette holder is not completely closed, if there is identical with a mild detergent solution. never pull the cord. • AC power cord must be damaged. On cleaning the tape deck Clean the cabinet, panel and controls...
... use the tape deck for side B To record on the bottom. - this may be changed only at the rear of a safety mechanism, the function buttons will not operate if the cassette holder is not completely closed, if there is identical with a mild detergent solution. never pull the cord. • AC power cord must be damaged. On cleaning the tape deck Clean the cabinet, panel and controls...
Operating Instructions (primary manual)
Page 22
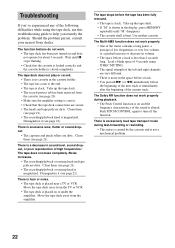
.... • The record-protect tab has been removed from the amplifier. There is less than 4 seconds long. Demagnetize it (see page 21). Clean them (see page 21). Use another cassette. Take up the tape slack. • If "M" is shown in sound level, sound dropout, or poor reproduction of 4 seconds using the tape deck, use this troubleshooting guide to turn off the function. There is excessively loud...
.... • The record-protect tab has been removed from the amplifier. There is less than 4 seconds long. Demagnetize it (see page 21). Clean them (see page 21). Use another cassette. Take up the tape slack. • If "M" is shown in sound level, sound dropout, or poor reproduction of 4 seconds using the tape deck, use this troubleshooting guide to turn off the function. There is excessively loud...
Operating Instructions (primary manual)
Page 23
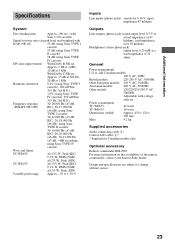
RMS (NAB) ±0.2% W. Additional Information Specifications System Fast-winding time Approx. 100 sec. (with Sony C-60 cassette) Signal-to-noise ratio (at peak level and weighted with voltage selector Power consumption TC-WE675: 22 watts TC-WE475: 18 watts Dimensions (w/h/d) Approx. 430 × 120 × 300 mm Mass 4.2 kg Supplied accessories Audio connecting cords (2) Control A1II cable (1)* * Supplied for Canadian models only Optional accessory Remote commander RM-J910 For more...
RMS (NAB) ±0.2% W. Additional Information Specifications System Fast-winding time Approx. 100 sec. (with Sony C-60 cassette) Signal-to-noise ratio (at peak level and weighted with voltage selector Power consumption TC-WE675: 22 watts TC-WE475: 18 watts Dimensions (w/h/d) Approx. 430 × 120 × 300 mm Mass 4.2 kg Supplied accessories Audio connecting cords (2) Control A1II cable (1)* * Supplied for Canadian models only Optional accessory Remote commander RM-J910 For more...


