
Operating Instructions
Page 3
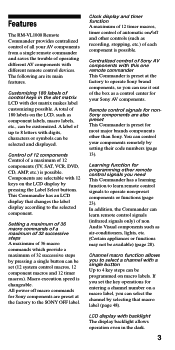
... of operating different AV components with dot matrix makes label customizing possible. Channel macro function allows you can learn remote control signals to 4 key steps can be programmed on the LCD, such as component labels, macro labels, etc., can be available) (page 28). Features The RM-VL1000 Remote Commander provides centralized control of all your AV components from a single remote commander and saves the trouble of the box as a control center for your components remotely by setting their code numbers...
... of operating different AV components with dot matrix makes label customizing possible. Channel macro function allows you can learn remote control signals to 4 key steps can be programmed on the LCD, such as component labels, macro labels, etc., can be available) (page 28). Features The RM-VL1000 Remote Commander provides centralized control of all your AV components from a single remote commander and saves the trouble of the box as a control center for your components remotely by setting their code numbers...
Operating Instructions
Page 4
... Controls 6 Installing the Batteries 7 When to replace the batteries 7 Setting the Clock 8 Setting the clock for the first time after installing batteries 8 Adjusting the clock after setting the clock 11 Basic Operations Setting the Code for Preset Audio and Visual Components 13 Setting a component code 13 Checking if the code number works 16 Finding a component code with the Search function 17 To clear the contents programmed for a specific component label .......... 19 Operating Your Components with a Single Label - Learning Function ....... 23 Notes on System Control Operations...
... Controls 6 Installing the Batteries 7 When to replace the batteries 7 Setting the Clock 8 Setting the clock for the first time after installing batteries 8 Adjusting the clock after setting the clock 11 Basic Operations Setting the Code for Preset Audio and Visual Components 13 Setting a component code 13 Checking if the code number works 16 Finding a component code with the Search function 17 To clear the contents programmed for a specific component label .......... 19 Operating Your Components with a Single Label - Learning Function ....... 23 Notes on System Control Operations...
Operating Instructions
Page 5
... the Display Window 63 Setting the Key-Touch Beep 64 Adjusting the Contrast of the Display Window 65 Changing the Names of the Labels on the Display 65 Erasing All the Settings 68 Additional Information Precautions 70 Maintenance 70 Specifications 70 Troubleshooting 71 Appendix Table of Preset Functions 74 TV ...74 SAT (Digital satellite 75 Digital cable box 76 DVD ...77 VCR1, VCR2 ...78 DVR (Digital video recorder 79 CD ...80 CABLE (Cable box...
... the Display Window 63 Setting the Key-Touch Beep 64 Adjusting the Contrast of the Display Window 65 Changing the Names of the Labels on the Display 65 Erasing All the Settings 68 Additional Information Precautions 70 Maintenance 70 Specifications 70 Troubleshooting 71 Appendix Table of Preset Functions 74 TV ...74 SAT (Digital satellite 75 Digital cable box 76 DVD ...77 VCR1, VCR2 ...78 DVR (Digital video recorder 79 CD ...80 CABLE (Cable box...
Operating Instructions
Page 6
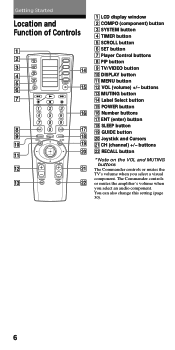
... an audio component. You can also change this setting (page 30). 6 The Commander controls or mutes the amplifier's volume when you select a visual component. Joystick and Cursors wa CH (channel) +/- Getting Started Location and Function of Controls COMPO SYSTEM TIMER SCROLL SET POWER REC VIDEO1 VIDEO2 AUX TUNER CD TAPE MD TV PHONO DVD MENU GUIDE VOL CH MUTING RECALL 1 LCD display window 2 COMPO (component) button 3 SYSTEM button 4 TIMER button 5 SCROLL button 6 SET button 7 Player Control buttons 8 PIP button 9 TV/VIDEO button 0 DISPLAY button qa MENU button qs...
... an audio component. You can also change this setting (page 30). 6 The Commander controls or mutes the amplifier's volume when you select a visual component. Joystick and Cursors wa CH (channel) +/- Getting Started Location and Function of Controls COMPO SYSTEM TIMER SCROLL SET POWER REC VIDEO1 VIDEO2 AUX TUNER CD TAPE MD TV PHONO DVD MENU GUIDE VOL CH MUTING RECALL 1 LCD display window 2 COMPO (component) button 3 SYSTEM button 4 TIMER button 5 SCROLL button 6 SET button 7 Player Control buttons 8 PIP button 9 TV/VIDEO button 0 DISPLAY button qa MENU button qs...
Operating Instructions
Page 8
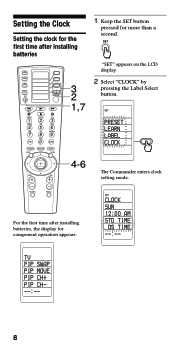
... STD TIME DS TIME --:-- MUTING RECALL For the first time after installing batteries COMPO SYSTEM TIMER SCROLL SET POWER REC VIDEO1 VIDEO2 AUX TUNER CD TAPE MD TV PHONO DVD 3 2 1,7 1 Keep the SET button pressed for component operation appears. SET PRESET LEARN LABEL CLOCK MENU GUIDE VOL CH 4-6 The Commander enters clock setting mode. "SET" appears on the LCD display. 2 Select "CLOCK" by pressing the Label Select button. Setting the Clock Setting the clock for the first time after installing batteries, the display for...
... STD TIME DS TIME --:-- MUTING RECALL For the first time after installing batteries COMPO SYSTEM TIMER SCROLL SET POWER REC VIDEO1 VIDEO2 AUX TUNER CD TAPE MD TV PHONO DVD 3 2 1,7 1 Keep the SET button pressed for component operation appears. SET PRESET LEARN LABEL CLOCK MENU GUIDE VOL CH 4-6 The Commander enters clock setting mode. "SET" appears on the LCD display. 2 Select "CLOCK" by pressing the Label Select button. Setting the Clock Setting the clock for the first time after installing batteries, the display for...
Operating Instructions
Page 13
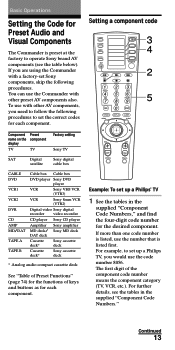
... display TV Preset component TV Factory setting Sony TV SAT Digital Sony digital satellite cable box CABLE DVD VCR1 VCR2 DVR CD AMP MD/DAT TAPE A TAPE B Cable box Cable box DVD player Sony DVD player VCR Sony VHS VCR (VTR3) VCR Sony 8mm VCR (VTR2) Digital video Sony digital recorder video recorder CD player Sony CD player Amplifier Sony amplifier MD deck/ Sony MD deck DAT deck Cassette deck* Sony cassette deck Cassette deck* Sony cassette deck * Analog audio compact cassette deck See "Table of Preset Functions" (page 74) for the functions of the component code number...
... display TV Preset component TV Factory setting Sony TV SAT Digital Sony digital satellite cable box CABLE DVD VCR1 VCR2 DVR CD AMP MD/DAT TAPE A TAPE B Cable box Cable box DVD player Sony DVD player VCR Sony VHS VCR (VTR3) VCR Sony 8mm VCR (VTR2) Digital video Sony digital recorder video recorder CD player Sony CD player Amplifier Sony amplifier MD deck/ Sony MD deck DAT deck Cassette deck* Sony cassette deck Cassette deck* Sony cassette deck * Analog audio compact cassette deck See "Table of Preset Functions" (page 74) for the functions of the component code number...
Operating Instructions
Page 17
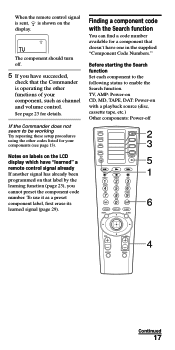
... component should turn off COMPO SYSTEM TIMER SCROLL SET POWER REC VIDEO1 VIDEO2 AUX TUNER CD TAPE MD TV PHONO DVD MENU GUIDE 2 3 5 1 6 VOL CH MUTING RECALL 4 Continued 17 Notes on labels on the LCD display which have "learned" a remote control signal already If another signal has already been programmed on the display. Before starting the Search function Set each component to the following status to be working Try repeating these setup procedures using...
... component should turn off COMPO SYSTEM TIMER SCROLL SET POWER REC VIDEO1 VIDEO2 AUX TUNER CD TAPE MD TV PHONO DVD MENU GUIDE 2 3 5 1 6 VOL CH MUTING RECALL 4 Continued 17 Notes on labels on the LCD display which have "learned" a remote control signal already If another signal has already been programmed on the display. Before starting the Search function Set each component to the following status to be working Try repeating these setup procedures using...
Operating Instructions
Page 19
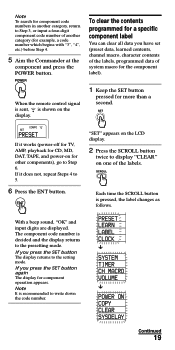
... LCD display. 2 Press the SCROLL button twice to display "CLEAR" on the display. 1 Keep the SET button pressed for more than a second. Each time the SCROLL button is recommended to write down the code number. If you press the SET button again The display for component operation appears. PRESET LEARN LABEL CLOCK SYSTEM TIMER CH MACRO VOLUME POWER ON COPY CLEAR SYSDELAY Continued 19 With a beep sound, "OK" and input digits are displayed. When the remote control...
... LCD display. 2 Press the SCROLL button twice to display "CLEAR" on the display. 1 Keep the SET button pressed for more than a second. Each time the SCROLL button is recommended to write down the code number. If you press the SET button again The display for component operation appears. PRESET LEARN LABEL CLOCK SYSTEM TIMER CH MACRO VOLUME POWER ON COPY CLEAR SYSDELAY Continued 19 With a beep sound, "OK" and input digits are displayed. When the remote control...
Operating Instructions
Page 22
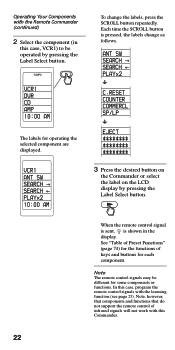
... in this case, VCR1) to be different for operating the selected component are displayed. In this Commander. 22 See "Table of Preset Functions" (page 74) for the functions of infrared signals will not work with this case, program the remote control signals with the Remote Commander (continued) 2 Select the component (in the display. Note, however, that components and functions that do not support the remote control of keys and buttons for each component.
... in this case, VCR1) to be different for operating the selected component are displayed. In this Commander. 22 See "Table of Preset Functions" (page 74) for the functions of infrared signals will not work with this case, program the remote control signals with the Remote Commander (continued) 2 Select the component (in the display. Note, however, that components and functions that do not support the remote control of keys and buttons for each component.
Operating Instructions
Page 23
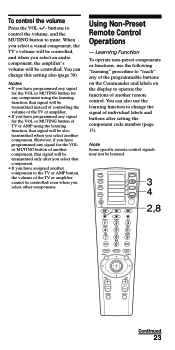
... button of another component, that signal will be transmitted only after setting the component code number (page 13). Using Non-Preset Remote Control Operations - COMPO SYSTEM TIMER SCROLL SET POWER REC VIDEO1 VIDEO2 AUX TUNER CD TAPE MD TV PHONO DVD 3 4 2,8 MENU GUIDE VOL CH MUTING RECALL Continued 23 To control the volume Press the VOL +/- buttons to control the volume, and the MUTING button to the TV or AMP button, the volume of TV or AMP using the learning function, that component...
... button of another component, that signal will be transmitted only after setting the component code number (page 13). Using Non-Preset Remote Control Operations - COMPO SYSTEM TIMER SCROLL SET POWER REC VIDEO1 VIDEO2 AUX TUNER CD TAPE MD TV PHONO DVD 3 4 2,8 MENU GUIDE VOL CH MUTING RECALL Continued 23 To control the volume Press the VOL +/- buttons to control the volume, and the MUTING button to the TV or AMP button, the volume of TV or AMP using the learning function, that component...
Operating Instructions
Page 24
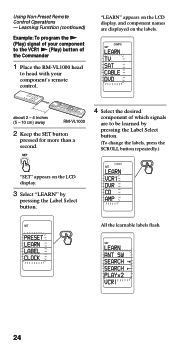
COMPO SET LEARN TV SAT CABLE DVD about 2 - 4 inches (5 - 10 cm) away RM-VL1000 2 Keep the SET button pressed for more than a second. 4 Select the desired component of the Commander 1 Place the RM-VL1000 head to head with your component's remote control. COMPO SET LEARN VCR1 DVR CD AMP SET PRESET LEARN LABEL CLOCK All the learnable labels flash. "LEARN" appears on the LCD display, and component names are to the VCR1 N (Play) button of which signals are displayed on...
COMPO SET LEARN TV SAT CABLE DVD about 2 - 4 inches (5 - 10 cm) away RM-VL1000 2 Keep the SET button pressed for more than a second. 4 Select the desired component of the Commander 1 Place the RM-VL1000 head to head with your component's remote control. COMPO SET LEARN VCR1 DVR CD AMP SET PRESET LEARN LABEL CLOCK All the learnable labels flash. "LEARN" appears on the LCD display, and component names are to the VCR1 N (Play) button of which signals are displayed on...
Operating Instructions
Page 26
... the "Notes on learning the signals of TV or AMP using the learning function, that signal will be also transmitted when you want to set a component code to a label after Step 5, the display reverts to the two buttons pressed at the same time (for the VOL +/- Using Non-Preset Remote Control Operations - To learn another component, that signal will be working If the learned label or button does not operate properly, teach once...
... the "Notes on learning the signals of TV or AMP using the learning function, that signal will be also transmitted when you want to set a component code to a label after Step 5, the display reverts to the two buttons pressed at the same time (for the VOL +/- Using Non-Preset Remote Control Operations - To learn another component, that signal will be working If the learned label or button does not operate properly, teach once...
Operating Instructions
Page 28
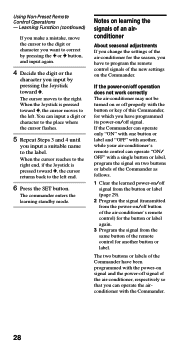
... airconditioner with the button or key of the new settings on /off properly with the Commander. 28 If the power-on/off operation does not work correctly The air-conditioner may not be turned on or off signal. Using Non-Preset Remote Control Operations - When the Joystick is pressed toward , the cursor moves to program the remote control signals of this Commander, for the season, you input a suitable name...
... airconditioner with the button or key of the new settings on /off properly with the Commander. 28 If the power-on/off operation does not work correctly The air-conditioner may not be turned on or off signal. Using Non-Preset Remote Control Operations - When the Joystick is pressed toward , the cursor moves to program the remote control signals of this Commander, for the season, you input a suitable name...

Operating Instructions
Page 31
... the SCROLL button. The components with a preset code number beginning with "8" (TV) or "4" (amplifier) flash. COMPO SET VOLUME TV SAT CABLE DVD VISUAL Continued 31 Each time the SCROLL button is pressed, the labels change as in this case, TV) by pressing the Label Select button. SET SYSTEM TIMER CH MACRO VOLUME The component names are displayed on page 14. "SET" appears on the LCD display. 2 Press the SCROLL button once to visual (in Step 4 on the...
... the SCROLL button. The components with a preset code number beginning with "8" (TV) or "4" (amplifier) flash. COMPO SET VOLUME TV SAT CABLE DVD VISUAL Continued 31 Each time the SCROLL button is pressed, the labels change as in this case, TV) by pressing the Label Select button. SET SYSTEM TIMER CH MACRO VOLUME The component names are displayed on page 14. "SET" appears on the LCD display. 2 Press the SCROLL button once to visual (in Step 4 on the...
Operating Instructions
Page 34
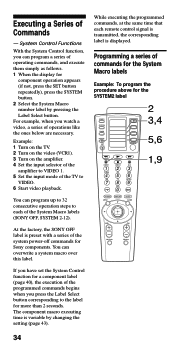
Example: 1 Turn on the TV. 2 Turn on the video (VCR1). 3 Turn on the amplifier. 4 Set the input selector of the amplifier to VIDEO 1. 5 Set the input mode of operating commands, and execute them simply as follows. 1 When the display for component operation appears (if not, press the SET button repeatedly), press the SYSTEM button. 2 Select the System Macro number label by changing the setting (page 43). You can program a series of the TV to the...
Example: 1 Turn on the TV. 2 Turn on the video (VCR1). 3 Turn on the amplifier. 4 Set the input selector of the amplifier to VIDEO 1. 5 Set the input mode of operating commands, and execute them simply as follows. 1 When the display for component operation appears (if not, press the SET button repeatedly), press the SYSTEM button. 2 Select the System Macro number label by changing the setting (page 43). You can program a series of the TV to the...
Operating Instructions
Page 37
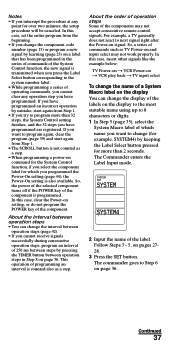
... System Control setting finishes, and the 32 steps you have programmed an incorrect operation by keeping the Label Select button pressed for which name you want to the system number label. • While programming a series of the component. The Commander enters the Label Input mode. Follow Steps 3 - 5, on page 36. In this case, insert other signals like the example below; TV Power-on t VCR Power-on t VCR play back t TV input...
... System Control setting finishes, and the 32 steps you have programmed an incorrect operation by keeping the Label Select button pressed for which name you want to the system number label. • While programming a series of the component. The Commander enters the Label Input mode. Follow Steps 3 - 5, on page 36. In this case, insert other signals like the example below; TV Power-on t VCR Power-on t VCR play back t TV input...
Operating Instructions
Page 55
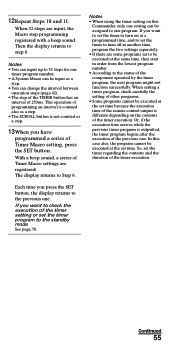
... input up to 32 steps for one timer program number. • A System Macro can be input as a step. 13When you press the SET button, the display returns to be assigned to the standby mode See page 58. Each time you have programmed a series of the timer execution. If you want to set the timer to turn on at a programmed time, and to set the timer to turn off at another time, program the two settings...
... input up to 32 steps for one timer program number. • A System Macro can be input as a step. 13When you press the SET button, the display returns to be assigned to the standby mode See page 58. Each time you have programmed a series of the timer execution. If you want to set the timer to turn on at a programmed time, and to set the timer to turn off at another time, program the two settings...
Operating Instructions
Page 71
... controlled when you have set the component codes, then use the learning function to program the remote control signals for your visual components are connected to the TV or AMP label (page 46). The maximum operating distance is fixed by a remote commander. • You have assigned another component to an audio system, make sure you are aiming the Commander directly at the component, and that there are listed in "Controlling the Volume of being controlled by presetting a component code number...
... controlled when you have set the component codes, then use the learning function to program the remote control signals for your visual components are connected to the TV or AMP label (page 46). The maximum operating distance is fixed by a remote commander. • You have assigned another component to an audio system, make sure you are aiming the Commander directly at the component, and that there are listed in "Controlling the Volume of being controlled by presetting a component code number...
Operating Instructions
Page 72
... buttons and labels. (When programming the system control function, you have programmed the commands in which that you can program the Channel Macro function of the components of which the first digit of the four-digit preset component code number is executed. • The interval may be programmed. Clear the learned signals (page 19, 29) and try setting again. • You may try to program the Power-On function (page 44) for a component...
... buttons and labels. (When programming the system control function, you have programmed the commands in which that you can program the Channel Macro function of the components of which the first digit of the four-digit preset component code number is executed. • The interval may be programmed. Clear the learned signals (page 19, 29) and try setting again. • You may try to program the Power-On function (page 44) for a component...

Operating Instructions
Page 73
... the Remote Commander to work properly, call the Sony Customer Support Helpline at 1-800822-2217. 73 use the Commander with new ones (page 7). with the previous set contents, you press a button. Customer Support Information After you have read through this Commander executed in the U.S.A. When using the timer, check the the Commander does not following. Check the location of the Commander. • The status of each component is displayed for operation...
... the Remote Commander to work properly, call the Sony Customer Support Helpline at 1-800822-2217. 73 use the Commander with new ones (page 7). with the previous set contents, you press a button. Customer Support Information After you have read through this Commander executed in the U.S.A. When using the timer, check the the Commander does not following. Check the location of the Commander. • The status of each component is displayed for operation...


