
Operating Instructions
Page 5
... Front/Left Side 10 Rear/Right Side/Bottom 10 Control Panel 12 Connector Panel 13 Remote Commander 14 Setting Up and Projecting Installing the Projector 17 Connecting the Projector 18 Connecting with a Computer ......18 Connecting with a VCR or 15k RGB/Component Equipment 20 Selecting the Menu Language ..........22 Projecting 24 Effective Tools...
... Front/Left Side 10 Rear/Right Side/Bottom 10 Control Panel 12 Connector Panel 13 Remote Commander 14 Setting Up and Projecting Installing the Projector 17 Connecting the Projector 18 Connecting with a Computer ......18 Connecting with a VCR or 15k RGB/Component Equipment 20 Selecting the Menu Language ..........22 Projecting 24 Effective Tools...

Operating Instructions
Page 6
...lighting or sunlight. • Ceiling-mounted spot lighting is recommended. The air coming out is hot. • Be careful not to the projector. If the floor and walls are not of light-reflecting material. On cleaning • To keep the cabinet looking new, periodically clean it...unit and easily accessible. • The unit is still running. they will damage the cabinet. • Avoid touching the lens. On LCD projector • The LCD projector is a normal result of the screen should be used for several days. • To disconnect the cord, pull it was originally packed...
...lighting or sunlight. • Ceiling-mounted spot lighting is recommended. The air coming out is hot. • Be careful not to the projector. If the floor and walls are not of light-reflecting material. On cleaning • To keep the cabinet looking new, periodically clean it...unit and easily accessible. • The unit is still running. they will damage the cabinet. • Avoid touching the lens. On LCD projector • The LCD projector is a normal result of the screen should be used for several days. • To disconnect the cord, pull it was originally packed...

Operating Instructions
Page 7
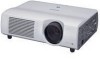
... GB Highly heated and humid Usage in the INSTALL SETTING menu. These installations may inhale tininess such as reducing the reliability of the projector. The power will be turned off in the following situations. Do not place the unit on surfaces (rugs, blankets, etc.) or...that the ventilation holes may cause malfunction or damage to the block-up . Clean it up due to the projector. Overview Notes on Installation Unsuitable Installation Do not install the projector in 1 min." Poorly ventilated Very dusty Avoid installing the unit in a location where there is very low...
... GB Highly heated and humid Usage in the INSTALL SETTING menu. These installations may inhale tininess such as reducing the reliability of the projector. The power will be turned off in the following situations. Do not place the unit on surfaces (rugs, blankets, etc.) or...that the ventilation holes may cause malfunction or damage to the block-up . Clean it up due to the projector. Overview Notes on Installation Unsuitable Installation Do not install the projector in 1 min." Poorly ventilated Very dusty Avoid installing the unit in a location where there is very low...
Operating Instructions
Page 8
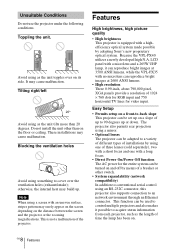
...and off by adopting Sony's new proprietary optical system. otherwise, the internal heat may rarely appear on the screen depending on the floor or ceiling. LCD panel with a microlens and a 265W UHP lamp, it possible to 90 degrees up . The projector also permits rear projection...,000 pixel, XGA panels provide a resolution of time the lamp has been on. 8 GB Features These installations may cause malfunction. Tilting right/left 20° Avoid using a screen with a highefficiency optical system made possible by means of the projector. Because the VPL-PX40 utilizes a newly...
...and off by adopting Sony's new proprietary optical system. otherwise, the internal heat may rarely appear on the screen depending on the floor or ceiling. LCD panel with a microlens and a 265W UHP lamp, it possible to 90 degrees up . The projector also permits rear projection...,000 pixel, XGA panels provide a resolution of time the lamp has been on. 8 GB Features These installations may cause malfunction. Tilting right/left 20° Avoid using a screen with a highefficiency optical system made possible by means of the projector. Because the VPL-PX40 utilizes a newly...

Operating Instructions
Page 9
...8226; Windows is a registered trademark of Microsoft Corporation in the United States and/or other device, as well as 15k RGB, VGA, SVGA, XGA, SXGA, SXGA+ and UXGA (60 Hz) signals, which all can be selected automatically or manually. 1) NTSC4.43 is the color system used... playing back a video recorded on NTSC on the network functions, contact your dealer or the Sony customer service.) Convenient presentation functions • Equipped with USB connector Simply by connecting the projector to connect a digital RGB device. Accepts various input signals • Equipped with DVI connector ...
...8226; Windows is a registered trademark of Microsoft Corporation in the United States and/or other device, as well as 15k RGB, VGA, SVGA, XGA, SXGA, SXGA+ and UXGA (60 Hz) signals, which all can be selected automatically or manually. 1) NTSC4.43 is the color system used... playing back a video recorded on NTSC on the network functions, contact your dealer or the Sony customer service.) Convenient presentation functions • Equipped with USB connector Simply by connecting the projector to connect a digital RGB device. Accepts various input signals • Equipped with DVI connector ...
Operating Instructions
Page 10
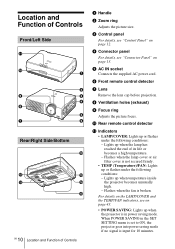
...d Connector panel For details, see "Control Panel" on page 43. • POWER SAVING: Lights up when the projector is in the SET SETTING menu is set to ON, the projector goes into power saving mode if no signal is input for 10 minutes. j Rear remote control detector k Indicators •...; LAMP/COVER: Lights up when temperature inside the projector becomes unusually high. - f Front remote control detector g Lens Remove the lens cap before projection. Flashes when the lamp cover or air filter cover...
...d Connector panel For details, see "Control Panel" on page 43. • POWER SAVING: Lights up when the projector is in the SET SETTING menu is set to ON, the projector goes into power saving mode if no signal is input for 10 minutes. j Rear remote control detector k Indicators •...; LAMP/COVER: Lights up when temperature inside the projector becomes unusually high. - f Front remote control detector g Lens Remove the lens cap before projection. Flashes when the lamp cover or air filter cover...

Operating Instructions
Page 11
...-up . • Do not place your fingers. • Do not push hard on your hand or objects near the ventilation holes as follows: 1 Lift the projector and press the adjuster adjustment buttons. In power saving mode, any key is pressed. During this time, you can turn the adjusters to use the... fan runs after the lamp goes out. • ON/STANDBY: Lights up the ON/STANDBY indicator with the I / 1 key. The adjusters will extend from the projector. Although the lamp goes out, the cooling fan keeps running. The power saving mode is canceled when a signal is input or any key does not...
...-up . • Do not place your fingers. • Do not push hard on your hand or objects near the ventilation holes as follows: 1 Lift the projector and press the adjuster adjustment buttons. In power saving mode, any key is pressed. During this time, you can turn the adjusters to use the... fan runs after the lamp goes out. • ON/STANDBY: Lights up the ON/STANDBY indicator with the I / 1 key. The adjusters will extend from the projector. Although the lamp goes out, the cooling fan keeps running. The power saving mode is canceled when a signal is input or any key does not...
Operating Instructions
Page 12
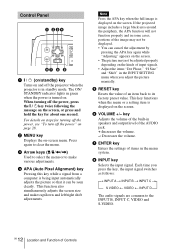
For details on steps for about one second. Control Panel MENU APA I/ ENTER RESET INPUT VOLUME CONT ETH INPU INPU a I / 1 key twice following the message on the screen, or press and hold the key for turning off the power, see "To turn off the projector when the projector is turned on. c Arrow keys (M/m/ b MENU key Displays the on page 28. When turning off the power, press the I / 1 (on/standby) key Turns on and off the power" on -screen menu. Press again to clear the menu. The ON/ STANDBY indicator lights in green when the power is in standby mode.
For details on steps for about one second. Control Panel MENU APA I/ ENTER RESET INPUT VOLUME CONT ETH INPU INPU a I / 1 key twice following the message on the screen, or press and hold the key for turning off the power, see "To turn off the projector when the projector is turned on. c Arrow keys (M/m/ b MENU key Displays the on page 28. When turning off the power, press the I / 1 (on/standby) key Turns on and off the power" on -screen menu. Press again to clear the menu. The ON/ STANDBY indicator lights in green when the power is in standby mode.
Operating Instructions
Page 13
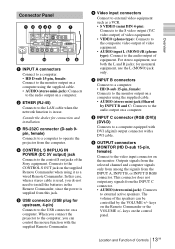
... Remote Commander. g INPUT B connectors Connect to a computer. • HD D-sub 15-pin, female: Connects to the audio output of the Sony equipment. Outputs signals from the selected channel and computer signals only from among the signals from the INPUT C connector. • AUDIO (stereo mini-jack...• AUDIO (stereo mini-jack): Connects to the audio output on a computer. h INPUT C connector (RGB (DVI)) (DVI-D) Connects to operate the projector from this case, when a stereo cable is used, you can be controlled by INPUT B and C: Connects to the audio output on a computer. c ...
... Remote Commander. g INPUT B connectors Connect to a computer. • HD D-sub 15-pin, female: Connects to the audio output of the Sony equipment. Outputs signals from the selected channel and computer signals only from among the signals from the INPUT C connector. • AUDIO (stereo mini-jack...• AUDIO (stereo mini-jack): Connects to the audio output on a computer. h INPUT C connector (RGB (DVI)) (DVI-D) Connects to operate the projector from this case, when a stereo cable is used, you can be controlled by INPUT B and C: Connects to the audio output on a computer. c ...

Operating Instructions
Page 14
... or VCR where signals are transmitted long distances; c INPUT key GB 14 Location and Function of Controls for example, when the projector has been hung from the speaker, and the output on the AUDIO jack in the OUTPUT section. Press again to restore the ...APA D KEYSTONE VOLUME HELP MENU/ TAB LASER FREEZE 1 2 3 4 5 6 7 8 9 qh qg ENTER R CLICK D ZOOM RESET/ ESCAPE 1 3 2 FUNCTION RM-PJM15 PROJECTOR q; j INPUT D, 5BNC input connectors (R/R-Y/PR, G/Y, B/BY/PB, SYNC/HD, VD connectors) (BNC type): Connect to restore the sound. According to the connected equipment, computer,...
... or VCR where signals are transmitted long distances; c INPUT key GB 14 Location and Function of Controls for example, when the projector has been hung from the speaker, and the output on the AUDIO jack in the OUTPUT section. Press again to restore the ...APA D KEYSTONE VOLUME HELP MENU/ TAB LASER FREEZE 1 2 3 4 5 6 7 8 9 qh qg ENTER R CLICK D ZOOM RESET/ ESCAPE 1 3 2 FUNCTION RM-PJM15 PROJECTOR q; j INPUT D, 5BNC input connectors (R/R-Y/PR, G/Y, B/BY/PB, SYNC/HD, VD connectors) (BNC type): Connect to restore the sound. According to the connected equipment, computer,...

Operating Instructions
Page 15
Overview d D KEYSTONE key Corrects the trapezoidal distortion caused by the projection angle. Use the arrow keys (M/m/
Overview d D KEYSTONE key Corrects the trapezoidal distortion caused by the projection angle. Use the arrow keys (M/m/

Operating Instructions
Page 16
...lid, then install the two size AA (R6) batteries (supplied) with the correct polarity. While pressing the lid, slide it. Notes on the projector. • The operation range is limited. Be sure to obstruct the infrared beam between the Remote Commander and the... detector on Remote Commander operation • Make sure that the battery orientation is , the wider the angle within which the commander can control the projector. Notes on batteries • Make sure that nothing to install the battery from battery leakage. Battery installation 1 Push and slide to avoid damage ...
...lid, then install the two size AA (R6) batteries (supplied) with the correct polarity. While pressing the lid, slide it. Notes on the projector. • The operation range is limited. Be sure to obstruct the infrared beam between the Remote Commander and the... detector on Remote Commander operation • Make sure that the battery orientation is , the wider the angle within which the commander can control the projector. Notes on batteries • Make sure that nothing to install the battery from battery leakage. Battery installation 1 Push and slide to avoid damage ...
Operating Instructions
Page 17
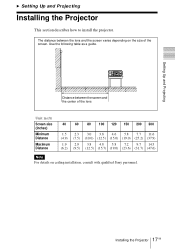
Installing the Projector 17 GB The distance between the screen and the center of the lens Unit: m (ft) Screen size (inches) Minimum Distance Maximum Distance 40 60 80 ....7) (47.6) Note For details on the size of the screen. Distance between the lens and the screen varies depending on ceiling installation, consult with qualified Sony personnel. Use the following table as a guide. Setting Up and Projecting B Setting Up and Projecting Installing the Projector This section describes how to install the...
Installing the Projector 17 GB The distance between the screen and the center of the lens Unit: m (ft) Screen size (inches) Minimum Distance Maximum Distance 40 60 80 ....7) (47.6) Note For details on the size of the screen. Distance between the lens and the screen varies depending on ceiling installation, consult with qualified Sony personnel. Use the following table as a guide. Setting Up and Projecting B Setting Up and Projecting Installing the Projector This section describes how to install the...

Operating Instructions
Page 18
...refer to the computer by using the supplied HD D-sub 15-pin cable or DVI cable. 2 Turn the projector on. 3 Start the computer. For details, refer to both your computer to XGA mode for each connection. • Insert the cable plugs firmly; However, we recommend that you set your computer...you set the output mode of your computer's display and the external monitor, the picture of the projector may increase noise and reduce performance of picture signals. Notes • The projector accepts 15k RGB, VGA, SVGA, XGA, SXGA, SXGA+ and UXGA (60 Hz) signals. When pulling out a cable, be sure...
...refer to the computer by using the supplied HD D-sub 15-pin cable or DVI cable. 2 Turn the projector on. 3 Start the computer. For details, refer to both your computer to XGA mode for each connection. • Insert the cable plugs firmly; However, we recommend that you set your computer...you set the output mode of your computer's display and the external monitor, the picture of the projector may increase noise and reduce performance of picture signals. Notes • The projector accepts 15k RGB, VGA, SVGA, XGA, SXGA, SXGA+ and UXGA (60 Hz) signals. When pulling out a cable, be sure...

Operating Instructions
Page 19
... When you use a DVI equipment. In this case, disconnect the USB cable, restart the computer, then connect the computer to the projector using the USB cable for the first time, the computer recognizes the following devices automatically. b) Connect a DVI cable to monitor output ...resistance cable. Notes • Your computer may not start correctly when connected to a computer by using the USB cable. • This projector is not guaranteed for all the recommended computer environments. When you use a wireless mouse.) to USB connector Stereo audio connecting cable (not...
... When you use a DVI equipment. In this case, disconnect the USB cable, restart the computer, then connect the computer to the projector using the USB cable for the first time, the computer recognizes the following devices automatically. b) Connect a DVI cable to monitor output ...resistance cable. Notes • Your computer may not start correctly when connected to a computer by using the USB cable. • This projector is not guaranteed for all the recommended computer environments. When you use a wireless mouse.) to USB connector Stereo audio connecting cable (not...

Operating Instructions
Page 20
...equipment. For more information, refer to audio output For stereo equipment, use both the L and R jacks. When you are connecting. VCR GB 20 Connecting the Projector To connect a VCR Right side S VIDEO IN S VIDEO VIDEO AUDIO WER) INPUT B RGB L (MONO) INPUT C AUDIO R DVI-D Audio connecting cable ... computer To connect a Macintosh computer equipped with a VCR or 15k RGB/Component Equipment This section describes how to connect the projector to the projector, wireless mouse functions become available. For monaural equipment, use a commercially available plug adaptor.
...equipment. For more information, refer to audio output For stereo equipment, use both the L and R jacks. When you are connecting. VCR GB 20 Connecting the Projector To connect a VCR Right side S VIDEO IN S VIDEO VIDEO AUDIO WER) INPUT B RGB L (MONO) INPUT C AUDIO R DVI-D Audio connecting cable ... computer To connect a Macintosh computer equipped with a VCR or 15k RGB/Component Equipment This section describes how to connect the projector to the projector, wireless mouse functions become available. For monaural equipment, use a commercially available plug adaptor.

Operating Instructions
Page 21
... signal when you connect the unit to 15k RGB or component video equipment, select video GBR or component with the Input-D Signal Sel. Connecting the Projector 21 GB Setting Up and Projecting To connect a 15k RGB/Component equipment Right side INPUT D R/R-Y/Pn G/Y B/B-Y/Ps SYNC/HD VD OUTPUT AUDIO MONITOR AUDIO Stereo...
... signal when you connect the unit to 15k RGB or component video equipment, select video GBR or component with the Input-D Signal Sel. Connecting the Projector 21 GB Setting Up and Projecting To connect a 15k RGB/Component equipment Right side INPUT D R/R-Y/Pn G/Y B/B-Y/Ps SYNC/HD VD OUTPUT AUDIO MONITOR AUDIO Stereo...

Operating Instructions
Page 22
... Front remote control detector MENU APA I/ ENTER RESET INPUT VOLUME 1 Plug the AC power cord into a wall outlet. 2 Press the I / 1 key to turn on the projector. 3 Press the MENU key. The menu appears. The menu presently selected is English. PICTURE SETTING Input A Picture Mode: Adjust Picture... Vo l u m e : 30 GB 22 Selecting...
... Front remote control detector MENU APA I/ ENTER RESET INPUT VOLUME 1 Plug the AC power cord into a wall outlet. 2 Press the I / 1 key to turn on the projector. 3 Press the MENU key. The menu appears. The menu presently selected is English. PICTURE SETTING Input A Picture Mode: Adjust Picture... Vo l u m e : 30 GB 22 Selecting...

Operating Instructions
Page 24
... into a wall outlet, then connect all equipment. The ON/STANDBY indicator lights in green. 3 Turn on the equipment connected to the projector. 4 Press the INPUT key to the VIDEO input connector VIDEO GB 24 Projecting To input from Press INPUT to display Computer connected to the INPUT A ...
... into a wall outlet, then connect all equipment. The ON/STANDBY indicator lights in green. 3 Turn on the equipment connected to the projector. 4 Press the INPUT key to the VIDEO input connector VIDEO GB 24 Projecting To input from Press INPUT to display Computer connected to the INPUT A ...

Operating Instructions
Page 25
...Looking into the lens when projecting may have to switch the computer to output to the projector by pressing Fn key and Fx key (such as LCD / VGA .) F7 or Fx Fn 5 Turn the zoom ring to adjust the ...size of the connected equipment so that it is set to "On", the projector searches for the input signal from... the connected equipment and displays the input channel where the input signals are found. When the projector is effective for the signals from a computer only. To adjust the volume The volume can be ...
...Looking into the lens when projecting may have to switch the computer to output to the projector by pressing Fn key and Fx key (such as LCD / VGA .) F7 or Fx Fn 5 Turn the zoom ring to adjust the ...size of the connected equipment so that it is set to "On", the projector searches for the input signal from... the connected equipment and displays the input channel where the input signals are found. When the projector is effective for the signals from a computer only. To adjust the volume The volume can be ...


