Intellisync Lite Quick Start Guide
Page 7
Intellisync transfers data of manuals (Adobe Acrobat .pdf format), online Help files, and Readme files. Additional documentation The Intellisync software includes additional documentation in the form of electronic copies of different formats between your first synchronization. It provides complete information on using Intellisync with a variety of popular Windows applications. It also includes information on the Start menu by clicking Intellisync User Guide. It then makes whatever changes are necessary in each system contains the...
Intellisync transfers data of manuals (Adobe Acrobat .pdf format), online Help files, and Readme files. Additional documentation The Intellisync software includes additional documentation in the form of electronic copies of different formats between your first synchronization. It provides complete information on using Intellisync with a variety of popular Windows applications. It also includes information on the Start menu by clicking Intellisync User Guide. It then makes whatever changes are necessary in each system contains the...
Intellisync Lite Quick Start Guide
Page 9
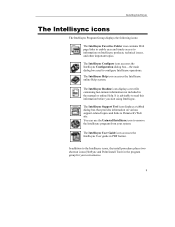
... manual or online Help. It is advisable to configure Intellisync operations. In addition to the Intellisync icons, the install procedure places two shortcut icons (HotSync and Palm Install Tool) in the program group for your system. You can use the Uninstall Intellisync icon to remove the Intellisync program from your convenience. 9 The Intellisync Readme icon displays a text file containing last-minute information not included in PDF format. Installing...
... manual or online Help. It is advisable to configure Intellisync operations. In addition to the Intellisync icons, the install procedure places two shortcut icons (HotSync and Palm Install Tool) in the program group for your system. You can use the Uninstall Intellisync icon to remove the Intellisync program from your convenience. 9 The Intellisync Readme icon displays a text file containing last-minute information not included in PDF format. Installing...

Limited Warranty Statement
Page 4
... number for technical support. SONY is a registered trademark of charge under this for your Product, date of purchase, a list of all options installed in your Product. For Product information, service assistance, resolution of a service problem, or technical assistance, call , please have available the model and serial number for future reference. 2001 Sony Electronics Inc. All rights reserved. It Is Important That You Register Your Personal Entertainment Organizer By...
... number for technical support. SONY is a registered trademark of charge under this for your Product, date of purchase, a list of all options installed in your Product. For Product information, service assistance, resolution of a service problem, or technical assistance, call , please have available the model and serial number for future reference. 2001 Sony Electronics Inc. All rights reserved. It Is Important That You Register Your Personal Entertainment Organizer By...

Intellisync User Guide
Page 7
... Intellisync Support Tool icon displays a tabbed dialog that provides information on Mobile Resource Central site. The Intellisync Uninstall icon can be used to configure Intellisync operations. Page 7 Before You Begin To access Help specific to the PC application you are using Intellisync. It's advisable to read this information before you start using , click Supported Systems in the program group for the HotSync Manager and Palm Install Tool applications are...
... Intellisync Support Tool icon displays a tabbed dialog that provides information on Mobile Resource Central site. The Intellisync Uninstall icon can be used to configure Intellisync operations. Page 7 Before You Begin To access Help specific to the PC application you are using Intellisync. It's advisable to read this information before you start using , click Supported Systems in the program group for the HotSync Manager and Palm Install Tool applications are...

powerOne Personal v2.0 Operating Instructions
Page 2
... Contents GETTING STARTED 1 THE DISPLAYS 1 NUMBER RANGES 1 LONG CALCULATIONS 1 PALMOS® DEVICES 1 THE POWERONE DISPLAY 4 TEMPLATE BAR & TEMPLATE QUICK HIT BUTTON 4 VIEW WINDOW 4 FUNCTION BUTTON 5 KEYPAD 5 MENUS 5 PERFORMING ARITHMETIC 7 INPUT MODE 7 ENTERING NUMBERS (0-9 CE/C 8 MATHEMATICS 10 MEMORY 12 SKINS/PERSONALIZED DISPLAYS 13 INSTALLING SKINS 13 CHANGING SKINS 13 DELETING SKINS 13 CALCULATOR SETTINGS 14 INPUT MODE 14 DECIMAL SETTING 14 DISPLAY MODE 15 TRIG MODE 15 USE CALC BUTTON 15 DEFAULT SETTINGS 15 PROGRAMMABLE BUTTONS 15 USING THE TEMPLATES...
... Contents GETTING STARTED 1 THE DISPLAYS 1 NUMBER RANGES 1 LONG CALCULATIONS 1 PALMOS® DEVICES 1 THE POWERONE DISPLAY 4 TEMPLATE BAR & TEMPLATE QUICK HIT BUTTON 4 VIEW WINDOW 4 FUNCTION BUTTON 5 KEYPAD 5 MENUS 5 PERFORMING ARITHMETIC 7 INPUT MODE 7 ENTERING NUMBERS (0-9 CE/C 8 MATHEMATICS 10 MEMORY 12 SKINS/PERSONALIZED DISPLAYS 13 INSTALLING SKINS 13 CHANGING SKINS 13 DELETING SKINS 13 CALCULATOR SETTINGS 14 INPUT MODE 14 DECIMAL SETTING 14 DISPLAY MODE 15 TRIG MODE 15 USE CALC BUTTON 15 DEFAULT SETTINGS 15 PROGRAMMABLE BUTTONS 15 USING THE TEMPLATES...
CLIE Handbook (primary manual)
Page 2
...; handheld. Using the Bluetooth™ function (for the first time The basic features and operations are explained in detail (pages 9-65). Enhancing features with another Sony CLIÉ™ handheld Explains how to make full use of your data with another CLIÉ handheld by beaming. Using the Calculator and finding records Explains the calculator and how to install additional applications on "Memory Stick" media. Protecting...
...; handheld. Using the Bluetooth™ function (for the first time The basic features and operations are explained in detail (pages 9-65). Enhancing features with another Sony CLIÉ™ handheld Explains how to make full use of your data with another CLIÉ handheld by beaming. Using the Calculator and finding records Explains the calculator and how to install additional applications on "Memory Stick" media. Protecting...
CLIE Handbook (primary manual)
Page 3
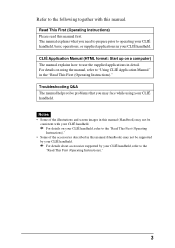
.... CLIÉ Application Manual (HTML format: Start up on using your CLIÉ handheld. Notes • Some of the accessories described in the "Read This First (Operating Instructions)." Troubleshooting Q&A The manual helps solve problems that you need to prepare prior to operating your CLIÉ handheld, refer to "Using CLIÉ Application Manual" in this manual (Handbook) may not be supported by your CLIÉ handheld, basic operations, or supplied applications in detail.
.... CLIÉ Application Manual (HTML format: Start up on using your CLIÉ handheld. Notes • Some of the accessories described in the "Read This First (Operating Instructions)." Troubleshooting Q&A The manual helps solve problems that you need to prepare prior to operating your CLIÉ handheld, refer to "Using CLIÉ Application Manual" in this manual (Handbook) may not be supported by your CLIÉ handheld, basic operations, or supplied applications in detail.

CLIE Handbook (primary manual)
Page 8
...; operation . . . 160 Backing up data to a "Memory Stick" media using the Memory Stick Backup application . . . . . 161 Protecting your data with a password Enhancing features with add-on applications 174 Installing 175 Installing from your computer 175 Installing applications on a "Memory Stick" media 177 Installing from the Internet. . . . 177 Deleting the installed add-on applications 178 Entering personal information . . . 165 Locking your CLIÉ handheld with a password (Data protection 167 Turn off your CLIÉ handheld after locking 167 Setting your CLIÉ handheld to...
...; operation . . . 160 Backing up data to a "Memory Stick" media using the Memory Stick Backup application . . . . . 161 Protecting your data with a password Enhancing features with add-on applications 174 Installing 175 Installing from your computer 175 Installing applications on a "Memory Stick" media 177 Installing from the Internet. . . . 177 Deleting the installed add-on applications 178 Entering personal information . . . 165 Locking your CLIÉ handheld with a password (Data protection 167 Turn off your CLIÉ handheld after locking 167 Setting your CLIÉ handheld to...

CLIE Handbook (primary manual)
Page 80
...-screen instructions to adjust the digitizer when performing a hard reset, when the tapping operation or scrolling does not work properly, or when you turn on your Sony CLIÉ™ handheld (Preferences) 80 Tip Use the stylus perpendicular to the screen to tap targets. The Digitizer calibration screen is exactly the same as the screen displayed the first time you cannot adjust the brightness of the back light or screen...
...-screen instructions to adjust the digitizer when performing a hard reset, when the tapping operation or scrolling does not work properly, or when you turn on your Sony CLIÉ™ handheld (Preferences) 80 Tip Use the stylus perpendicular to the screen to tap targets. The Digitizer calibration screen is exactly the same as the screen displayed the first time you cannot adjust the brightness of the back light or screen...

CLIE Handbook (primary manual)
Page 97
... the Preferences screen and select ShortCuts. 2 Tap New. For details on how to use Graffiti® ShortCuts, refer to edit and tap Edit. 2 Edit the ShortCut name or the abbreviation (character string) and tap OK. To Delete a ShortCut 1 Tap the ShortCut you want to delete and tap Delete. To Edit a ShortCut 1 Tap the ShortCut you want to "Using Shortcuts" on page 56. 1 Tap the arrow V in the top right-hand corner of ShortCuts is displayed. 3 Enter the ShortCut name...
... the Preferences screen and select ShortCuts. 2 Tap New. For details on how to use Graffiti® ShortCuts, refer to edit and tap Edit. 2 Edit the ShortCut name or the abbreviation (character string) and tap OK. To Delete a ShortCut 1 Tap the ShortCut you want to delete and tap Delete. To Edit a ShortCut 1 Tap the ShortCut you want to "Using Shortcuts" on page 56. 1 Tap the arrow V in the top right-hand corner of ShortCuts is displayed. 3 Enter the ShortCut name...
CLIE Handbook (primary manual)
Page 185
... application 130 Viewing information 131 What is "Memory Stick" media? . . .125 "Memory Stick" slot 127 N Network 87 Network Log 96 Numbers Selecting a regional default 81 O Owner 165 P Palm™ Desktop for CLIÉ software Basic operations 64 Exchanging data of another Sony CLIÉ handheld 180 Locating the components 63 Starting 62 Password Changing or deleting 171 If you forget your password 171 Preferences Bluetooth 69 Buttons 72, 73, 74 Connection 75 Date & Time 77 Digitizer...
... application 130 Viewing information 131 What is "Memory Stick" media? . . .125 "Memory Stick" slot 127 N Network 87 Network Log 96 Numbers Selecting a regional default 81 O Owner 165 P Palm™ Desktop for CLIÉ software Basic operations 64 Exchanging data of another Sony CLIÉ handheld 180 Locating the components 63 Starting 62 Password Changing or deleting 171 If you forget your password 171 Preferences Bluetooth 69 Buttons 72, 73, 74 Connection 75 Date & Time 77 Digitizer...
Read This First Operating Instructions
Page 4
... du Canada. However, there is for help. Connect the equipment into an outlet on the back of Conformity Trade Name: SONY Model No.: PEG-NZ90/U Responsible Party: Sony Electronics Inc. The supplied interface cable must accept any interference received, including interference that any changes or modifications not expressly approved in accordance with the limits for a Class B digital device, pursuant to radio communications.
... du Canada. However, there is for help. Connect the equipment into an outlet on the back of Conformity Trade Name: SONY Model No.: PEG-NZ90/U Responsible Party: Sony Electronics Inc. The supplied interface cable must accept any interference received, including interference that any changes or modifications not expressly approved in accordance with the limits for a Class B digital device, pursuant to radio communications.
Read This First Operating Instructions
Page 23
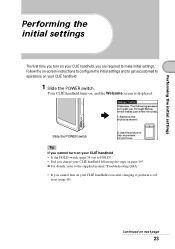
... to operations on your CLIÉ handheld. 1 Slide the POWER switch. Follow the on-screen instructions to configure the initial settings and to get accustomed to make initial settings. Continued on , and the Welcome screen is displayed. Performing the initial settings Performing the initial settings The first time you turn on your CLIÉ handheld, you cannot turn on your CLIÉ handheld even after charging it, perform a soft reset (page...
... to operations on your CLIÉ handheld. 1 Slide the POWER switch. Follow the on-screen instructions to configure the initial settings and to get accustomed to make initial settings. Continued on , and the Welcome screen is displayed. Performing the initial settings Performing the initial settings The first time you turn on your CLIÉ handheld, you cannot turn on your CLIÉ handheld even after charging it, perform a soft reset (page...
Read This First Operating Instructions
Page 39
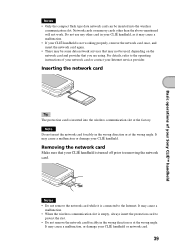
Removing the network card Make sure that your CLIÉ handheld. Network cards or memory cards other card in your CLIÉ handheld, as it is empty, always insert the protection card to the Internet. Inserting the network card Tip The protection card is turned off prior to the operating instructions of your Sony CLIÉ™ handheld Notes • Only the compact flash type data network card can be used, depending on the network card and provider that...
Removing the network card Make sure that your CLIÉ handheld. Network cards or memory cards other card in your CLIÉ handheld, as it is empty, always insert the protection card to the Internet. Inserting the network card Tip The protection card is turned off prior to the operating instructions of your Sony CLIÉ™ handheld Notes • Only the compact flash type data network card can be used, depending on the network card and provider that...
Read This First Operating Instructions
Page 67
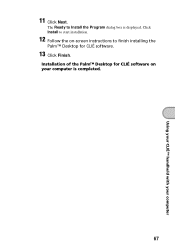
The Ready to finish installing the Palm™ Desktop for CLIÉ software on -screen instructions to Install the Program dialog box is completed. 67 Using your CLIÉ™ handheld with your computer is displayed, Click Install to start installation. 12 Follow the on your computer 11 Click Next. Installation of the Palm™ Desktop for CLIÉ software. 13 Click Finish.
The Ready to finish installing the Palm™ Desktop for CLIÉ software on -screen instructions to Install the Program dialog box is completed. 67 Using your CLIÉ™ handheld with your computer is displayed, Click Install to start installation. 12 Follow the on your computer 11 Click Next. Installation of the Palm™ Desktop for CLIÉ software. 13 Click Finish.
Read This First Operating Instructions
Page 98
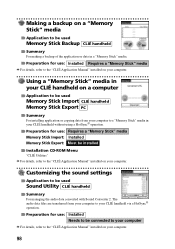
... use : Requires a "Memory Stick" media Memory Stick Import: Installed Memory Stick Export: Must be installed Installation CD-ROM Menu "CLIÉ Utilities" b For details, refer to the "CLIÉ Application Manual" installed on your computer. Using a "Memory Stick" media in your CLIÉ handheld on a "Memory Stick" media Application to be used Memory Stick Backup CLIÉ handheld Summary For making a backup of the application or data in your CLIÉ handheld without using a HotSync® operation. Making a backup on a computer Application to be used Memory...
... use : Requires a "Memory Stick" media Memory Stick Import: Installed Memory Stick Export: Must be installed Installation CD-ROM Menu "CLIÉ Utilities" b For details, refer to the "CLIÉ Application Manual" installed on your computer. Using a "Memory Stick" media in your CLIÉ handheld on a "Memory Stick" media Application to be used Memory Stick Backup CLIÉ handheld Summary For making a backup of the application or data in your CLIÉ handheld without using a HotSync® operation. Making a backup on a computer Application to be used Memory...
Troubleshooting Q&A
Page 5
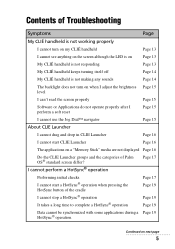
... time to complete a HotSync® operation Page 17 Page 19 Page 19 Page 19 Data cannot be synchronized with some applications during a Page 19 HotSync® operation Continued on a "Memory Stick" media are not displayed Page 16 Do the CLIE Launcher groups and the categories of the cradle I cannot start a HotSync® operation when pressing the HotSync button of Palm OS® standard screen...
... time to complete a HotSync® operation Page 17 Page 19 Page 19 Page 19 Data cannot be synchronized with some applications during a Page 19 HotSync® operation Continued on a "Memory Stick" media are not displayed Page 16 Do the CLIE Launcher groups and the categories of the cradle I cannot start a HotSync® operation when pressing the HotSync button of Palm OS® standard screen...
Troubleshooting Q&A
Page 23
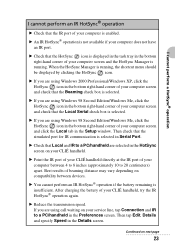
... are using Windows 2000 Professional/Windows XP, click the HotSync icon in the Setup window. B Point the IR port of your CLIÉ handheld directly at the IR port of your computer screen and the HotSync Manager is running . B Reduce the transmission speed. When the HotSync Manager is running , the shortcut menu should be displayed by clicking the HotSync icon. B Check that the Local Serial...
... are using Windows 2000 Professional/Windows XP, click the HotSync icon in the Setup window. B Point the IR port of your CLIÉ handheld directly at the IR port of your computer screen and the HotSync Manager is running . B Reduce the transmission speed. When the HotSync Manager is running , the shortcut menu should be displayed by clicking the HotSync icon. B Check that the Local Serial...
Troubleshooting Q&A
Page 24
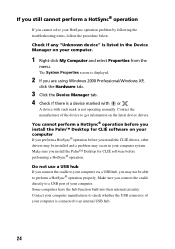
The System Properties screen is displayed. 2 If you are using Windows 2000 Professional/Windows XP, click the Hardware tab. 3 Click the Device Manager tab. 4 Check if there is a device marked with such mark is connected to a USB port of your HotSync operation problem by following the troubleshooting items, follow the procedure below. Make sure you connect the cradle directly to an internal USB hub. 24 Contact the manufacturer of your...
The System Properties screen is displayed. 2 If you are using Windows 2000 Professional/Windows XP, click the Hardware tab. 3 Click the Device Manager tab. 4 Check if there is a device marked with such mark is connected to a USB port of your HotSync operation problem by following the troubleshooting items, follow the procedure below. Make sure you connect the cradle directly to an internal USB hub. 24 Contact the manufacturer of your...
Marketing Specifications
Page 1
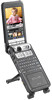
....sony.com/clie ©2003 Sony Electronics Inc. The Sony CLIÉ handheld is independently manufactured by Picsel Viewer, a product of audio files recorded. Pentium and MMX are the property of the hardware and software in each and every particular instance. Reproduction in whole or in part without notice. Additional 100 MB or more needed for printing with PictureGear Studio application. Personal Entertainment Organizer PEG-NZ90...
....sony.com/clie ©2003 Sony Electronics Inc. The Sony CLIÉ handheld is independently manufactured by Picsel Viewer, a product of audio files recorded. Pentium and MMX are the property of the hardware and software in each and every particular instance. Reproduction in whole or in part without notice. Additional 100 MB or more needed for printing with PictureGear Studio application. Personal Entertainment Organizer PEG-NZ90...


