CLIE Handbook (primary manual)
Page 7
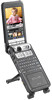
... Exchanging data without using the CLIE Files application 143 Notes on starting applications from a "Memory Stick" media . . . . 144 Beaming between your Sony CLIÉ handheld and another Palm OS® PDA 146 What you can do with beaming 146 Beaming information 147 Tips on beaming information . . 148 Using the Bluetooth™ function...
... Exchanging data without using the CLIE Files application 143 Notes on starting applications from a "Memory Stick" media . . . . 144 Beaming between your Sony CLIÉ handheld and another Palm OS® PDA 146 What you can do with beaming 146 Beaming information 147 Tips on beaming information . . 148 Using the Bluetooth™ function...
CLIE Handbook (primary manual)
Page 25
...). Delete an application (page 178). Send an application or data to display the Edit Description screen and enter the new description. Sony CLIÉ™ handheld basic operations 25 Default button: Restore the default description. Edit CLIE Launcher Edit a group of an application.... Beam... Info... OK button: Change to another Bluetooth™ compliant Palm OS PDA device by wireless communication (page 150). Copy... Menu List The following list describes the functions of each menu in the CLIE Launcher...
...). Delete an application (page 178). Send an application or data to display the Edit Description screen and enter the new description. Sony CLIÉ™ handheld basic operations 25 Default button: Restore the default description. Edit CLIE Launcher Edit a group of an application.... Beam... Info... OK button: Change to another Bluetooth™ compliant Palm OS PDA device by wireless communication (page 150). Copy... Menu List The following list describes the functions of each menu in the CLIE Launcher...
CLIE Handbook (primary manual)
Page 73
... V next to Graffiti Help and select the settings for entering text. Turns off and locks your Sony CLIÉ™ handheld (Preferences) 73 Customizing your CLIÉ handheld. b For details, please refer to another Palm OS PDA. Beams the current record to "Protecting your CLIÉ handheld without using the POWER button...
... V next to Graffiti Help and select the settings for entering text. Turns off and locks your Sony CLIÉ™ handheld (Preferences) 73 Customizing your CLIÉ handheld. b For details, please refer to another Palm OS PDA. Beams the current record to "Protecting your CLIÉ handheld without using the POWER button...
CLIE Handbook (primary manual)
Page 124
Using "Memory Stick®" media This chapter explains how to communicate with another Palm OS® PDA device via "Memory Stick" media . . 134 Using "Memory Stick®" media 125 Exchanging data via "Memory Stick" media, how to handle "Memory Stick" media, and how to use the CLIE Files application for managing the data on "Memory Stick" media.
Using "Memory Stick®" media This chapter explains how to communicate with another Palm OS® PDA device via "Memory Stick" media . . 134 Using "Memory Stick®" media 125 Exchanging data via "Memory Stick" media, how to handle "Memory Stick" media, and how to use the CLIE Files application for managing the data on "Memory Stick" media.

CLIE Handbook (primary manual)
Page 145
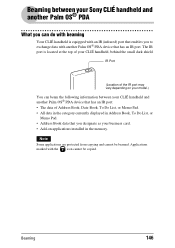
Beaming This chapter explains how to communicate with another Palm OS® PDA 146 Beaming between your Sony CLIÉ handheld and another Palm OS® PDA device via the infrared communications port.
Beaming This chapter explains how to communicate with another Palm OS® PDA 146 Beaming between your Sony CLIÉ handheld and another Palm OS® PDA device via the infrared communications port.
CLIE Handbook (primary manual)
Page 146
... card. • Add-on your model.) You can beam the following information between your Sony CLIÉ handheld and another Palm OS® PDA What you can do with beaming Your CLIÉ handheld is located at the top of... handheld, behind the small dark shield. Applications marked with another Palm OS® PDA device that has an IR port: • The data of your CLIÉ handheld and another Palm OS®...; PDA device that you to exchange data with the icon cannot be beamed. Beaming 146 IR Port ...
... card. • Add-on your model.) You can beam the following information between your Sony CLIÉ handheld and another Palm OS® PDA What you can do with beaming Your CLIÉ handheld is located at the top of... handheld, behind the small dark shield. Applications marked with another Palm OS® PDA device that has an IR port: • The data of your CLIÉ handheld and another Palm OS®...; PDA device that you to exchange data with the icon cannot be beamed. Beaming 146 IR Port ...
CLIE Handbook (primary manual)
Page 147
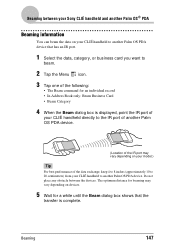
...obstacle between your Sony CLIÉ handheld and another Palm OS® PDA Beaming information You can beam the data on your model.) Tip For best performance of the data exchange, keep 4 to 8 inches (approximately 10 to 20 centimeters) from your CLIÉ handheld to another Palm OS PDA device that has... until the Beam dialog box shows that the transfer is displayed, point the IR port of your CLIÉ handheld directly to another Palm OS PDA device. The optimum distance for beaming may vary depending on devices. 5 Wait for an individual record • In Address Book only: Beam Business ...
...obstacle between your Sony CLIÉ handheld and another Palm OS® PDA Beaming information You can beam the data on your model.) Tip For best performance of the data exchange, keep 4 to 8 inches (approximately 10 to 20 centimeters) from your CLIÉ handheld to another Palm OS PDA device that has... until the Beam dialog box shows that the transfer is displayed, point the IR port of your CLIÉ handheld directly to another Palm OS PDA device. The optimum distance for beaming may vary depending on devices. 5 Wait for an individual record • In Address Book only: Beam Business ...
CLIE Handbook (primary manual)
Page 148
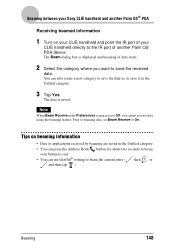
... Book button for about two seconds to beam your CLIÉ handheld directly to Off, you want to On. Beaming between your Sony CLIÉ handheld and another Palm OS PDA device. The Beam dialog box is saved. Prior to beaming data, set to the IR port of another Palm OS®...; PDA Receiving beamed information 1 Turn on beaming information • Data or applications received by beaming are saved in the Unfiled category. 3 Tap Yes. The data is ...
... Book button for about two seconds to beam your CLIÉ handheld directly to Off, you want to On. Beaming between your Sony CLIÉ handheld and another Palm OS PDA device. The Beam dialog box is saved. Prior to beaming data, set to the IR port of another Palm OS®...; PDA Receiving beamed information 1 Turn on beaming information • Data or applications received by beaming are saved in the Unfiled category. 3 Tap Yes. The data is ...

Read This First Operating Instructions
Page 35
... You can beam data between your CLIÉ handheld and another CLIÉ handheld or Palm OS® PDA. b For details, refer to find the most sensitive direction. Basic operations of your Sony CLIÉ™ handheld Scroll Button Displays text and other information that extends beyond the area of each application...
... You can beam data between your CLIÉ handheld and another CLIÉ handheld or Palm OS® PDA. b For details, refer to find the most sensitive direction. Basic operations of your Sony CLIÉ™ handheld Scroll Button Displays text and other information that extends beyond the area of each application...

Read This First Operating Instructions
Page 88
... OK. 9 Click Done. 10 To install the application on your CLIÉ handheld You can install applications with other CLIÉ handheld or Palm OS PDAs is not guaranteed. 1 Quit all applications running on the Windows® operating system. 2 Insert the Installation CD-ROM into the CD-ROM drive of CLI...É Add-ons. 5 Select the add-on applications to your computer. The installation launcher window appears. 3 Click CLIÉ Desktop. 4 Click Install to operate on PEG-NZ90 only. Installing add-on applications on your CLIÉ handheld, press the HotSync button on the cradle. 88
... OK. 9 Click Done. 10 To install the application on your CLIÉ handheld You can install applications with other CLIÉ handheld or Palm OS PDAs is not guaranteed. 1 Quit all applications running on the Windows® operating system. 2 Insert the Installation CD-ROM into the CD-ROM drive of CLI...É Add-ons. 5 Select the add-on applications to your computer. The installation launcher window appears. 3 Click CLIÉ Desktop. 4 Click Install to operate on PEG-NZ90 only. Installing add-on applications on your CLIÉ handheld, press the HotSync button on the cradle. 88