
Quick Start Guide
Page 2
...privacy policies will be transported or used outside the United States. Sony, VAIO, the VAIO logo, DVgate Plus, PictureGear, Click to current retail versions. Intel and Pentium are trademarks or registered trademarks of the computer, and may require a fee and credit card information. PS/2... information contained herein at any modification to online service providers may be identical to DVD, Giga Pocket, Handycam, MagicGate, Memory Stick, the Memory Stick logo, SonicStage, ImageStation, ATRAC3, and i.LINK are trademarks or registered trademarks of the IBM Corporation. All rights ...
...privacy policies will be transported or used outside the United States. Sony, VAIO, the VAIO logo, DVgate Plus, PictureGear, Click to current retail versions. Intel and Pentium are trademarks or registered trademarks of the computer, and may require a fee and credit card information. PS/2... information contained herein at any modification to online service providers may be identical to DVD, Giga Pocket, Handycam, MagicGate, Memory Stick, the Memory Stick logo, SonicStage, ImageStation, ATRAC3, and i.LINK are trademarks or registered trademarks of the IBM Corporation. All rights ...
Quick Start Guide
Page 19
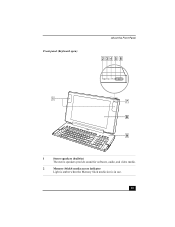
Front panel (Keyboard open) About the Front Panel 1 Stereo speakers (built-in) The stereo speakers provide sound for software, audio, and video media. 2 Memory Stick® media access indicator Light is amber when the Memory Stick media slot is in use. 19
Front panel (Keyboard open) About the Front Panel 1 Stereo speakers (built-in) The stereo speakers provide sound for software, audio, and video media. 2 Memory Stick® media access indicator Light is amber when the Memory Stick media slot is in use. 19
Quick Start Guide
Page 24
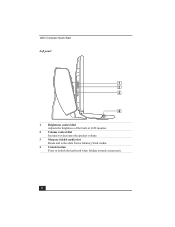
VAIO Computer Quick Start Left panel 1 Brightness control dial Adjusts the brightness of the built-in LCD monitor. 2 Volume control dial Increases or decreases the speaker volume. 3 Memory Stick® media slot Reads and writes data from a Memory Stick media. 4 Unlock button Press to unlock the keyboard when folding towards system unit. 24
VAIO Computer Quick Start Left panel 1 Brightness control dial Adjusts the brightness of the built-in LCD monitor. 2 Volume control dial Increases or decreases the speaker volume. 3 Memory Stick® media slot Reads and writes data from a Memory Stick media. 4 Unlock button Press to unlock the keyboard when folding towards system unit. 24
VAIO User Guide
Page 8
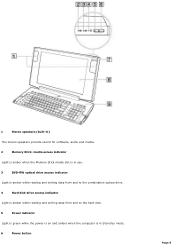
1 Stereo speakers (built-in) The stereo speakers provide sound for software, audio and media. 2 Memory Stick® media access indicator Light is amber when the Memory Stick media slot is in use. 3 DVD-RW optical drive access indicator Light is amber while reading and writing data from and to the combination optical drive. 4 Hard disk drive access indicator Light is amber while reading and writing data from and to the hard disk. 5 Power indicator Light is green while the power is on and amber when the computer is in Stand by mode. 6 Power button Page 8
1 Stereo speakers (built-in) The stereo speakers provide sound for software, audio and media. 2 Memory Stick® media access indicator Light is amber when the Memory Stick media slot is in use. 3 DVD-RW optical drive access indicator Light is amber while reading and writing data from and to the combination optical drive. 4 Hard disk drive access indicator Light is amber while reading and writing data from and to the hard disk. 5 Power indicator Light is green while the power is on and amber when the computer is in Stand by mode. 6 Power button Page 8
VAIO User Guide
Page 12
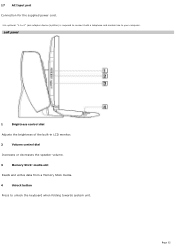
Page 12 17 AC Input port Connection for the supplied power cord. 1 A n optional "1 -to-2 " jac k adapter devic e (s plitter) is required to c onnec t both a telephone and modem line to unlock the keyboard when folding towards system unit. Left panel 1 Brightness control dial Adjusts the brightness of the built-in LCD monitor. 2 Volume control dial Increases or decreases the speaker volume. 3 Memory Stick® media slot Reads and writes data from a Memory Stick media. 4 Unlock button Press to your c omputer.
Page 12 17 AC Input port Connection for the supplied power cord. 1 A n optional "1 -to-2 " jac k adapter devic e (s plitter) is required to c onnec t both a telephone and modem line to unlock the keyboard when folding towards system unit. Left panel 1 Brightness control dial Adjusts the brightness of the built-in LCD monitor. 2 Volume control dial Increases or decreases the speaker volume. 3 Memory Stick® media slot Reads and writes data from a Memory Stick media. 4 Unlock button Press to your c omputer.

VAIO User Guide
Page 25
... - The Wizard interface guides you to watch TV programs on a network to this folder or its contents may cause your computer's display and record them onto a Memory Stick® media for later playback. Timer Recording Manager - The Giga Pocket Explorer program functions as Video Capsules ...; Giga Pocket Server - You can change the format your Giga Pocket contents and transfer them onto the hard disk drive as your Sony® CLIÉ® Handheld. Click Start in application that enables the conversion of all TV program recordings you to stop working properly...
... - The Wizard interface guides you to watch TV programs on a network to this folder or its contents may cause your computer's display and record them onto a Memory Stick® media for later playback. Timer Recording Manager - The Giga Pocket Explorer program functions as Video Capsules ...; Giga Pocket Server - You can change the format your Giga Pocket contents and transfer them onto the hard disk drive as your Sony® CLIÉ® Handheld. Click Start in application that enables the conversion of all TV program recordings you to stop working properly...

VAIO User Guide
Page 55
... site at http://sonystyle.com/vaio/clie. Powered by the Palm operating system, the CLIÉ handheld is a plug-in application, make sure you have installed all required software for viewing with amazing clarity. The Sony CLIÉ Handheld personal entertainment organizers provide a rich and compelling handheld computing experience. In order to use...
... site at http://sonystyle.com/vaio/clie. Powered by the Palm operating system, the CLIÉ handheld is a plug-in application, make sure you have installed all required software for viewing with amazing clarity. The Sony CLIÉ Handheld personal entertainment organizers provide a rich and compelling handheld computing experience. In order to use...

VAIO User Guide
Page 58
... Handhelds that support the use of a Memory Stick media. Click Start in application, follow these steps: 1. The Send To dialog box appears. 4. Transferring converted video files using the HotSync operation. 2. Designate a user name, if applicable to your computer. 2. Point to Giga Pocket, point ...when you want to transfer to your CLIÉ Handheld. Your converted video files can transfer your converted video files directly to the Memory Stick media. 3. The Send To dialog box appears. 3. Select Using HotSync as the transfer destination. When transfer is complete, the...
... Handhelds that support the use of a Memory Stick media. Click Start in application, follow these steps: 1. The Send To dialog box appears. 4. Transferring converted video files using the HotSync operation. 2. Designate a user name, if applicable to your computer. 2. Point to Giga Pocket, point ...when you want to transfer to your CLIÉ Handheld. Your converted video files can transfer your converted video files directly to the Memory Stick media. 3. The Send To dialog box appears. 3. Select Using HotSync as the transfer destination. When transfer is complete, the...
VAIO User Guide
Page 63
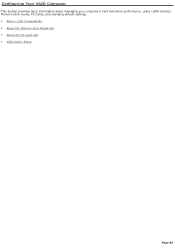
Configuring Your VAIO Computer This section provides basic information about managing your computer's hard disk drive performance, using i.LINK devices, Memory Stick media, PC Cards, and changing default settings. About i.LINK Compatibility About the Memory Stick Media Slot About the PC Card Slot VAIO Action Setup Page 63
Configuring Your VAIO Computer This section provides basic information about managing your computer's hard disk drive performance, using i.LINK devices, Memory Stick media, PC Cards, and changing default settings. About i.LINK Compatibility About the Memory Stick Media Slot About the PC Card Slot VAIO Action Setup Page 63

VAIO User Guide
Page 68
About the Memory Stick Media Slot Your VAIO® computer is equipped with a Memory Stick® slot that supports certain types of Memory Stick® media. Page 68
About the Memory Stick Media Slot Your VAIO® computer is equipped with a Memory Stick® slot that supports certain types of Memory Stick® media. Page 68
VAIO User Guide
Page 69
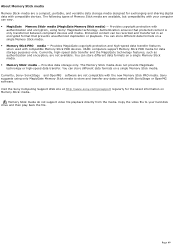
... video file playback directly from the media. The following types of Memory Stick media are not available. Visit the Sony Computing Support Web site at http://www.sony.com/pcsupport regularly for exchanging and sharing digital data with SonicStage or OpenMG software. VAIO® computers support Memory Stick PRO media for data storage purposes only. You can...
... video file playback directly from the media. The following types of Memory Stick media are not available. Visit the Sony Computing Support Web site at http://www.sony.com/pcsupport regularly for exchanging and sharing digital data with SonicStage or OpenMG software. VAIO® computers support Memory Stick PRO media for data storage purposes only. You can...
VAIO User Guide
Page 70
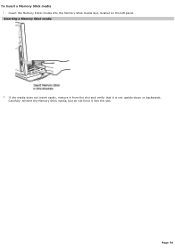
Insert the Memory Stick® media into the slot. Inserting a Mem ory Stick m edia 2. To insert a Memory Stick media 1. If the media does not insert easily, remove it from the slot and verify that it into the Memory Stick media slot, located on the left panel. Carefully reinsert the Memory Stick media, but do not force it is not upside-down or backwards. Page 70
Insert the Memory Stick® media into the slot. Inserting a Mem ory Stick m edia 2. To insert a Memory Stick media 1. If the media does not insert easily, remove it from the slot and verify that it into the Memory Stick media slot, located on the left panel. Carefully reinsert the Memory Stick media, but do not force it is not upside-down or backwards. Page 70

VAIO User Guide
Page 71
... media to play back the file. Do not remove the Memory Stick media while the media access indicator light is inserted into the Memory Stick media slot. 1. Copy the AVI file to your hard disk drive before attempting to release it from the slot. Page 71 The media extends... grasp it is on. The media or its data may become damaged. Carefully remove the Memory Stick media from the Memory Stick slot. To remove a Memory Stick media A small portion of the Memory Stick® media remains extended when it . Memory Stick media do not support AVI file playback. Rem ov ing a Mem ory Stick...
... media to play back the file. Do not remove the Memory Stick media while the media access indicator light is inserted into the Memory Stick media slot. 1. Copy the AVI file to your hard disk drive before attempting to release it from the slot. Page 71 The media extends... grasp it is on. The media or its data may become damaged. Carefully remove the Memory Stick media from the Memory Stick slot. To remove a Memory Stick media A small portion of the Memory Stick® media remains extended when it . Memory Stick media do not support AVI file playback. Rem ov ing a Mem ory Stick...
VAIO User Guide
Page 72
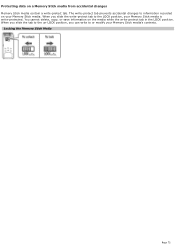
The write-protect tab prevents accidental changes to or modify your Memory Stick media's contents. When you slide the tab to the un-LOCK position, you slide the write-protect tab to the LOCK position, your Memory Stick media. Locking the Mem ory Stick Media Page 72 When you can write to information recorded on your Memory Stick media is write-protected. Protecting data on the media while the write-protect tab in the LOCK position. You cannot delete, copy, or save information on a Memory Stick media from accidental changes Memory Stick media contain a write-protect tab.
The write-protect tab prevents accidental changes to or modify your Memory Stick media's contents. When you slide the tab to the un-LOCK position, you slide the write-protect tab to the LOCK position, your Memory Stick media. Locking the Mem ory Stick Media Page 72 When you can write to information recorded on your Memory Stick media is write-protected. Protecting data on the media while the write-protect tab in the LOCK position. You cannot delete, copy, or save information on a Memory Stick media from accidental changes Memory Stick media contain a write-protect tab.
VAIO User Guide
Page 76
This section provides information about upgrading your VAIO® computer. Upgrading and Maintaining your VAIO Computer In the future you may want to increase the functionality of your system. Overview Installing Memory Replacing the Lithium Battery Replacing a Hard Disk Drive Page 76
This section provides information about upgrading your VAIO® computer. Upgrading and Maintaining your VAIO Computer In the future you may want to increase the functionality of your system. Overview Installing Memory Replacing the Lithium Battery Replacing a Hard Disk Drive Page 76
VAIO User Guide
Page 79
See Before upgrading your computer. Page 79 Observe the proper safety precautions when you purchased. See the online Specifications sheet for details about the memory installed in your computer. Your computer may vary, depending on the system configuration you add or remove the memory in your computer. Installing Memory The amount of preinstalled memory may ship with all available memory slots filled.
See Before upgrading your computer. Page 79 Observe the proper safety precautions when you purchased. See the online Specifications sheet for details about the memory installed in your computer. Your computer may vary, depending on the system configuration you add or remove the memory in your computer. Installing Memory The amount of preinstalled memory may ship with all available memory slots filled.
VAIO User Guide
Page 81
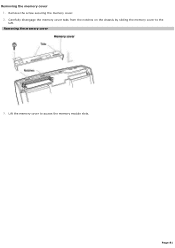
Lift the memory cover to the left. Rem ov ing the m em ory cov er 3. Removing the memory cover 1. Remove the screw securing the memory cover. 2. Page 81 Carefully disengage the memory cover tabs from the notches on the chassis by sliding the memory cover to access the memory module slots.
Lift the memory cover to the left. Rem ov ing the m em ory cov er 3. Removing the memory cover 1. Remove the screw securing the memory cover. 2. Page 81 Carefully disengage the memory cover tabs from the notches on the chassis by sliding the memory cover to access the memory module slots.
VAIO User Guide
Page 82
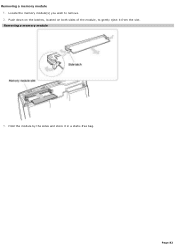
Page 82 Push down on the latches, located on both sides of the module, to remove. 2. Hold the module by the sides and store it from the slot. Rem ov ing a m em ory m odule 3. Removing a memory module 1. Locate the memory module(s) you wish to gently eject it in a static-free bag.
Page 82 Push down on the latches, located on both sides of the module, to remove. 2. Hold the module by the sides and store it from the slot. Rem ov ing a m em ory m odule 3. Removing a memory module 1. Locate the memory module(s) you wish to gently eject it in a static-free bag.

VAIO User Guide
Page 83
...The side latches snap into the slot. 4. To avoid damaging a memory module or the memory module slot, move the side latches slightly outward to the open slot. Locate the notch on the bottom edge of the module into position, holding the memory module in place. Page 83 Installing a m em ory m odule ...3. Firmly insert the bottom edge of the memory module and align it by the edges. 2. The module is properly inserted when the side ...
...The side latches snap into the slot. 4. To avoid damaging a memory module or the memory module slot, move the side latches slightly outward to the open slot. Locate the notch on the bottom edge of the module into position, holding the memory module in place. Page 83 Installing a m em ory m odule ...3. Firmly insert the bottom edge of the memory module and align it by the edges. 2. The module is properly inserted when the side ...
VAIO User Guide
Page 84
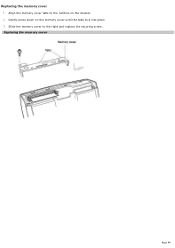
Align the memory cover tabs to the right and replace the securing screw. Replacing the m em ory cov er Page 84 Gently press down on the chassis. 2. Replacing the memory cover 1. Slide the memory cover to the notches on the memory cover until the tabs lock into place. 3.
Align the memory cover tabs to the right and replace the securing screw. Replacing the m em ory cov er Page 84 Gently press down on the chassis. 2. Replacing the memory cover 1. Slide the memory cover to the notches on the memory cover until the tabs lock into place. 3.


