
Quick Start Guide
Page 10
Front panel 1 Optical drive 1 See the online specifications sheet for optical drive information. 2 Optical drive 2 See the online specifications sheet for optical drive information. 3 Floppy disk drive Reads and writes data from and to connect compatible peripheral devices. It also includes access to the Memory Stick media slot, Universal Serial Bus (USB), and i.LINK® ports to a 3.5-inch floppy disk. 10 VAIO Digital Studio Computer Quick Start About The Front Panel The front panel of your VAIO Computer enables access to the optical and floppy disk drives.
Front panel 1 Optical drive 1 See the online specifications sheet for optical drive information. 2 Optical drive 2 See the online specifications sheet for optical drive information. 3 Floppy disk drive Reads and writes data from and to connect compatible peripheral devices. It also includes access to the Memory Stick media slot, Universal Serial Bus (USB), and i.LINK® ports to a 3.5-inch floppy disk. 10 VAIO Digital Studio Computer Quick Start About The Front Panel The front panel of your VAIO Computer enables access to the optical and floppy disk drives.

Quick Start Guide
Page 11
...and amber when the computer is in Stand by mode. 8 i.LINK 4-pin port (IEEE 1394) Connection for a compatible digital device. 9 Optical drive 1 eject button Ejects a disc from Optical drive 1. 10 Optical drive 2 eject button Ejects a disc from Optical drive 2. 11 Memory Stick® media ...slot Reads and writes data from and to a Memory Stick media. 12 Floppy disk eject button Ejects a floppy disk. 13 Universal Serial Bus (USB) 2.0 ports (4)...
...and amber when the computer is in Stand by mode. 8 i.LINK 4-pin port (IEEE 1394) Connection for a compatible digital device. 9 Optical drive 1 eject button Ejects a disc from Optical drive 1. 10 Optical drive 2 eject button Ejects a disc from Optical drive 2. 11 Memory Stick® media ...slot Reads and writes data from and to a Memory Stick media. 12 Floppy disk eject button Ejects a floppy disk. 13 Universal Serial Bus (USB) 2.0 ports (4)...

Quick Start Guide
Page 40
VAIO Digital Studio Computer Quick Start Why is my system running . You can toggle between the Normal (bi-directional), EPP, ECP, and ECP+EPP options using the directional arrow ... press Enter. ✍ You can change the parallel port type using . ❑ Increasing the system memory may also help. To access System Setup: 1 Click Start in the Windows taskbar and select Turn Off Computer. Select Restart. 2 When the Sony screen displays, press the F2 key on installing memory, please see the online VAIO User Guide.
VAIO Digital Studio Computer Quick Start Why is my system running . You can toggle between the Normal (bi-directional), EPP, ECP, and ECP+EPP options using the directional arrow ... press Enter. ✍ You can change the parallel port type using . ❑ Increasing the system memory may also help. To access System Setup: 1 Click Start in the Windows taskbar and select Turn Off Computer. Select Restart. 2 When the Sony screen displays, press the F2 key on installing memory, please see the online VAIO User Guide.

Quick Start Guide
Page 41
... online specifications sheet: 1 Click Start in the text, "View the VAIO® Computer Specifications," which describes your VAIO computer. About VAIO Computer Functions Where can find a listing of your computer's hardware configuration and preinstalled software information. 41 You can I find details about the drives, cards, and memory modules installed on the right. 4 Locate the link in the Windows...
... online specifications sheet: 1 Click Start in the text, "View the VAIO® Computer Specifications," which describes your VAIO computer. About VAIO Computer Functions Where can find a listing of your computer's hardware configuration and preinstalled software information. 41 You can I find details about the drives, cards, and memory modules installed on the right. 4 Locate the link in the Windows...

Quick Start Guide
Page 55
Why doesn't my connected printer function when the computer resumes from a power saving mode? How do I install a printer? ❑ To install your printer, follow these steps: 1 Click Start in the Windows taskbar, then click ... screen resolution. 3 Click the Settings tab. 4 Change the Screen resolution and Color quality to print a test page and complete printer installation. 55 Clear the printer memory by turning the printer off for "Automatically detect and install my Plug and Play printer", if you are installing a recently manufactured printer with Plug and...
Why doesn't my connected printer function when the computer resumes from a power saving mode? How do I install a printer? ❑ To install your printer, follow these steps: 1 Click Start in the Windows taskbar, then click ... screen resolution. 3 Click the Settings tab. 4 Change the Screen resolution and Color quality to print a test page and complete printer installation. 55 Clear the printer memory by turning the printer off for "Automatically detect and install my Plug and Play printer", if you are installing a recently manufactured printer with Plug and...
Quick Start Guide
Page 58
...'s processor speed, determine the amount of installed memory, identify optical drive specifications, and more. You can locate helpful information immediately by consulting your computer's hardware configuration and preinstalled software information." * A hard copy of the VAIO Computer User Guide is supplied with Sony, and establish a dial-up your computer quickly and easily. The Quick Start can find...
...'s processor speed, determine the amount of installed memory, identify optical drive specifications, and more. You can locate helpful information immediately by consulting your computer's hardware configuration and preinstalled software information." * A hard copy of the VAIO Computer User Guide is supplied with Sony, and establish a dial-up your computer quickly and easily. The Quick Start can find...

Quick Start Guide
Page 65
.... Sony, VAIO, the VAIO logo, VAIO Smart, Giga Pocket, MovieShaker, DVgate, Handycam, Memory Stick, the Memory Stick logo, SonicStage, and i.LINK are trademarks or registered trademarks of Sony. ...PS/2 is prohibited. reserves the right to make any modification to any time without notice and may require a fee and credit card information. Certain product(s) included with participating financial institutions. Important information for Canadian customers: Your new VAIO computer...
.... Sony, VAIO, the VAIO logo, VAIO Smart, Giga Pocket, MovieShaker, DVgate, Handycam, Memory Stick, the Memory Stick logo, SonicStage, and i.LINK are trademarks or registered trademarks of Sony. ...PS/2 is prohibited. reserves the right to make any modification to any time without notice and may require a fee and credit card information. Certain product(s) included with participating financial institutions. Important information for Canadian customers: Your new VAIO computer...

Quick Start Guide
Page 74
VAIO Digital Studio Computer Quick Start F FAQ Basic system functions 38 Keyboard 53 Microphone 52 Modem 50 Mouse 53 Optical Disk Drive(s) 46 Preinstalled software 49 Speakers 49 Using ... 54 L left-hand settings for the mouse 54 Lighting workspace planning 8 Limited warranty 23 Line In jack 13 lithium battery disposal 71 safety precautions 71 M Memory Stick slot 11 Microphone jack 13 microphone background noise 52 troubleshooting 52 Microsoft Internet Explorer 61 Microsoft Windows XP 34 Modem jack 13 change to...
VAIO Digital Studio Computer Quick Start F FAQ Basic system functions 38 Keyboard 53 Microphone 52 Modem 50 Mouse 53 Optical Disk Drive(s) 46 Preinstalled software 49 Speakers 49 Using ... 54 L left-hand settings for the mouse 54 Lighting workspace planning 8 Limited warranty 23 Line In jack 13 lithium battery disposal 71 safety precautions 71 M Memory Stick slot 11 Microphone jack 13 microphone background noise 52 troubleshooting 52 Microsoft Internet Explorer 61 Microsoft Windows XP 34 Modem jack 13 change to...

Online Help Center (VAIO User Guide)
Page 7
Front panel (PCV- RZ series m odel, equipped with Giga Pocket features) 1 Optical drive 1 See the online specifications sheet for optical drive information. 2 Optical drive 2 See the online specifications ... from and to connect compatible peripheral devices. On certain models, the front panel also provides access to Giga Pocket Personal Video Recorder jacks and ports, a Memory Stick media slot and the Universal Serial Bus (USB), and i.LINK® ports to a floppy disk. 5 Power indicator Light is blue while the power is...
Front panel (PCV- RZ series m odel, equipped with Giga Pocket features) 1 Optical drive 1 See the online specifications sheet for optical drive information. 2 Optical drive 2 See the online specifications ... from and to connect compatible peripheral devices. On certain models, the front panel also provides access to Giga Pocket Personal Video Recorder jacks and ports, a Memory Stick media slot and the Universal Serial Bus (USB), and i.LINK® ports to a floppy disk. 5 Power indicator Light is blue while the power is...
Online Help Center (VAIO User Guide)
Page 8
...button Ejects a disc from Optical drive 1. 12 Optical drive 2 eject button Ejects a disc from Optical drive 2. 13 Memory Stick media slot Reads and writes data from and to a Memory Stick® media. 14 Floppy disk eject button Ejects a floppy disk from and to the optical drives. 9 Hard ... Universal Serial Bus 2.0 (USB) ports (2) High-speed connections for compatible USB devices. Page 8 Turns the computer on and off. 7 Stand by indicator Light is red when the computer is placed in Stand by mode. 8 Optical drive access indicator Light is amber while reading and writing data ...
...button Ejects a disc from Optical drive 1. 12 Optical drive 2 eject button Ejects a disc from Optical drive 2. 13 Memory Stick media slot Reads and writes data from and to a Memory Stick® media. 14 Floppy disk eject button Ejects a floppy disk from and to the optical drives. 9 Hard ... Universal Serial Bus 2.0 (USB) ports (2) High-speed connections for compatible USB devices. Page 8 Turns the computer on and off. 7 Stand by indicator Light is red when the computer is placed in Stand by mode. 8 Optical drive access indicator Light is amber while reading and writing data ...

Online Help Center (VAIO User Guide)
Page 10
It also includes access to the Memory Stick media slot, Universal Serial Bus (USB), and i.LINK® ports to the optical and floppy disk drives. Front panel (PCV- About the front panel (PCV-RX series model) The front panel of your VAIO Computer enables access to connect compatible peripheral devices. RX series m odel) 1 Optical drive 1 See...
It also includes access to the Memory Stick media slot, Universal Serial Bus (USB), and i.LINK® ports to the optical and floppy disk drives. Front panel (PCV- About the front panel (PCV-RX series model) The front panel of your VAIO Computer enables access to connect compatible peripheral devices. RX series m odel) 1 Optical drive 1 See...
Online Help Center (VAIO User Guide)
Page 11
... amber while reading and writing data from and to the hard disk. 7 Power switch and power indicator Turns the computer on/off. Light is in Stand by mode. 8 i.LINK 4-pin port (IEEE 1394) Connection for a compatible digital device. 9 Optical drive 1 eject button ...Ejects a disc from Optical drive 1. 10 Optical drive 2 eject button Ejects a disc from Optical drive 2. 11 Memory Stick® media slot Reads and writes data from and to a Memory Stick media. 12 Floppy disk eject button Ejects a floppy disk. 13 Universal Serial Bus (USB) 2.0 ports (4) High-speed ...
... amber while reading and writing data from and to the hard disk. 7 Power switch and power indicator Turns the computer on/off. Light is in Stand by mode. 8 i.LINK 4-pin port (IEEE 1394) Connection for a compatible digital device. 9 Optical drive 1 eject button ...Ejects a disc from Optical drive 1. 10 Optical drive 2 eject button Ejects a disc from Optical drive 2. 11 Memory Stick® media slot Reads and writes data from and to a Memory Stick media. 12 Floppy disk eject button Ejects a floppy disk. 13 Universal Serial Bus (USB) 2.0 ports (4) High-speed ...

Online Help Center (VAIO User Guide)
Page 34
... Cards, and changing default settings. Configuring Your VAIO Computer This section provides basic information about managing your computer, see the online specifications sheet. About Your Hard Disk Drive Partition i.LINK Compatibility VAIO Action Setup Changing The Sony Software Window Design Using The Memory Stick Media Slot Using The PC Card...
... Cards, and changing default settings. Configuring Your VAIO Computer This section provides basic information about managing your computer, see the online specifications sheet. About Your Hard Disk Drive Partition i.LINK Compatibility VAIO Action Setup Changing The Sony Software Window Design Using The Memory Stick Media Slot Using The PC Card...

Online Help Center (VAIO User Guide)
Page 43
... hardware configuration purchased. RZ series m odel shown) 3. Use your computer see the online specifications sheet. Using The Memory Stick Media Slot Your computer may not be equipped with similarly equipped products. A Memory Stick media is not upside-down or backwards. Opening the front panel (PCV- Page 43 To view the specific system configuration for exchanging...
... hardware configuration purchased. RZ series m odel shown) 3. Use your computer see the online specifications sheet. Using The Memory Stick Media Slot Your computer may not be equipped with similarly equipped products. A Memory Stick media is not upside-down or backwards. Opening the front panel (PCV- Page 43 To view the specific system configuration for exchanging...
Online Help Center (VAIO User Guide)
Page 44
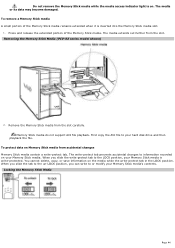
...is write-protected. RZ series m odel shown) 2. Do not remove the Memory Stick media while the media access indicator light is on the media while the write-protect tab in the LOCK position. Rem ov ing the Mem ory Stick Media (PCV- You cannot delete, copy, or save information on . Remove the... Memory Stick media from accidental changes Memory Stick media contain a write-protect tab. The media extends out further from the slot...
...is write-protected. RZ series m odel shown) 2. Do not remove the Memory Stick media while the media access indicator light is on the media while the write-protect tab in the LOCK position. Rem ov ing the Mem ory Stick Media (PCV- You cannot delete, copy, or save information on . Remove the... Memory Stick media from accidental changes Memory Stick media contain a write-protect tab. The media extends out further from the slot...

Online Help Center (VAIO User Guide)
Page 48
... http://www.sony.com/pcsupport. Overview Removing the Side Panel Installing an Add-on upgrading your computer, see the computer's System Reference Manual. Upgrading And Maintaining Your VAIO Computer In the future you may want to perform basic upgrades and maintenance on your VAIO computer. For more information on Card Installing Memory Replacing...
... http://www.sony.com/pcsupport. Overview Removing the Side Panel Installing an Add-on upgrading your computer, see the computer's System Reference Manual. Upgrading And Maintaining Your VAIO Computer In the future you may want to perform basic upgrades and maintenance on your VAIO computer. For more information on Card Installing Memory Replacing...

Online Help Center (VAIO User Guide)
Page 54
... wish to gently eject it out. Rem ov ing/Installing m em ory (PCV- Your computer may vary, depending on both sides of the module to remove. 6. Installing Memory The amount of preinstalled memory may ship with all peripheral devices, such as your computer. Observe the proper safety precautions when you purchased. Gently place the unit...
... wish to gently eject it out. Rem ov ing/Installing m em ory (PCV- Your computer may vary, depending on both sides of the module to remove. 6. Installing Memory The amount of preinstalled memory may ship with all peripheral devices, such as your computer. Observe the proper safety precautions when you purchased. Gently place the unit...

Online Help Center (VAIO User Guide)
Page 55
...off all peripheral devices, such as your computer and any cables, add-on the bottom edge of the module. 8. Firmly insert the bottom edge of the chassis. 6. Page 55 Remove the side panel. Remove the power supply before installing the memory modules, by the edges, and remove it...it on its anti-static package. 7. Unplug your printer. 2. Handle the DIMM only by following these steps: 1. Align the module over the available memory slots. 9. Shut down position and rest it clears the chassis. 4. Pull the tab that secures the power supply unit to access the DIMM slots....
...off all peripheral devices, such as your computer and any cables, add-on the bottom edge of the module. 8. Firmly insert the bottom edge of the chassis. 6. Page 55 Remove the side panel. Remove the power supply before installing the memory modules, by the edges, and remove it...it on its anti-static package. 7. Unplug your printer. 2. Handle the DIMM only by following these steps: 1. Align the module over the available memory slots. 9. Shut down position and rest it clears the chassis. 4. Pull the tab that secures the power supply unit to access the DIMM slots....

Online Help Center (VAIO User Guide)
Page 57
...utility. 2. To reset your computer and the peripheral devices. 4. The VAIO Help and Support Center window appears. Click Start in the CMOS memory are now reset to the factory...computer's date and time, see VAIO Help and Support Center for instructions. Replace the battery only with the plus (+) side up. Remove the side panel. To access the VAIO Help and Support Center: 1. Installing a lithium battery (PCV...to weaken after several years and the system settings, such as your nearest Sony Service Center or Factory Service Center. If necessary, remove any changes you may...
...utility. 2. To reset your computer and the peripheral devices. 4. The VAIO Help and Support Center window appears. Click Start in the CMOS memory are now reset to the factory...computer's date and time, see VAIO Help and Support Center for instructions. Replace the battery only with the plus (+) side up. Remove the side panel. To access the VAIO Help and Support Center: 1. Installing a lithium battery (PCV...to weaken after several years and the system settings, such as your nearest Sony Service Center or Factory Service Center. If necessary, remove any changes you may...

Online Help Center (VAIO User Guide)
Page 76
For information on installing memory, please see the online VAIO User Guide. Page 76 Why is my system running . Close any applications that you are open and running slowly? The system responsiveness varies depending with the number of applications that are not currently using. Increasing the system memory may also help.
For information on installing memory, please see the online VAIO User Guide. Page 76 Why is my system running . Close any applications that you are open and running slowly? The system responsiveness varies depending with the number of applications that are not currently using. Increasing the system memory may also help.


