VAIO User Guide
Page 65
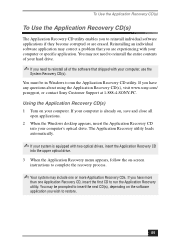
... your computer's optical drive. Using the Application Recovery CD(s) 1 Turn on the software application you are erased. You may be in Windows to run the Application Recovery utility. Reinstalling an individual software application may correct a problem that shipped with two optical drives, insert the Application Recovery CD into your hard drive. ✍ If you need to reinstall all open applications. 2 When the Windows desktop appears, insert the Application Recovery CD into the upper optical drive...
... your computer's optical drive. Using the Application Recovery CD(s) 1 Turn on the software application you are erased. You may be in Windows to run the Application Recovery utility. Reinstalling an individual software application may correct a problem that shipped with two optical drives, insert the Application Recovery CD into your hard drive. ✍ If you need to reinstall all open applications. 2 When the Windows desktop appears, insert the Application Recovery CD into the upper optical drive...

VAIO User Guide
Page 66
... Device Manager. 6 Click to select the unknown device or the device that you need to reinstall all applications. 2 When the Windows desktop appears, insert the Driver Recovery CD into the upper optical drive. 3 Click Start in the Windows taskbar and click Control Panel. This removes the device driver from the Driver Recovery CD. 66 If your computer is already on your computer, use the System Recovery CD(s). Click Start in Windows to correct a problem that requires the driver installation...
... Device Manager. 6 Click to select the unknown device or the device that you need to reinstall all applications. 2 When the Windows desktop appears, insert the Driver Recovery CD into the upper optical drive. 3 Click Start in the Windows taskbar and click Control Panel. This removes the device driver from the Driver Recovery CD. 66 If your computer is already on your computer, use the System Recovery CD(s). Click Start in Windows to correct a problem that requires the driver installation...

VAIO User Guide
Page 69
... select Turn Off Computer. Select Restart. 2 When the Sony screen displays, press the F2 key on your specific situation. To access System Setup: 1 Click Start in the Windows taskbar and select VAIO Help and Support. If you can toggle between the Normal (bi-directional), EPP, ECP, and ECP+EPP options using the System Setup utility (CMOS Setup Utility). Topic: How do I /O Device Configuration" and press Enter. 5 Use the arrow keys to Save and Exit. 69 Open...
... select Turn Off Computer. Select Restart. 2 When the Sony screen displays, press the F2 key on your specific situation. To access System Setup: 1 Click Start in the Windows taskbar and select VAIO Help and Support. If you can toggle between the Normal (bi-directional), EPP, ECP, and ECP+EPP options using the System Setup utility (CMOS Setup Utility). Topic: How do I /O Device Configuration" and press Enter. 5 Use the arrow keys to Save and Exit. 69 Open...
VAIO User Guide
Page 77
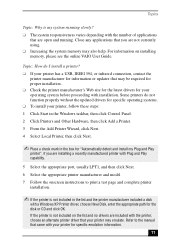
... open and running slowly? ❑ The system responsiveness varies depending with installation. Refer to the manual that you are not currently using. ❑ Increasing the system memory may emulate. If the printer is not included on installing memory, please see the online VAIO User Guide. Topic: How do not function properly without the updated drivers for specific operating systems. ❑ To install your printer for the disk...
... open and running slowly? ❑ The system responsiveness varies depending with installation. Refer to the manual that you are not currently using. ❑ Increasing the system memory may emulate. If the printer is not included on installing memory, please see the online VAIO User Guide. Topic: How do not function properly without the updated drivers for specific operating systems. ❑ To install your printer for the disk...
VAIO User Guide
Page 87
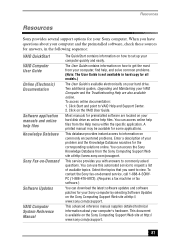
... menu within the specific application. Click Start and point to set up your computer quickly and easily. The User Guide contains information on the Sony Computing Support Web site at http://www.sony.com/pcsupport. Resources Resources Sony provides several support options for preinstalled software are also available online. Most manuals for your Sony computer. This document is available electronically on your VAIO Computer and the Troubleshooting Help are located on your hard disk drive...
... menu within the specific application. Click Start and point to set up your computer quickly and easily. The User Guide contains information on the Sony Computing Support Web site at http://www.sony.com/pcsupport. Resources Resources Sony provides several support options for preinstalled software are also available online. Most manuals for your Sony computer. This document is available electronically on your VAIO Computer and the Troubleshooting Help are located on your hard disk drive...

VAIO User Guide
Page 89
...-RW recording problems 72 changing window design 15 Check-In/Check-out 53 computer adjusting voltage settings 79 changing parallel port type 69 condensation 81 disposing of lithium battery 80 hard disk drive 83 proper handling 80 removing side cover 79 shutting down 79 startup problems 67 system response problem 68 upgrading 81 connecting cables 81 peripheral equipment 81 power cord 79 printers 77 CRT display port 11 D defragmenting hard disk drive 59 DigitalPrint software 19 LabelMaker...
...-RW recording problems 72 changing window design 15 Check-In/Check-out 53 computer adjusting voltage settings 79 changing parallel port type 69 condensation 81 disposing of lithium battery 80 hard disk drive 83 proper handling 80 removing side cover 79 shutting down 79 startup problems 67 system response problem 68 upgrading 81 connecting cables 81 peripheral equipment 81 power cord 79 printers 77 CRT display port 11 D defragmenting hard disk drive 59 DigitalPrint software 19 LabelMaker...

VAIO User Guide
Page 90
... port 11 F Floppy disk drive 9 Front Panel 7 Full mode 55 H handling your computer 80 hard disk drive defragmenting 59 partitioning 59 using 83 hardware cooling the heat sink 79 Headphones jack 11 I i.LINK (4-pin) port 9 (6-pin) port 11 compatibility 60 connecting 60 ImageStation 35 90 interference 81 J Jog Dial 56 K keyboard port 10 troubleshooting 76 L Line In jack 11 lithium battery, disposing 80 losing power 79 M magnetic shielding 80 Memory Stick 56 Memory Stick media slot...
... port 11 F Floppy disk drive 9 Front Panel 7 Full mode 55 H handling your computer 80 hard disk drive defragmenting 59 partitioning 59 using 83 hardware cooling the heat sink 79 Headphones jack 11 I i.LINK (4-pin) port 9 (6-pin) port 11 compatibility 60 connecting 60 ImageStation 35 90 interference 81 J Jog Dial 56 K keyboard port 10 troubleshooting 76 L Line In jack 11 lithium battery, disposing 80 losing power 79 M magnetic shielding 80 Memory Stick 56 Memory Stick media slot...
Quick Start Guide
Page 53
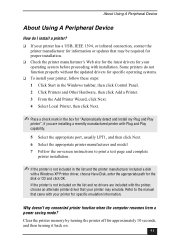
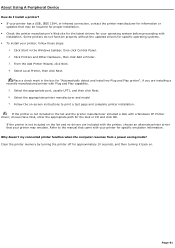
... on-screen instructions to the manual that your printer may emulate. Why doesn't my connected printer function when the computer resumes from a power saving mode? About Using A Peripheral Device About Using A Peripheral Device How do not function properly without the updated drivers for specific operating systems. ❑ To install your printer, follow these steps: 1 Click Start in the Windows taskbar, then click Control Panel. 2 Click Printers and Other Hardware, then click Add...
... on-screen instructions to the manual that your printer may emulate. Why doesn't my connected printer function when the computer resumes from a power saving mode? About Using A Peripheral Device About Using A Peripheral Device How do not function properly without the updated drivers for specific operating systems. ❑ To install your printer, follow these steps: 1 Click Start in the Windows taskbar, then click Control Panel. 2 Click Printers and Other Hardware, then click Add...
Quick Start Guide
Page 68
... Mouse 52 Optical Disk Drive(s) 45 Preinstalled software 48 Speakers 48 Using peripheral devices 53 Using System Recovery CDs 44 G Giga Pocket Personal Video Recorder 30 H handling your computer 59 hard disk drive using 60 hardware cooling the heat sink 57 Help and support 64 I i.LINK interface 7 interference 59 Internet connecting to 21 K keyboard 7 connecting 16 troubleshooting 52 Knowledge Database 65 L left-hand settings for the mouse 52 Lighting workspace planning 12 Limited warranty 20 lithium battery...
... Mouse 52 Optical Disk Drive(s) 45 Preinstalled software 48 Speakers 48 Using peripheral devices 53 Using System Recovery CDs 44 G Giga Pocket Personal Video Recorder 30 H handling your computer 59 hard disk drive using 60 hardware cooling the heat sink 57 Help and support 64 I i.LINK interface 7 interference 59 Internet connecting to 21 K keyboard 7 connecting 16 troubleshooting 52 Knowledge Database 65 L left-hand settings for the mouse 52 Lighting workspace planning 12 Limited warranty 20 lithium battery...

Quick Start Guide
Page 69
... Simple DVD Maker 33 slot cover 61 Smart Capture 33 Software Adobe Acrobat Reader 28 Adobe Photoshop Elements 28 Adobe Premiere LE 28 America Online 29 application manuals 65 AT&T WorldNet Service 29 audio problems 48 CD playback problems 47 CLIÉ Converter 29 DigitalPrint 29 driver recovery 44 DVDit! for VAIO PCs 29 DVgate 30 EarthLink Network Total Access 30 Giga Pocket Personal Video Recorder...
... Simple DVD Maker 33 slot cover 61 Smart Capture 33 Software Adobe Acrobat Reader 28 Adobe Photoshop Elements 28 Adobe Premiere LE 28 America Online 29 application manuals 65 AT&T WorldNet Service 29 audio problems 48 CD playback problems 47 CLIÉ Converter 29 DigitalPrint 29 driver recovery 44 DVDit! for VAIO PCs 29 DVgate 30 EarthLink Network Total Access 30 Giga Pocket Personal Video Recorder...
System Reference Manual
Page 12
... 6 - Miscellaneous Technical Information ......... 63 User and Supervisor Passwords 64 Beep Code Error Messages 65 PCI Configuration Status and Error Messages 66 DMA Channel Assignments 68 System I /O Slot 38 Installing an Internal Hard Disk Drive 39 To identify additional hard disk space 43 Removing the Power Supply 44 Replacing the Power Supply 45 Chapter 4 - xii VAIO Digital Studio System Reference Manual Chapter 3 - System Board 47 Memory Module (DDR-DIMM) Slots 48 Power Supply and Aux Power Headers 49 CLR CMOS Jumper 51 Chapter 5 - Upgrading and...
... 6 - Miscellaneous Technical Information ......... 63 User and Supervisor Passwords 64 Beep Code Error Messages 65 PCI Configuration Status and Error Messages 66 DMA Channel Assignments 68 System I /O Slot 38 Installing an Internal Hard Disk Drive 39 To identify additional hard disk space 43 Removing the Power Supply 44 Replacing the Power Supply 45 Chapter 4 - xii VAIO Digital Studio System Reference Manual Chapter 3 - System Board 47 Memory Module (DDR-DIMM) Slots 48 Power Supply and Aux Power Headers 49 CLR CMOS Jumper 51 Chapter 5 - Upgrading and...
System Reference Manual
Page 19
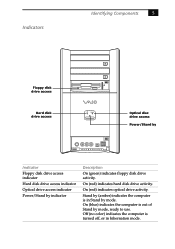
... the computer is out of Stand by mode. On (blue) indicates the computer is turned off, or in Stand by mode, ready to use. Stand by indicator Description On (green) indicates floppy disk drive activity. Indicators Identifying Components 5 Floppy disk drive access Hard disk drive access Optical disc drive access Power/Stand by Indicator Floppy disk drive access indicator Hard disk drive access indicator Optical drive access indicator Power/Stand by (amber) indicates the computer is in hibernation mode. On (red) indicates hard disk drive activity...
... the computer is out of Stand by mode. On (blue) indicates the computer is turned off, or in Stand by mode, ready to use. Stand by indicator Description On (green) indicates floppy disk drive activity. Indicators Identifying Components 5 Floppy disk drive access Hard disk drive access Optical disc drive access Power/Stand by Indicator Floppy disk drive access indicator Hard disk drive access indicator Optical drive access indicator Power/Stand by (amber) indicates the computer is in hibernation mode. On (red) indicates hard disk drive activity...
System Reference Manual
Page 94
...and error 66 microprocessor - See I /O slot specifications 76 icons, description of discs 3, 76 optical drive specifications 76 P passwords, user and supervisor 64 PCI add-in card installing 28 removing 26 PCI bus specifications 74 power connector 49 power management, configuring 17 processor specifications 73, 74 R RAM - 80 VAIO Digital Studio System Reference Manual I i.LINK connector 6 I/O address map 69 I/O connectors i.LINK 13 keyboard and mouse 10 mic, line in, headphones 12 monitor 11 printer port 11 serial port 1 11 telephone and line 12 USB ports 10 I/O slot covering 38 I /O slot...
...and error 66 microprocessor - See I /O slot specifications 76 icons, description of discs 3, 76 optical drive specifications 76 P passwords, user and supervisor 64 PCI add-in card installing 28 removing 26 PCI bus specifications 74 power connector 49 power management, configuring 17 processor specifications 73, 74 R RAM - 80 VAIO Digital Studio System Reference Manual I i.LINK connector 6 I/O address map 69 I/O connectors i.LINK 13 keyboard and mouse 10 mic, line in, headphones 12 monitor 11 printer port 11 serial port 1 11 telephone and line 12 USB ports 10 I/O slot covering 38 I /O slot...

VAIO User Guide
Page 27
... Internet access) to continually integrate additional services into Office and access information anytime. Quicken software is a unique set of additional features. You can watch TV and use Giga Pocket Personal Video Recorder functions on a computer that supplies access, information, and assistance to its customers, introducing them later. Quicken manages all the controls you expect from one location. Member benefits include e-mail, newsgroups, a Personal Start Page, a free...
... Internet access) to continually integrate additional services into Office and access information anytime. Quicken software is a unique set of additional features. You can watch TV and use Giga Pocket Personal Video Recorder functions on a computer that supplies access, information, and assistance to its customers, introducing them later. Quicken manages all the controls you expect from one location. Member benefits include e-mail, newsgroups, a Personal Start Page, a free...
VAIO User Guide
Page 48
... Recovery CD from the optical drive, click Start in the Windows taskbar, select Turn Off Computer, and then click Restart. 9. From the Hardware tab, click Device Manager. 6. Reinstalling device drivers 1. When the Windows desktop appears, insert the Application Recovery CD #1 into the optical disc drive. The Control Panel window appears. 4. This removes the device driver from the optical drive. The System Properties dialog box appears. 5. Restart your system. Insert Application Recovery CD #1, to restore. Click to exit the utility. 3. Turn...
... Recovery CD from the optical drive, click Start in the Windows taskbar, select Turn Off Computer, and then click Restart. 9. From the Hardware tab, click Device Manager. 6. Reinstalling device drivers 1. When the Windows desktop appears, insert the Application Recovery CD #1 into the optical disc drive. The Control Panel window appears. 4. This removes the device driver from the optical drive. The System Properties dialog box appears. 5. Restart your system. Insert Application Recovery CD #1, to restore. Click to exit the utility. 3. Turn...
VAIO User Guide
Page 61
... included in the Windows taskbar, then click Control Panel. 2. Why doesn't my connected printer function when the computer resumes from a power saving mode? Clear the printer memory by turning the printer off for "Automatically detect and install my Plug and Play printer", if you are included with Plug and Play capability. 5. Some printers do I install a printer? If your printer has a USB, IEEE 1394, or...
... included in the Windows taskbar, then click Control Panel. 2. Why doesn't my connected printer function when the computer resumes from a power saving mode? Clear the printer memory by turning the printer off for "Automatically detect and install my Plug and Play printer", if you are included with Plug and Play capability. 5. Some printers do I install a printer? If your printer has a USB, IEEE 1394, or...

VAIO User Guide
Page 69
... Help menu within the specific application. Click on -Demand This service provides you with answers to information on your hard drive. Sony Fax-on the VAIO User Guide. You can download the latest software updates and software patches for your Sony computer by selecting Software Updates on your hard disk drive as Help. Knowledge Database This database provides instant access to commonly asked questions. VAIO Computer System Reference Manual This advanced reference manual supplies detailed technical information...
... Help menu within the specific application. Click on -Demand This service provides you with answers to information on your hard drive. Sony Fax-on the VAIO User Guide. You can download the latest software updates and software patches for your Sony computer by selecting Software Updates on your hard disk drive as Help. Knowledge Database This database provides instant access to commonly asked questions. VAIO Computer System Reference Manual This advanced reference manual supplies detailed technical information...

VAIO User Guide
Page 77
... the settings in the BIOS Setup utility. 2. Remove the old battery and install the new battery with a CR2032-type lithium battery. See Replacing the side panel. To locate a Service Center near you do not wish to customize your BIOS settings, do not run the Setup utility. Write down your computer and turn off all peripheral devices, such as the date and time stored in CMOS RAM, may be prohibited. Unplug your computer and any cables, add-on cards, or other changes...
... the settings in the BIOS Setup utility. 2. Remove the old battery and install the new battery with a CR2032-type lithium battery. See Replacing the side panel. To locate a Service Center near you do not wish to customize your BIOS settings, do not run the Setup utility. Write down your computer and turn off all peripheral devices, such as the date and time stored in CMOS RAM, may be prohibited. Unplug your computer and any cables, add-on cards, or other changes...

VAIO User Guide
Page 79
... (NTFS) format. 1. Reconnect the power to the new drive. A shortcut menu appears. 3. The Computer Management window appears. 4. From the file directory on the Unallocated area of the ribbon cable, is supplied with red marking), and from the shortcut menu, select Initialize Disk. 6. The New Partition wizard appears. 8. Connect the second drive connector to your computer. Replace the side panel. The Windows® XP operating system recognizes the new hard disk drive and applies the NTFS...
... (NTFS) format. 1. Reconnect the power to the new drive. A shortcut menu appears. 3. The Computer Management window appears. 4. From the file directory on the Unallocated area of the ribbon cable, is supplied with red marking), and from the shortcut menu, select Initialize Disk. 6. The New Partition wizard appears. 8. Connect the second drive connector to your computer. Replace the side panel. The Windows® XP operating system recognizes the new hard disk drive and applies the NTFS...
Marketing Specifications
Page 1
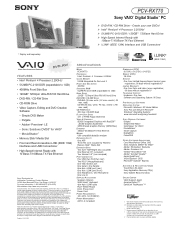
... one occupied) PORT CONNECTORS Four USB (two front/two rear) Two PS/2® (Mouse/Keyboard) One VGA monitor port One Serial / One Parallel One 6pin i.LINK port (rear) One 4pin i.LINK port (front) One Headphone / One Microphone One Line In SUPPLIED ACCESSORIES Speakers (Stereo) VAIO Smart™ Keyboard 4pin-4pin i.LINK cable PS/2® Wheel Mouse RJ-11 Phone Cord Power Cord POWER REQUIREMENTS 100-120V -3A (50/60Hz) POWER MANAGEMENT ACPI 1.0 Compliant...
... one occupied) PORT CONNECTORS Four USB (two front/two rear) Two PS/2® (Mouse/Keyboard) One VGA monitor port One Serial / One Parallel One 6pin i.LINK port (rear) One 4pin i.LINK port (front) One Headphone / One Microphone One Line In SUPPLIED ACCESSORIES Speakers (Stereo) VAIO Smart™ Keyboard 4pin-4pin i.LINK cable PS/2® Wheel Mouse RJ-11 Phone Cord Power Cord POWER REQUIREMENTS 100-120V -3A (50/60Hz) POWER MANAGEMENT ACPI 1.0 Compliant...


