
Quick Start Guide
Page 8
... electronically on your VAIO computer. 8 Provides safety and legal information about your computer's hard drive. To access the online manual: 1 Click Start in the Windows Taskbar, then click VAIO Help and Support. 2 From the VAIO Help and Support menu, click VAIO User Guide. ❑ Safety Information - VAIO Digital Studio Computer QuickStart Unpacking Your Computer Computer and Supplied Accessories Computer and accessories System...
... electronically on your VAIO computer. 8 Provides safety and legal information about your computer's hard drive. To access the online manual: 1 Click Start in the Windows Taskbar, then click VAIO Help and Support. 2 From the VAIO Help and Support menu, click VAIO User Guide. ❑ Safety Information - VAIO Digital Studio Computer QuickStart Unpacking Your Computer Computer and Supplied Accessories Computer and accessories System...
Quick Start Guide
Page 29
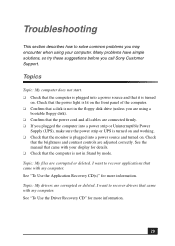
... applications that came with my computer. See "To Use the...manual that came with your computer. Topic: My files are corrupted or deleted. Topics Topic: My computer... does not start. ❑ Check that a disk is lit on . Check that the brightness and contrast controls are connected firmly. ❑ If you are using your display for details. ❑ Check that the computer... is not in the floppy disk drive (unless you plugged the computer...computer. ❑ Confirm that the computer is plugged into a power source and turned on. Check that came with my computer...
... applications that came with my computer. See "To Use the...manual that came with your computer. Topic: My files are corrupted or deleted. Topics Topic: My computer... does not start. ❑ Check that a disk is lit on . Check that the brightness and contrast controls are connected firmly. ❑ If you are using your display for details. ❑ Check that the computer... is not in the floppy disk drive (unless you plugged the computer...computer. ❑ Confirm that the computer is plugged into a power source and turned on. Check that came with my computer...

Quick Start Guide
Page 39
... usually LPT1, and then click Next. 6 Select the appropriate printer manufacturer and model. 7 Follow the on-screen instructions to the manual that came with the printer, choose an alternate printer driver that your printer for specific emulation information. Topics ❑ Check the printer...the printer manufacturer included a disk with installation. To contact Sony for technical support For further technical assistance, call 1-888-4-SONY-PC (1-888-476-6972) or access the Sony Computing Support Web site at http://www.sony.com/pcsupport. 39 Topic: My connected printer doesn't function...
... usually LPT1, and then click Next. 6 Select the appropriate printer manufacturer and model. 7 Follow the on-screen instructions to the manual that came with the printer, choose an alternate printer driver that your printer for specific emulation information. Topics ❑ Check the printer...the printer manufacturer included a disk with installation. To contact Sony for technical support For further technical assistance, call 1-888-4-SONY-PC (1-888-476-6972) or access the Sony Computing Support Web site at http://www.sony.com/pcsupport. 39 Topic: My connected printer doesn't function...
Quick Start Guide
Page 43
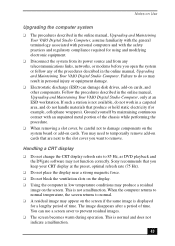
Sony recommends that you keep your CRT display at an ESD workstation. This is not available, do not work in the online manual, Upgrading and Maintaining Your VAIO Digital Studio Computer. The image disappears after a period of time. You can damage disk drives, add-on the screen.... damage. ❑ Electrostatic discharge (ESD) can use a screen saver to remove. Follow the procedures described in the online manual, Upgrading and Maintaining Your VAIO Digital Studio Computer, only at the preset, optimal refresh rate (75 Hz). ❑ Do not place the display near a strong magnetic ...
Sony recommends that you keep your CRT display at an ESD workstation. This is not available, do not work in the online manual, Upgrading and Maintaining Your VAIO Digital Studio Computer. The image disappears after a period of time. You can damage disk drives, add-on the screen.... damage. ❑ Electrostatic discharge (ESD) can use a screen saver to remove. Follow the procedures described in the online manual, Upgrading and Maintaining Your VAIO Digital Studio Computer, only at the preset, optimal refresh rate (75 Hz). ❑ Do not place the display near a strong magnetic ...
Quick Start Guide
Page 44
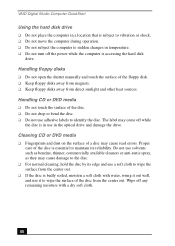
Handling floppy disks ❑ Do not open the shutter manually and touch the surface of the disc from direct sunlight and other heat sources. Wipe off the power while the computer is accessing the hard disk drive. The label may come off while the disc is in use in temperature. &#...errors. Proper care of a disc may cause damage to the disc. ❑ For normal cleaning, hold the disc by its reliability. VAIO Digital Studio Computer QuickStart Using the hard disk drive ❑ Do not place the computer in a location that is subject to vibration or shock. ❑ Do not move the...
Handling floppy disks ❑ Do not open the shutter manually and touch the surface of the disc from direct sunlight and other heat sources. Wipe off the power while the computer is accessing the hard disk drive. The label may come off while the disc is in use in temperature. &#...errors. Proper care of a disc may cause damage to the disc. ❑ For normal cleaning, hold the disc by its reliability. VAIO Digital Studio Computer QuickStart Using the hard disk drive ❑ Do not place the computer in a location that is subject to vibration or shock. ❑ Do not move the...

Quick Start Guide
Page 48
..., call 1-888-4-SONYPC (1-888-476-6972). (Requires a fax machine or fax software.) You can access the Sony Knowledge Database from your computer's hardware. A printed manual may be available for some applications. To contact the Sony fax-on your VAIO Computer and the Troubleshooting Help are also available online. This document is available electronically on commonly encountered...
..., call 1-888-4-SONYPC (1-888-476-6972). (Requires a fax machine or fax software.) You can access the Sony Knowledge Database from your computer's hardware. A printed manual may be available for some applications. To contact the Sony fax-on your VAIO Computer and the Troubleshooting Help are also available online. This document is available electronically on commonly encountered...

System Reference Manual
Page 2
... may not necessarily be transported or used outside the United States. IN NO EVENT SHALL SONY ELECTRONICS INC. Sony Electronics Inc. Sony, VAIO, the VAIO logo, VAIO Digital Studio, VAIO Smart, VisualFlow, Media Bar, MovieShaker, DVgate, PictureGear, and i.LINK are trademarks or registered trademarks... of IBM Corporation. ii VAIO Digital Studio System Reference Manual NOTICE © 2001 Sony Electronics Inc. Use of such software is a registered trademark of Sony. Subscriptions to the model and serial numbers when you call your Sony VAIO computer. Refer to online service ...
... may not necessarily be transported or used outside the United States. IN NO EVENT SHALL SONY ELECTRONICS INC. Sony Electronics Inc. Sony, VAIO, the VAIO logo, VAIO Digital Studio, VAIO Smart, VisualFlow, Media Bar, MovieShaker, DVgate, PictureGear, and i.LINK are trademarks or registered trademarks... of IBM Corporation. ii VAIO Digital Studio System Reference Manual NOTICE © 2001 Sony Electronics Inc. Use of such software is a registered trademark of Sony. Subscriptions to the model and serial numbers when you call your Sony VAIO computer. Refer to online service ...
System Reference Manual
Page 5
... the limits for a Class B digital device, pursuant to provide reasonable protection against harmful interference in interference to this manual could void your authority to radio communications. This equipment has been tested and found to comply with noncompliant peripherals is no... not occur in this computer product. This equipment generates, uses, and can be shielded and grounded. This device complies with the instructions, may result in accordance with Part 15 of Conformity Trade Name: SONY Model No.: PCV-7732 Responsible Party: Sony Electronics Inc. Address:...
... the limits for a Class B digital device, pursuant to provide reasonable protection against harmful interference in interference to this manual could void your authority to radio communications. This equipment has been tested and found to comply with noncompliant peripherals is no... not occur in this computer product. This equipment generates, uses, and can be shielded and grounded. This device complies with the instructions, may result in accordance with Part 15 of Conformity Trade Name: SONY Model No.: PCV-7732 Responsible Party: Sony Electronics Inc. Address:...

System Reference Manual
Page 6
vi VAIO Digital Studio System Reference Manual FCC Part 68 This equipment complies with Part 68 of devices...States) The Telephone Consumer Protection Act of 1991 makes it unlawful for repair or warranty information, please contact 1-888-4-SONY-PC, or write to make changes in advance that you , call . This Class B digital apparatus complies ... 5 étage Hull PQ K1A 0N2. In order to program this modem, for any person to use a computer or other entity, or individual. But if advance notice is necessary. The telephone company may request that temporary discontinuance...
vi VAIO Digital Studio System Reference Manual FCC Part 68 This equipment complies with Part 68 of devices...States) The Telephone Consumer Protection Act of 1991 makes it unlawful for repair or warranty information, please contact 1-888-4-SONY-PC, or write to make changes in advance that you , call . This Class B digital apparatus complies ... 5 étage Hull PQ K1A 0N2. In order to program this modem, for any person to use a computer or other entity, or individual. But if advance notice is necessary. The telephone company may request that temporary discontinuance...
System Reference Manual
Page 10
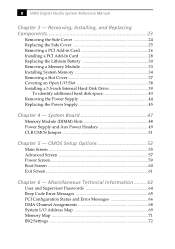
... 30 Removing a Memory Module 33 Installing System Memory 34 Removing a Slot Cover 37 Covering an Open I /O Address Map 69 Memory Map 71 IRQ Settings 72 x VAIO Digital Studio System Reference Manual Chapter 3 -
... 30 Removing a Memory Module 33 Installing System Memory 34 Removing a Slot Cover 37 Covering an Open I /O Address Map 69 Memory Map 71 IRQ Settings 72 x VAIO Digital Studio System Reference Manual Chapter 3 -
System Reference Manual
Page 13
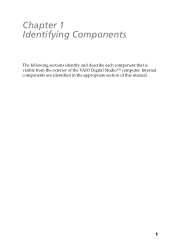
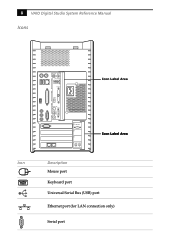
Chapter 1 Identifying Components The following sections identify and describe each component that is visible from the exterior of this manual. 1 Internal components are identified in the appropriate section of the VAIO Digital Studio™ computer.
Chapter 1 Identifying Components The following sections identify and describe each component that is visible from the exterior of this manual. 1 Internal components are identified in the appropriate section of the VAIO Digital Studio™ computer.

System Reference Manual
Page 16
Ejects a floppy disk. Turns system power on /off , or into Stand by mode. 4 VAIO Digital Studio System Reference Manual Buttons and Switches Optical disc eject Floppy disk eject Power on/off Button or switch Optical disc eject button Floppy disk eject button Power on , off switch Description Automatically opens and closes the optical drive tray.
Ejects a floppy disk. Turns system power on /off , or into Stand by mode. 4 VAIO Digital Studio System Reference Manual Buttons and Switches Optical disc eject Floppy disk eject Power on/off Button or switch Optical disc eject button Floppy disk eject button Power on , off switch Description Automatically opens and closes the optical drive tray.
System Reference Manual
Page 18
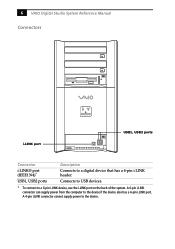
6 VAIO Digital Studio System Reference Manual Connectors i.LINK port USB1, USB2 ports Connector i.LINK® port (IEEE1394)* USB1, USB2 ports Description Connects to the device. A 4-pin i.LINK connector cannot supply power to a digital device that has a 4-pin i.LINK header. A 6-pin i.LINK connector can supply power from the computer to a 6-pin i.LINK device, use the i.LINK port on the back of the system. Connects to USB devices. * To connect to the device if the device also has a 6-pin i.LINK port.
6 VAIO Digital Studio System Reference Manual Connectors i.LINK port USB1, USB2 ports Connector i.LINK® port (IEEE1394)* USB1, USB2 ports Description Connects to the device. A 4-pin i.LINK connector cannot supply power to a digital device that has a 4-pin i.LINK header. A 6-pin i.LINK connector can supply power from the computer to a 6-pin i.LINK device, use the i.LINK port on the back of the system. Connects to USB devices. * To connect to the device if the device also has a 6-pin i.LINK port.
System Reference Manual
Page 20
8 VAIO Digital Studio System Reference Manual Icons Icon KEYBOARD MOUSE USB NETWORK ACT LINK PRINTER i.LINK S400 HEADPHONES SERIAL LINE IN MIC 4 MONITOR 3 2 1 LINE TELEPHONE Icon Label Area Icon Label Area Description Mouse port Keyboard port Universal Serial Bus (USB) port Ethernet port (for LAN connection only) Serial port
8 VAIO Digital Studio System Reference Manual Icons Icon KEYBOARD MOUSE USB NETWORK ACT LINK PRINTER i.LINK S400 HEADPHONES SERIAL LINE IN MIC 4 MONITOR 3 2 1 LINE TELEPHONE Icon Label Area Icon Label Area Description Mouse port Keyboard port Universal Serial Bus (USB) port Ethernet port (for LAN connection only) Serial port
System Reference Manual
Page 22
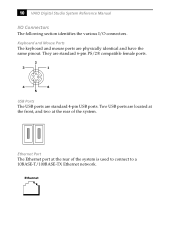
Ethernet They are standard 6-pin PS/2® compatible female ports. 2 3 1 4 6 5 USB Ports The USB ports are located at the front, and two at the rear of the system. Two USB ports are standard 4-pin USB ports. 10 VAIO Digital Studio System Reference Manual I/O Connectors The following section identifies the various I/O connectors. Ethernet Port The Ethernet port at the rear of the system is used to connect to a 10BASE-T/100BASE-TX Ethernet network. Keyboard and Mouse Ports The keyboard and mouse ports are physically identical and have the same pinout.
Ethernet They are standard 6-pin PS/2® compatible female ports. 2 3 1 4 6 5 USB Ports The USB ports are located at the front, and two at the rear of the system. Two USB ports are standard 4-pin USB ports. 10 VAIO Digital Studio System Reference Manual I/O Connectors The following section identifies the various I/O connectors. Ethernet Port The Ethernet port at the rear of the system is used to connect to a 10BASE-T/100BASE-TX Ethernet network. Keyboard and Mouse Ports The keyboard and mouse ports are physically identical and have the same pinout.

System Reference Manual
Page 24
... a HomePNA modem installed. Line Phone ✍ Accidentally plugging a phone line from the wall, and the telephone jack is for connecting the computer to a telephone. 12 VAIO Digital Studio System Reference Manual Mic, Line In, and Headphones Jacks The microphone, line in, and headphones jacks are physically identical, but have identical connections. They are...
... a HomePNA modem installed. Line Phone ✍ Accidentally plugging a phone line from the wall, and the telephone jack is for connecting the computer to a telephone. 12 VAIO Digital Studio System Reference Manual Mic, Line In, and Headphones Jacks The microphone, line in, and headphones jacks are physically identical, but have identical connections. They are...
System Reference Manual
Page 26
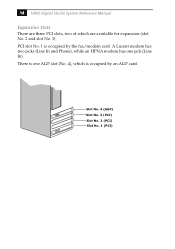
Slot No. 4 (AGP) Slot No. 3 (PCI) Slot No. 2 (PCI) Slot No. 1 (PCI) A Lucent modem has two jacks (Line In and Phone), while an HPNA modem has one AGP slot (No. 4), which are three PCI slots, two of which is occupied by an AGP card. There is one jack (Line In). 14 VAIO Digital Studio System Reference Manual Expansion Slots There are available for expansion (slot No. 2 and slot No. 3). PCI slot No. 1 is occupied by the fax/modem card.
Slot No. 4 (AGP) Slot No. 3 (PCI) Slot No. 2 (PCI) Slot No. 1 (PCI) A Lucent modem has two jacks (Line In and Phone), while an HPNA modem has one AGP slot (No. 4), which are three PCI slots, two of which is occupied by an AGP card. There is one jack (Line In). 14 VAIO Digital Studio System Reference Manual Expansion Slots There are available for expansion (slot No. 2 and slot No. 3). PCI slot No. 1 is occupied by the fax/modem card.

System Reference Manual
Page 28
... follow the prompts. Before rebooting the system, save and close all open files, and exit open applications. 1 Reboot your computer by selecting Shut Down... Each menu presents options for setup. 3 Press F2. Use the left , this indicates that a...out of the screen. Use the up and down arrow keys to access a sub-menu. 16 VAIO Digital Studio System Reference Manual Accessing the BIOS Setup Utility You must access the BIOS Setup Utility to make changes to its left..., there is another layer of options from the Start menu, then selecting Restart. 2 When the Sony logo appears, press F3.
... follow the prompts. Before rebooting the system, save and close all open files, and exit open applications. 1 Reboot your computer by selecting Shut Down... Each menu presents options for setup. 3 Press F2. Use the left , this indicates that a...out of the screen. Use the up and down arrow keys to access a sub-menu. 16 VAIO Digital Studio System Reference Manual Accessing the BIOS Setup Utility You must access the BIOS Setup Utility to make changes to its left..., there is another layer of options from the Start menu, then selecting Restart. 2 When the Sony logo appears, press F3.

System Reference Manual
Page 30
Power is running on the keyboard. 18 VAIO Digital Studio System Reference Manual The Turn off monitor option allows you to specify the period of inactivity (in minutes) that you want to elapse before your computer goes in the hibernate state. The System hibernates option allows you want to specify the period of inactivity...
Power is running on the keyboard. 18 VAIO Digital Studio System Reference Manual The Turn off monitor option allows you to specify the period of inactivity (in minutes) that you want to elapse before your computer goes in the hibernate state. The System hibernates option allows you want to specify the period of inactivity...

System Reference Manual
Page 32
20 VAIO Digital Studio System Reference Manual 6 Click the Hibernate tab. 7 Select the settings most appropriate for your system.
20 VAIO Digital Studio System Reference Manual 6 Click the Hibernate tab. 7 Select the settings most appropriate for your system.


