Quick Start Guide
Page 3
... backs the development and dissemination of Microsoft Corporation. Sony, VAIO, the VAIO logo, Image Station, SonicStage, DVgate, MagicGate, PictureGear, i.LINK, Memory Stick, and the Memory Stick Logo are available to the model and serial numbers when you call your Sony VAIO® computer. As an ENERGY STAR® Partner, Sony Corporation has determined that are trademarks or registered trademarks...
... backs the development and dissemination of Microsoft Corporation. Sony, VAIO, the VAIO logo, Image Station, SonicStage, DVgate, MagicGate, PictureGear, i.LINK, Memory Stick, and the Memory Stick Logo are available to the model and serial numbers when you call your Sony VAIO® computer. As an ENERGY STAR® Partner, Sony Corporation has determined that are trademarks or registered trademarks...
System Reference Manual
Page 2
... to any time without written permission is governed by the terms of the computer, and may be identical to U.S. Software specifications are available to current retail versions. Sony, VAIO, the VAIO logo, Image Station, SonicStage, DVgate, MagicGate, PictureGear, i.LINK, Memory Stick, and the Memory Stick Logo are trademarks or registered trademarks of license agreements enclosed with...
... to any time without written permission is governed by the terms of the computer, and may be identical to U.S. Software specifications are available to current retail versions. Sony, VAIO, the VAIO logo, Image Station, SonicStage, DVgate, MagicGate, PictureGear, i.LINK, Memory Stick, and the Memory Stick Logo are trademarks or registered trademarks of license agreements enclosed with...
System Reference Manual
Page 12
CMOS Setup Options 53 Main Screen 55 Advanced Screen 58 Power Screen 61 Boot Screen 62 Exit Screen 64 xii VAIO Computer System Reference Manual Chapter 3 - Upgrading and Maintaining Components 25 Removing the Cover 26 Removing the cover 26 Replacing the cover 28 ...Installing an Add-on Card 29 About the Lithium Battery 32 Replacing the lithium battery 32 About Installing Memory 35 Removing a memory module 35 Installing a memory module 36 Installing Memory Modules 38 Covering an Open I/O Slot 41 About Hard Disk Drive Installation 42 Replacing the original hard disk ...
CMOS Setup Options 53 Main Screen 55 Advanced Screen 58 Power Screen 61 Boot Screen 62 Exit Screen 64 xii VAIO Computer System Reference Manual Chapter 3 - Upgrading and Maintaining Components 25 Removing the Cover 26 Removing the cover 26 Replacing the cover 28 ...Installing an Add-on Card 29 About the Lithium Battery 32 Replacing the lithium battery 32 About Installing Memory 35 Removing a memory module 35 Installing a memory module 36 Installing Memory Modules 38 Covering an Open I/O Slot 41 About Hard Disk Drive Installation 42 Replacing the original hard disk ...
System Reference Manual
Page 13
... 66 Beep Code Error Messages 67 PCI Configuration Status and Error Messages 68 DMA Channel Assignments 69 System I/O Address Map (PCV-RS310 70 System I /O and Expansion Slots 82 Floppy Disk Drive and Controller 82 Hard Drives and Controller 82 Optical Drives 83...79 PCI Bus ...79 AGP BUS (PCV-RS320 series models only 79 Memory Modules 80 Memory Configurations 80 L2 Cache ...80 Graphics ...80 Audio ...81 Communications 81 I /O Address Map (PCV-RS320 72 Memory Map (PCV-RS310 74 Memory Map (PCV-RS320 75 IRQ Settings (PCV-RS310 76 IRQ Settings (PCV-RS320 77 Chapter 7 - xiii Chapter ...
... 66 Beep Code Error Messages 67 PCI Configuration Status and Error Messages 68 DMA Channel Assignments 69 System I/O Address Map (PCV-RS310 70 System I /O and Expansion Slots 82 Floppy Disk Drive and Controller 82 Hard Drives and Controller 82 Optical Drives 83...79 PCI Bus ...79 AGP BUS (PCV-RS320 series models only 79 Memory Modules 80 Memory Configurations 80 L2 Cache ...80 Graphics ...80 Audio ...81 Communications 81 I /O Address Map (PCV-RS320 72 Memory Map (PCV-RS310 74 Memory Map (PCV-RS320 75 IRQ Settings (PCV-RS310 76 IRQ Settings (PCV-RS320 77 Chapter 7 - xiii Chapter ...
System Reference Manual
Page 48
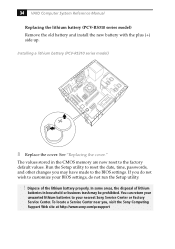
Run the Setup utility to customize your nearest Sony Service Center or Factory Service Center. In some areas, the disposal of the lithium battery properly. See "Replacing the cover." You can return your unwanted ... model) 8 Replace the cover. Dispose of lithium batteries in the CMOS memory are now reset to the BIOS settings. If you , visit the Sony Computing Support Web site at http://www.sony.com/pcsupport 34 VAIO Computer System Reference Manual Replacing the lithium battery (PCV-RS310 series model) Remove the old battery and install the new battery with...
Run the Setup utility to customize your nearest Sony Service Center or Factory Service Center. In some areas, the disposal of the lithium battery properly. See "Replacing the cover." You can return your unwanted ... model) 8 Replace the cover. Dispose of lithium batteries in the CMOS memory are now reset to the BIOS settings. If you , visit the Sony Computing Support Web site at http://www.sony.com/pcsupport 34 VAIO Computer System Reference Manual Replacing the lithium battery (PCV-RS310 series model) Remove the old battery and install the new battery with...
System Reference Manual
Page 49
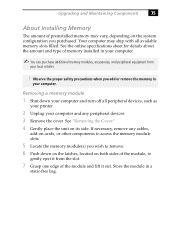
... it from your local retailer. ! See the online specifications sheet for details about the amount and type of preinstalled memory may ship with all peripheral devices, such as your printer. 2 Unplug your computer and any cables, add-on its side. See "Removing the Cover." 4 Gently place the unit on cards, or other...
... it from your local retailer. ! See the online specifications sheet for details about the amount and type of preinstalled memory may ship with all peripheral devices, such as your printer. 2 Unplug your computer and any cables, add-on its side. See "Removing the Cover." 4 Gently place the unit on cards, or other...

System Reference Manual
Page 50
... insert the bottom edge of the memory module into the slot. on cards, or other components to align it by the edges. 6 Locate the notch on its side. 36 VAIO Computer System Reference Manual Removing/Installing memory (PCV-RS310 series model shown) Latch Latch Installing a memory module 1 Shut down your computer and turn off all peripheral devices, such...
... insert the bottom edge of the memory module into the slot. on cards, or other components to align it by the edges. 6 Locate the notch on its side. 36 VAIO Computer System Reference Manual Removing/Installing memory (PCV-RS310 series model shown) Latch Latch Installing a memory module 1 Shut down your computer and turn off all peripheral devices, such...

System Reference Manual
Page 51
To avoid damaging a memory module slot, move the end latches slightly outward to relieve pressure. See "Replacing the cover." The module clicks into position, holding the module in place. ! The latches snap into place. 9 Reinstall any components or add-on cards you may have removed. 10 Replace the cover. Upgrading and Maintaining Components 37 8 Press down evenly against the module's upper corners.
To avoid damaging a memory module slot, move the end latches slightly outward to relieve pressure. See "Replacing the cover." The module clicks into position, holding the module in place. ! The latches snap into place. 9 Reinstall any components or add-on cards you may have removed. 10 Replace the cover. Upgrading and Maintaining Components 37 8 Press down evenly against the module's upper corners.

System Reference Manual
Page 52
... can vary in the following table. Memory module configurations (MB)* PCV-RS310 Series PCV-RS320 Series DIMM1 0, 128, 256, 512 0, 128, 256, 512 DIMM2 0, 128, 256, 512 0, 128, 256, 512 DIMM3 0, 128, 256, 512 DIMM4 0, 128, 256, 512 * Your computer ships with more than 256 MB DDR-SDRAM ... BIOS automatically detects the type, size and speed of memory. Your model may ship with at least 256 MB of the memory modules. Memory modules can be single- The minimum memory module size is 512 MB. 38 VAIO Computer System Reference Manual Installing Memory Modules Your system supports DDR-SDRAM...
... can vary in the following table. Memory module configurations (MB)* PCV-RS310 Series PCV-RS320 Series DIMM1 0, 128, 256, 512 0, 128, 256, 512 DIMM2 0, 128, 256, 512 0, 128, 256, 512 DIMM3 0, 128, 256, 512 DIMM4 0, 128, 256, 512 * Your computer ships with more than 256 MB DDR-SDRAM ... BIOS automatically detects the type, size and speed of memory. Your model may ship with at least 256 MB of the memory modules. Memory modules can be single- The minimum memory module size is 512 MB. 38 VAIO Computer System Reference Manual Installing Memory Modules Your system supports DDR-SDRAM...
System Reference Manual
Page 53
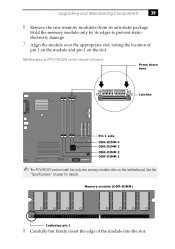
... prevent staticelectricity damage. 7 Align the module over the appropriate slot, noting the location of the module into the slot. Motherboard (PCV-RS320 series model shown) Press down here Latches Pin 1 side DDR-DIMM 4 DDR-DIMM 3 DDR-DIMM 2 DDR-DIMM 1 ✍ The PCV-RS310 series model has only two memory module slots on the slot.
... prevent staticelectricity damage. 7 Align the module over the appropriate slot, noting the location of the module into the slot. Motherboard (PCV-RS320 series model shown) Press down here Latches Pin 1 side DDR-DIMM 4 DDR-DIMM 3 DDR-DIMM 2 DDR-DIMM 1 ✍ The PCV-RS310 series model has only two memory module slots on the slot.
System Reference Manual
Page 54
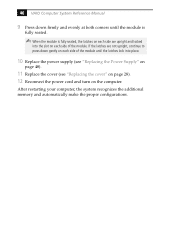
... seated. ✍ When the module is fully seated, the latches on each side of the module. After restarting your computer, the system recognizes the additional memory and automatically make the proper configurations. 40 VAIO Computer System Reference Manual 9 Press down firmly and evenly at both corners until the latches lock into place. 10 Replace... the cover" on page 28). 12 Reconnect the power cord and turn on each side are not upright, continue to press down gently on the computer.
... seated. ✍ When the module is fully seated, the latches on each side of the module. After restarting your computer, the system recognizes the additional memory and automatically make the proper configurations. 40 VAIO Computer System Reference Manual 9 Press down firmly and evenly at both corners until the latches lock into place. 10 Replace... the cover" on page 28). 12 Reconnect the power cord and turn on each side are not upright, continue to press down gently on the computer.

System Reference Manual
Page 61
... upside down the computer, and unplug the power cord. 1 Remove the screw that secures the power supply to the rear of the chassis where the hard drive is located. Upgrading and Maintaining Components 47 Removing the Power Supply Remove the power supply when you insert a memory module (see "Installing Memory Modules" on top...
... upside down the computer, and unplug the power cord. 1 Remove the screw that secures the power supply to the rear of the chassis where the hard drive is located. Upgrading and Maintaining Components 47 Removing the Power Supply Remove the power supply when you insert a memory module (see "Installing Memory Modules" on top...
System Reference Manual
Page 63
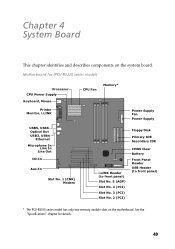
...describes components on the motherboard. See the "Specifications" chapter for (PCV-RS320 series model) Processor CPU Power Supply Keyboard, Mouse Printer ...Memory* Power Supply Fan Power Supply Floppy Disk Primary IDE Secondary IDE i.LINK Header (to front panel) Slot No. 5 (AGP) Slot No. 4 (PCI) Slot No. 3 (PCI) Slot No. 2 (PCI) CMOS Clear Battery Front Panel Header USB Header (to front panel) * The PCV-RS310... series model has only two memory module slots on the system board. Motherboard for details. 49
...describes components on the motherboard. See the "Specifications" chapter for (PCV-RS320 series model) Processor CPU Power Supply Keyboard, Mouse Printer ...Memory* Power Supply Fan Power Supply Floppy Disk Primary IDE Secondary IDE i.LINK Header (to front panel) Slot No. 5 (AGP) Slot No. 4 (PCI) Slot No. 3 (PCI) Slot No. 2 (PCI) CMOS Clear Battery Front Panel Header USB Header (to front panel) * The PCV-RS310... series model has only two memory module slots on the system board. Motherboard for details. 49

System Reference Manual
Page 64
DDR-DIMM1 DDR-DIMM2 DDR-DIMM3 DDR-DIMM4 50 VAIO Computer System Reference Manual Memory Module (DDR-DIMM) Slots PCV-RS320 series model Motherboard shown* * The PCV-RS310 series model has only two memory module slots on the memory module slot of the system board. See the "Specifications" chapter for details. Memory module (DDR-DIMM) 1 Indicates pin 1 Align pin 1 of the Dual Inline Memory Module DDR-SDRAM DIMM to the small triangle located on the motherboard.
DDR-DIMM1 DDR-DIMM2 DDR-DIMM3 DDR-DIMM4 50 VAIO Computer System Reference Manual Memory Module (DDR-DIMM) Slots PCV-RS320 series model Motherboard shown* * The PCV-RS310 series model has only two memory module slots on the memory module slot of the system board. See the "Specifications" chapter for details. Memory module (DDR-DIMM) 1 Indicates pin 1 Align pin 1 of the Dual Inline Memory Module DDR-SDRAM DIMM to the small triangle located on the motherboard.

System Reference Manual
Page 79
Chapter 6 Miscellaneous Technical Information This chapter contains information on the following subjects: ❑ User and Supervisor password ❑ Beep code error messages ❑ PCI configuration status and error messages ❑ DMA channel assignments ❑ System I/O address map ❑ Memory map ❑ IRQ settings 65
Chapter 6 Miscellaneous Technical Information This chapter contains information on the following subjects: ❑ User and Supervisor password ❑ Beep code error messages ❑ PCI configuration status and error messages ❑ DMA channel assignments ❑ System I/O address map ❑ Memory map ❑ IRQ settings 65

System Reference Manual
Page 82
... CMOS Data Invalid, CMOS Cleared Parallel Port Resource Conflict PCI Error Log is Full PCI I/O Port Conflict PCI IRQ Conflict PCI Memory Conflict Primary Boot Device Not Found Primary IDE Controller Resource Conflict Primary Input Device Not Found Primary Output Device Not Found Secondary IDE... found . The designated primary output device (display, serial port, or other , if input is redirected) could not be logged. 68 VAIO Computer System Reference Manual PCI Configuration Status and Error Messages The following is a list of status and error messages that may appear on your system...
... CMOS Data Invalid, CMOS Cleared Parallel Port Resource Conflict PCI Error Log is Full PCI I/O Port Conflict PCI IRQ Conflict PCI Memory Conflict Primary Boot Device Not Found Primary IDE Controller Resource Conflict Primary Input Device Not Found Primary Output Device Not Found Secondary IDE... found . The designated primary output device (display, serial port, or other , if input is redirected) could not be logged. 68 VAIO Computer System Reference Manual PCI Configuration Status and Error Messages The following is a list of status and error messages that may appear on your system...
System Reference Manual
Page 83
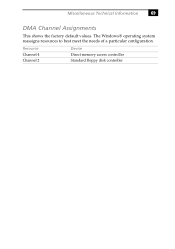
Resource Channel 4 Channel 2 Device Direct memory access controller Standard floppy disk controller Miscellaneous Technical Information 69 DMA Channel Assignments This shows the factory default values. The Windows® operating system reassigns resources to best meet the needs of a particular configuration.
Resource Channel 4 Channel 2 Device Direct memory access controller Standard floppy disk controller Miscellaneous Technical Information 69 DMA Channel Assignments This shows the factory default values. The Windows® operating system reassigns resources to best meet the needs of a particular configuration.
System Reference Manual
Page 86
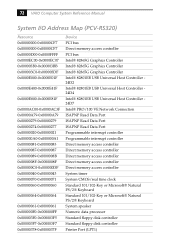
72 VAIO Computer System Reference Manual System I/O Address Map (PCV-RS320) Resource 0x00000000-0x00000CF7 0x00000000-0x00000CF7 0x00000D00-0x0000FFFF 0x0000EC00-0x0000EC07 0x000003B0-0x000003BB 0x000003C0-0x000003DF 0x0000E000-0x0000E01F 0x0000E400-...ISAPNP Read Data Port ISAPNP Read Data Port Programmable interrupt controller Programmable interrupt controller Direct memory access controller Direct memory access controller Direct memory access controller Direct memory access controller Direct memory access controller System timer System CMOS/real time clock Standard 101/102-Key or Microsoft&#...
72 VAIO Computer System Reference Manual System I/O Address Map (PCV-RS320) Resource 0x00000000-0x00000CF7 0x00000000-0x00000CF7 0x00000D00-0x0000FFFF 0x0000EC00-0x0000EC07 0x000003B0-0x000003BB 0x000003C0-0x000003DF 0x0000E000-0x0000E01F 0x0000E400-...ISAPNP Read Data Port ISAPNP Read Data Port Programmable interrupt controller Programmable interrupt controller Direct memory access controller Direct memory access controller Direct memory access controller Direct memory access controller Direct memory access controller System timer System CMOS/real time clock Standard 101/102-Key or Microsoft&#...

System Reference Manual
Page 88
74 VAIO Computer System Reference Manual Memory Map (PCV-RS310) Resource 0x0000-0x9FFFF 0xA0000-0xBFFFF 0xA0000-0xBFFFF 0xC8000-0xDFFFF 0xF0000-0xFFFFF 0x100000-0x1F7FFFFF 0x1F800000-0xFEBFFFFF 0xEC800000-0xEC8000FF 0xED000000-0xED0001FF 0xED800000-0xED8003FF 0xEE000000-0xEE000FFF 0xEE800000-0xEE8000FF ...
74 VAIO Computer System Reference Manual Memory Map (PCV-RS310) Resource 0x0000-0x9FFFF 0xA0000-0xBFFFF 0xA0000-0xBFFFF 0xC8000-0xDFFFF 0xF0000-0xFFFFF 0x100000-0x1F7FFFFF 0x1F800000-0xFEBFFFFF 0xEC800000-0xEC8000FF 0xED000000-0xED0001FF 0xED800000-0xED8003FF 0xEE000000-0xEE000FFF 0xEE800000-0xEE8000FF ...

System Reference Manual
Page 89
Miscellaneous Technical Information 75 Memory Map (PCV-RS320) Resource 0xA0000-0xBFFFF 0xA0000-0xBFFFF 0x1F800000-0xFFEFFFFF 0xF0000000-0xF7FFFFFF 0xFE780000-0xFE7FFFFF 0xFE77BC00-0xFE77BFFF 0xFE5FF000-0xFE5FFFFF 0xFE5FE000-0xFE5FEFFF 0xFED20000-0xFED8FFFF 0xFFB00000-0xFFBFFFFF 0xFEC00000-0xFEC00FFF 0xFEE00000-...
Miscellaneous Technical Information 75 Memory Map (PCV-RS320) Resource 0xA0000-0xBFFFF 0xA0000-0xBFFFF 0x1F800000-0xFFEFFFFF 0xF0000000-0xF7FFFFFF 0xFE780000-0xFE7FFFFF 0xFE77BC00-0xFE77BFFF 0xFE5FF000-0xFE5FFFFF 0xFE5FE000-0xFE5FEFFF 0xFED20000-0xFED8FFFF 0xFFB00000-0xFFBFFFFF 0xFEC00000-0xFEC00FFF 0xFEE00000-...


