Quick Start Guide
Page 3
... the Windows logo are available to the model and serial numbers when you call your Sony VAIO® computer. As an ENERGY STAR® Partner, Sony Corporation has determined that are trademarks or registered trademarks of Advanced Micro Devices. PS/2...Sony, VAIO, the VAIO logo, Image Station, SonicStage, DVgate, MagicGate, PictureGear, i.LINK, Memory Stick, and the Memory Stick Logo are located inside the lower front panel of the Environmental Protection Agency. Important information for Canadian customers: Your new VAIO® computer includes certain software versions or upgrades...
... the Windows logo are available to the model and serial numbers when you call your Sony VAIO® computer. As an ENERGY STAR® Partner, Sony Corporation has determined that are trademarks or registered trademarks of Advanced Micro Devices. PS/2...Sony, VAIO, the VAIO logo, Image Station, SonicStage, DVgate, MagicGate, PictureGear, i.LINK, Memory Stick, and the Memory Stick Logo are located inside the lower front panel of the Environmental Protection Agency. Important information for Canadian customers: Your new VAIO® computer includes certain software versions or upgrades...
System Reference Manual
Page 2
... of a separate user license agreement. Important information for Canadian customers: Your new VAIO® computer includes certain software versions or upgrades, and Internet services or offers that are trademarks or registered trademarks of the software...computer may require an additional charge. customers only. IN NO EVENT SHALL SONY ELECTRONICS INC. Subscriptions to software may include features such as copy protection and content management technology. Sony, VAIO, the VAIO logo, Image Station, SonicStage, DVgate, MagicGate, PictureGear, i.LINK, Memory Stick, and the Memory...
... of a separate user license agreement. Important information for Canadian customers: Your new VAIO® computer includes certain software versions or upgrades, and Internet services or offers that are trademarks or registered trademarks of the software...computer may require an additional charge. customers only. IN NO EVENT SHALL SONY ELECTRONICS INC. Subscriptions to software may include features such as copy protection and content management technology. Sony, VAIO, the VAIO logo, Image Station, SonicStage, DVgate, MagicGate, PictureGear, i.LINK, Memory Stick, and the Memory...
System Reference Manual
Page 12
CMOS Setup Options 53 Main Screen 55 Advanced Screen 58 Power Screen 61 Boot Screen 62 Exit Screen 64 Upgrading and Maintaining Components 25 Removing the Cover 26 Removing the cover 26 Replacing the cover 28 Installing an Add-on Card 29 About the Lithium ... hard disk drive 43 Identifying the additional hard disk space 45 Removing the Power Supply 47 Replacing the Power Supply 48 Chapter 4 - System Board 49 Memory Module (DDR-DIMM) Slots 50 Power Supply Header 51 CLR CMOS Jumper 52 Chapter 5 - xii VAIO Computer System Reference Manual Chapter 3 -
CMOS Setup Options 53 Main Screen 55 Advanced Screen 58 Power Screen 61 Boot Screen 62 Exit Screen 64 Upgrading and Maintaining Components 25 Removing the Cover 26 Removing the cover 26 Replacing the cover 28 Installing an Add-on Card 29 About the Lithium ... hard disk drive 43 Identifying the additional hard disk space 45 Removing the Power Supply 47 Replacing the Power Supply 48 Chapter 4 - System Board 49 Memory Module (DDR-DIMM) Slots 50 Power Supply Header 51 CLR CMOS Jumper 52 Chapter 5 - xii VAIO Computer System Reference Manual Chapter 3 -
System Reference Manual
Page 49
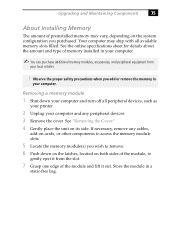
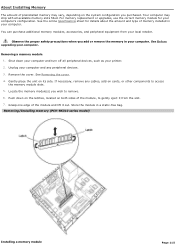
... of the module, to remove. 6 Push down your computer and turn off all available memory slots filled. Your computer may vary, depending on its side. If necessary, remove any peripheral devices. 3 Remove the cover. Upgrading and Maintaining Components 35 About Installing Memory The amount of preinstalled memory may ship with all peripheral devices, such as your...
... of the module, to remove. 6 Push down your computer and turn off all available memory slots filled. Your computer may vary, depending on its side. If necessary, remove any peripheral devices. 3 Remove the cover. Upgrading and Maintaining Components 35 About Installing Memory The amount of preinstalled memory may ship with all peripheral devices, such as your...

System Reference Manual
Page 51
To avoid damaging a memory module slot, move the end latches slightly outward to relieve pressure. See "Replacing the cover." The module clicks into position, holding the module in place. ! Upgrading and Maintaining Components 37 8 Press down evenly against the module's upper corners. The latches snap into place. 9 Reinstall any components or add-on cards you may have removed. 10 Replace the cover.
To avoid damaging a memory module slot, move the end latches slightly outward to relieve pressure. See "Replacing the cover." The module clicks into position, holding the module in place. ! Upgrading and Maintaining Components 37 8 Press down evenly against the module's upper corners. The latches snap into place. 9 Reinstall any components or add-on cards you may have removed. 10 Replace the cover.
System Reference Manual
Page 53
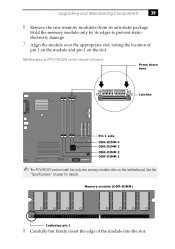
... 3 DDR-DIMM 2 DDR-DIMM 1 ✍ The PCV-RS310 series model has only two memory module slots on the slot. Memory module (DDR-DIMM) 1 Indicates pin 1 8 Carefully but firmly insert the edge of pin 1 on the module and pin 1 on the motherboard. Upgrading and Maintaining Components 39 6 Remove the new memory module(s) from its edges to prevent...
... 3 DDR-DIMM 2 DDR-DIMM 1 ✍ The PCV-RS310 series model has only two memory module slots on the slot. Memory module (DDR-DIMM) 1 Indicates pin 1 8 Carefully but firmly insert the edge of pin 1 on the module and pin 1 on the motherboard. Upgrading and Maintaining Components 39 6 Remove the new memory module(s) from its edges to prevent...

System Reference Manual
Page 61
Upgrading and Maintaining Components 47 Removing the Power Supply Remove the power supply when you insert a memory module (see "Installing Memory Modules" on top of the chassis. 2 Pull the tab (A) that secures the power supply to the chassis. 3 Slide the power supply up until the power ... power to all attached peripheral devices, shut down and rest it on page 38). ! Removing the power supply A 4 Rotate the power supply upside down the computer, and unplug the power cord. 1 Remove the screw that latches the power supply to the rear of the chassis where the hard drive is located.
Upgrading and Maintaining Components 47 Removing the Power Supply Remove the power supply when you insert a memory module (see "Installing Memory Modules" on top of the chassis. 2 Pull the tab (A) that secures the power supply to the chassis. 3 Slide the power supply up until the power ... power to all attached peripheral devices, shut down and rest it on page 38). ! Removing the power supply A 4 Rotate the power supply upside down the computer, and unplug the power cord. 1 Remove the screw that latches the power supply to the rear of the chassis where the hard drive is located.
System Reference Manual
Page 99
See BIOS CMOS Clear configuration jumper 52 CMOS RAM 32 codes, beeps 67 communications, specifications 81 computer add-on card installation 29 lithium battery ix memory upgrade 35 removing unit cover 26 replacing lithium battery 32 configuration jumper, CMOS Clear 52 configuring BIOS setup utility 18 power management 19 connectors i.LINK 6 USB 6 ...
See BIOS CMOS Clear configuration jumper 52 CMOS RAM 32 codes, beeps 67 communications, specifications 81 computer add-on card installation 29 lithium battery ix memory upgrade 35 removing unit cover 26 replacing lithium battery 32 configuration jumper, CMOS Clear 52 configuring BIOS setup utility 18 power management 19 connectors i.LINK 6 USB 6 ...

System Reference Manual
Page 100
86 VAIO Computer System Reference Manual G Giga Pocket initialize additional hard disk drive 45 graphics controller - See processor modem - See system memory memory module connector 50 specifications for 80 messages error 67 status and error 68 mic connector 14 microprocessor - See display monitor ... precautions ix M map - See I /O slot covering 41 icons, description of discs 3, 83 See communications monitor - See i.LINK installing system memory 38 IRQ settings 77 K keyboard connector 12 L L2 cache specifications 80 line in 14 mic 14 monitor 13 mouse 12 printer 13 telephone 14 ...
86 VAIO Computer System Reference Manual G Giga Pocket initialize additional hard disk drive 45 graphics controller - See processor modem - See system memory memory module connector 50 specifications for 80 messages error 67 status and error 68 mic connector 14 microprocessor - See display monitor ... precautions ix M map - See I /O slot covering 41 icons, description of discs 3, 83 See communications monitor - See i.LINK installing system memory 38 IRQ settings 77 K keyboard connector 12 L L2 cache specifications 80 line in 14 mic 14 monitor 13 mouse 12 printer 13 telephone 14 ...
VAIO User Guide (primary manual)
Page 109
... http://www.sony.com/pcsupport. Overview About Opening the System Unit About Add-on your system. This section describes how to increase the functionality of your VAIO computer. Upgrade and Maintain your VAIO Computer In the future you may want to perform basic upgrades and maintenance on Card Installation About Installing Memory About...
... http://www.sony.com/pcsupport. Overview About Opening the System Unit About Add-on your system. This section describes how to increase the functionality of your VAIO computer. Upgrade and Maintain your VAIO Computer In the future you may want to perform basic upgrades and maintenance on Card Installation About Installing Memory About...
VAIO User Guide (primary manual)
Page 115
...module in your printer. 2. RS310 series m odel) Installing a memory module Page 115 Your computer may vary, depending on cards, or other components to remove. 6. For memory replacement or upgrades, use the correct memory module for details about the amount and type of memory installed in a static-free bag... Rem ov ing/Installing m em ory (PCV- You can purchase additional memory modules, accessories, and peripheral equipment from the slot. 7. Observe the proper safety precautions when you add or remove the memory in your computer and any cables, add-on the system ...
...module in your printer. 2. RS310 series m odel) Installing a memory module Page 115 Your computer may vary, depending on cards, or other components to remove. 6. For memory replacement or upgrades, use the correct memory module for details about the amount and type of memory installed in a static-free bag... Rem ov ing/Installing m em ory (PCV- You can purchase additional memory modules, accessories, and peripheral equipment from the slot. 7. Observe the proper safety precautions when you add or remove the memory in your computer and any cables, add-on the system ...
Marketing Specifications
Page 1
... StudioTM - Sony hereby disclaims any representations or warranty that a product contains an IEEE 1394 connector. Software titles pre-installed on the Sony Desktop Computer are NOT ... Music VAIO MediaTM - PCV-RS310 Sony VAIO Digital Studio™ PC ! Sony, i.LINK, VAIO Digital Studio, SonicStage, Memory Stick, DVgate Plus, PictureGear Studio, VAIO Media, Click to DVD, SonicStage Mastering Studio, and VAIO are ...may choose to assist you may require additional upgrade. 3 5GB of Hard Disk space is a trademark of non-Sony products you and may affect application performance. &#...
... StudioTM - Sony hereby disclaims any representations or warranty that a product contains an IEEE 1394 connector. Software titles pre-installed on the Sony Desktop Computer are NOT ... Music VAIO MediaTM - PCV-RS310 Sony VAIO Digital Studio™ PC ! Sony, i.LINK, VAIO Digital Studio, SonicStage, Memory Stick, DVgate Plus, PictureGear Studio, VAIO Media, Click to DVD, SonicStage Mastering Studio, and VAIO are ...may choose to assist you may require additional upgrade. 3 5GB of Hard Disk space is a trademark of non-Sony products you and may affect application performance. &#...


