
User Guide
Page 2
... Number: PCV-R553DS/PCV-R556DS/PCVR558DS Serial Number 2 Sony Electronics Inc. All other limited viewing uses only unless otherwise authorized by Macrovision Corporation, and is subject to this product. VAIO Digital Studio™ Computer User Guide NOTICE © 2000 Sony Electronics Inc... herein is prohibited. This manual and the software described herein, in whole or in part, may require an additional charge. Software specifications are trademarks of your Sony Service Center. Sony, VAIO, the VAIO logo, VAIO Smart, VAIO Digital Studio, Media Park, DVgate, ...
... Number: PCV-R553DS/PCV-R556DS/PCVR558DS Serial Number 2 Sony Electronics Inc. All other limited viewing uses only unless otherwise authorized by Macrovision Corporation, and is subject to this product. VAIO Digital Studio™ Computer User Guide NOTICE © 2000 Sony Electronics Inc... herein is prohibited. This manual and the software described herein, in whole or in part, may require an additional charge. Software specifications are trademarks of your Sony Service Center. Sony, VAIO, the VAIO logo, VAIO Smart, VAIO Digital Studio, Media Park, DVgate, ...
User Guide
Page 5
...digital device, pursuant to radio and television reception. This device complies with the limits for this equipment is no guarantee that interference will not occur in interference to Part 15 of the Rules. This equipment generates, uses, and can be shielded and grounded. However, there is 0.7. If this computer...the USOC RJ-11 telephone jack. 5 Operation is likely to result in this manual could void your authority to correct the interference by one or more of the FCC... Trade Name: SONY Model No.: PCV-R553DS/ PCV-R556DS/ PCV-R558DS/ Responsible Party: Sony Electronics Inc.
...digital device, pursuant to radio and television reception. This device complies with the limits for this equipment is no guarantee that interference will not occur in interference to Part 15 of the Rules. This equipment generates, uses, and can be shielded and grounded. However, there is 0.7. If this computer...the USOC RJ-11 telephone jack. 5 Operation is likely to result in this manual could void your authority to correct the interference by one or more of the FCC... Trade Name: SONY Model No.: PCV-R553DS/ PCV-R556DS/ PCV-R558DS/ Responsible Party: Sony Electronics Inc.

User Guide
Page 13
...CD does not come out when you press the eject button, insert a thin, pointed object into this hole to eject the disc manually. ✍ For your convenience, your computer includes USB and i.LINK connectors on both the front and back panels, allowing you to connect to the hard disk. 2 Power ...switch and indicator light Turns on/off the computer. The i.LINK connector on and amber when the computer is a 4-pin connector. 13 The indicator light is green while the power is on the front of connectors.
...CD does not come out when you press the eject button, insert a thin, pointed object into this hole to eject the disc manually. ✍ For your convenience, your computer includes USB and i.LINK connectors on both the front and back panels, allowing you to connect to the hard disk. 2 Power ...switch and indicator light Turns on/off the computer. The i.LINK connector on and amber when the computer is a 4-pin connector. 13 The indicator light is green while the power is on the front of connectors.

User Guide
Page 29
Enabling Smart Connect Your computer comes with this software disabled. Enabling Smart Connect To connect an i.LINK (IEEE1394) device ❑ Use the symbol to locate the i.LINK connector. Plug the i.LINK cable into this connector. ✍ See the manual that came with your computer ships with preinstalled Smart Connect software. To enable faster startup, your i.LINK (IEEE1394)-equipped device for more information on setting it up and using it. The Control Panel window appears. 29 To enable Smart Connect: 1 From the Start menu, select Settings > Control Panel.
Enabling Smart Connect Your computer comes with this software disabled. Enabling Smart Connect To connect an i.LINK (IEEE1394) device ❑ Use the symbol to locate the i.LINK connector. Plug the i.LINK cable into this connector. ✍ See the manual that came with your computer ships with preinstalled Smart Connect software. To enable faster startup, your i.LINK (IEEE1394)-equipped device for more information on setting it up and using it. The Control Panel window appears. 29 To enable Smart Connect: 1 From the Start menu, select Settings > Control Panel.
User Guide
Page 34
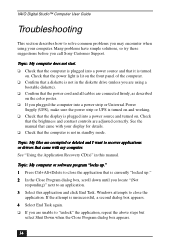
... that is unsuccessful, a second dialog box appears. 4 Select End Task again. ❑ If you call Sony Customer Support. See the manual that came with your computer. Windows attempts to close the application that it is plugged into a power source and turned on . Topic:... Shut Down when the Close Program dialog box appears. 34 VAIO Digital Studio™ Computer User Guide Troubleshooting This section describes how to solve common problems you locate "(Not responding)" next to an application. 3 Select this manual. See "Using the Application Recovery CD(s)" in standby mode....
... that is unsuccessful, a second dialog box appears. 4 Select End Task again. ❑ If you call Sony Customer Support. See the manual that came with your computer. Windows attempts to close the application that it is plugged into a power source and turned on . Topic:... Shut Down when the Close Program dialog box appears. 34 VAIO Digital Studio™ Computer User Guide Troubleshooting This section describes how to solve common problems you locate "(Not responding)" next to an application. 3 Select this manual. See "Using the Application Recovery CD(s)" in standby mode....

User Guide
Page 35
...problem. To access System Setup: 1 From the Start menu, select Shut Down, and then select Restart. 2 When the Sony screen displays, press the F2 key on your keyboard. 3 Select the Advanced tab from the CMOS Setup Utility screen. 35 ... EPP, or bidirectional? Topic: Why does Windows lock up during shutdown? Troubleshooting ❑ If the above steps fail to "unlock" your computer, try the following steps: 1 Save any unsaved work, if possible. 2 Press Alt+F4. 3 Select Restart. 4 Click OK. &#... using the System Setup utility (CMOS Setup Utility). See the contact information in this manual.
...problem. To access System Setup: 1 From the Start menu, select Shut Down, and then select Restart. 2 When the Sony screen displays, press the F2 key on your keyboard. 3 Select the Advanced tab from the CMOS Setup Utility screen. 35 ... EPP, or bidirectional? Topic: Why does Windows lock up during shutdown? Troubleshooting ❑ If the above steps fail to "unlock" your computer, try the following steps: 1 Save any unsaved work, if possible. 2 Press Alt+F4. 3 Select Restart. 4 Click OK. &#... using the System Setup utility (CMOS Setup Utility). See the contact information in this manual.
User Guide
Page 44
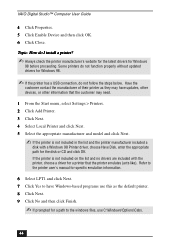
... a driver for a path to have updates, other devices, or other information that the printer emulates (acts like). Refer to the printer user's manual for specific emulation information. 6 Select LPT1 and click Next. 7 Click Yes to the windows files, use this as they may need. 1 From...I install a printer? ✍ Always check the printer manufacturer's website for the latest drivers for the disk or CD and click OK. VAIO Digital Studio™ Computer User Guide 4 Click Properties. 5 Click Enable Device and then click OK. 6 Click Close. Topic: How do not follow the steps below.
... a driver for a path to have updates, other devices, or other information that the printer emulates (acts like). Refer to the printer user's manual for specific emulation information. 6 Select LPT1 and click Next. 7 Click Yes to the windows files, use this as they may need. 1 From...I install a printer? ✍ Always check the printer manufacturer's website for the latest drivers for the disk or CD and click OK. VAIO Digital Studio™ Computer User Guide 4 Click Properties. 5 Click Enable Device and then click OK. 6 Click Close. Topic: How do not follow the steps below.

User Guide
Page 50
... is accessing the hard disk drive. On Handling Diskettes ❑ Do not open the shutter manually and touch the surface of the disc. ❑ Do not drop or bend the disc. VAIO Digital Studio™ Computer User Guide ❑ Do not turn off any remaining moisture with water, wring it out well..., and use it to wipe the surface of the disc from the center out. Wipe off the power while the computer is badly soiled, moisten a soft...
... is accessing the hard disk drive. On Handling Diskettes ❑ Do not open the shutter manually and touch the surface of the disc. ❑ Do not drop or bend the disc. VAIO Digital Studio™ Computer User Guide ❑ Do not turn off any remaining moisture with water, wring it out well..., and use it to wipe the surface of the disc from the center out. Wipe off the power while the computer is badly soiled, moisten a soft...
User Guide
Page 51
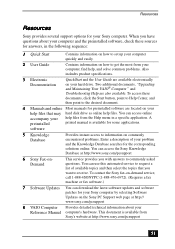
... the Knowledge Database searches for the corresponding solutions online. Two additional documents, "Upgrading and Maintaining Your VAIO® Computer" and Troubleshooting Help are located on your Sony computer by selecting Software Updates on your Reference Manual computer's hardware. A preinstalled printed manual is available from the Help menu in the following sequence: 1 Quick Start Contains information on how...
... the Knowledge Database searches for the corresponding solutions online. Two additional documents, "Upgrading and Maintaining Your VAIO® Computer" and Troubleshooting Help are located on your Sony computer by selecting Software Updates on your Reference Manual computer's hardware. A preinstalled printed manual is available from the Help menu in the following sequence: 1 Quick Start Contains information on how...
Reference Manual
Page 2
... number when you call your VAIO® computer. Use of this product. IN NO EVENT SHALL SONY ELECTRONICS INC. patents and other trademarks are registered trademarks of Microsoft Corporation. Model Number: PCV-R556DS/PCV-R558DS Serial Number ii Sony Electronics Inc. The software described...Notice to the terms and conditions of license agreements enclosed with participating financial institutions. Sony, VAIO, the VAIO logo, VAIO Digital Studio, and i.LINK are located on the back of Sony. This manual and the software described herein, in whole or in part, may require prior...
... number when you call your VAIO® computer. Use of this product. IN NO EVENT SHALL SONY ELECTRONICS INC. patents and other trademarks are registered trademarks of Microsoft Corporation. Model Number: PCV-R556DS/PCV-R558DS Serial Number ii Sony Electronics Inc. The software described...Notice to the terms and conditions of license agreements enclosed with participating financial institutions. Sony, VAIO, the VAIO logo, VAIO Digital Studio, and i.LINK are located on the back of Sony. This manual and the software described herein, in whole or in part, may require prior...

Reference Manual
Page 5
...and, if not installed and used to connect peripherals must accept any changes or modifications not expressly approved in this manual could void your authority to operate this equipment does cause harmful interference to radio or television reception, which the ...Trade Name: SONY Model No.: PCV-R556DS/ PCV-R558DS Responsible Party: Sony Electronics Inc. Operation is connected. ❑ Consult the dealer or an experienced radio/TV technician for a Class B digital device, pursuant to correct the interference by one or more of FCC Rules. Only peripherals (computer input/output ...
...and, if not installed and used to connect peripherals must accept any changes or modifications not expressly approved in this manual could void your authority to operate this equipment does cause harmful interference to radio or television reception, which the ...Trade Name: SONY Model No.: PCV-R556DS/ PCV-R558DS Responsible Party: Sony Electronics Inc. Operation is connected. ❑ Consult the dealer or an experienced radio/TV technician for a Class B digital device, pursuant to correct the interference by one or more of FCC Rules. Only peripherals (computer input/output ...

Reference Manual
Page 12
... 39 Covering an Open I/O Slot 40 Installing a 3½" Internal Hard Disk Drive 41 Removing the Power Supply 45 Replacing the Power Supply 48 Chapter 4 - xii VAIO Digital Studio™ Reference Manual Chapter 3 -
... 39 Covering an Open I/O Slot 40 Installing a 3½" Internal Hard Disk Drive 41 Removing the Power Supply 45 Replacing the Power Supply 48 Chapter 4 - xii VAIO Digital Studio™ Reference Manual Chapter 3 -

Reference Manual
Page 15
Internal components are identified in the appropriate section of the VAIO Digital Studio™ Computer. Chapter 1 Identifying Components The following sections identify and describe each component that is visible from the exterior of this manual. 1
Internal components are identified in the appropriate section of the VAIO Digital Studio™ Computer. Chapter 1 Identifying Components The following sections identify and describe each component that is visible from the exterior of this manual. 1

Reference Manual
Page 18
4 VAIO Digital Studio Reference Manual Buttons and Switches Optical disc eject Diskette eject Power/Standby FRNTPNLB.VSD Button or switch Power/Standby switch Diskette eject button Optical disc eject button Description Turns system power on, off, or into standby mode. Automatically opens and closes the optical drive tray. Ejects a diskette.
4 VAIO Digital Studio Reference Manual Buttons and Switches Optical disc eject Diskette eject Power/Standby FRNTPNLB.VSD Button or switch Power/Standby switch Diskette eject button Optical disc eject button Description Turns system power on, off, or into standby mode. Automatically opens and closes the optical drive tray. Ejects a diskette.

Reference Manual
Page 20
6 VAIO Digital Studio Reference Manual Connectors USB i.LINK FRNTPNLD.VSD Connector i.LINK® (IEEE-1394)* USB Description Connects to the device if the device also has a 6-pin i.LINK connector. A 6-pin i.LINK connector can supply power from the computer to a digital device that has a 4-pin i.LINK connector. A 4-pin i.LINK connector cannot supply power to a 6-pin i.LINK device, use the i.LINK connector on the back of the system. Connects to USB devices. * To connect to the device.
6 VAIO Digital Studio Reference Manual Connectors USB i.LINK FRNTPNLD.VSD Connector i.LINK® (IEEE-1394)* USB Description Connects to the device if the device also has a 6-pin i.LINK connector. A 6-pin i.LINK connector can supply power from the computer to a digital device that has a 4-pin i.LINK connector. A 4-pin i.LINK connector cannot supply power to a 6-pin i.LINK device, use the i.LINK connector on the back of the system. Connects to USB devices. * To connect to the device.

Reference Manual
Page 22
8 VAIO Digital Studio Reference Manual Icons Icon Icon label area OM04692X.VSD Description Mouse connector Keyboard connector Universal Serial Bus (USB) connector Serial port connector Printer port connector Game/MIDI port connector Headphones LINE IN jack (audio) Microphone jack Monitor connector Line jack (for telephone line from primary service jack)
8 VAIO Digital Studio Reference Manual Icons Icon Icon label area OM04692X.VSD Description Mouse connector Keyboard connector Universal Serial Bus (USB) connector Serial port connector Printer port connector Game/MIDI port connector Headphones LINE IN jack (audio) Microphone jack Monitor connector Line jack (for telephone line from primary service jack)

Reference Manual
Page 24
... Ethernet Connector The Ethernet connector at the rear of the system. Keyboard and Mouse The keyboard and mouse connectors are standard 4-pin USB connectors. 10 VAIO Digital Studio Reference Manual I/O Connectors The following section identifies the various I/O connectors. They are standard 6-pin PS/2®-type female connectors. 2 3 1 4 6 5 KY0002.VS USB Ports The USB ports...
... Ethernet Connector The Ethernet connector at the rear of the system. Keyboard and Mouse The keyboard and mouse connectors are standard 4-pin USB connectors. 10 VAIO Digital Studio Reference Manual I/O Connectors The following section identifies the various I/O connectors. They are standard 6-pin PS/2®-type female connectors. 2 3 1 4 6 5 KY0002.VS USB Ports The USB ports...

Reference Manual
Page 26
Electret condenser microphone input. 1.0 Vrms (typical), 10 Kohm impedance. Headphones Line In Mic Connector Headphones Mic Line In Description 1.0 Vrms (typical). KY0013.VSD They are physically identical, but have different connections. This port is a standard 15-pin DB-15 female connector. 12 VAIO Digital Studio Reference Manual Game Port The Game port is also used to connect MIDI devices. 8 15 9 1 KY0012.VSD Mic, Line In, and Headphones The Mic, Line In, and Headphones jacks are standard 3.5 mm stereo mini-jacks.
Electret condenser microphone input. 1.0 Vrms (typical), 10 Kohm impedance. Headphones Line In Mic Connector Headphones Mic Line In Description 1.0 Vrms (typical). KY0013.VSD They are physically identical, but have different connections. This port is a standard 15-pin DB-15 female connector. 12 VAIO Digital Studio Reference Manual Game Port The Game port is also used to connect MIDI devices. 8 15 9 1 KY0012.VSD Mic, Line In, and Headphones The Mic, Line In, and Headphones jacks are standard 3.5 mm stereo mini-jacks.

Reference Manual
Page 28
14 VAIO Digital Studio Reference Manual Expansion Slots There are three PCI slots, two of which are available for expansion. The other PCI slot is occupied by the fax/modem card (#1). AGP PCI #3 PCI #2 PCI #1 OM04577B.VSD
14 VAIO Digital Studio Reference Manual Expansion Slots There are three PCI slots, two of which are available for expansion. The other PCI slot is occupied by the fax/modem card (#1). AGP PCI #3 PCI #2 PCI #1 OM04577B.VSD

Reference Manual
Page 30
... to return to the BIOS settings (see "CMOS Setup Options" on page 73 for information on -screen prompts. Follow the on BIOS settings). ! 16 VAIO Digital Studio Reference Manual Accessing the BIOS Setup Utility You must access the CMOS Setup Utility to make changes to the main menu. 8 Select SAVE & EXIT SETUP, then press...
... to return to the BIOS settings (see "CMOS Setup Options" on page 73 for information on -screen prompts. Follow the on BIOS settings). ! 16 VAIO Digital Studio Reference Manual Accessing the BIOS Setup Utility You must access the CMOS Setup Utility to make changes to the main menu. 8 Select SAVE & EXIT SETUP, then press...


