Operating Instructions
Page 4
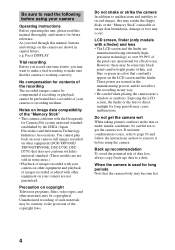
... or edited with this may render the floppy disks or the "Memory Stick"s unusable or image data breakdown, damage or loss may be some areas.) • Playback of images recorded with your camera on your camera or recording medium. However, there may occur. Unauthorized recording of ...or green in the rain or under similar conditions, be performed due to direct sunlight for contents of your camera still images recorded on other equipment on your camera Operating instructions Before operating the unit, please read this manual, buttons and settings on the LCD screen and...
... or edited with this may render the floppy disks or the "Memory Stick"s unusable or image data breakdown, damage or loss may be some areas.) • Playback of images recorded with your camera on your camera or recording medium. However, there may occur. Unauthorized recording of ...or green in the rain or under similar conditions, be performed due to direct sunlight for contents of your camera still images recorded on other equipment on your camera Operating instructions Before operating the unit, please read this manual, buttons and settings on the LCD screen and...

Operating Instructions
Page 6
... the information on your floppy disk (DISK COPY) ..... 79 Selecting still images to print (PRINT MARK 80 Format 81 B As an external drive Using the camera as an external drive of a computer 82 Additional information Precautions 83 On "Memory Stick"s 85 Using your camera abroad 85 About "InfoLITHIUM" battery pack 86 Troubleshooting 88 Warning and...
... the information on your floppy disk (DISK COPY) ..... 79 Selecting still images to print (PRINT MARK 80 Format 81 B As an external drive Using the camera as an external drive of a computer 82 Additional information Precautions 83 On "Memory Stick"s 85 Using your camera abroad 85 About "InfoLITHIUM" battery pack 86 Troubleshooting 88 Warning and...
Operating Instructions
Page 8
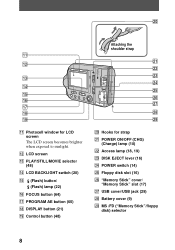
...) V Access lamp (18, 19) W DISK EJECT lever (16) X POWER switch (14) Y Floppy disk slot (16) Z "Memory Stick" cover/ "Memory Stick" slot (17) wj USB cover/USB jack (29) wk Battery cover (9) wl MS /FD ("Memory Stick"/floppy disk) selector 8 L LCD screen M PLAY/STILL/MOVIE selector (48) N LCD BACKLIGHT switch (20) O (Flash) button/ (Flash) lamp (22) P FOCUS button (64...
...) V Access lamp (18, 19) W DISK EJECT lever (16) X POWER switch (14) Y Floppy disk slot (16) Z "Memory Stick" cover/ "Memory Stick" slot (17) wj USB cover/USB jack (29) wk Battery cover (9) wl MS /FD ("Memory Stick"/floppy disk) selector 8 L LCD screen M PLAY/STILL/MOVIE selector (48) N LCD BACKLIGHT switch (20) O (Flash) button/ (Flash) lamp (22) P FOCUS button (64...

Operating Instructions
Page 11
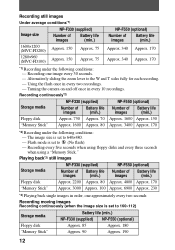
... using the LCD screen, the operating time becomes short. Please note that can be used when you record in Normal mode with a "Memory Stick." When using a pocket heater, take care not to turn on the conditions of images that can be recorded/played back and battery life... the length of images that the numbers and time shown in the following table, "Recording still images under average conditions," are only for changing a floppy disk or "Memory Stick" as necessary. To use the camera again, slide the POWER switch down the battery pack. Getting started NP-F330 (supplied)/F550...
... using the LCD screen, the operating time becomes short. Please note that can be used when you record in Normal mode with a "Memory Stick." When using a pocket heater, take care not to turn on the conditions of images that can be recorded/played back and battery life... the length of images that the numbers and time shown in the following table, "Recording still images under average conditions," are only for changing a floppy disk or "Memory Stick" as necessary. To use the camera again, slide the POWER switch down the battery pack. Getting started NP-F330 (supplied)/F550...
Operating Instructions
Page 12
...Storage media Battery life (min.) NP-F330 (supplied) NP-F550 (optional) Floppy disk Approx. 85 Approx. 180 "Memory Stick" Approx. 90 Approx. 190 12 Recording still images Under average conditions*1) Image size NP-F330 (supplied) Number of images Battery life (min.) 1600×1200 (MVC... (optional) Number of Battery life images (min.) Floppy disk Approx. 750 Approx. 70 Approx. 1600 Approx. 150 "Memory Stick" Approx. 1600 Approx. 80 Approx. 3400 Approx. 170 *2) Recording under the following conditions: - Turning the camera on and off once in every two recordings. -
...Storage media Battery life (min.) NP-F330 (supplied) NP-F550 (optional) Floppy disk Approx. 85 Approx. 180 "Memory Stick" Approx. 90 Approx. 190 12 Recording still images Under average conditions*1) Image size NP-F330 (supplied) Number of images Battery life (min.) 1600×1200 (MVC... (optional) Number of Battery life images (min.) Floppy disk Approx. 750 Approx. 70 Approx. 1600 Approx. 150 "Memory Stick" Approx. 1600 Approx. 80 Approx. 3400 Approx. 170 *2) Recording under the following conditions: - Turning the camera on and off once in every two recordings. -
Operating Instructions
Page 16
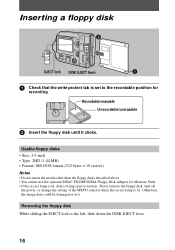
... use the optional MSAC-FD2M/FD2MA Floppy Disk Adaptor for recording. Removing the floppy disk While sliding the EJECT lock to the recordable position for Memory Stick. • If the access lamp is lit, data is set to the left, slide down the DISK EJECT lever. 16 Never remove the floppy disk..., turn off the power, or change the setting of the MS/FD selector while the access lamp is lit. Otherwise, the image data could be damaged or lost. Recordable/erasable Unrecordable/unerasable 2 Insert the floppy disk until...
... use the optional MSAC-FD2M/FD2MA Floppy Disk Adaptor for recording. Removing the floppy disk While sliding the EJECT lock to the recordable position for Memory Stick. • If the access lamp is lit, data is set to the left, slide down the DISK EJECT lever. 16 Never remove the floppy disk..., turn off the power, or change the setting of the MS/FD selector while the access lamp is lit. Otherwise, the image data could be damaged or lost. Recordable/erasable Unrecordable/unerasable 2 Insert the floppy disk until...
Operating Instructions
Page 17
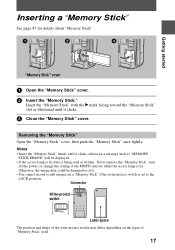
... LOCK position. Notes • Insert the "Memory Stick" firmly until it clicks, otherwise a message such as "MEMORY STICK ERROR" will be damaged or lost. • You cannot record or edit images on the types of the MS/FD selector while the access lamp is being read ...or written. Never remove the "Memory Stick," turn off the power, or change the setting of "Memory Stick" used. 17 Insert the "Memory Stick" with the B mark facing toward the "Memory Stick" slot as illustrated until it clicks. 3 Close the "Memory Stick" cover...
... LOCK position. Notes • Insert the "Memory Stick" firmly until it clicks, otherwise a message such as "MEMORY STICK ERROR" will be damaged or lost. • You cannot record or edit images on the types of the MS/FD selector while the access lamp is being read ...or written. Never remove the "Memory Stick," turn off the power, or change the setting of "Memory Stick" used. 17 Insert the "Memory Stick" with the B mark facing toward the "Memory Stick" slot as illustrated until it clicks. 3 Close the "Memory Stick" cover...

Operating Instructions
Page 18
... in your camera. 3, 4 12 Access lamp 1 Set the PLAY/STILL/MOVIE selector to STILL. 2 Select the recording media using the MS/FD selector. FD: When recording on the floppy disk. 3 Press and hold the shutter button halfway down to turn on the "Memory Stick." When the camera finishes the ... and is followed by beeps, and the camera is ready for recording. MS: When recording on the power and insert a floppy disk or a "Memory Stick" in accordance with the subject and recording conditions. Basic operations Recording still images B Recording Still images are recorded in JPEG format. If ...
... in your camera. 3, 4 12 Access lamp 1 Set the PLAY/STILL/MOVIE selector to STILL. 2 Select the recording media using the MS/FD selector. FD: When recording on the floppy disk. 3 Press and hold the shutter button halfway down to turn on the "Memory Stick." When the camera finishes the ... and is followed by beeps, and the camera is ready for recording. MS: When recording on the power and insert a floppy disk or a "Memory Stick" in accordance with the subject and recording conditions. Basic operations Recording still images B Recording Still images are recorded in JPEG format. If ...

Operating Instructions
Page 19
... from the screen (page 49) and pressing b on a floppy disk or a "Memory Stick" See page 58. Also, do not shake or strike the camera. B Recording 4 Press the shutter button fully down at once, the camera starts recording after the AE/AF is locked. Notes • When recording bright subjects,... the color of the MS/FD selector, or not remove the battery pack/floppy disk/"Memory Stick." Checking the last recorded image (Quick Review) You...
... from the screen (page 49) and pressing b on a floppy disk or a "Memory Stick" See page 58. Also, do not shake or strike the camera. B Recording 4 Press the shutter button fully down at once, the camera starts recording after the AE/AF is locked. Notes • When recording bright subjects,... the color of the MS/FD selector, or not remove the battery pack/floppy disk/"Memory Stick." Checking the last recorded image (Quick Review) You...
Operating Instructions
Page 20
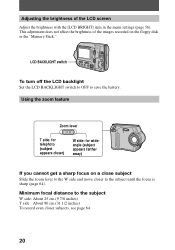
... T side: for telephoto (subject appears closer) W side: for wideangle (subject appears farther away) If you cannot get a sharp focus on the floppy disk or the "Memory Stick." This adjustment does not affect the brightness of the LCD screen Adjust the brightness with the [LCD BRIGHT] item in the menu settings (page 56...
... T side: for telephoto (subject appears closer) W side: for wideangle (subject appears farther away) If you cannot get a sharp focus on the floppy disk or the "Memory Stick." This adjustment does not affect the brightness of the LCD screen Adjust the brightness with the [LCD BRIGHT] item in the menu settings (page 56...
Operating Instructions
Page 23
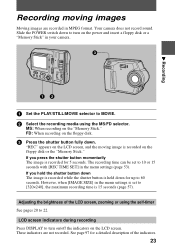
...on/off the indicators on the "Memory Stick." FD: When recording on the power and insert a floppy disk or a "Memory Stick" in MPEG format. However, when [IMAGE SIZE] in the menu settings (page 53). These indicators are recorded in your camera. 3 12 1 Set the PLAY/STILL/MOVIE selector to MOVIE. 2 ... recording time is held down . If you press the shutter button momentarily The image is recorded on the floppy disk or the "Memory Stick." Your camera does not record sound. See page 97 for up to 60 seconds. B Recording Recording moving image is recorded for 5 seconds. ...
...on/off the indicators on the "Memory Stick." FD: When recording on the power and insert a floppy disk or a "Memory Stick" in MPEG format. However, when [IMAGE SIZE] in the menu settings (page 53). These indicators are recorded in your camera. 3 12 1 Set the PLAY/STILL/MOVIE selector to MOVIE. 2 ... recording time is held down . If you press the shutter button momentarily The image is recorded on the floppy disk or the "Memory Stick." Your camera does not record sound. See page 97 for up to 60 seconds. B Recording Recording moving image is recorded for 5 seconds. ...

Operating Instructions
Page 24
... play back the image with b/B on the LCD screen. 4 Select the desired still image with this camera for a detailed description of the indicators. 24 LCD screen indicators during still image playback Press DISPLAY to turn on the LCD screen, then press b/B. Access...Memory Stick." The last recorded image (still or moving) appears on the control button to play back images whose image sizes are larger than the maximum image size that can directly select and play back images recorded with the control button. Press v/V/b/B on the LCD screen. 2 Select the playback media using the MS/FD...
... play back the image with b/B on the LCD screen. 4 Select the desired still image with this camera for a detailed description of the indicators. 24 LCD screen indicators during still image playback Press DISPLAY to turn on the LCD screen, then press b/B. Access...Memory Stick." The last recorded image (still or moving) appears on the control button to play back images whose image sizes are larger than the maximum image size that can directly select and play back images recorded with the control button. Press v/V/b/B on the LCD screen. 2 Select the playback media using the MS/FD...

Operating Instructions
Page 25
...Memory Stick" in your camera. "b: To display the preceding image. B": To display the next image. "b/B" 60min 160 6/8 INDEX DELETE FILE TOOL SETUP SELECT FILE BACK/NEXT 25 Moving images are displayed one size smaller than still images. The last recorded image (still or moving image with the control button. FD: When playing back images in the "Memory Stick...." Access lamp 2 3-5 Control button 1 1 Set the PLAY/STILL/MOVIE selector ...
...Memory Stick" in your camera. "b: To display the preceding image. B": To display the next image. "b/B" 60min 160 6/8 INDEX DELETE FILE TOOL SETUP SELECT FILE BACK/NEXT 25 Moving images are displayed one size smaller than still images. The last recorded image (still or moving image with the control button. FD: When playing back images in the "Memory Stick...." Access lamp 2 3-5 Control button 1 1 Set the PLAY/STILL/MOVIE selector ...
Operating Instructions
Page 27
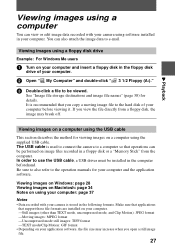
...3 1/2 Floppy (A:)." 3 Double-click a file to a computer so that operations can be performed on image files recorded in a floppy disk or a "Memory Stick" from a floppy disk, the image may increase when you view the file directly from the computer. Make sure that applications that you copy a moving image... Depending on using your computer: page 37 Notes • Data recorded with your camera using software installed in your computer. Viewing images using the supplied USB cable. If you open a still image file. 27 Viewing images on Windows: page 28 Viewing images on Macintosh: page...
...3 1/2 Floppy (A:)." 3 Double-click a file to a computer so that operations can be performed on image files recorded in a floppy disk or a "Memory Stick" from a floppy disk, the image may increase when you view the file directly from the computer. Make sure that applications that you copy a moving image... Depending on using your computer: page 37 Notes • Data recorded with your camera using software installed in your computer. Viewing images using the supplied USB cable. If you open a still image file. 27 Viewing images on Windows: page 28 Viewing images on Macintosh: page...
Operating Instructions
Page 30
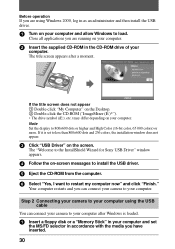
...FD selector in accordance with the media you have inserted. 30 If the title screen does not appear 1 Double-click "My Computer" on the Desktop. 2 Double-click the CD-ROM ("ImageMixer (E:)*"). ∗ The drive symbol ((E:), etc.) may differ depending on your computer. The "Welcome to the InstallShield Wizard for Sony...more. Step 2 Connecting your camera to your computer using Windows 2000, log in as an administrator and then install the USB driver. 1 Turn on your computer and allow Windows to your computer. If it is loaded. 1 Insert a floppy disk or a "Memory Stick" in your computer and set...
...FD selector in accordance with the media you have inserted. 30 If the title screen does not appear 1 Double-click "My Computer" on the Desktop. 2 Double-click the CD-ROM ("ImageMixer (E:)*"). ∗ The drive symbol ((E:), etc.) may differ depending on your computer. The "Welcome to the InstallShield Wizard for Sony...more. Step 2 Connecting your camera to your computer using Windows 2000, log in as an administrator and then install the USB driver. 1 Turn on your computer and allow Windows to your computer. If it is loaded. 1 Insert a floppy disk or a "Memory Stick" in your computer and set...

Operating Instructions
Page 31
...and/or mouse. • If you have a desktop computer, use the USB jack on the LCD screen of your computer, when you switch the MS/FD selector For Windows 2000, Windows Me, and Windows XP users 1 Double-click the "Remove hardware" icon displayed at the lower right of the computer. .... 2 Click "Sony DSC" and click "Stop." 3 Confirm the drive to be removed and click "OK." 4 Click "OK." 5 Perform operations such as it will go. See "If the Copy Wizard appears" (page 33) if you are using the USB cable, and when you remove a floppy disk or a "Memory Stick" from the camera being connected...
...and/or mouse. • If you have a desktop computer, use the USB jack on the LCD screen of your computer, when you switch the MS/FD selector For Windows 2000, Windows Me, and Windows XP users 1 Double-click the "Remove hardware" icon displayed at the lower right of the computer. .... 2 Click "Sony DSC" and click "Stop." 3 Confirm the drive to be removed and click "OK." 4 Click "OK." 5 Perform operations such as it will go. See "If the Copy Wizard appears" (page 33) if you are using the USB cable, and when you remove a floppy disk or a "Memory Stick" from the camera being connected...
Operating Instructions
Page 32
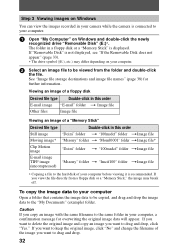
... delete the original image and copy an image you want to the hard disk of a floppy disk Desired file type Double-click in this order Still image Moving image* Clip Motion image "Dcim" folder t "100msdcf" folder tImage file "Mssony" folder t "Moml0001" folder tImage file* "Dcim" folder t "...camera while the camera is not displayed, see "If the Removable Disk does not appear" (page 33). ∗ The drive symbol ((E:), etc.) may differ depending on your computer. 2 Select an image file to be copied, and drag and drop the image data to be viewed from a floppy disk or a "Memory Stick...
... delete the original image and copy an image you want to the hard disk of a floppy disk Desired file type Double-click in this order Still image Moving image* Clip Motion image "Dcim" folder t "100msdcf" folder tImage file "Mssony" folder t "Moml0001" folder tImage file* "Dcim" folder t "...camera while the camera is not displayed, see "If the Removable Disk does not appear" (page 33). ∗ The drive symbol ((E:), etc.) may differ depending on your computer. 2 Select an image file to be copied, and drag and drop the image data to be viewed from a floppy disk or a "Memory Stick...

Operating Instructions
Page 34
... or use a USB connection only when a "Memory Stick" is used for the following models. - QuickTime 3.0 or newer must be used . See "Step 1 Installing the USB driver to your camera and disconnect the dedicated USB cable from the camera and computer. 5 Install the USB driver provided on... Macintosh (page 36) 34 Display: Resolution of 800×600 dots or higher, 32 000-color mode or higher The USB connector must be installed at the same time as standard. iMac with a question mark, delete it. 1 Click " Sony DSC" or " Sony...
... or use a USB connection only when a "Memory Stick" is used for the following models. - QuickTime 3.0 or newer must be used . See "Step 1 Installing the USB driver to your camera and disconnect the dedicated USB cable from the camera and computer. 5 Install the USB driver provided on... Macintosh (page 36) 34 Display: Resolution of 800×600 dots or higher, 32 000-color mode or higher The USB connector must be installed at the same time as standard. iMac with a question mark, delete it. 1 Click " Sony DSC" or " Sony...
Operating Instructions
Page 36
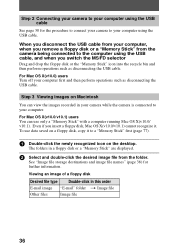
... switch the MS/FD selector Drag and drop the floppy disk or the "Memory Stick" icon into the recycle bin and then perform operations such as disconnecting the USB cable. For Mac OS X(v10.0/v10.1) users You can view the images recorded in your camera while the camera is connected to ... desktop. Viewing an image of a floppy disk Desired file type Double-click in a floppy disk or a "Memory Stick" are displayed. 2 Select and double-click the desired image file from the camera being connected to the computer using the USB cable. See "Image file storage destinations and image file names" ...
... switch the MS/FD selector Drag and drop the floppy disk or the "Memory Stick" icon into the recycle bin and then perform operations such as disconnecting the USB cable. For Mac OS X(v10.0/v10.1) users You can view the images recorded in your camera while the camera is connected to ... desktop. Viewing an image of a floppy disk Desired file type Double-click in a floppy disk or a "Memory Stick" are displayed. 2 Select and double-click the desired image file from the camera being connected to the computer using the USB cable. See "Image file storage destinations and image file names" ...
Operating Instructions
Page 37
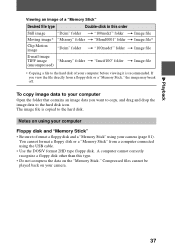
... using your camera. 37 You cannot format a floppy disk or a "Memory Stick" from a floppy disk or a "Memory Stick," the image may break off. Compressed files cannot be played back on the "Memory Stick." The image file is copied to format a floppy disk and a "Memory Stick" using your... computer before viewing it is recommended. A computer cannot correctly recognize a floppy disk other than this order Still image Moving image* Clip Motion image "Dcim...
... using your camera. 37 You cannot format a floppy disk or a "Memory Stick" from a floppy disk or a "Memory Stick," the image may break off. Compressed files cannot be played back on the "Memory Stick." The image file is copied to format a floppy disk and a "Memory Stick" using your... computer before viewing it is recommended. A computer cannot correctly recognize a floppy disk other than this order Still image Moving image* Clip Motion image "Dcim...


