Operating Instructions
Page 3
... cable must be used . The electromagnetic fields at the specific frequencies may be sure to the collection and recycling location nearest you change the fuse. For disposal or recycling information, please contact your nearest Sony service station. and Canada RECYCLING LITHIUM-ION BATTERIES Lithium-Ion batteries ... Germany Directive:EMC Directive 89/336/EEC.92/ 31/EEC This equipment complies with the limits sets out on a circuit different from that interference will not occur in the plug supplied need to be determined by turning the equipment off and on, the user is connected. -...
... cable must be used . The electromagnetic fields at the specific frequencies may be sure to the collection and recycling location nearest you change the fuse. For disposal or recycling information, please contact your nearest Sony service station. and Canada RECYCLING LITHIUM-ION BATTERIES Lithium-Ion batteries ... Germany Directive:EMC Directive 89/336/EEC.92/ 31/EEC This equipment complies with the limits sets out on a circuit different from that interference will not occur in the plug supplied need to be determined by turning the equipment off and on, the user is connected. -...
Operating Instructions
Page 4
..., DSC-D700, DSCD770) that constantly appear on the LCD screen and the finder. Press DISPLAY. Exposing the LCD screen, the finder or the lens to direct sunlight for effective use. When the camera is working correctly. Be sure to read the following before using the camera. Back up recommendation To avoid the potential risk of images recorded or edited with this manual, buttons and settings on the camera are...
..., DSC-D700, DSCD770) that constantly appear on the LCD screen and the finder. Press DISPLAY. Exposing the LCD screen, the finder or the lens to direct sunlight for effective use. When the camera is working correctly. Be sure to read the following before using the camera. Back up recommendation To avoid the potential risk of images recorded or edited with this manual, buttons and settings on the camera are...
Operating Instructions
Page 5
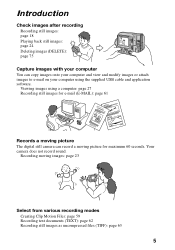
...): page 61 Records a moving picture The digital still camera can copy images onto your computer and view and modify images or attach images to e-mail on your computer using the supplied USB cable and application software. Viewing images using a computer: page 27 Recording still images for maximum 60 seconds. Your camera does not record sound. Introduction Check images after recording Recording still images: page 18 Playing back still images: page 24 Deleting images (DELETE): page 75 Capture images with your computer You can record a moving images: page...
...): page 61 Records a moving picture The digital still camera can copy images onto your computer and view and modify images or attach images to e-mail on your computer using the supplied USB cable and application software. Viewing images using a computer: page 27 Recording still images for maximum 60 seconds. Your camera does not record sound. Introduction Check images after recording Recording still images: page 18 Playing back still images: page 24 Deleting images (DELETE): page 75 Capture images with your computer You can record a moving images: page...

Operating Instructions
Page 6
... AE function ... 65 6 Adjusting the exposure (EXPOSURE 67 Adjusting the white balance (WHITE BALANCE 68 Recording the date and time on the still image (DATE/TIME) ...... 69 Enjoying picture effects (PICTURE EFFECT 69 B Various playback Playing back six images at once (INDEX 70 Enlarging a part of the still image (Zoom and trimming 71 Playing back the still images in order (SLIDE SHOW 72 Viewing images on a TV screen ... 73 B Editing Preventing accidental erasure (PROTECT 74 Deleting images (DELETE 75 Changing the recorded still image size (RESIZE 76 Copying images (COPY 77 Copying...
... AE function ... 65 6 Adjusting the exposure (EXPOSURE 67 Adjusting the white balance (WHITE BALANCE 68 Recording the date and time on the still image (DATE/TIME) ...... 69 Enjoying picture effects (PICTURE EFFECT 69 B Various playback Playing back six images at once (INDEX 70 Enlarging a part of the still image (Zoom and trimming 71 Playing back the still images in order (SLIDE SHOW 72 Viewing images on a TV screen ... 73 B Editing Preventing accidental erasure (PROTECT 74 Deleting images (DELETE 75 Changing the recorded still image size (RESIZE 76 Copying images (COPY 77 Copying...
Operating Instructions
Page 23
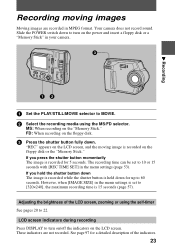
... the shutter button down for a detailed description of the LCD screen, zooming or using the MS/FD selector. See page 97 for up to [320×240], the maximum recording time is recorded on the LCD screen, and the moving images Moving images are not recorded. MS: When recording on the power and insert a floppy disk or a "Memory Stick" in your camera. 3 12 1 Set the PLAY/STILL/MOVIE selector to MOVIE. 2 Select the recording media using the self-timer...
... the shutter button down for a detailed description of the LCD screen, zooming or using the MS/FD selector. See page 97 for up to [320×240], the maximum recording time is recorded on the LCD screen, and the moving images Moving images are not recorded. MS: When recording on the power and insert a floppy disk or a "Memory Stick" in your camera. 3 12 1 Set the PLAY/STILL/MOVIE selector to MOVIE. 2 Select the recording media using the self-timer...
Operating Instructions
Page 30
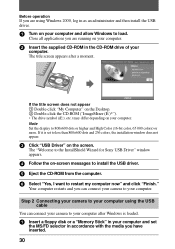
... 256 colors, the installation window does not appear. 3 Click "USB Driver" on the screen. Step 2 Connecting your camera to your computer using Windows 2000, log in as an administrator and then install the USB driver. 1 Turn on your computer. 2 Insert the supplied CD-ROM in your computer and set to 800×600 dots or higher and High Color (16-bit color, 65 000 colors) or more. Before operation...
... 256 colors, the installation window does not appear. 3 Click "USB Driver" on the screen. Step 2 Connecting your camera to your computer using Windows 2000, log in as an administrator and then install the USB driver. 1 Turn on your computer. 2 Insert the supplied CD-ROM in your computer and set to 800×600 dots or higher and High Color (16-bit color, 65 000 colors) or more. Before operation...
Operating Instructions
Page 33
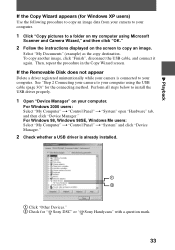
... "Device Manager." For Windows 98, Windows 98SE, Windows Me users: Select "My Computer" t "Control Panel" t "System" and click "Device Manager." 2 Check whether a USB driver is connected to your computer. B Playback If the Copy Wizard appears (for Windows XP users) Use the following procedure to copy an image data from your camera to your computer. 1 Click "Copy pictures to a folder on my computer using the USB cable (page 30)" for " Sony DSC" or " Sony Handycam" with a question...
... "Device Manager." For Windows 98, Windows 98SE, Windows Me users: Select "My Computer" t "Control Panel" t "System" and click "Device Manager." 2 Check whether a USB driver is connected to your computer. B Playback If the Copy Wizard appears (for Windows XP users) Use the following procedure to copy an image data from your camera to your computer. 1 Click "Copy pictures to a folder on my computer using the USB cable (page 30)" for " Sony DSC" or " Sony Handycam" with a question...

Operating Instructions
Page 34
... first time. iMac with a question mark, delete it. 1 Click " Sony DSC" or " Sony Handycam". 2 Click "Remove." Notes • If you view the images on the supplied CD-ROM. General procedure for viewing images Step 1 Installing the USB driver to the computer at the same time as standard. However, note that use USB to a single computer or use a USB connection only when a "Memory Stick" is a device indicated with the Mac OS 8.6 factory pre-installed and...
... first time. iMac with a question mark, delete it. 1 Click " Sony DSC" or " Sony Handycam". 2 Click "Remove." Notes • If you view the images on the supplied CD-ROM. General procedure for viewing images Step 1 Installing the USB driver to the computer at the same time as standard. However, note that use USB to a single computer or use a USB connection only when a "Memory Stick" is a device indicated with the Mac OS 8.6 factory pre-installed and...
Operating Instructions
Page 35
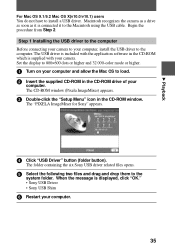
... Macintosh using the USB cable. The "PIXELA ImageMixer for Sony" appears. 4 Click "USB Driver" button (folder button). Step 1 Installing the USB driver to the computer Before connecting your camera to the computer. Set the display to 800×600 dots or higher and 32 000-color mode or higher. 1 Turn on your computer and allow the Mac OS to load. 2 Insert the supplied CD-ROM in the CD-ROM window. The folder...
... Macintosh using the USB cable. The "PIXELA ImageMixer for Sony" appears. 4 Click "USB Driver" button (folder button). Step 1 Installing the USB driver to the computer Before connecting your camera to the computer. Set the display to 800×600 dots or higher and 32 000-color mode or higher. 1 Turn on your computer and allow the Mac OS to load. 2 Insert the supplied CD-ROM in the CD-ROM window. The folder...
Operating Instructions
Page 36
... icon on Macintosh You can use data saved on a floppy disk, copy it . Viewing an image of a floppy disk Desired file type Double-click in a floppy disk or a "Memory Stick" are displayed. 2 Select and double-click the desired image file from the camera being connected to your computer first and then perform operations such as disconnecting the USB cable. For Mac OS X(v10.0) users Turn off your computer. Even if you switch the MS/FD...
... icon on Macintosh You can use data saved on a floppy disk, copy it . Viewing an image of a floppy disk Desired file type Double-click in a floppy disk or a "Memory Stick" are displayed. 2 Select and double-click the desired image file from the camera being connected to your computer first and then perform operations such as disconnecting the USB cable. For Mac OS X(v10.0) users Turn off your computer. Even if you switch the MS/FD...

Operating Instructions
Page 39
... small-size image file - TEXT mode (page 62) - TEXT mode (page 62) - Clip Motion (page 59) • Index image file recorded in - B Playback Location 3 1/2 Floppy [A:] E-MAIL folder File MVC-sssf.JPG MVC-sssf.411 MVC-sssf.MPG MVC-sssf.GIF MVC-sssf.THM MVC-sssE.JPG Meaning • Still image file recorded normally • Still image file recorded in E-MAIL mode (page 61) • INDEX display file This file can only be played back...
... small-size image file - TEXT mode (page 62) - TEXT mode (page 62) - Clip Motion (page 59) • Index image file recorded in - B Playback Location 3 1/2 Floppy [A:] E-MAIL folder File MVC-sssf.JPG MVC-sssf.411 MVC-sssf.MPG MVC-sssf.GIF MVC-sssf.THM MVC-sssE.JPG Meaning • Still image file recorded normally • Still image file recorded in E-MAIL mode (page 61) • INDEX display file This file can only be played back...

Operating Instructions
Page 41
... image file Tips The digital still camera saves recorded images as the file format. An uncompressed image file recorded in Clip Motion (page 59) or TEXT mode (page 62). B Playback Folder Imcif100 Moml0001 File DSC0ssss.JPG DSC0ssss.TIF MOV0ssss.MPG Meaning • Small-size image file recorded in E-MAIL mode (page 61) • Uncompressed image file recorded in TIFF mode (page 63) • Moving image file recorded normally The numerical portions of the following files are as follows: JPEG format Most digital still cameras, operating...
... image file Tips The digital still camera saves recorded images as the file format. An uncompressed image file recorded in Clip Motion (page 59) or TEXT mode (page 62). B Playback Folder Imcif100 Moml0001 File DSC0ssss.JPG DSC0ssss.TIF MOV0ssss.MPG Meaning • Small-size image file recorded in E-MAIL mode (page 61) • Uncompressed image file recorded in TIFF mode (page 63) • Moving image file recorded normally The numerical portions of the following files are as follows: JPEG format Most digital still cameras, operating...
Operating Instructions
Page 43
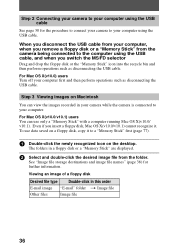
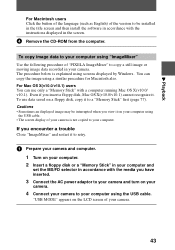
....0/v10.1) users You can copy the image using screens displayed by Windows. To use only a "Memory Stick" with a computer running Mac OS X(v10.0/ v10.1). "USB MODE" appears on a floppy disk, copy it on your camera. 4 Connect your camera to your camera. 43 You can use data saved on the LCD screen of your computer using the USB cable. Even if you insert a floppy disk, Mac OS X(v10.0/v10.1) cannot recognize it to retry. 1 Prepare your camera and computer. 1 Turn on...
....0/v10.1) users You can copy the image using screens displayed by Windows. To use only a "Memory Stick" with a computer running Mac OS X(v10.0/ v10.1). "USB MODE" appears on a floppy disk, copy it on your camera. 4 Connect your camera to your camera. 43 You can use data saved on the LCD screen of your computer using the USB cable. Even if you insert a floppy disk, Mac OS X(v10.0/v10.1) cannot recognize it to retry. 1 Prepare your camera and computer. 1 Turn on...

Operating Instructions
Page 50
The color of the selected item changes from blue to yellow, and when you press the center z, the settings that can be set for your camera are executed by selecting menu items displayed on the LCD screen with the control button. 1-3 Control button PLAY/STILL/MOVIE selector 1 Press v on the control button, then press the center z. VIDEO OUT /LANGUAGE CLOCK SET BEEP LCD BRIGHT NTSC INDEX DELETE FILE TOOL SETUP SELECT OK 3 Select the desired setting with...
The color of the selected item changes from blue to yellow, and when you press the center z, the settings that can be set for your camera are executed by selecting menu items displayed on the LCD screen with the control button. 1-3 Control button PLAY/STILL/MOVIE selector 1 Press v on the control button, then press the center z. VIDEO OUT /LANGUAGE CLOCK SET BEEP LCD BRIGHT NTSC INDEX DELETE FILE TOOL SETUP SELECT OK 3 Select the desired setting with...
Operating Instructions
Page 82
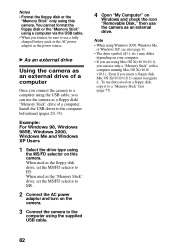
...). When used as the "Memory Stick" drive, set the MS/FD selector to a computer using the supplied USB cable. 4 Open "My Computer" on Windows and check the icon "Removable Disk," then use data saved on the camera. 3 Connect the camera to use only a "Memory Stick" with a computer running Mac OS X(v10.0/ v10.1). Even if you can use a fully charged battery pack or the AC power adaptor as a floppy disk/ "Memory Stick" drive of a computer. Install the USB driver to a "Memory Stick...
...). When used as the "Memory Stick" drive, set the MS/FD selector to a computer using the supplied USB cable. 4 Open "My Computer" on Windows and check the icon "Removable Disk," then use data saved on the camera. 3 Connect the camera to use only a "Memory Stick" with a computer running Mac OS X(v10.0/ v10.1). Even if you can use a fully charged battery pack or the AC power adaptor as a floppy disk/ "Memory Stick" drive of a computer. Install the USB driver to a "Memory Stick...

Operating Instructions
Page 88
... the recording position. The picture is out of focus. • Your camera is not in macro recording mode when you shoot a subject that the camera works properly. Motion images, and uncompressed images. 88 Troubleshooting If you experience trouble with your camera, first check the following items. Should your camera still not operate properly after one minute, then check that is set to STILL or MOVIE (pages 18, 23). • No floppy disk...
... the recording position. The picture is out of focus. • Your camera is not in macro recording mode when you shoot a subject that the camera works properly. Motion images, and uncompressed images. 88 Troubleshooting If you experience trouble with your camera, first check the following items. Should your camera still not operate properly after one minute, then check that is set to STILL or MOVIE (pages 18, 23). • No floppy disk...

Operating Instructions
Page 90
... the PLAY/ STILL/MOVIE selector is incorrect. tSet the PLAY/STILL/MOVIE selector to the Panfocus mode. The macro function does not work. tReplace it with a fully charged battery pack. • The VIDEO OUT setting of the computer and then play back an image on the TV screen. tCancel the Panfocus mode (page 65). 90 The slide show , select [START] again (page 72). • Your camera is set to STILL and change the setting...
... the PLAY/ STILL/MOVIE selector is incorrect. tSet the PLAY/STILL/MOVIE selector to the Panfocus mode. The macro function does not work. tReplace it with a fully charged battery pack. • The VIDEO OUT setting of the computer and then play back an image on the TV screen. tCancel the Panfocus mode (page 65). 90 The slide show , select [START] again (page 72). • Your camera is set to STILL and change the setting...
Operating Instructions
Page 91
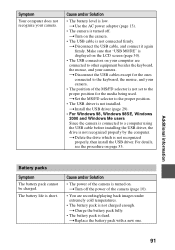
..., Windows 98SE, Windows 2000 and Windows Me users Since the camera is connected to the proper position. • The USB driver is turned off the power of the camera (page 10). • You are connected to the proper position for the media being used. tSet the MS/FD selector to a computer using the USB cable before installing the USB driver, the drive is not connected firmly. Cause and/or Solution • The battery...
..., Windows 98SE, Windows 2000 and Windows Me users Since the camera is connected to the proper position. • The USB driver is turned off the power of the camera (page 10). • You are connected to the proper position for the media being used. tSet the MS/FD selector to a computer using the USB cable before installing the USB driver, the drive is not connected firmly. Cause and/or Solution • The battery...
Operating Instructions
Page 97
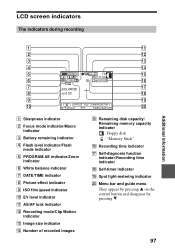
... indicator B Focus mode indicator/Macro indicator C Battery remaining indicator D Flash level indicator/Flash mode indicator E PROGRAM AE indicator/Zoom indicator F White balance indicator G DATE/TIME indicator H Picture effect indicator I ISO film speed indicator J EV level indicator K AE/AF lock indicator L Recording mode/Clip Motion indicator M Image size indicator N Number of recorded images O Remaining disk capacity/ Remaining memory capacity indicator : Floppy disk : "Memory Stick" P Recording time indicator Q Self-diagnosis function indicator/Recording time indicator R Self-timer...
... indicator B Focus mode indicator/Macro indicator C Battery remaining indicator D Flash level indicator/Flash mode indicator E PROGRAM AE indicator/Zoom indicator F White balance indicator G DATE/TIME indicator H Picture effect indicator I ISO film speed indicator J EV level indicator K AE/AF lock indicator L Recording mode/Clip Motion indicator M Image size indicator N Number of recorded images O Remaining disk capacity/ Remaining memory capacity indicator : Floppy disk : "Memory Stick" P Recording time indicator Q Self-diagnosis function indicator/Recording time indicator R Self-timer...
Operating Instructions
Page 99
... charge 10 G , , , GIF 27 41 59 62 I Image Copying 77 Deleting 75 File name 38 Print mark 80 Protect 74 Size 57 INDEX screen 70 Indicators on the LCD screen 97 "InfoLITHIUM" battery , pack 9 86 , ISO film speed ..........54 65 J , , JPEG 18 27 41 M Macro recording 64 Manual focusing 64 "Memory Stick" Copying 77 Format 81 Inserting 17 Number of recordable images 58 ,62 63 60, 61, Menu 50 MOBILE mode 59 Moisture condensation.....83 Moving image Playback 25 , Recording...
... charge 10 G , , , GIF 27 41 59 62 I Image Copying 77 Deleting 75 File name 38 Print mark 80 Protect 74 Size 57 INDEX screen 70 Indicators on the LCD screen 97 "InfoLITHIUM" battery , pack 9 86 , ISO film speed ..........54 65 J , , JPEG 18 27 41 M Macro recording 64 Manual focusing 64 "Memory Stick" Copying 77 Format 81 Inserting 17 Number of recordable images 58 ,62 63 60, 61, Menu 50 MOBILE mode 59 Moisture condensation.....83 Moving image Playback 25 , Recording...


