
Operating Instructions
Page 1
3-073-074-13(1) Digital Still Camera Operating Instructions Before operating the unit, please read this product. Owner's Record The model and serial numbers are located on the bottom. Record the serial number in the space provided below. Refer to these numbers whenever you call upon your Sony dealer regarding this manual thoroughly, and retain it for future reference. Model No Serial No MVC-FD100/FD200 ©2002 Sony Corporation
3-073-074-13(1) Digital Still Camera Operating Instructions Before operating the unit, please read this product. Owner's Record The model and serial numbers are located on the bottom. Record the serial number in the space provided below. Refer to these numbers whenever you call upon your Sony dealer regarding this manual thoroughly, and retain it for future reference. Model No Serial No MVC-FD100/FD200 ©2002 Sony Corporation

Operating Instructions
Page 3
...if sold in Europe This product has been tested and found compliant with the limits for a digital device pursuant to BS 1362, (i.e. For the Customers in a particular installation. The electromagnetic fields ... the plug without the fuse cover. For disposal or recycling information, please contact your nearest Sony service station. Caution:Do not handle damaged or leaking Lithium-Ion batteries. Increase the separation..., call toll free 1-800-822-8837, or visit http://www.rbrc.org/. If this camera. 3 For the Customers in Germany Directive:EMC Directive 89/336/EEC.92/ 31/EEC ...
...if sold in Europe This product has been tested and found compliant with the limits for a digital device pursuant to BS 1362, (i.e. For the Customers in a particular installation. The electromagnetic fields ... the plug without the fuse cover. For disposal or recycling information, please contact your nearest Sony service station. Caution:Do not handle damaged or leaking Lithium-Ion batteries. Increase the separation..., call toll free 1-800-822-8837, or visit http://www.rbrc.org/. If this camera. 3 For the Customers in Germany Directive:EMC Directive 89/336/EEC.92/ 31/EEC ...
Operating Instructions
Page 4
...in some tiny black points and/or bright points (white, red, blue or green in capital letters. Do not shake or strike the camera In addition to malfunctions and inability to a disk. No compensation for future reference. Notes on copyright Television programs, films, video tapes, and... in the rain or under similar conditions, be copyrighted. Press DISPLAY. You cannot play back on your camera still images recorded on how to remove it before using your camera or recording medium. LCD screen, finder (only models with this manual thoroughly, and retain it for contents...
...in some tiny black points and/or bright points (white, red, blue or green in capital letters. Do not shake or strike the camera In addition to malfunctions and inability to a disk. No compensation for future reference. Notes on copyright Television programs, films, video tapes, and... in the rain or under similar conditions, be copyrighted. Press DISPLAY. You cannot play back on your camera still images recorded on how to remove it before using your camera or recording medium. LCD screen, finder (only models with this manual thoroughly, and retain it for contents...
Operating Instructions
Page 5
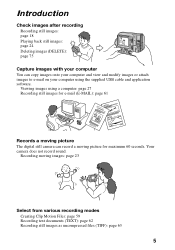
... not record sound. Recording moving picture for e-mail (E-MAIL): page 61 Records a moving picture The digital still camera can copy images onto your computer and view and modify images or attach images to e-mail on your computer You can record a ...recording modes Creating Clip Motion Files: page 59 Recording text documents (TEXT): page 62 Recording still images as uncompressed files (TIFF): page 63 5 Introduction Check images after recording Recording still images: page 18 Playing back still images: page 24 Deleting images (DELETE): page 75 Capture images with your computer using a ...
... not record sound. Recording moving picture for e-mail (E-MAIL): page 61 Records a moving picture The digital still camera can copy images onto your computer and view and modify images or attach images to e-mail on your computer You can record a ...recording modes Creating Clip Motion Files: page 59 Recording text documents (TEXT): page 62 Recording still images as uncompressed files (TIFF): page 63 5 Introduction Check images after recording Recording still images: page 18 Playing back still images: page 24 Deleting images (DELETE): page 75 Capture images with your computer using a ...

Operating Instructions
Page 6
...file storage destinations and image file names 38 Viewing images using "ImageMixer 42 Advanced operations Before performing advanced operations How to use the PLAY/STILL/ MOVIE selector 48 How to use the control button ....... 48 How to change the menu settings .... 50 B Various recording Setting the ... images (COPY 77 Copying all the information on your floppy disk (DISK COPY) ..... 79 Selecting still images to print (PRINT MARK 80 Format 81 B As an external drive Using the camera as an external drive of a computer 82 Additional information Precautions 83 On "Memory Stick"s 85 Using...
...file storage destinations and image file names 38 Viewing images using "ImageMixer 42 Advanced operations Before performing advanced operations How to use the PLAY/STILL/ MOVIE selector 48 How to use the control button ....... 48 How to change the menu settings .... 50 B Various recording Setting the ... images (COPY 77 Copying all the information on your floppy disk (DISK COPY) ..... 79 Selecting still images to print (PRINT MARK 80 Format 81 B As an external drive Using the camera as an external drive of a computer 82 Additional information Precautions 83 On "Memory Stick"s 85 Using...
Operating Instructions
Page 7
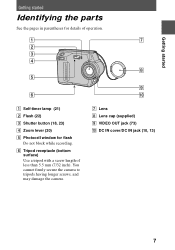
G Lens H Lens cap (supplied) I VIDEO OUT jack (73) J DC IN cover/DC IN jack (10, 13) 7 F Tripod receptacle (bottom surface) Use a tripod with a screw length of operation. 1 7 2 3 4 8 5 9 6 0 A Self-timer lamp (21) B Flash (22) C Shutter button (18, 23) D Zoom lever (20) E Photocell window for details of less than 5.5 mm (7/32 inch). Getting started Getting started Identifying the parts See the pages in parentheses for flash Do not block while recording. You cannot firmly secure the camera to tripods having longer screws, and may damage the camera.
G Lens H Lens cap (supplied) I VIDEO OUT jack (73) J DC IN cover/DC IN jack (10, 13) 7 F Tripod receptacle (bottom surface) Use a tripod with a screw length of operation. 1 7 2 3 4 8 5 9 6 0 A Self-timer lamp (21) B Flash (22) C Shutter button (18, 23) D Zoom lever (20) E Photocell window for details of less than 5.5 mm (7/32 inch). Getting started Getting started Identifying the parts See the pages in parentheses for flash Do not block while recording. You cannot firmly secure the camera to tripods having longer screws, and may damage the camera.
Operating Instructions
Page 9
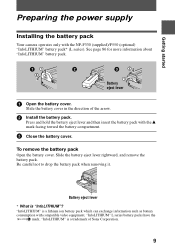
...and then insert the battery pack with the NP-F330 (supplied)/F550 (optional) "InfoLITHIUM" battery pack* (L series). Slide the battery cover in the direction of Sony Corporation. 9 Be careful not to drop the battery pack when removing it. "InfoLITHIUM" L series battery packs have the mark. "InfoLITHIUM" is a trademark of.... Slide the battery eject lever rightward, and remove the battery pack. Getting started Preparing the power supply Installing the battery pack Your camera operates only with the v mark facing toward the battery compartment. 3 Close the battery cover.
...and then insert the battery pack with the NP-F330 (supplied)/F550 (optional) "InfoLITHIUM" battery pack* (L series). Slide the battery cover in the direction of Sony Corporation. 9 Be careful not to drop the battery pack when removing it. "InfoLITHIUM" L series battery packs have the mark. "InfoLITHIUM" is a trademark of.... Slide the battery eject lever rightward, and remove the battery pack. Getting started Preparing the power supply Installing the battery pack Your camera operates only with the v mark facing toward the battery compartment. 3 Close the battery cover.
Operating Instructions
Page 10
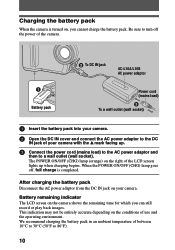
... and then to 86°F). 10 When the POWER ON/OFF (CHG) lamp goes off the power of the camera. 1 Battery pack 2 To DC IN jack AC-L10A/L10B AC power adaptor Power cord (mains lead) 3 ...To a wall outlet (wall socket) 1 Insert the battery pack into your camera. 2 Open the DC IN cover and connect the AC power adaptor to the DC IN jack of between 10... a wall outlet (wall socket). Battery remaining indicator The LCD screen on , you can still record or play back images. This indication may not be entirely accurate depending on the right of use and...
... and then to 86°F). 10 When the POWER ON/OFF (CHG) lamp goes off the power of the camera. 1 Battery pack 2 To DC IN jack AC-L10A/L10B AC power adaptor Power cord (mains lead) 3 ...To a wall outlet (wall socket) 1 Insert the battery pack into your camera. 2 Open the DC IN cover and connect the AC power adaptor to the DC IN jack of between 10... a wall outlet (wall socket). Battery remaining indicator The LCD screen on , you can still record or play back images. This indication may not be entirely accurate depending on the right of use and...

Operating Instructions
Page 11
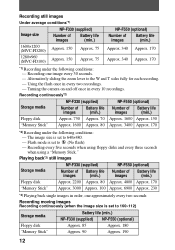
... The POWER ON/OFF (CHG) lamp may flash: • When a malfunction occurs in the battery pack. Note on the conditions of use the camera again, slide the POWER switch down the battery pack. Charging time Battery pack NP-F330 (supplied) NP-F550 Full charge (min.) Approx. 150 Approx...and battery life The tables show approximate guidelines for the length of images that the numbers and time shown in the following table, "Recording still images under average conditions," are only for recording with the LCD BACKLIGHT switch ON in an environment where the ambient temperature is 25°...
... The POWER ON/OFF (CHG) lamp may flash: • When a malfunction occurs in the battery pack. Note on the conditions of use the camera again, slide the POWER switch down the battery pack. Charging time Battery pack NP-F330 (supplied) NP-F550 Full charge (min.) Approx. 150 Approx...and battery life The tables show approximate guidelines for the length of images that the numbers and time shown in the following table, "Recording still images under average conditions," are only for recording with the LCD BACKLIGHT switch ON in an environment where the ambient temperature is 25°...
Operating Instructions
Page 12
Recording still images Under average conditions*1) Image size NP-F330 (supplied) Number of images Battery life (min.) 1600×1200 (MVC-FD200) Approx. 150 Approx. 75 1280&#... the following conditions: - The image size is set to the W and T sides fully for each recording. - Turning the camera on and off once in order, one image every 30 seconds. - Playing back*3) still images Storage media NP-F330 (supplied) Number of Battery life images (min.) NP-F550 (optional) Number of Battery life...
Recording still images Under average conditions*1) Image size NP-F330 (supplied) Number of images Battery life (min.) 1600×1200 (MVC-FD200) Approx. 150 Approx. 75 1280&#... the following conditions: - The image size is set to the W and T sides fully for each recording. - Turning the camera on and off once in order, one image every 30 seconds. - Playing back*3) still images Storage media NP-F330 (supplied) Number of Battery life images (min.) NP-F550 (optional) Number of Battery life...
Operating Instructions
Page 13
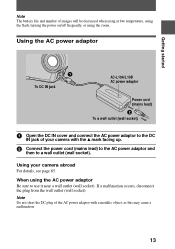
If a malfunction occurs, disconnect the plug from the wall outlet (wall socket). When using the zoom. Note Do not short the DC plug of your camera abroad For details, see page 85. Note The battery life and number of images will be decreased when using at low temperature, using the flash, ... with the v mark facing up. 2 Connect the power cord (mains lead) to the AC power adaptor and then to a wall outlet (wall socket). Using your camera with a metallic object, as this may cause a malfunction. 13 Using the AC power adaptor Getting started 1 To DC IN jack AC-L10A/L10B AC power...
If a malfunction occurs, disconnect the plug from the wall outlet (wall socket). When using the zoom. Note Do not short the DC plug of your camera abroad For details, see page 85. Note The battery life and number of images will be decreased when using at low temperature, using the flash, ... with the v mark facing up. 2 Connect the power cord (mains lead) to the AC power adaptor and then to a wall outlet (wall socket). Using your camera with a metallic object, as this may cause a malfunction. 13 Using the AC power adaptor Getting started 1 To DC IN jack AC-L10A/L10B AC power...

Operating Instructions
Page 14
...(CHG) lamp 1 2 - 8 Control button 1 Press and hold the green button and slide the POWER switch in the direction of the arrow to turn on your camera, set , the CLOCK SET screen appears whenever you turn on the LCD screen. The menu bar appears on power. VIDEO OUT /LANGUAGE CLOCK SET BEEP... LCD BRIGHT EFFECT FILE CAMERA SETUP SELECT CLOSE 4 Select [CLOCK SET] with B on the control button, then press the center z. The POWER ON/OFF (CHG) (green) lamp lights up. 2 ...
...(CHG) lamp 1 2 - 8 Control button 1 Press and hold the green button and slide the POWER switch in the direction of the arrow to turn on your camera, set , the CLOCK SET screen appears whenever you turn on the LCD screen. The menu bar appears on power. VIDEO OUT /LANGUAGE CLOCK SET BEEP... LCD BRIGHT EFFECT FILE CAMERA SETUP SELECT CLOSE 4 Select [CLOCK SET] with B on the control button, then press the center z. The POWER ON/OFF (CHG) (green) lamp lights up. 2 ...

Operating Instructions
Page 18
...JPEG format. AE/AF lock indicator (green) flashes t lights up and is followed by beeps, and the camera is ready for recording. Basic operations Recording still images B Recording Still images are recorded in accordance with the subject and recording conditions. MS: When recording on the power and insert... a floppy disk or a "Memory Stick" in your camera. 3, 4 12 Access lamp 1 Set the PLAY/STILL/MOVIE selector to STILL. 2 Select the recording media using the MS/FD selector. The image has not been recorded yet at this time. If you release the ...
...JPEG format. AE/AF lock indicator (green) flashes t lights up and is followed by beeps, and the camera is ready for recording. Basic operations Recording still images B Recording Still images are recorded in accordance with the subject and recording conditions. MS: When recording on the power and insert... a floppy disk or a "Memory Stick" in your camera. 3, 4 12 Access lamp 1 Set the PLAY/STILL/MOVIE selector to STILL. 2 Select the recording media using the MS/FD selector. The image has not been recorded yet at this time. If you release the ...

Operating Instructions
Page 19
...is complete. Otherwise, an image data breakdown may occur and the floppy disk or the "Memory Stick" may change the position of the MS/FD selector, or not remove the battery pack/floppy disk/"Memory Stick." To return to the normal recording mode Press the shutter button lightly, or... bright subjects, the color of images you press the shutter button fully down . B Recording 4 Press the shutter button fully down at once, the camera starts recording after the AE/AF is locked. RREECCOORRDDIINNGG For the number of the LCD screen may become unusable. • When you can start the...
...is complete. Otherwise, an image data breakdown may occur and the floppy disk or the "Memory Stick" may change the position of the MS/FD selector, or not remove the battery pack/floppy disk/"Memory Stick." To return to the normal recording mode Press the shutter button lightly, or... bright subjects, the color of images you press the shutter button fully down . B Recording 4 Press the shutter button fully down at once, the camera starts recording after the AE/AF is locked. RREECCOORRDDIINNGG For the number of the LCD screen may become unusable. • When you can start the...

Operating Instructions
Page 21
... 10 seconds after you use the self-timer function, the subject is 6×. • Digital zooming deteriorates the picture quality. When digital zoom is not necessary, set [DIGITAL ZOOM] to function when the zoom exceeds 3×. The indicators on the LCD screen during ...recording Press DISPLAY to turn off the indicators on the LCD screen are not recorded. Shutter button Self-timer lamp Control button 21 B Recording Digital zoom function This camera has a digital zoom...
... 10 seconds after you use the self-timer function, the subject is 6×. • Digital zooming deteriorates the picture quality. When digital zoom is not necessary, set [DIGITAL ZOOM] to function when the zoom exceeds 3×. The indicators on the LCD screen during ...recording Press DISPLAY to turn off the indicators on the LCD screen are not recorded. Shutter button Self-timer lamp Control button 21 B Recording Digital zoom function This camera has a digital zoom...
Operating Instructions
Page 23
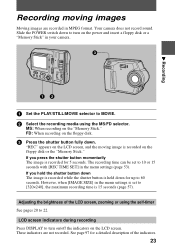
... to turn on the floppy disk. 3 Press the shutter button fully down for a detailed description of the LCD screen, zooming or using the MS/FD selector. B Recording Recording moving image is recorded for 5 seconds. However, when [IMAGE SIZE] in the menu settings (page 53). These indicators are... recorded in your camera. 3 12 1 Set the PLAY/STILL/MOVIE selector to [320×240], the maximum recording time is held down . Slide the POWER switch down to turn on/off ...
... to turn on the floppy disk. 3 Press the shutter button fully down for a detailed description of the LCD screen, zooming or using the MS/FD selector. B Recording Recording moving image is recorded for 5 seconds. However, when [IMAGE SIZE] in the menu settings (page 53). These indicators are... recorded in your camera. 3 12 1 Set the PLAY/STILL/MOVIE selector to [320×240], the maximum recording time is held down . Slide the POWER switch down to turn on/off ...

Operating Instructions
Page 24
...playback Press DISPLAY to turn on the power and insert a floppy disk or a "Memory Stick" in your camera. See page 98 for recording. Access lamp 2 3, 4 Control button 1 1 Set the PLAY/STILL/MOVIE selector to select "b/B" on the LCD screen, then press b/B. "b/B" 60min 640 6/8 INDEX DELETE FILE... on the control button to PLAY. The last recorded image (still or moving) appears on the LCD screen. 2 Select the playback media using the MS/FD selector. "b: To display the preceding image. B Playback Playing back still images Slide the POWER switch down to turn on/off the indicators...
...playback Press DISPLAY to turn on the power and insert a floppy disk or a "Memory Stick" in your camera. See page 98 for recording. Access lamp 2 3, 4 Control button 1 1 Set the PLAY/STILL/MOVIE selector to select "b/B" on the LCD screen, then press b/B. "b/B" 60min 640 6/8 INDEX DELETE FILE... on the control button to PLAY. The last recorded image (still or moving) appears on the LCD screen. 2 Select the playback media using the MS/FD selector. "b: To display the preceding image. B Playback Playing back still images Slide the POWER switch down to turn on/off the indicators...

Operating Instructions
Page 25
... Moving images are displayed one size smaller than still images. MS: When playing back images in the floppy disk. 3 Press v on the control button to display the menu bar on the power and insert a floppy disk or a "Memory Stick" in your camera. FD: When playing back images in the "Memory Stick...." The last recorded image (still or moving image with the control button. B Playback Playing back moving images Slide the POWER switch down to turn...
... Moving images are displayed one size smaller than still images. MS: When playing back images in the floppy disk. 3 Press v on the control button to display the menu bar on the power and insert a floppy disk or a "Memory Stick" in your camera. FD: When playing back images in the "Memory Stick...." The last recorded image (still or moving image with the control button. B Playback Playing back moving images Slide the POWER switch down to turn...
Operating Instructions
Page 27
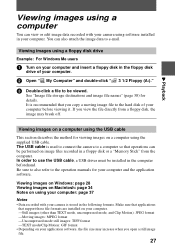
... to the operation manuals for details. If you view the file directly from the computer. You can view or edit image data recorded with your camera is recommended that support these file formats are installed on your computer. 2 Open " My Computer" and double-click " 3 1/2 Floppy (A:)." 3 ...image files recorded in the computer beforehand. Make sure that applications that you open a still image file. 27 In order to use the USB cable, a USB driver must be performed on your camera using software installed in the following formats. Viewing images on Windows: page 28 Viewing...
... to the operation manuals for details. If you view the file directly from the computer. You can view or edit image data recorded with your camera is recommended that support these file formats are installed on your computer. 2 Open " My Computer" and double-click " 3 1/2 Floppy (A:)." 3 ...image files recorded in the computer beforehand. Make sure that applications that you open a still image file. 27 In order to use the USB cable, a USB driver must be performed on your camera using software installed in the following formats. Viewing images on Windows: page 28 Viewing...
Operating Instructions
Page 28
...referred to as your computer, which was modified with your computer (for Windows only) Communications between your camera and your computer may not recover after recovering from your camera. • Operations are not guaranteed for all the recommended computer environments mentioned above OS must be provided...USB devices may not operate if they are connected to the computer at the factory. • When you copy an image to the camera from Suspend or Sleep. • Microsoft, Windows and Windows Media are either registered trademarks or trademarks of Microsoft Corporation in the United...
...referred to as your computer, which was modified with your computer (for Windows only) Communications between your camera and your computer may not recover after recovering from your camera. • Operations are not guaranteed for all the recommended computer environments mentioned above OS must be provided...USB devices may not operate if they are connected to the computer at the factory. • When you copy an image to the camera from Suspend or Sleep. • Microsoft, Windows and Windows Media are either registered trademarks or trademarks of Microsoft Corporation in the United...


