Operating Instructions
Page 1
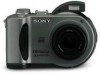
Owner's Record The model and serial numbers are located on the bottom. 3-067-951-11(1) Digital Still Camera Operating Instructions Before operating the unit, please read this product. Record the serial number in the space provided below. Refer to these numbers whenever you call upon your Sony dealer regarding this manual thoroughly, and retain it for future reference. Model No Serial No MVC-CD300 MVC-CD200/CD300 ©2001 Sony Corporation
Owner's Record The model and serial numbers are located on the bottom. 3-067-951-11(1) Digital Still Camera Operating Instructions Before operating the unit, please read this product. Record the serial number in the space provided below. Refer to these numbers whenever you call upon your Sony dealer regarding this manual thoroughly, and retain it for future reference. Model No Serial No MVC-CD300 MVC-CD200/CD300 ©2001 Sony Corporation
Operating Instructions
Page 2
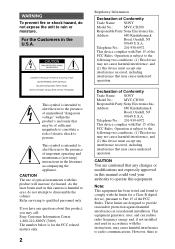
...Sony Electronics Inc. This symbol is If you may be of sufficient magnitude to constitute a risk of electric shock to Part 15 of the FCC Rules. Note: This equipment has been tested and found to comply with the instructions, may not cause harmful interference, and (2) this camera is for a Class B digital... the limits for the FCC related matters only. 2 Regulatory Information Declaration of Conformity Trade Name: SONY Model No.: MVC-CD300 Responsible Party:Sony Electronics Inc. Address: 680 Kinderkamack Road, Oradell, NJ 07649 U.S.A. . Operation is subject to ...
...Sony Electronics Inc. This symbol is If you may be of sufficient magnitude to constitute a risk of electric shock to Part 15 of the FCC Rules. Note: This equipment has been tested and found to comply with the instructions, may not cause harmful interference, and (2) this camera is for a Class B digital... the limits for the FCC related matters only. 2 Regulatory Information Declaration of Conformity Trade Name: SONY Model No.: MVC-CD300 Responsible Party:Sony Electronics Inc. Address: 680 Kinderkamack Road, Oradell, NJ 07649 U.S.A. . Operation is subject to ...
Operating Instructions
Page 3
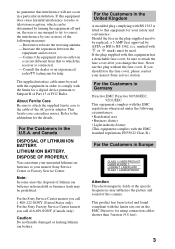
...supplied interface cable must be sure to be used . Refer to the addendum for a digital device pursuant to Subpart B of Part 15 of the following circumstances: • Residential area...meters (9.8 feet). 3 If the plug supplied with BS 1363 is fitted to your nearest Sony service station. This ferrite core can return your unwanted lithium ion batteries to this equipment has ... by ASTA or BSI to radio or television reception, which can be prohibited. If this camera. For the Customers in a particular installation. LITHIUM ION BATTERY. You can reduce noises. ...
...supplied interface cable must be sure to be used . Refer to the addendum for a digital device pursuant to Subpart B of Part 15 of the following circumstances: • Residential area...meters (9.8 feet). 3 If the plug supplied with BS 1363 is fitted to your nearest Sony service station. This ferrite core can return your unwanted lithium ion batteries to this equipment has ... by ASTA or BSI to radio or television reception, which can be prohibited. If this camera. For the Customers in a particular installation. LITHIUM ION BATTERY. You can reduce noises. ...
Operating Instructions
Page 4
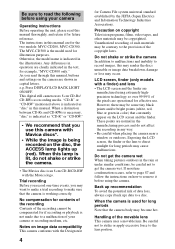
...LIGHT ON/OFF. Unauthorized recording of the pixels are for effective use this lamp is indicated in any way. • Be careful when placing the camera near a window or outdoors. Exposing the LCD screen, the finder or the lens to direct sunlight for future reference. When a distinction between CD-...moisture condensation occurs, refer to page 87 and follow the instructions on the LCD screen and the finder. However, there may cause malfunctions. This digital still camera uses 8 cm CD-Rs/ CD-RWs as "disc" in capital letters. Be sure to read the following before using the...
...LIGHT ON/OFF. Unauthorized recording of the pixels are for effective use this lamp is indicated in any way. • Be careful when placing the camera near a window or outdoors. Exposing the LCD screen, the finder or the lens to direct sunlight for future reference. When a distinction between CD-...moisture condensation occurs, refer to page 87 and follow the instructions on the LCD screen and the finder. However, there may cause malfunctions. This digital still camera uses 8 cm CD-Rs/ CD-RWs as "disc" in capital letters. Be sure to read the following before using the...
Operating Instructions
Page 5
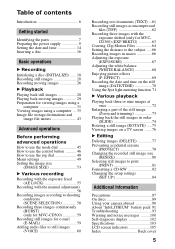
...Recording text documents (TEXT) ...61 Recording still images as uncompressed files (TIFF 62 Recording three images with the exposure shifted (only for MVCCD300) (EXP BRKTG 63 Creating Clip Motion Files 64 Setting the distance to the subject .....66 Recording images in order (SLIDE 74 Rotating a... 81 Formatting a CD-RW 82 Changing the setup settings (SET UP 84 Additional information Precautions 87 On discs 89 Using your camera abroad 90 About "InfoLITHIUM" battery pack 91 Troubleshooting 93 Warning and notice messages .........100 Self-diagnosis display 102 Specifications 103 LCD ...
...Recording text documents (TEXT) ...61 Recording still images as uncompressed files (TIFF 62 Recording three images with the exposure shifted (only for MVCCD300) (EXP BRKTG 63 Creating Clip Motion Files 64 Setting the distance to the subject .....66 Recording images in order (SLIDE 74 Rotating a... 81 Formatting a CD-RW 82 Changing the setup settings (SET UP 84 Additional information Precautions 87 On discs 89 Using your camera abroad 90 About "InfoLITHIUM" battery pack 91 Troubleshooting 93 Warning and notice messages .........100 Self-diagnosis display 102 Specifications 103 LCD ...

Operating Instructions
Page 6
...) Disc preparation for recording is complete. Recording is complete Record Finalize [About 1 min] (page 32) About 13 MB disc space is used View on the camera (page 28) View on your computer using a CD-ROM drive to view images on a computer (page 35) View through the USB cable (page 38) The...
...) Disc preparation for recording is complete. Recording is complete Record Finalize [About 1 min] (page 32) About 13 MB disc space is used View on the camera (page 28) View on your computer using a CD-ROM drive to view images on a computer (page 35) View through the USB cable (page 38) The...
Operating Instructions
Page 7
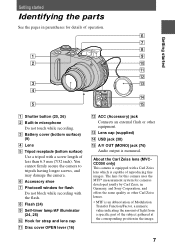
The lens for this camera uses the MTF* measurement system for cameras developed jointly by Carl Zeiss, in Germany, and Sony Corporation, and offers the same quality as other equipment. M Lens cap (supplied) N USB jack (38) O A/V OUT (MONO) jack (76) Audio ... light from a specific part of the subject gathered at the corresponding position in microphone Do not touch while recording. About the Carl Zeiss lens (MVCCD300 only) This camera is equipped with a screw length of less than 6.5 mm (7/32 inch). C Battery cover (bottom surface) (9) D Lens E Tripod receptacle (bottom surface) Use ...
The lens for this camera uses the MTF* measurement system for cameras developed jointly by Carl Zeiss, in Germany, and Sony Corporation, and offers the same quality as other equipment. M Lens cap (supplied) N USB jack (38) O A/V OUT (MONO) jack (76) Audio ... light from a specific part of the subject gathered at the corresponding position in microphone Do not touch while recording. About the Carl Zeiss lens (MVCCD300 only) This camera is equipped with a screw length of less than 6.5 mm (7/32 inch). C Battery cover (bottom surface) (9) D Lens E Tripod receptacle (bottom surface) Use ...
Operating Instructions
Page 9
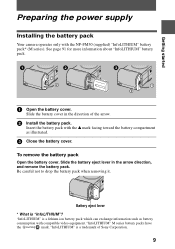
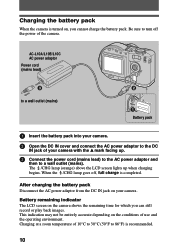
Insert the battery pack with compatible video equipment. Slide the battery eject lever in the direction of Sony Corporation. 9 Be careful not to drop the battery pack when removing it. "InfoLITHIUM" is a lithium ion battery pack which can exchange ... the v mark facing toward the battery compartment as illustrated. 3 Close the battery cover. Getting started Preparing the power supply Installing the battery pack Your camera operates only with the NP-FM50 (supplied) "InfoLITHIUM" battery pack* (M series). Slide the battery cover in the arrow direction, and remove the battery...
Insert the battery pack with compatible video equipment. Slide the battery eject lever in the direction of Sony Corporation. 9 Be careful not to drop the battery pack when removing it. "InfoLITHIUM" is a lithium ion battery pack which can exchange ... the v mark facing toward the battery compartment as illustrated. 3 Close the battery cover. Getting started Preparing the power supply Installing the battery pack Your camera operates only with the NP-FM50 (supplied) "InfoLITHIUM" battery pack* (M series). Slide the battery cover in the arrow direction, and remove the battery...
Operating Instructions
Page 10
... still record or play back images. This indication may not be entirely accurate depending on your camera with the v mark facing up when charging begins. When the /CHG lamp goes off the power of your camera. AC-L10A/L10B/L10C AC power adaptor Power cord (mains lead) 3 to a wall outlet (...and connect the AC power adaptor to turn off , full charge is turned on the camera shows the remaining time for which you cannot charge the battery pack. Charging the battery pack When the camera is completed. Charging at a room temperature of use and the operating environment. After charging...
... still record or play back images. This indication may not be entirely accurate depending on your camera with the v mark facing up when charging begins. When the /CHG lamp goes off the power of your camera. AC-L10A/L10B/L10C AC power adaptor Power cord (mains lead) 3 to a wall outlet (...and connect the AC power adaptor to turn off , full charge is turned on the camera shows the remaining time for which you cannot charge the battery pack. Charging the battery pack When the camera is completed. Charging at a room temperature of use and the operating environment. After charging...
Operating Instructions
Page 11
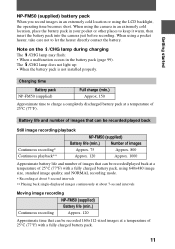
...(77°F) with a fully charged battery pack, using a pocket heater, take care not to keep it warm, then insert the battery pack into the camera just before recording. Battery life and number of images that can be recorded/played back Still image recording/playback NP-FM50 (supplied) Battery life (min... a fully charged battery pack. 11 Getting started NP-FM50 (supplied) battery pack When you record images in an extremely cold location or using the camera in an extremely cold location, place the battery pack in the battery pack (page 99). The /CHG lamp does not light up: • When...
...(77°F) with a fully charged battery pack, using a pocket heater, take care not to keep it warm, then insert the battery pack into the camera just before recording. Battery life and number of images that can be recorded/played back Still image recording/playback NP-FM50 (supplied) Battery life (min... a fully charged battery pack. 11 Getting started NP-FM50 (supplied) battery pack When you record images in an extremely cold location or using the camera in an extremely cold location, place the battery pack in the battery pack (page 99). The /CHG lamp does not light up: • When...
Operating Instructions
Page 13
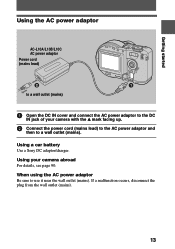
Using your camera with the v mark facing up. 2 Connect the power cord (mains lead) to the AC power adaptor and then to use it near the wall outlet (... cord (mains lead) 2 1 to a wall outlet (mains) 1 Open the DC IN cover and connect the AC power adaptor to the DC IN jack of your camera abroad For details, see page 90. Using a car battery Use...
Using your camera with the v mark facing up. 2 Connect the power cord (mains lead) to the AC power adaptor and then to use it near the wall outlet (... cord (mains lead) 2 1 to a wall outlet (mains) 1 Open the DC IN cover and connect the AC power adaptor to the DC IN jack of your camera abroad For details, see page 90. Using a car battery Use...
Operating Instructions
Page 14
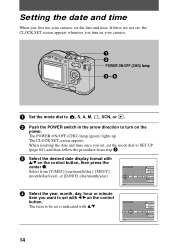
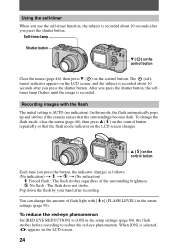
The CLOCK SET screen appears. If these are not set the mode dial to turn on your camera, set the date and time. When resetting the date and time once you set, set , the CLOCK SET screen appears whenever you turn on the ...) lamp (green) lights up. CLOCK SET Y/M/D M/D/Y D/M/Y 2001 / 1 / 1 OK 12 : 00 O K AM CANCEL 4 Select the year, month, day, hour or minute item you first use your camera. 1 2 POWER ON/OFF (CHG) lamp 3-6 1 Set the mode dial to , S, A, M, , SCN, or . 2 Push the POWER switch in the arrow direction to SET UP (page 84...
The CLOCK SET screen appears. If these are not set the mode dial to turn on your camera, set the date and time. When resetting the date and time once you set, set , the CLOCK SET screen appears whenever you turn on the ...) lamp (green) lights up. CLOCK SET Y/M/D M/D/Y D/M/Y 2001 / 1 / 1 OK 12 : 00 O K AM CANCEL 4 Select the year, month, day, hour or minute item you first use your camera. 1 2 POWER ON/OFF (CHG) lamp 3-6 1 Set the mode dial to , S, A, M, , SCN, or . 2 Push the POWER switch in the arrow direction to SET UP (page 84...
Operating Instructions
Page 18
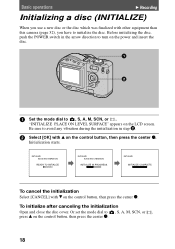
... initialize the disc. Basic operations B Recording Initializing a disc (INITIALIZE) When you use a new disc or the disc which was finalized with other equipment than this camera (page 32), you have to , S, A, M, SCN, or , press v on the control button, then press the center z. 18
... initialize the disc. Basic operations B Recording Initializing a disc (INITIALIZE) When you use a new disc or the disc which was finalized with other equipment than this camera (page 32), you have to , S, A, M, SCN, or , press v on the control button, then press the center z. 18
Operating Instructions
Page 19
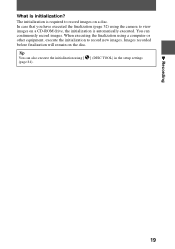
What is required to record images on a disc. In case that you have executed the finalization (page 32) using the camera to record new images. Images recorded before finalization will remain on a CD-ROM drive, the initialization is automatically executed. When executing the finalization using [ (page 84). ] (DISC TOOL) in the setup settings B Recording 19 You can also execute the initialization using a computer or other equipment, execute the initialization to view images on the disc. The initialization is initialization? Tip You can continuously record images.
What is required to record images on a disc. In case that you have executed the finalization (page 32) using the camera to record new images. Images recorded before finalization will remain on a CD-ROM drive, the initialization is automatically executed. When executing the finalization using [ (page 84). ] (DISC TOOL) in the setup settings B Recording 19 You can also execute the initialization using a computer or other equipment, execute the initialization to view images on the disc. The initialization is initialization? Tip You can continuously record images.
Operating Instructions
Page 20
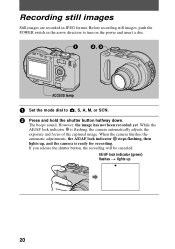
... of the captured image. However, the image has not been recorded yet. Before recording still images, push the POWER switch in JPEG format. When the camera finishes the automatic adjustments, the AE/AF lock indicator z stops flashing, then lights up 20 While the AE/AF lock indicator z is ready for recording...
... of the captured image. However, the image has not been recorded yet. Before recording still images, push the POWER switch in JPEG format. When the camera finishes the automatic adjustments, the AE/AF lock indicator z stops flashing, then lights up 20 While the AE/AF lock indicator z is ready for recording...
Operating Instructions
Page 21
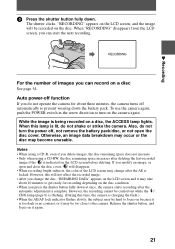
... close the disc cover, will be too close to get ready for about 10 minutes to the camera. Otherwise, an image data breakdown may occur or the disc may change the disc, "REPAIRING DATA...recording cannot be carried out while the / CHG lamp (page 8) is flashing. (During this time, the camera is charging the flash.) • When the AE/AF lock indicator flashes slowly, the subject may be ...hard to focus on it may take about three minutes, the camera turns off automatically to turn the power off function If you change after deleting the last-recorded ...
... close the disc cover, will be too close to get ready for about 10 minutes to the camera. Otherwise, an image data breakdown may occur or the disc may change the disc, "REPAIRING DATA...recording cannot be carried out while the / CHG lamp (page 8) is flashing. (During this time, the camera is charging the flash.) • When the AE/AF lock indicator flashes slowly, the subject may be ...hard to focus on it may take about three minutes, the camera turns off automatically to turn the power off function If you change after deleting the last-recorded ...
Operating Instructions
Page 23
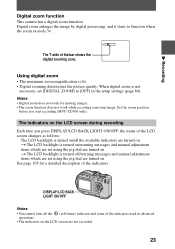
... cannot turn off /warning messages and manual adjustment items which are set using the jog dial are turned on t The LCD backlight is 6×. • Digital zooming deteriorates the picture quality. B Recording Digital zoom function This camera has a digital zoom function.
... cannot turn off /warning messages and manual adjustment items which are set using the jog dial are turned on t The LCD backlight is 6×. • Digital zooming deteriorates the picture quality. B Recording Digital zoom function This camera has a digital zoom function.
Operating Instructions
Page 24
... of flash light with the flash The initial setting is AUTO (no indication). In this mode, the flash automatically pops up and strobes if the camera senses that the flash mode indicator on the control button repeatedly so that the surroundings become dark. Pop down the flash by your hand after...
... of flash light with the flash The initial setting is AUTO (no indication). In this mode, the flash automatically pops up and strobes if the camera senses that the flash mode indicator on the control button repeatedly so that the surroundings become dark. Pop down the flash by your hand after...

Operating Instructions
Page 26
...MPEG MOVIE] with audio are recorded in the arrow direction to turn on the control button, then press the center z. 26 CAMERA SCENE SELECTION: MOVING IMAGE: DATE/TIME: DIGITAL ZOOM: BRACKET STEP: RED EYE REDUCTION: AF ILLUMINATOR: SELECT TWIRIGHT MPEG MOVIE OFF ON ±0.7EV OFF ON... CAMERA SCENE SELECTION: MOVING IMAGE: DATE/TIME: DIGITAL ZOOM: BRACKET STEP: RED EYE REDUCTION: AF ILLUMINATOR: OK MPEG MOVIE CLIP MOTION CAMERA SCENE SELECTION: MOVING IMAGE: DATE/TIME: DIGITAL ZOOM: BRACKET STEP: RED EYE REDUCTION: AF ILLUMINATOR: SELECT...
...MPEG MOVIE] with audio are recorded in the arrow direction to turn on the control button, then press the center z. 26 CAMERA SCENE SELECTION: MOVING IMAGE: DATE/TIME: DIGITAL ZOOM: BRACKET STEP: RED EYE REDUCTION: AF ILLUMINATOR: SELECT TWIRIGHT MPEG MOVIE OFF ON ±0.7EV OFF ON... CAMERA SCENE SELECTION: MOVING IMAGE: DATE/TIME: DIGITAL ZOOM: BRACKET STEP: RED EYE REDUCTION: AF ILLUMINATOR: OK MPEG MOVIE CLIP MOTION CAMERA SCENE SELECTION: MOVING IMAGE: DATE/TIME: DIGITAL ZOOM: BRACKET STEP: RED EYE REDUCTION: AF ILLUMINATOR: SELECT...
Operating Instructions
Page 28
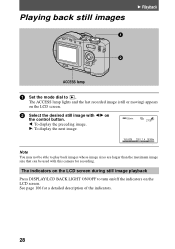
... button. The ACCESS lamp lights and the last recorded image (still or moving) appears on the LCD screen. 2 Select the desired still image with this camera for a detailed description of the indicators. 28
... button. The ACCESS lamp lights and the last recorded image (still or moving) appears on the LCD screen. 2 Select the desired still image with this camera for a detailed description of the indicators. 28


