Operating Instructions
Page 3
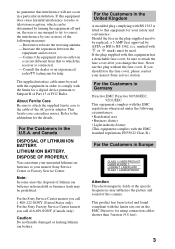
... The electromagnetic fields at the specific frequencies may be replaced, a 5 AMP fuse approved by one or more of the following circumstances: • Residential area • Business district • Light-industry district (This equipment complies with this camera. Connect the equipment into an outlet on the EMC Directive for the details. For the Sony Service Center nearest you call...
... The electromagnetic fields at the specific frequencies may be replaced, a 5 AMP fuse approved by one or more of the following circumstances: • Residential area • Business district • Light-industry district (This equipment complies with this camera. Connect the equipment into an outlet on the EMC Directive for the details. For the Sony Service Center nearest you call...
Operating Instructions
Page 4
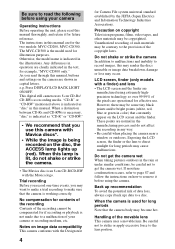
... manual, buttons and settings on how to remove it for the two models: MVC-CD200, MVC-CD300. Unauthorized recording of such materials may be copyrighted. Exposing the LCD screen, the finder or the lens to a disc. Back up ) data to direct sunlight for Camera File system universal standard established by the JEITA (Japan Electrics and Information Technology Industries Association). Any differences in operation are...
... manual, buttons and settings on how to remove it for the two models: MVC-CD200, MVC-CD300. Unauthorized recording of such materials may be copyrighted. Exposing the LCD screen, the finder or the lens to a disc. Back up ) data to direct sunlight for Camera File system universal standard established by the JEITA (Japan Electrics and Information Technology Industries Association). Any differences in operation are...
Operating Instructions
Page 5
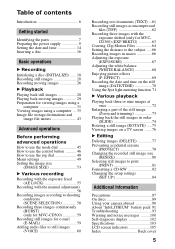
... image (ROTATE) .....75 Viewing images on a TV screen .......76 B Editing Deleting images (DELETE 77 Preventing accidental erasure (PROTECT 78 Changing the recorded still image size (RESIZE 80 Selecting still images to the subject .....66 Recording images in macro 66 Adjusting the exposure (EXPOSURE 67 Adjusting the white balance (WHITE BALANCE 68 Enjoying picture effects (P. EFFECT 69 Recording the date and time on the still image (DATE/TIME 70 Using the Spot light-metering function 71 B Various playback Playing back three or nine images at once 72 Enlarging a part...
... image (ROTATE) .....75 Viewing images on a TV screen .......76 B Editing Deleting images (DELETE 77 Preventing accidental erasure (PROTECT 78 Changing the recorded still image size (RESIZE 80 Selecting still images to the subject .....66 Recording images in macro 66 Adjusting the exposure (EXPOSURE 67 Adjusting the white balance (WHITE BALANCE 68 Enjoying picture effects (P. EFFECT 69 Recording the date and time on the still image (DATE/TIME 70 Using the Spot light-metering function 71 B Various playback Playing back three or nine images at once 72 Enlarging a part...
Operating Instructions
Page 7
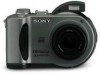
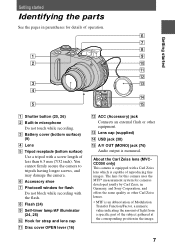
... equipment. About the Carl Zeiss lens (MVCCD300 only) This camera is capable of reproducing fine images. C Battery cover (bottom surface) (9) D Lens E Tripod receptacle (bottom surface) Use a tripod with a screw length of less than 6.5 mm (7/32 inch). Getting started Getting started Identifying the parts See the pages in parentheses for details of operation. 6 7 8 1 9 2 0 qa qs 3 qd 4 qf 5 qg A Shutter button (20, 26) B Built-in...
... equipment. About the Carl Zeiss lens (MVCCD300 only) This camera is capable of reproducing fine images. C Battery cover (bottom surface) (9) D Lens E Tripod receptacle (bottom surface) Use a tripod with a screw length of less than 6.5 mm (7/32 inch). Getting started Getting started Identifying the parts See the pages in parentheses for details of operation. 6 7 8 1 9 2 0 qa qs 3 qd 4 qf 5 qg A Shutter button (20, 26) B Built-in...
Operating Instructions
Page 21
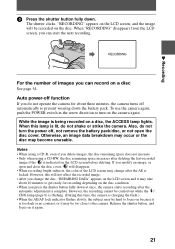
B Recording 3 Press the shutter button fully down at once, the camera starts recording after the automatic adjustment is complete. RECORDING For the number of the LCD screen may take about 10 minutes to get ready for about three minutes, the camera turns off automatically to turn the power off function If you do not operate the camera for recording depending on the LCD screen before deleting. However, this will not affect the recorded image. • After...
B Recording 3 Press the shutter button fully down at once, the camera starts recording after the automatic adjustment is complete. RECORDING For the number of the LCD screen may take about 10 minutes to get ready for about three minutes, the camera turns off automatically to turn the power off function If you do not operate the camera for recording depending on the LCD screen before deleting. However, this will not affect the recorded image. • After...
Operating Instructions
Page 22
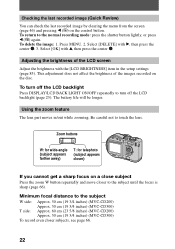
Using the zoom feature The lens part moves in the setup settings (page 85). Checking the last recorded image (Quick Review) You can check the last recorded image by clearing the menu from the screen (page 46) and pressing b (7) on a close subject Press the zoom W button repeatedly and move closer to the subject until the focus is sharp (page 66). To delete the image: 1. Select [OK] with B, then press the...
Using the zoom feature The lens part moves in the setup settings (page 85). Checking the last recorded image (Quick Review) You can check the last recorded image by clearing the menu from the screen (page 46) and pressing b (7) on a close subject Press the zoom W button repeatedly and move closer to the subject until the focus is sharp (page 66). To delete the image: 1. Select [OK] with B, then press the...
Operating Instructions
Page 23
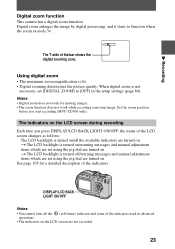
... the digital zooming zone. DISPLAY/LCD BACK LIGHT ON/OFF Notes • You cannot turn off /warning messages and manual adjustment items which are set using the jog dial are not recorded. 23 B Recording Digital zoom function This camera has a digital zoom function. Digital zoom enlarges the image by digital processing, and it starts to [OFF] in advanced operations. • The indicators on the LCD screen are turned on See page 105 for moving images. • The zoom function does not work while recording a moving image...
... the digital zooming zone. DISPLAY/LCD BACK LIGHT ON/OFF Notes • You cannot turn off /warning messages and manual adjustment items which are set using the jog dial are not recorded. 23 B Recording Digital zoom function This camera has a digital zoom function. Digital zoom enlarges the image by digital processing, and it starts to [OFF] in advanced operations. • The indicators on the LCD screen are turned on See page 105 for moving images. • The zoom function does not work while recording a moving image...
Operating Instructions
Page 35
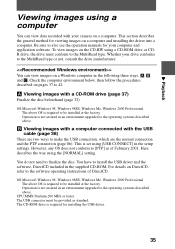
... must be installed at the factory. B Viewing images with a computer connected with the USB cable (page 38) There are two ways to the MultiRead type. For details on DirectCD, refer to the MultiRead type or not, consult the drive manufacturer. Whether your drive conforms to the software operating instructions of February 2001. This is required to install the USB driver and the software, DirectCD...
... must be installed at the factory. B Viewing images with a computer connected with the USB cable (page 38) There are two ways to the MultiRead type. For details on DirectCD, refer to the MultiRead type or not, consult the drive manufacturer. Whether your drive conforms to the software operating instructions of February 2001. This is required to install the USB driver and the software, DirectCD...
Operating Instructions
Page 38
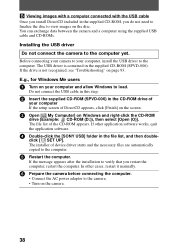
... screen. 3 Open [ My Computer] on the camera. 38 The installer of the CD-ROM appears. In other application software works, quit the application software. 4 Double-click the [SONY USB] folder in the file list, and then double- Before connecting your camera to your computer and allow Windows to the computer. 5 Restart the computer. The USB driver is not recognized, see "Troubleshooting" on the disc. The file list of device driver starts...
... screen. 3 Open [ My Computer] on the camera. 38 The installer of the CD-ROM appears. In other application software works, quit the application software. 4 Double-click the [SONY USB] folder in the file list, and then double- Before connecting your camera to your computer and allow Windows to the computer. 5 Restart the computer. The USB driver is not recognized, see "Troubleshooting" on the disc. The file list of device driver starts...

Operating Instructions
Page 40
..." of the software operating instructions of DirectCD. Copying a file in a computer to a disc Once you install DirectCD included in the supplied CD-ROM into your computer before viewing is not recognized, see "Troubleshooting" on Windows and double-click the newly recognized drive. (Example: [ CD Mavica (E:)]) The folders inside the disc are displayed, and the disc cover of the camera will be sure...
..." of the software operating instructions of DirectCD. Copying a file in a computer to a disc Once you install DirectCD included in the supplied CD-ROM into your computer before viewing is not recognized, see "Troubleshooting" on Windows and double-click the newly recognized drive. (Example: [ CD Mavica (E:)]) The folders inside the disc are displayed, and the disc cover of the camera will be sure...
Operating Instructions
Page 44
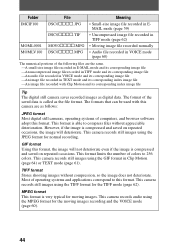
... camera records still images using the JPEG format for moving images recording and the VOICE mode (page 60). 44 Most of computers, and browser software adopt this camera are the same. -A small-size image file recorded in E-MAIL mode and its corresponding image file -An uncompressed image file recorded in TIFF mode and its corresponding image file -An audio file recorded in VOICE mode and its corresponding index image file Tip The digital still camera saves recorded images as follows: JPEG format Most digital still cameras, operating...
... camera records still images using the JPEG format for moving images recording and the VOICE mode (page 60). 44 Most of computers, and browser software adopt this camera are the same. -A small-size image file recorded in E-MAIL mode and its corresponding image file -An uncompressed image file recorded in TIFF mode and its corresponding image file -An audio file recorded in VOICE mode and its corresponding index image file Tip The digital still camera saves recorded images as follows: JPEG format Most digital still cameras, operating...

Operating Instructions
Page 46
... setup screen is displayed, the control button is used for "Advanced operations" are described below. Turning on/off the operation buttons (menu) on the LCD screen Press MENU to select the buttons, images and menu items displayed on the LCD screen. DELETE PROTECT PRINT SLIDE OK Menu Setting up the items in the setup or menu 1 Set the mode dial to SET UP so that the setup screen appears, or press MENU so that are frequently used to display/clear the menu on the LCD screen of your camera...
... setup screen is displayed, the control button is used for "Advanced operations" are described below. Turning on/off the operation buttons (menu) on the LCD screen Press MENU to select the buttons, images and menu items displayed on the LCD screen. DELETE PROTECT PRINT SLIDE OK Menu Setting up the items in the setup or menu 1 Set the mode dial to SET UP so that the setup screen appears, or press MENU so that are frequently used to display/clear the menu on the LCD screen of your camera...
Operating Instructions
Page 57
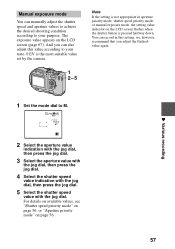
..., see "Shutter speed priority mode" on page 56, or "Aperture priority mode" on the LCD screen (page 67). The exposure value appears on page 56. 57 You can record in aperture priority mode, shutter speed priority mode, or manual exposure mode, the setting value indicator on the LCD screen flashes when the shutter button is not appropriate in this value according to your purpose. Manual exposure mode You can manually adjust the shutter speed and aperture values to achieve the desired shooting condition...
..., see "Shutter speed priority mode" on page 56, or "Aperture priority mode" on the LCD screen (page 67). The exposure value appears on page 56. 57 You can record in aperture priority mode, shutter speed priority mode, or manual exposure mode, the setting value indicator on the LCD screen flashes when the shutter button is not appropriate in this value according to your purpose. Manual exposure mode You can manually adjust the shutter speed and aperture values to achieve the desired shooting condition...

Operating Instructions
Page 85
... is not activated. • The macro recording is changed . Displays the menu items in Japanese. Sets the video output signal to PAL mode (e.g., Europe). Resets the file number that the VAD-S70 adaptor ring needed to mount the conversion lens to your camera is changed . At this time, the zoom function does not work. When [CONVERSION LENS] is set to [ON]: • The SCENE SELECTION and zoom functions are not activated. • When...
... is not activated. • The macro recording is changed . Displays the menu items in Japanese. Sets the video output signal to PAL mode (e.g., Europe). Resets the file number that the VAD-S70 adaptor ring needed to mount the conversion lens to your camera is changed . At this time, the zoom function does not work. When [CONVERSION LENS] is set to [ON]: • The SCENE SELECTION and zoom functions are not activated. • When...

Operating Instructions
Page 93
... not using an "InfoLITHIUM" battery pack. tEject the disc, and insert it securely to , S, A, M, SCN, or (pages 20, 26). • No disc is inserted into your camera. If code displays (C:ss:ss) appear on the bottom. (If you press the reset button, the date and time setting is cleared.) Should your camera still not operate properly, consult your Sony dealer or local authorized Sony service...
... not using an "InfoLITHIUM" battery pack. tEject the disc, and insert it securely to , S, A, M, SCN, or (pages 20, 26). • No disc is inserted into your camera. If code displays (C:ss:ss) appear on the bottom. (If you press the reset button, the date and time setting is cleared.) Should your camera still not operate properly, consult your Sony dealer or local authorized Sony service...
Operating Instructions
Page 94
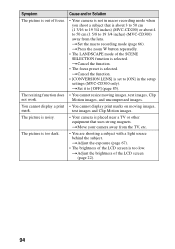
... a light source behind the subject. You cannot display a print • You cannot display print marks on moving images, text images, Clip not work. tCancel the function. • [CONVERSION LENS] is set to [OFF] (page 85). The picture is noisy. • Your camera is not in the setup settings (MVC-CD300 only). Symptom Cause and/or Solution The picture is out of the LCD screen (page 22). 94 tSet the macro recording mode...
... a light source behind the subject. You cannot display a print • You cannot display print marks on moving images, text images, Clip not work. tCancel the function. • [CONVERSION LENS] is set to [OFF] (page 85). The picture is noisy. • Your camera is not in the setup settings (MVC-CD300 only). Symptom Cause and/or Solution The picture is out of the LCD screen (page 22). 94 tSet the macro recording mode...
Operating Instructions
Page 96
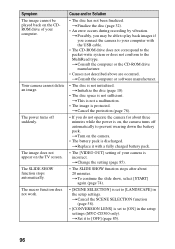
... on the TV screen. tThis is not a malfunction. • The image is discharged. tFinalize the disc (page 32). • An error occurs during recording by vibration. tCancel the SCENE SELECTION function (page 58). • [CONVERSION LENS] is incorrect. The power turns off automatically to [OFF] (page 85). 96 tCancel the protection (page 78). • If you connect the camera to the...
... on the TV screen. tThis is not a malfunction. • The image is discharged. tFinalize the disc (page 32). • An error occurs during recording by vibration. tCancel the SCENE SELECTION function (page 58). • [CONVERSION LENS] is incorrect. The power turns off automatically to [OFF] (page 85). 96 tCancel the protection (page 78). • If you connect the camera to the...
Operating Instructions
Page 97
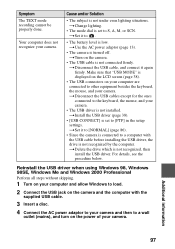
... the power of your camera. • The USB driver is displayed on the LCD screen (page 38). • The USB connectors on the camera. • The USB cable is not recognized by the computer. Reinstall the USB driver when using Windows 98, Windows 98SE, Windows Me and Windows 2000 Professional Perform all steps without skipping. 1 Turn on the camera and the computer with the USB cable before installing the USB driver, the drive is not connected...
... the power of your camera. • The USB driver is displayed on the LCD screen (page 38). • The USB connectors on the camera. • The USB cable is not recognized by the computer. Reinstall the USB driver when using Windows 98, Windows 98SE, Windows Me and Windows 2000 Professional Perform all steps without skipping. 1 Turn on the camera and the computer with the USB cable before installing the USB driver, the drive is not connected...

Operating Instructions
Page 99
... Solution • You are using a sharp-pointed object. (If you press the reset button, the date and time setting is too low. tRemove the battery pack, then install it properly (page 9). • Charging of the battery remaining time is not proper, or the power is immediately turned off even if the battery remaining indicator indicates that the battery level is complete. •- tContact your Sony dealer or local authorized Sony service...
... Solution • You are using a sharp-pointed object. (If you press the reset button, the date and time setting is too low. tRemove the battery pack, then install it properly (page 9). • Charging of the battery remaining time is not proper, or the power is immediately turned off even if the battery remaining indicator indicates that the battery level is complete. •- tContact your Sony dealer or local authorized Sony service...

Operating Instructions
Page 108
... Focus preset 66 Focusing 66 FORMAT 82 Full charge 10 G , , GIF 44 61 64 I Image Deleting 77 File name 43 Print mark 81 Protect 78 Size 53 Index screen 72 Indicators on the LCD screen 105 , "InfoLITHIUM" battery pack 9 91 INITIALIZE 18 J , Jog dial 48 JPEG 20 44 M Macro recording 66 Manual focusing 66 MOBILE mode 64 Mode dial 45 Moisture condensation.....87 Moving image Playback 29 , Recording 26 MPEG 26 44 N number 11 Number of recordable images...
... Focus preset 66 Focusing 66 FORMAT 82 Full charge 10 G , , GIF 44 61 64 I Image Deleting 77 File name 43 Print mark 81 Protect 78 Size 53 Index screen 72 Indicators on the LCD screen 105 , "InfoLITHIUM" battery pack 9 91 INITIALIZE 18 J , Jog dial 48 JPEG 20 44 M Macro recording 66 Manual focusing 66 MOBILE mode 64 Mode dial 45 Moisture condensation.....87 Moving image Playback 29 , Recording 26 MPEG 26 44 N number 11 Number of recordable images...

