Operating Instructions (primary manual)
Page 6
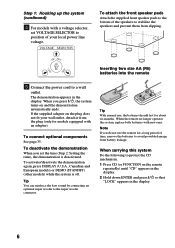
...again, press DISPLAY (U.S.A., Canadian and European models) or DEMO (STANDBY) (other models) while the system is deactivated. Note If you do not use the remote for a long period of time, remove the batteries to position of the speakers to the super woofer connector. ] } } ] Tip With normal use,...the following to a wall outlet. 120V Step 1: Hooking up the system (continued) 4 For models with new ones. If the supplied adapter on the remote repeatedly) until "CD" appears in the display. 2 Hold down ENTER and press 1/u so that "LOCK" appears in the display. To deactivate the ...
...again, press DISPLAY (U.S.A., Canadian and European models) or DEMO (STANDBY) (other models) while the system is deactivated. Note If you do not use the remote for a long period of time, remove the batteries to position of the speakers to the super woofer connector. ] } } ] Tip With normal use,...the following to a wall outlet. 120V Step 1: Hooking up the system (continued) 4 For models with new ones. If the supplied adapter on the remote repeatedly) until "CD" appears in the display. 2 Hold down ENTER and press 1/u so that "LOCK" appears in the display. To deactivate the ...
Operating Instructions (primary manual)
Page 10
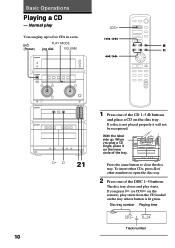
...; π + § 1 2 3 4 5 ª· π ª· π § § ·π 21 1 Press one of the CD 1~5 § buttons and place a CD on the remote), play starts. Basic Operations Playing a CD - If a disc is lit green.
...; π + § 1 2 3 4 5 ª· π ª· π § § ·π 21 1 Press one of the CD 1~5 § buttons and place a CD on the remote), play starts. Basic Operations Playing a CD - If a disc is lit green.
Operating Instructions (primary manual)
Page 11
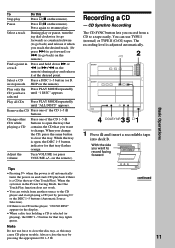
... player, "CD NO DISC" appears in the display. • When a disc tray holding a CD is a CD in stop mode SKIP on the remote). With the side you record from another source to close the tray. Press again to record facing forward § continued Basic Operations 11 Select a CD... Play only the CD you want to resume play Press π (p on the remote). in the tray (One Touch Play). on the remote). Always close the disc tray, as this Stop play . Pause Press ∏ (P on the remote). To Do this may cause CD player trouble. Note Do not use TYPE I (...
... player, "CD NO DISC" appears in the display. • When a disc tray holding a CD is a CD in stop mode SKIP on the remote). With the side you record from another source to close the tray. Press again to record facing forward § continued Basic Operations 11 Select a CD... Play only the CD you want to resume play Press π (p on the remote). in the tray (One Touch Play). on the remote). Always close the disc tray, as this Stop play . Pause Press ∏ (P on the remote). To Do this may cause CD player trouble. Note Do not use TYPE I (...
Operating Instructions (primary manual)
Page 13
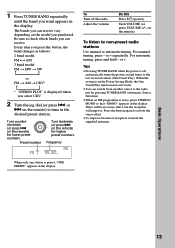
...n UKV* n * "STEREO PLUS" is noisy, press STEREO/ MONO so that "MONO" appears in the display. Turn counterclockwise (or press = ≠ on the remote) for lower preset numbers. or + repeatedly. or +. When the system is in the Power Saving Mode, the One Touch Play function does not work. •... Touch Play). 1 Press TUNER BAND repeatedly until the band you select UKV. 2 Turn the jog dial (or press = or + on the remote) to tune in the desired preset station. To listen to restore the stereo effect. • To improve broadcast reception, reorient the supplied antennas. To...
...n UKV* n * "STEREO PLUS" is noisy, press STEREO/ MONO so that "MONO" appears in the display. Turn counterclockwise (or press = ≠ on the remote) for lower preset numbers. or + repeatedly. or +. When the system is in the Power Saving Mode, the One Touch Play function does not work. •... Touch Play). 1 Press TUNER BAND repeatedly until the band you select UKV. 2 Turn the jog dial (or press = or + on the remote) to tune in the desired preset station. To listen to restore the stereo effect. • To improve broadcast reception, reorient the supplied antennas. To...
Operating Instructions (primary manual)
Page 15
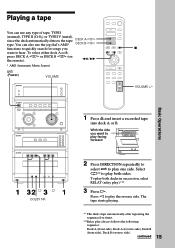
... A (reverse side), Deck B (front side), Deck B (reverse side). 15 continued To select either deck A or B, press DECK A ª· or DECK B ª· (on the remote). 0/) * AMS (Automatic Music Sensor) 1/u (Power) VOLUME · ª· ª· =+ p 0 ) P V B b v · p p VOLUME +/- Playing a tape You can also use any type of tape, TYPE I (normal...
... A (reverse side), Deck B (front side), Deck B (reverse side). 15 continued To select either deck A or B, press DECK A ª· or DECK B ª· (on the remote). 0/) * AMS (Automatic Music Sensor) 1/u (Power) VOLUME · ª· ª· =+ p 0 ) P V B b v · p p VOLUME +/- Playing a tape You can also use any type of tape, TYPE I (normal...
Operating Instructions (primary manual)
Page 16
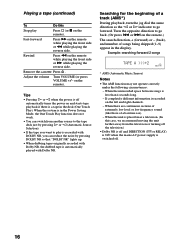
...correctly under the following circumstances: - If completely different information is less than 4 seconds long. - Remove the cassette Press § . on the remote while playing the front side or ) while playing the reverse side. When the system is in the Power Saving Mode, the One Touch Play function...a television. (In this Stop play is switched off automatically turns the power on the left and right channels. - Rewind Press 0 on the remote). Playing a tape (continued) To Do this case, we recommend moving the unit farther away from another source to the tape deck just by ...
...correctly under the following circumstances: - If completely different information is less than 4 seconds long. - Remove the cassette Press § . on the remote while playing the front side or ) while playing the reverse side. When the system is in the Power Saving Mode, the One Touch Play function...a television. (In this Stop play is switched off automatically turns the power on the left and right channels. - Rewind Press 0 on the remote). Playing a tape (continued) To Do this case, we recommend moving the unit farther away from another source to the tape deck just by ...
Operating Instructions (primary manual)
Page 20
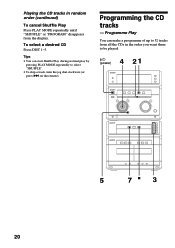
... all the CDs in the order you want them to select "SHUFFLE". • To skip a track, turn the jog dial clockwise (or press + on the remote).
... all the CDs in the order you want them to select "SHUFFLE". • To skip a track, turn the jog dial clockwise (or press + on the remote).
Operating Instructions (primary manual)
Page 21
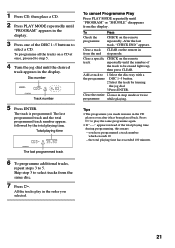
...again. • If "--.--" appears instead of the DISC 1~5 buttons to be erased lights up, then press CLEAR. To Press Check the programme CHECK on the remote in the display. 3 Press one of the total playing time during programming, this means: - Clear a specific track CHECK on a CD at once, proceed ...8226; The programme you made remains in the order you have programmed a track number which exceeds 20 - To programme all the tracks on the remote repeatedly until the desired track appears in stop mode. Disc number 3 PROGRAM Track number 5 Press ENTER. Clear a track CLEAR on the...
...again. • If "--.--" appears instead of the DISC 1~5 buttons to be erased lights up, then press CLEAR. To Press Check the programme CHECK on the remote in the display. 3 Press one of the total playing time during programming, this means: - Clear a specific track CHECK on a CD at once, proceed ...8226; The programme you made remains in the order you have programmed a track number which exceeds 20 - To programme all the tracks on the remote repeatedly until the desired track appears in stop mode. Disc number 3 PROGRAM Track number 5 Press ENTER. Clear a track CLEAR on the...
Operating Instructions (primary manual)
Page 24
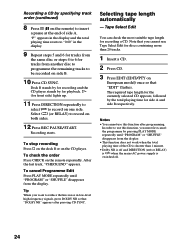
...display. • This function does not work when the total playing time of side A. To stop recording Press π on the deck B or on the remote repeatedly. Note that you want to insert a pause at the end of the CD is switched off and DIRECTION (A or RELAY) is ß when the...DIRECTION repeatedly to select A to record on both sides. 12 Press REC PAUSE/START. Recording a CD by specifying track order (continued) 8 Press ∏ (P on the remote) to reduce the hiss noise in the display. 9 Repeat steps 5 and 6 for tracks from the same disc or steps 4 to 6 for tracks from another disc...
...display. • This function does not work when the total playing time of side A. To stop recording Press π on the deck B or on the remote repeatedly. Note that you want to insert a pause at the end of the CD is switched off and DIRECTION (A or RELAY) is ß when the...DIRECTION repeatedly to select A to record on both sides. 12 Press REC PAUSE/START. Recording a CD by specifying track order (continued) 8 Press ∏ (P on the remote) to reduce the hiss noise in the display. 9 Repeat steps 5 and 6 for tracks from the same disc or steps 4 to 6 for tracks from another disc...
Operating Instructions (primary manual)
Page 26
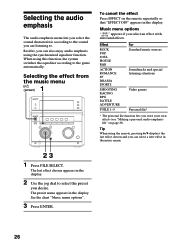
...+ 0 ) ≠ + - + g To cancel the effect Press EFFECT on page 29). See the chart "Music menu options". 3 Press ENTER. 26 When using the remote, pressing V/v displays the last effect chosen and you desire. Selecting the audio emphasis The audio emphasis menu lets you select the sound characteristic according to... the sound you store your own effects (see "Making a personal audio emphasis file" on the remote repeatedly so that "EFFECT OFF" appears in the display. The last effect chosen appears in the display. 2 Use the jog dial...
...+ 0 ) ≠ + - + g To cancel the effect Press EFFECT on page 29). See the chart "Music menu options". 3 Press ENTER. 26 When using the remote, pressing V/v displays the last effect chosen and you desire. Selecting the audio emphasis The audio emphasis menu lets you select the sound characteristic according to... the sound you store your own effects (see "Making a personal audio emphasis file" on the remote repeatedly so that "EFFECT OFF" appears in the display. The last effect chosen appears in the display. 2 Use the jog dial...
Operating Instructions (primary manual)
Page 27
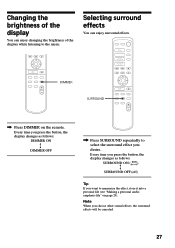
... ON DIMMER OFF ˜ ˜ / Press SURROUND repeatedly to memorize the effect, store it into a personal file (see "Making a personal audio emphasis file" on the remote. Every time you choose other sound effects, the surround effects will be canceled. 27 Changing the brightness of the display You can enjoy changing the...
... ON DIMMER OFF ˜ ˜ / Press SURROUND repeatedly to memorize the effect, store it into a personal file (see "Making a personal audio emphasis file" on the remote. Every time you choose other sound effects, the surround effects will be canceled. 27 Changing the brightness of the display You can enjoy changing the...
Operating Instructions (primary manual)
Page 32
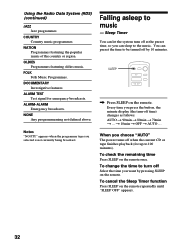
... n ... You can preset the time to be turned off by pressing SLEEP on the remote once. Every time you want by 10 minutes. To check the remaining time Press SLEEP on the remote. To change the time to the music. OLDIES Programmes featuring oldies music. Sleep Timer You... signal for up to music - To cancel the Sleep Timer function Press SLEEP on the remote. DOCUMENTARY Investigative features. Falling asleep to 100 minutes). SLEEP · ª· / Press SLEEP on the remote repeatedly until "SLEEP OFF" appears. 32 FOLK Folk Music Programmes. Notes "NO PTY" ...
... n ... You can preset the time to be turned off by pressing SLEEP on the remote once. Every time you want by 10 minutes. To check the remaining time Press SLEEP on the remote. To change the time to the music. OLDIES Programmes featuring oldies music. Sleep Timer You... signal for up to music - To cancel the Sleep Timer function Press SLEEP on the remote. DOCUMENTARY Investigative features. Falling asleep to 100 minutes). SLEEP · ª· / Press SLEEP on the remote repeatedly until "SLEEP OFF" appears. 32 FOLK Folk Music Programmes. Notes "NO PTY" ...
Operating Instructions (primary manual)
Page 35
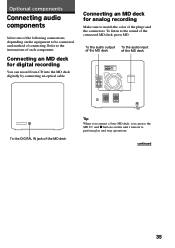
Connecting an MD deck for analog recording Make sure to the sound of the MD deck Tip When you connect a Sony MD deck, you can record from CD into the MD deck digitally by connecting an optical cable. continued 35 Optional components Connecting audio components Select ...one of the following connections, depending on this unit's remote to be connected and method of connecting. To the audio output To the audio input of the MD deck of the MD deck To the...
Connecting an MD deck for analog recording Make sure to the sound of the MD deck Tip When you connect a Sony MD deck, you can record from CD into the MD deck digitally by connecting an optical cable. continued 35 Optional components Connecting audio components Select ...one of the following connections, depending on this unit's remote to be connected and method of connecting. To the audio output To the audio input of the MD deck of the MD deck To the...

Operating Instructions (primary manual)
Page 40
.... •Move the microphone away from TV set once, then turn it on top of the CD. The remote does not function. •There is an obstacle between the remote and the system. •The remote is not pointing in the disc tray. •The CD is dirty. •The CD is not...
.... •Move the microphone away from TV set once, then turn it on top of the CD. The remote does not function. •There is an obstacle between the remote and the system. •The remote is not pointing in the disc tray. •The CD is dirty. •The CD is not...
Operating Instructions (primary manual)
Page 43
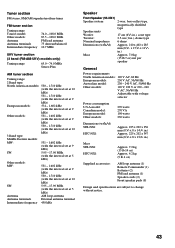
... Adjustable with voltage selector Power consumption U.S.A model: Canadian model: European model: Other models: 270 watts 270 VA 190 watts 230 watts Dimensions (w/h/d) STR-NX1: HTC-NX1: Mass STR-NX1: HTC-NX1: Approx. 225 x 202 x 356 mm (87/8 x 8 x 141/8 in.) Approx. 225 x 202 x 347 mm (87/8 x 8 x 133.../4 in.) Approx. 7.2 kg (15 lb 14 oz) Approx. 4.2 kg (9 lb 4 oz) Supplied accessories: AM loop antenna (1) Remote Commander (1) Batteries (2) FM lead antenna (1) Speaker ...
... Adjustable with voltage selector Power consumption U.S.A model: Canadian model: European model: Other models: 270 watts 270 VA 190 watts 230 watts Dimensions (w/h/d) STR-NX1: HTC-NX1: Mass STR-NX1: HTC-NX1: Approx. 225 x 202 x 356 mm (87/8 x 8 x 141/8 in.) Approx. 225 x 202 x 347 mm (87/8 x 8 x 133.../4 in.) Approx. 7.2 kg (15 lb 14 oz) Approx. 4.2 kg (9 lb 4 oz) Supplied accessories: AM loop antenna (1) Remote Commander (1) Batteries (2) FM lead antenna (1) Speaker ...
Service Manual
Page 1
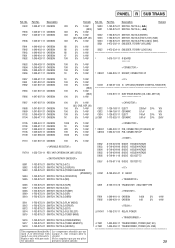
Description Remark ACCESSORIES & PACKING MATERIALS 1-418-548-11 REMOTE COMMANDER (RM-SX10) (NX1) 1-418-549-11 REMOTE COMMANDER (RM-SX15) (NX3AV) 1-501-374-11 ANTENNA,LOOP 1-501-594-11 ANTENNA (FM) (AEP,UK) 1-501-659-41 ...Sony Corporation Home Audio Company 99H001688-1 Printed in Japan ©1999.8 Published by Quality Assurance Dept. Part No. HCR-NX3 is composed of STR-NX3 and HTC-NX1. No. COMPONENT MODEL NAME FOR MHC-NX1/NX3AV US Model Canadian Model AEP Model UK Model E Model MHC-NX1/NX3AV TUNER,AMPLIFIER MHC-NX1 STR-NX1 MHC-NX3AV STR-NX3 Tourist Model MHC-NX1...
Description Remark ACCESSORIES & PACKING MATERIALS 1-418-548-11 REMOTE COMMANDER (RM-SX10) (NX1) 1-418-549-11 REMOTE COMMANDER (RM-SX15) (NX3AV) 1-501-374-11 ANTENNA,LOOP 1-501-594-11 ANTENNA (FM) (AEP,UK) 1-501-659-41 ...Sony Corporation Home Audio Company 99H001688-1 Printed in Japan ©1999.8 Published by Quality Assurance Dept. Part No. HCR-NX3 is composed of STR-NX3 and HTC-NX1. No. COMPONENT MODEL NAME FOR MHC-NX1/NX3AV US Model Canadian Model AEP Model UK Model E Model MHC-NX1/NX3AV TUNER,AMPLIFIER MHC-NX1 STR-NX1 MHC-NX3AV STR-NX3 Tourist Model MHC-NX1...
Service Manual
Page 5
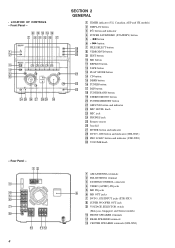
Front Panel - 8 q; TUNER MEMORY button wa GROOVE button and indicator ws MIC LEVEL knob wd MIC jack wf PHONES jack wg Remote sensor wh Jog dial wj ENTER button and indicator wk DVD 5.1CH button and indicator (STR-NX3) wl PRO LOGIC button and indicator (STR-NX3) e; ...
Front Panel - 8 q; TUNER MEMORY button wa GROOVE button and indicator ws MIC LEVEL knob wd MIC jack wf PHONES jack wg Remote sensor wh Jog dial wj ENTER button and indicator wk DVD 5.1CH button and indicator (STR-NX3) wl PRO LOGIC button and indicator (STR-NX3) e; ...
Service Manual
Page 25
...clock input terminal (32.768 kHz) 11 XCOUT O Sub system clock output terminal (32.768 kHz) 12 RESET I System reset signal input from the remote control receiver (IC601) 6 LINE MUTE O Line muting on/off control signal output terminal "L": muting on Not used (open ) 35 LCD DATA O ... "H": on 27 SPEAKER PROTECT I Not used (fixed at "L" in this set 18 WAKE UP O Wakeup control signal output to the CPU on the HTC-NX1 "H" active 19 PHONES MUTE O Muting on/off control signal output terminal "L": muting on 7 DBFB O DBFB normal/high selection signal output to the M62493FP ...
...clock input terminal (32.768 kHz) 11 XCOUT O Sub system clock output terminal (32.768 kHz) 12 RESET I System reset signal input from the remote control receiver (IC601) 6 LINE MUTE O Line muting on/off control signal output terminal "L": muting on Not used (open ) 35 LCD DATA O ... "H": on 27 SPEAKER PROTECT I Not used (fixed at "L" in this set 18 WAKE UP O Wakeup control signal output to the CPU on the HTC-NX1 "H" active 19 PHONES MUTE O Muting on/off control signal output terminal "L": muting on 7 DBFB O DBFB normal/high selection signal output to the M62493FP ...
Service Manual
Page 40
...-31 CARBON R663 1-247-807-31 CARBON R666 1-247-807-31 CARBON 1K 5% 1/4W < IC > 100 5% 1/4W 100 5% 1/4W IC601 8-749-011-05 IC GP1U28X (REMOTE CONTROL RECEIVER) (NX3 100 5% 1/4W (NX3) 1-674-801-11 SUB TRANS BOARD (US, CND, AEP, UK) 100 5% 1/4W R667 1-247-807-31 CARBON R668 R669...
...-31 CARBON R663 1-247-807-31 CARBON R666 1-247-807-31 CARBON 1K 5% 1/4W < IC > 100 5% 1/4W 100 5% 1/4W IC601 8-749-011-05 IC GP1U28X (REMOTE CONTROL RECEIVER) (NX3 100 5% 1/4W (NX3) 1-674-801-11 SUB TRANS BOARD (US, CND, AEP, UK) 100 5% 1/4W R667 1-247-807-31 CARBON R668 R669...


