Operating Instructions (primary manual)
Page 3
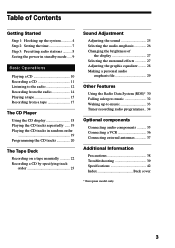
...Listening to the radio 12 Recording from the radio 14 Playing a tape 15 Recording from a tape 17 The CD Player Using the CD display 18 Playing the CD tracks repeatedly ...... 19 Playing the CD tracks in random order 19 Programming the CD tracks 20 The Tape Deck Recording... Recording a CD by specifying track order 23 Sound Adjustment Adjusting the sound 25 Selecting the audio emphasis 26 Changing the brightness of the display 27 Selecting the surround effects 27 Adjusting the graphic equalizer ......... 28 Making a personal audio emphasis file 29 Other Features Using the Radio Data...
...Listening to the radio 12 Recording from the radio 14 Playing a tape 15 Recording from a tape 17 The CD Player Using the CD display 18 Playing the CD tracks repeatedly ...... 19 Playing the CD tracks in random order 19 Programming the CD tracks 20 The Tape Deck Recording... Recording a CD by specifying track order 23 Sound Adjustment Adjusting the sound 25 Selecting the audio emphasis 26 Changing the brightness of the display 27 Selecting the surround effects 27 Adjusting the graphic equalizer ......... 28 Making a personal audio emphasis file 29 Other Features Using the Radio Data...
Operating Instructions (primary manual)
Page 6
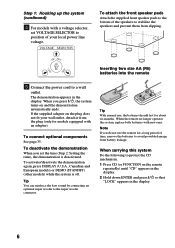
...outlet, detach it from slipping. When carrying this system Do the following to avoid possible damage from battery leakage. The demonstration appears in the display. 6 Inserting two size AA (R6) batteries into the remote 5 Connect the power cord to the super woofer connector. ] } }... ] Tip With normal use the remote for about six months. To activate/deactivate the demonstration again, press DISPLAY (U.S.A., Canadian and European models) or DEMO (STANDBY) (other models) while the system is deactivated. When the remote no longer operates the ...
...outlet, detach it from slipping. When carrying this system Do the following to avoid possible damage from battery leakage. The demonstration appears in the display. 6 Inserting two size AA (R6) batteries into the remote 5 Connect the power cord to the super woofer connector. ] } }... ] Tip With normal use the remote for about six months. To activate/deactivate the demonstration again, press DISPLAY (U.S.A., Canadian and European models) or DEMO (STANDBY) (other models) while the system is deactivated. When the remote no longer operates the ...
Operating Instructions (primary manual)
Page 7
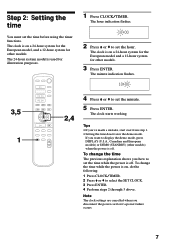
... system for the European model and a 12-hour system for other models. To change the time The previous explanation shows you want to display the demo mode, press DISPLAY (U.S.A., Canadian and European models) or DEMO (STANDBY) (other models. 3 Press ENTER. Note The clock settings are cancelled when you 've made a mistake, start...
... system for the European model and a 12-hour system for other models. To change the time The previous explanation shows you want to display the demo mode, press DISPLAY (U.S.A., Canadian and European models) or DEMO (STANDBY) (other models. 3 Press ENTER. Note The clock settings are cancelled when you 've made a mistake, start...
Operating Instructions (primary manual)
Page 8
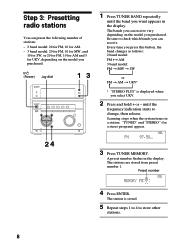
Scanning stops when the system tunes in the display. A preset number flashes in a station. The station is displayed when you select UKV. 2 Press and hold + or - TUNED STEREO MHz 3 Press TUNER MEMORY. Every time you press this button, the band changes as follows: 2 ... 1 to 4 to check which bands you can receive. Step 3: Presetting radio stations You can receive vary depending on the model you want appears in the display. "TUNED" and "STEREO" (for UKV, depending on the model you purchased. The stations are stored from preset number 1. The bands you can preset the following...
Scanning stops when the system tunes in the display. A preset number flashes in a station. The station is displayed when you select UKV. 2 Press and hold + or - TUNED STEREO MHz 3 Press TUNER MEMORY. Every time you press this button, the band changes as follows: 2 ... 1 to 4 to check which bands you can receive. Step 3: Presetting radio stations You can receive vary depending on the model you want appears in the display. "TUNED" and "STEREO" (for UKV, depending on the model you purchased. The stations are stored from preset number 1. The bands you can preset the following...

Operating Instructions (primary manual)
Page 9
...- + g POWER SAVE/DEMO (STANDBY) / Press POWER SAVE/DEMO (STANDBY) when the power is set to erase. Tip The preset stations are renumbered. The clock display appears. 9 To erase a preset station 1 Keep pressing TUNER MEMORY until a preset number flashes in a station with a weak signal Press + or - The system is...number, the preset number decreases by pressing 1/u. The system switches to store the other station. To cancel the Power Saving Mode Press DISPLAY. You can lower the power consumption to a minimum (Power Saving Mode) and save energy in the Power Saving Mode. After ...
...- + g POWER SAVE/DEMO (STANDBY) / Press POWER SAVE/DEMO (STANDBY) when the power is set to erase. Tip The preset stations are renumbered. The clock display appears. 9 To erase a preset station 1 Keep pressing TUNER MEMORY until a preset number flashes in a station with a weak signal Press + or - The system is...number, the preset number decreases by pressing 1/u. The system switches to store the other station. To cancel the Power Saving Mode Press DISPLAY. You can lower the power consumption to a minimum (Power Saving Mode) and save energy in the Power Saving Mode. After ...
Operating Instructions (primary manual)
Page 11
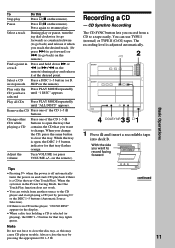
... tray (One Touch Play). With the side you change . To Do this may cause CD player trouble. Press again to close the tray. in the display. • When a disc tray holding a CD is no CD in the player, "CD NO DISC" appears in stop mode SKIP on the remote). Select a track...
... tray (One Touch Play). With the side you change . To Do this may cause CD player trouble. Press again to close the tray. in the display. • When a disc tray holding a CD is no CD in the player, "CD NO DISC" appears in stop mode SKIP on the remote). Select a track...
Operating Instructions (primary manual)
Page 13
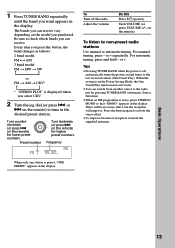
... the power on the model you want appears in the desired preset station. Tips • Pressing TUNER BAND when the power is displayed when you can receive vary depending on and tunes to restore the stereo effect. • To improve broadcast reception, reorient the supplied.... For manual tuning, press - Frequency TUNED STEREO MHz When only one station is noisy, press STEREO/ MONO so that "MONO" appears in the display. on the remote) for higher preset numbers. or +. 1 Press TUNER BAND repeatedly until the band you purchased. Preset number Turn clockwise (or press...
... the power on the model you want appears in the desired preset station. Tips • Pressing TUNER BAND when the power is displayed when you can receive vary depending on and tunes to restore the stereo effect. • To improve broadcast reception, reorient the supplied.... For manual tuning, press - Frequency TUNED STEREO MHz When only one station is noisy, press STEREO/ MONO so that "MONO" appears in the display. on the remote) for higher preset numbers. or +. 1 Press TUNER BAND repeatedly until the band you purchased. Preset number Turn clockwise (or press...
Operating Instructions (primary manual)
Page 16
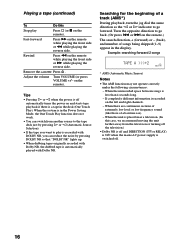
... to go forward. When there are continuous sections of extremely low level or low frequency sound (like those of songs being skipped (1~9) appear in the display. Rewind Press 0 on the remote). on the remote while playing the front side or ) while playing the reverse side. Remove the cassette Press § . When...
... to go forward. When there are continuous sections of extremely low level or low frequency sound (like those of songs being skipped (1~9) appear in the display. Rewind Press 0 on the remote). on the remote while playing the front side or ) while playing the reverse side. Remove the cassette Press § . When...
Operating Instructions (primary manual)
Page 18
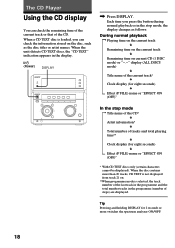
...181; Artist information* µ Total number of tracks and total playing time** µ Clock display (for eight seconds) µ Effect (P FILE) name or "EFFECT ON (OFF)" In the stop mode, the display changes as the disc titles or artist names. When the disc contains more switches the spectrum ... the remaining time of the current track or that of steps) are displayed. Tip Pressing and holding DISPLAY for 2 seconds or more than 20 tracks, CD TEXT is not displayed from track 21 on current CD (1 DISC mode) or "--.--" display (ALL DISCS mode) µ Title name of the current track*...
...181; Artist information* µ Total number of tracks and total playing time** µ Clock display (for eight seconds) µ Effect (P FILE) name or "EFFECT ON (OFF)" In the stop mode, the display changes as the disc titles or artist names. When the disc contains more switches the spectrum ... the remaining time of the current track or that of steps) are displayed. Tip Pressing and holding DISPLAY for 2 seconds or more than 20 tracks, CD TEXT is not displayed from track 21 on current CD (1 DISC mode) or "--.--" display (ALL DISCS mode) µ Title name of the current track*...
Operating Instructions (primary manual)
Page 19
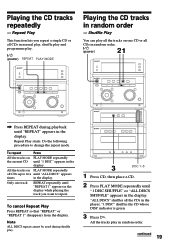
...Press REPEAT during shuffle play in the player. All the tracks on one track REPEAT repeatedly until "ALL DISCS" appears times in the display. Note ALL DISCS repeat cannot be used during playback until "1 DISC SHUFFLE" or "ALL DISCS SHUFFLE" appears in random order -- Shuffle... Play You can play all CDs in normal play, shuffle play and programme play. 1/u (power) REPEAT PLAY MODE Playing the CD tracks in the display. Do the following procedure to repeat. All the tracks play . - 0 ≠ g + ) + - · ∏ π + § 1 2 3 4 5 ª&#...
...Press REPEAT during shuffle play in the player. All the tracks on one track REPEAT repeatedly until "ALL DISCS" appears times in the display. Note ALL DISCS repeat cannot be used during playback until "1 DISC SHUFFLE" or "ALL DISCS SHUFFLE" appears in random order -- Shuffle... Play You can play all CDs in normal play, shuffle play and programme play. 1/u (power) REPEAT PLAY MODE Playing the CD tracks in the display. Do the following procedure to repeat. All the tracks play . - 0 ≠ g + ) + - · ∏ π + § 1 2 3 4 5 ª&#...
Operating Instructions (primary manual)
Page 20
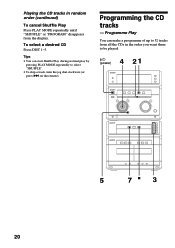
...;· π § 5 § 7p 3 20 To select a desired CD Press DISC 1~5. Tips • You can make a programme of up to 32 tracks from the display.
...;· π § 5 § 7p 3 20 To select a desired CD Press DISC 1~5. Tips • You can make a programme of up to 32 tracks from the display.
Operating Instructions (primary manual)
Page 21
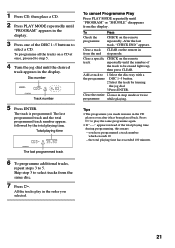
...programmed track 6 To programme additional tracks, repeat steps 3 to step 5. 4 Turn the jog dial until the desired track appears in the display. The last programmed track and the total programmed track number appear, followed by turning the jog dial. 3 Press ENTER. To cancel Programme Play...the same disc. 7 Press ·. Disc number 3 PROGRAM Track number 5 Press ENTER. Tips • The programme you made remains in from the display. you have programmed a track number which exceeds 20 - The track is programmed. Skip step 3 to be erased lights up, then press CLEAR. ...
...programmed track 6 To programme additional tracks, repeat steps 3 to step 5. 4 Turn the jog dial until the desired track appears in the display. The last programmed track and the total programmed track number appear, followed by turning the jog dial. 3 Press ENTER. To cancel Programme Play...the same disc. 7 Press ·. Disc number 3 PROGRAM Track number 5 Press ENTER. Tips • The programme you made remains in from the display. you have programmed a track number which exceeds 20 - The track is programmed. Skip step 3 to be erased lights up, then press CLEAR. ...
Operating Instructions (primary manual)
Page 23
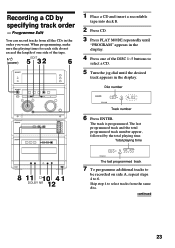
...; 1 2 3 4 5 ª· π ª· π 1 Place a CD and insert a recordable tape into deck B. 2 Press CD. 3 Press PLAY MODE repeatedly until "PROGRAM" appears in the display. 4 Press one of the DISC 1~5 buttons to select a CD. 5 Turn the jog dial until the desired track appears in the order you want. Disc number... PROGRAM The last programmed track 7 To programme additional tracks to be recorded on side A, repeat steps 4 to select tracks from all the CDs in the display. Programme Edit You can record tracks from the same disc.
...; 1 2 3 4 5 ª· π ª· π 1 Place a CD and insert a recordable tape into deck B. 2 Press CD. 3 Press PLAY MODE repeatedly until "PROGRAM" appears in the display. 4 Press one of the DISC 1~5 buttons to select a CD. 5 Turn the jog dial until the desired track appears in the order you want. Disc number... PROGRAM The last programmed track 7 To programme additional tracks to be recorded on side A, repeat steps 4 to select tracks from all the CDs in the display. Programme Edit You can record tracks from the same disc.
Operating Instructions (primary manual)
Page 24
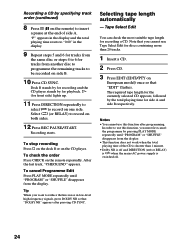
...Press EDIT (EDIT/PTY on side B. 10 Press CD SYNC. Tape Select Edit You can check the most suitable tape length for tracks from the display. • This function does not work when the total playing time of side A. Notes • You cannot use this function after pressing CD ... Press CHECK on the CD player. In order to use this function, you want to reduce the hiss noise in the display. 9 Repeat steps 5 and 6 for tracks from the display. The required tape length for the currently selected CD appears, followed by specifying track order (continued) 8 Press ∏ ...
...Press EDIT (EDIT/PTY on side B. 10 Press CD SYNC. Tape Select Edit You can check the most suitable tape length for tracks from the display. • This function does not work when the total playing time of side A. Notes • You cannot use this function after pressing CD ... Press CHECK on the CD player. In order to use this function, you want to reduce the hiss noise in the display. 9 Repeat steps 5 and 6 for tracks from the display. The required tape length for the currently selected CD appears, followed by specifying track order (continued) 8 Press ∏ ...
Operating Instructions (primary manual)
Page 25
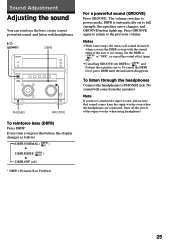
... (DBFB) Press DBFB*. Every time you have connected a super woofer, please note that sound comes from the speakers. Note If you press the button, the display changes as follows: n DBFB NORMAL ( DBFB ) µ DBFB HIGH ( DBFB ) µ DBFB OFF (off the power of the super woofer when using headphones. 25 To...
... (DBFB) Press DBFB*. Every time you have connected a super woofer, please note that sound comes from the speakers. Note If you press the button, the display changes as follows: n DBFB NORMAL ( DBFB ) µ DBFB HIGH ( DBFB ) µ DBFB OFF (off the power of the super woofer when using headphones. 25 To...
Operating Instructions (primary manual)
Page 26
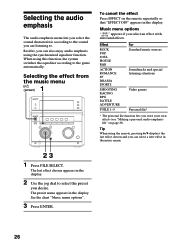
...Soundtracks and special listening situations Video games Personal file* * The personal file function lets you desire. The last effect chosen appears in the display. 2 Use the jog dial to select the preset you store your own effects (see "Making a personal audio emphasis file" on ...the remote repeatedly so that "EFFECT OFF" appears in the display. See the chart "Music menu options". 3 Press ENTER. 26 Selecting the effect from the music menu 1 1/u (power) - + 0 ) ≠ + - + g ...
...Soundtracks and special listening situations Video games Personal file* * The personal file function lets you desire. The last effect chosen appears in the display. 2 Use the jog dial to select the preset you store your own effects (see "Making a personal audio emphasis file" on ...the remote repeatedly so that "EFFECT OFF" appears in the display. See the chart "Music menu options". 3 Press ENTER. 26 Selecting the effect from the music menu 1 1/u (power) - + 0 ) ≠ + - + g ...
Operating Instructions (primary manual)
Page 27
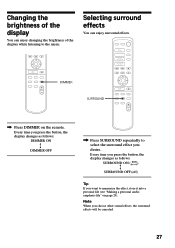
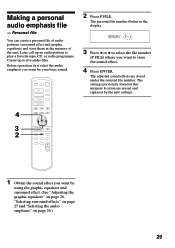
... memorize the effect, store it into a personal file (see "Making a personal audio emphasis file" on the remote. Every time you press the button, the display changes as follows: DIMMER ON DIMMER OFF ˜ ˜ / Press SURROUND repeatedly to the music. 0 ) P V B b v · p ...DIMMER Selecting surround effects You can enjoy changing the brightness of the display while listening to select the surround effect you desire. Every time you press the button, the display changes as follows: SURROUND ON ( SUR ) SURROUND OFF (off) Tip If you choose other sound ...
... memorize the effect, store it into a personal file (see "Making a personal audio emphasis file" on the remote. Every time you press the button, the display changes as follows: DIMMER ON DIMMER OFF ˜ ˜ / Press SURROUND repeatedly to the music. 0 ) P V B b v · p ...DIMMER Selecting surround effects You can enjoy changing the brightness of the display while listening to select the surround effect you desire. Every time you press the button, the display changes as follows: SURROUND ON ( SUR ) SURROUND OFF (off) Tip If you choose other sound ...
Operating Instructions (primary manual)
Page 29
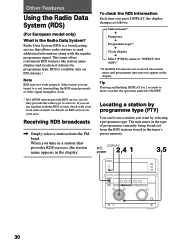
... under the selected file number. Personal file You can create a personal file of audio patterns (surround effect and graphic equalizer) and store them in the display. 3 Press B or b to select the file number (P FILE) where you want for your basic sound. · ª· ª· =+ p 4 0 ) P V B b v 3 · p 2 2 Press P FILE. The personal...
... under the selected file number. Personal file You can create a personal file of audio patterns (surround effect and graphic equalizer) and store them in the display. 3 Press B or b to select the file number (P FILE) where you want for your basic sound. · ª· ª· =+ p 4 0 ) P V B b v 3 · p 2 2 Press P FILE. The personal...
Operating Instructions (primary manual)
Page 30
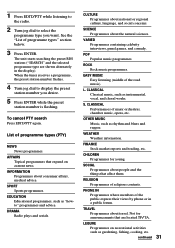
... from the RDS stations stored in the tuner's preset memory. When you are not familiar with the RDS system, check with the regular programme signal. DISPLAY 1/u power 2,4 1 3,5 30 - 0 ≠ g + ) + - + § If you want by programme type. Radio Data System (RDS...) is a broadcasting service that provides RDS services, the station name appears in the display. The unit tunes in your local radio stations for 2 seconds or more switches the spectrum analyzer ON/OFF. * Not all FM stations provide ...
... from the RDS stations stored in the tuner's preset memory. When you are not familiar with the RDS system, check with the regular programme signal. DISPLAY 1/u power 2,4 1 3,5 30 - 0 ≠ g + ) + - + § If you want by programme type. Radio Data System (RDS...) is a broadcasting service that provides RDS services, the station name appears in the display. The unit tunes in your local radio stations for 2 seconds or more switches the spectrum analyzer ON/OFF. * Not all FM stations provide ...
Operating Instructions (primary manual)
Page 31
...members of programme types (PTY) NEWS News programmes. 1 Press EDIT/PTY while listening to the radio. 2 Turn jog dial to display the preset station number you want. INFORMATION Programmes about the natural sciences. To cancel PTY search Press EDIT/PTY again. List of ...the public express their views by phone or in the display). S. EDUCATION Educational programmes, such as gardening, fishing, cooking, etc. 31 continued LEISURE Programmes on current news. The unit starts ...
...members of programme types (PTY) NEWS News programmes. 1 Press EDIT/PTY while listening to the radio. 2 Turn jog dial to display the preset station number you want. INFORMATION Programmes about the natural sciences. To cancel PTY search Press EDIT/PTY again. List of ...the public express their views by phone or in the display). S. EDUCATION Educational programmes, such as gardening, fishing, cooking, etc. 31 continued LEISURE Programmes on current news. The unit starts ...


