
Operating Instructions
Page 2
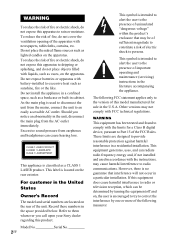
... equipment generates, uses, and can radiate radio frequency energy and, if not installed and used to disconnect the unit from earphones and headphones can be of sufficient magnitude to constitute a risk of the apparatus with the limits for sale in cabinet. Record these numbers in the United States Owner's Record The model and serial numbers are designed to radio communications. Model No. 2GB Serial No. To...
... equipment generates, uses, and can radiate radio frequency energy and, if not installed and used to disconnect the unit from earphones and headphones can be of sufficient magnitude to constitute a risk of the apparatus with the limits for sale in cabinet. Record these numbers in the United States Owner's Record The model and serial numbers are designed to radio communications. Model No. 2GB Serial No. To...
Operating Instructions
Page 6
... Additional Information Troubleshooting 41 Messages 48 Precautions 50 Specifications 51 Compatible USB devices with this manual 5 Guide to parts and controls.......... 7 Getting Started Hooking up the system 12 Positioning the speakers 16 Setting the clock 19 Basic Operations Playing a CD/MP3 disc 20 Listening to the radio 22 Transferring onto an USB device 23 Listening to music of an USB device 27 Playing a tape 29 Using optional components ....... 29 Adjusting the sound 30 Creating a party atmosphere...... 31 - Program Play Presetting radio stations 35 Using the Radio Data...
... Additional Information Troubleshooting 41 Messages 48 Precautions 50 Specifications 51 Compatible USB devices with this manual 5 Guide to parts and controls.......... 7 Getting Started Hooking up the system 12 Positioning the speakers 16 Setting the clock 19 Basic Operations Playing a CD/MP3 disc 20 Listening to the radio 22 Transferring onto an USB device 23 Listening to music of an USB device 27 Playing a tape 29 Using optional components ....... 29 Adjusting the sound 30 Creating a party atmosphere...... 31 - Program Play Presetting radio stations 35 Using the Radio Data...
Operating Instructions
Page 9
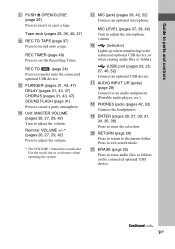
... or eject a tape. Guide to parts and controls K PUSH Z OPEN/CLOSE (page 29) Press to erase audio files or folders on the connected optional USB device. MIC LEVEL (pages 37, 39, 42) Turn to transfer onto the connected optional USB device. REC TO USB (page 24) Press to adjust the microphone volume. Tape deck (pages 29, 36, 40, 47) L REC TO TAPE (page 37) Press to set the Recording Timer. REC TIMER (page 40) Press to record onto a tape. O MIC (jack) (pages 39...
... or eject a tape. Guide to parts and controls K PUSH Z OPEN/CLOSE (page 29) Press to erase audio files or folders on the connected optional USB device. MIC LEVEL (pages 37, 39, 42) Turn to transfer onto the connected optional USB device. REC TO USB (page 24) Press to adjust the microphone volume. Tape deck (pages 29, 36, 40, 47) L REC TO TAPE (page 37) Press to set the Recording Timer. REC TIMER (page 40) Press to record onto a tape. O MIC (jack) (pages 39...
Operating Instructions
Page 10
...) Press to select a track, file or folder. wk OPERATION DIAL (pages 20, 27, 31, 38) Turn to select a disc. Turn to select a preset sound effect. es EQ (pages 30, 38) Press to select a setting. ed CLEAR (page 34) Press to select the tuning mode. Press to delete a pre-programmed track. W DISPLAY (pages 19, 32, 32, 36) Press to CD function from other discs during playback. Remote: DISC SKIP (pages 21...
...) Press to select a track, file or folder. wk OPERATION DIAL (pages 20, 27, 31, 38) Turn to select a disc. Turn to select a preset sound effect. es EQ (pages 30, 38) Press to select a setting. ed CLEAR (page 34) Press to select the tuning mode. Press to delete a pre-programmed track. W DISPLAY (pages 19, 32, 32, 36) Press to CD function from other discs during playback. Remote: DISC SKIP (pages 21...
Operating Instructions
Page 14
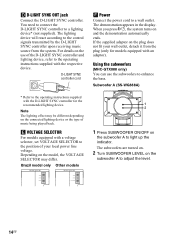
... demonstration appears in the display. Using the subwoofers (MHC-GTX888 only) You can use of the D-LIGHT SYNC controller and lighting device, refer to enhance the bass. Depending on the subwoofer A to light up the indicator. D D-LIGHT SYNC OUT jack Connect the D-LIGHT SYNC controller. You need to connect the D-LIGHT SYNC controller to a wall outlet. The subwoofers are turned on. 2 Turn SUBWOOFER LEVEL on the model, the VOLTAGE SELECTOR may be different depending on the connected lighting device or the type of your wall outlet...
... demonstration appears in the display. Using the subwoofers (MHC-GTX888 only) You can use of the D-LIGHT SYNC controller and lighting device, refer to enhance the bass. Depending on the subwoofer A to light up the indicator. D D-LIGHT SYNC OUT jack Connect the D-LIGHT SYNC controller. You need to connect the D-LIGHT SYNC controller to a wall outlet. The subwoofers are turned on. 2 Turn SUBWOOFER LEVEL on the model, the VOLTAGE SELECTOR may be different depending on the connected lighting device or the type of your wall outlet...
Operating Instructions
Page 22
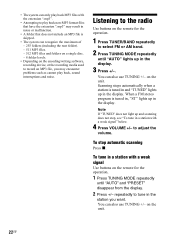
... TUNING MODE repeatedly until "AUTO" and "PRESET" disappear from the display. 2 Press +/- To tune in the station you may result in the display. on the unit. on the unit. 22GB repeatedly to tune in a station with a weak signal Use buttons on the encoding/writing software, recording device, or the recording media used to record an MP3 file, you want. to adjust the volume. You can also use TUNING +/- • The system can only play...
... TUNING MODE repeatedly until "AUTO" and "PRESET" disappear from the display. 2 Press +/- To tune in the station you may result in the display. on the unit. on the unit. 22GB repeatedly to tune in a station with a weak signal Use buttons on the encoding/writing software, recording device, or the recording media used to record an MP3 file, you want. to adjust the volume. You can also use TUNING +/- • The system can only play...
Operating Instructions
Page 23
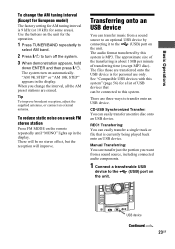
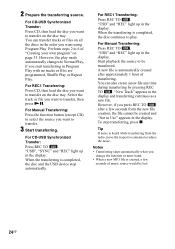
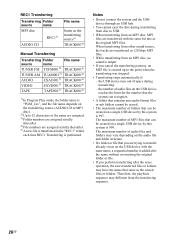
... in the display. To reduce static noise on a weak FM stereo station Press FM MODE on the unit. There are erased. When you want from a sound source to an optional USB device by this system" (page 56) for personal use only. Manual Transferring: You can easily transfer an entire disc onto an USB device. The files those are transferred onto the USB device is for a list of transferring time (except MP3 disc). See "Compatible USB devices with...
... in the display. To reduce static noise on a weak FM stereo station Press FM MODE on the unit. There are erased. When you want from a sound source to an optional USB device by this system" (page 56) for personal use only. Manual Transferring: You can easily transfer an entire disc onto an USB device. The files those are transferred onto the USB device is for a list of transferring time (except MP3 disc). See "Compatible USB devices with...
Operating Instructions
Page 24
... tracks or files are programmed, Shuffle Play or Repeat Play. When the transferring is completed, the disc continues to reduce the noise. Start playback the source to select the source you change the function or tuner band. • When a new MP3 file is completed, the disc and the USB device stop transferring, press x. For Manual Transferring: Press the function button (except CD) to be created and "Not in Use" appears in the display. To stop...
... tracks or files are programmed, Shuffle Play or Repeat Play. When the transferring is completed, the disc continues to reduce the noise. Start playback the source to select the source you change the function or tuner band. • When a new MP3 file is completed, the disc and the USB device stop transferring, press x. For Manual Transferring: Press the function button (except CD) to be created and "Not in Use" appears in the display. To stop...
Operating Instructions
Page 26
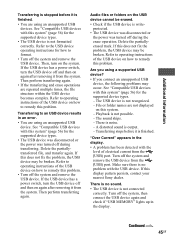
... USB device reaches the limit for the number that the system can recognize. • A folder that contains non-audio format files or sub folders cannot be erased. • The maximum number of audio files and folders may have the name that same as the erased files or folders. When transferring from other sound source, the tracks are trying to the point when the transferring was stopped. • Transferring stops automatically if: - Therefore, the playback...
... USB device reaches the limit for the number that the system can recognize. • A folder that contains non-audio format files or sub folders cannot be erased. • The maximum number of audio files and folders may have the name that same as the erased files or folders. When transferring from other sound source, the tracks are trying to the point when the transferring was stopped. • Transferring stops automatically if: - Therefore, the playback...
Operating Instructions
Page 28
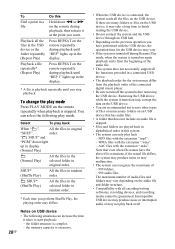
... play back at all encoding/writing softwares, recording devices, and recording media cannot be guaranteed. If there are recommended not to finish reading the USB device. • Do not connect the system and the USB device through an USB hub. • Depending on again playback starts from the beginning of - 999 folders. - 999 audio files. To change the play mode Press PLAY MODE on the remote during playback until "REP 1" lights up in the display. * A file is turned...
... play back at all encoding/writing softwares, recording devices, and recording media cannot be guaranteed. If there are recommended not to finish reading the USB device. • Do not connect the system and the USB device through an USB hub. • Depending on again playback starts from the beginning of - 999 folders. - 999 audio files. To change the play mode Press PLAY MODE on the remote during playback until "REP 1" lights up in the display. * A file is turned...
Operating Instructions
Page 31
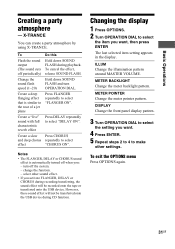
Change the sound flash speed (1~20) Hold down SOUND FLASH during playback. However, these sound effect will be transferred onto the USB device during recording/transferring, the sound effect will not be recorded onto the tape or transferred onto the USB device. ILLUM Change the illumination pattern around MASTER VOLUME. DISPLAY Change the front panel display pattern. 3 Turn OPERATION DIAL to make other settings. select other sound effect. • If you want . 4 Press ENTER. 5 Repeat steps 2 to 4 to select the...
Change the sound flash speed (1~20) Hold down SOUND FLASH during playback. However, these sound effect will be transferred onto the USB device during recording/transferring, the sound effect will not be recorded onto the tape or transferred onto the USB device. ILLUM Change the illumination pattern around MASTER VOLUME. DISPLAY Change the front panel display pattern. 3 Turn OPERATION DIAL to make other settings. select other sound effect. • If you want . 4 Press ENTER. 5 Repeat steps 2 to 4 to select the...
Operating Instructions
Page 33
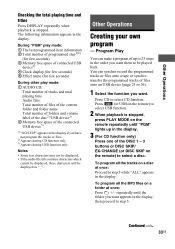
... function only) Press one of the DISC 1 ~ 3 buttons or DISC SKIP/ EX-CHANGE (or DISC SKIP on a disc at once: Press +/- Other Operations Creating your own program - During "PGM" play mode: 1 The last programmed item information 2 Total number of programmed step1)2) (for few seconds) 3 Memory free space of connected USB device3) 4 Clock display (for few seconds) 5 Effect name (for few seconds) During other play mode: 1 AUDIO CD: Total number of tracks and total playing time Audio files: Total number of files...
... function only) Press one of the DISC 1 ~ 3 buttons or DISC SKIP/ EX-CHANGE (or DISC SKIP on a disc at once: Press +/- Other Operations Creating your own program - During "PGM" play mode: 1 The last programmed item information 2 Total number of programmed step1)2) (for few seconds) 3 Memory free space of connected USB device3) 4 Clock display (for few seconds) 5 Effect name (for few seconds) During other play mode: 1 AUDIO CD: Total number of tracks and total playing time Audio files: Total number of files...
Operating Instructions
Page 37
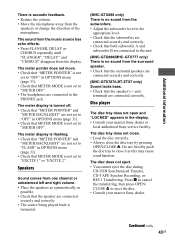
... recording, you connect or disconnect a microphone or headphone during recording pauses. • To record a folder of MP3 files, press PLAY MODE on the remote repeatedly until " " lights up and "REC" flashes in the display. When the recording is selected while recording, the selected sound effect will be recorded onto the tape. If acoustic feedback (howling) occurs, reduce the volume, move the microphone away from the speakers, or change the direction of the recorded sound signals (Auto Level Control Function). 37GB To stop...
... recording, you connect or disconnect a microphone or headphone during recording pauses. • To record a folder of MP3 files, press PLAY MODE on the remote repeatedly until " " lights up and "REC" flashes in the display. When the recording is selected while recording, the selected sound effect will be recorded onto the tape. If acoustic feedback (howling) occurs, reduce the volume, move the microphone away from the speakers, or change the direction of the recorded sound signals (Auto Level Control Function). 37GB To stop...

Operating Instructions
Page 39
... microphone from the speakers, or change the direction of the microphone. Use the buttons on the remote once. Sleep Timer You can set the system to turn -off on the preset time during CD-TAPE Synchro Recording, CD-USB Synchronized Transfer or the erase operation. The minute display (turn off after a certain time, so that play back on this system. 1 Turn MIC LEVEL to MIN to reduce the microphone volume. 2 Connect an optional microphone to MIC jack. 3 Start playing the music and adjust the volume. 4 Turn MIC LEVEL to music...
... microphone from the speakers, or change the direction of the microphone. Use the buttons on the remote once. Sleep Timer You can set the system to turn -off on the preset time during CD-TAPE Synchro Recording, CD-USB Synchronized Transfer or the erase operation. The minute display (turn off after a certain time, so that play back on this system. 1 Turn MIC LEVEL to MIN to reduce the microphone volume. 2 Connect an optional microphone to MIC jack. 3 Start playing the music and adjust the volume. 4 Turn MIC LEVEL to music...
Operating Instructions
Page 40
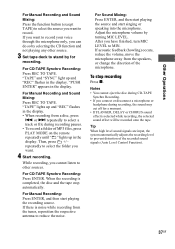
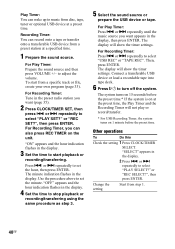
... display. 2 Press . or > repeatedly to adjust the volume. The display will show the timer settings. The system turns on 15 seconds before the preset time. Other operations To Do this Check the setting 1 Press CLOCK/TIMER SELECT. Recording Timer: You can record onto a tape or transfer onto a transferable USB device from disc, tape, tuner or optional USB device at a specified time. 1 Prepare the sound source. to select "USB REC" or "TAPE REC". For Recording Timer, you want appears in the preset radio station...
... display. 2 Press . or > repeatedly to adjust the volume. The display will show the timer settings. The system turns on 15 seconds before the preset time. Other operations To Do this Check the setting 1 Press CLOCK/TIMER SELECT. Recording Timer: You can record onto a tape or transfer onto a transferable USB device from disc, tape, tuner or optional USB device at a specified time. 1 Prepare the sound source. to select "USB REC" or "TAPE REC". For Recording Timer, you want appears in the preset radio station...
Operating Instructions
Page 43
...; The source being played back is monaural. (MHC-GTX888 only) There is no sound from the surround speaker. • Check that the surround speakers are connected to eject the disc. • Consult your nearest Sony dealer or local authorized Sony service facility. The disc does not eject. • You cannot eject the disc during CD-USB Synchronized Transfer, CD-TAPE Synchro Recording, or REC1 Transferring. The meter display is turned off. •...
...; The source being played back is monaural. (MHC-GTX888 only) There is no sound from the surround speaker. • Check that the surround speakers are connected to eject the disc. • Consult your nearest Sony dealer or local authorized Sony service facility. The disc does not eject. • You cannot eject the disc during CD-USB Synchronized Transfer, CD-TAPE Synchro Recording, or REC1 Transferring. The meter display is turned off. •...
Operating Instructions
Page 45
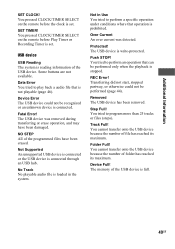
... problem, the USB device may occur. If the USB device has a power switch, turn on the USB device cannot be broken. Transferring to remedy this problem. Audio files or folders on the system. File or folder names are repeated multiple times, the file structure within the USB device becomes complex. Refer to operating instructions of the USB device on how to format. • Turn off the system, then connect the USB device again and check if "USB MEMORY" lights up in the display. • A problem...
... problem, the USB device may occur. If the USB device has a power switch, turn on the USB device cannot be broken. Transferring to remedy this problem. Audio files or folders on the system. File or folder names are repeated multiple times, the file structure within the USB device becomes complex. Refer to operating instructions of the USB device on how to format. • Turn off the system, then connect the USB device again and check if "USB MEMORY" lights up in the display. • A problem...
Operating Instructions
Page 47
... loaded. The recorded sound has echo effect. • Before you start recording, press FLANGER, DELAY or CHORUS repeatedly until "MONO" disappears from the speaker cords as possible. • Try turning off the surrounding electrical equipment. This is severe hum or noise. ("TUNED" or "ST" flashes in tape deck. A stereo FM program cannot be received in tape deck. Tape deck The tape does not record or playback, or there...
... loaded. The recorded sound has echo effect. • Before you start recording, press FLANGER, DELAY or CHORUS repeatedly until "MONO" disappears from the speaker cords as possible. • Try turning off the surrounding electrical equipment. This is severe hum or noise. ("TUNED" or "ST" flashes in tape deck. A stereo FM program cannot be received in tape deck. Tape deck The tape does not record or playback, or there...
Operating Instructions
Page 49
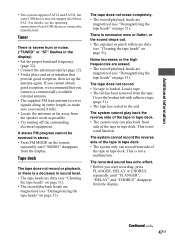
... playback is full. 49GB You tried to play back a audio file that operation is set . The memory of folder has reached its maximum. You cannot transfer onto the USB device because the number of the USB device is stopped. You pressed CLOCK/TIMER SELECT on the remote before the clock is prohibited. The USB device was detected. Protected! You tried to perform a specific operation under conditions where that is connected through an USB hub. REC Error! SET...
... playback is full. 49GB You tried to play back a audio file that operation is set . The memory of folder has reached its maximum. You cannot transfer onto the USB device because the number of the USB device is stopped. You pressed CLOCK/TIMER SELECT on the remote before the clock is prohibited. The USB device was detected. Protected! You tried to perform a specific operation under conditions where that is connected through an USB hub. REC Error! SET...
Operating Instructions
Page 56
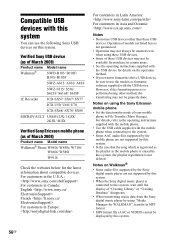
... the operating instructions supplied with the mobile phone. • Use the USB cable supplied with the USB device. For details, refer to File Transfer (Mass Storage). Operation of models not listed here is performed using "Media Manager for details on using the Sony Ericsson mobile phone • Set the data transfer mode of "Creating Library" or "Creating Database" disappears. • When transferring music data from the Sony digital music player by using other than these USB devices...
... the operating instructions supplied with the mobile phone. • Use the USB cable supplied with the USB device. For details, refer to File Transfer (Mass Storage). Operation of models not listed here is performed using "Media Manager for details on using the Sony Ericsson mobile phone • Set the data transfer mode of "Creating Library" or "Creating Database" disappears. • When transferring music data from the Sony digital music player by using other than these USB devices...


