
Operating Instructions
Page 3
..., heat registers, stoves, or other . - Reorient or relocate the receiving antenna. - Connect the equipment into the apparatus, the apparatus has been exposed to operate this manual could void your safety.
..., heat registers, stoves, or other . - Reorient or relocate the receiving antenna. - Connect the equipment into the apparatus, the apparatus has been exposed to operate this manual could void your safety.
Operating Instructions
Page 5
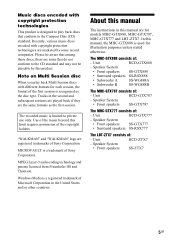
...subsequent sessions are played back if they are for models MHC-GTX888, MHC-GTX787, MHC-GTX777 and LBT-ZTX7. MPEG Layer-3 audio coding technology and patents licensed from Fraunhofer IIS and Thomson. The MHC-GTX888 consists of Sony Corporation. Unit HCD-GTX777 - Note on Multi Session... • Front speakers SS-GTX888 • Surround speakers SS-RSX888 • Subwoofer A SS-WG888A • Subwoofer B SS-WG888B The MHC-GTX787 consists of : - The recorded music is a registered trademark of Sony Corporation. Please be playable by this manual are the same formats as the...
...subsequent sessions are played back if they are for models MHC-GTX888, MHC-GTX787, MHC-GTX777 and LBT-ZTX7. MPEG Layer-3 audio coding technology and patents licensed from Fraunhofer IIS and Thomson. The MHC-GTX888 consists of Sony Corporation. Unit HCD-GTX777 - Note on Multi Session... • Front speakers SS-GTX888 • Surround speakers SS-RSX888 • Subwoofer A SS-WG888A • Subwoofer B SS-WG888B The MHC-GTX787 consists of : - The recorded music is a registered trademark of Sony Corporation. Please be playable by this manual are the same formats as the...
Operating Instructions
Page 6
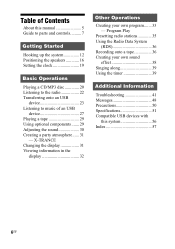
... sound effect 38 Singing along 39 Using the timer 39 Additional Information Troubleshooting 41 Messages 48 Precautions 50 Specifications 51 Compatible USB devices with this manual 5 Guide to parts and controls.......... 7 Getting Started Hooking up the system 12 Positioning the speakers 16 Setting the clock 19 Basic Operations Playing a CD/MP3...
... sound effect 38 Singing along 39 Using the timer 39 Additional Information Troubleshooting 41 Messages 48 Precautions 50 Specifications 51 Compatible USB devices with this manual 5 Guide to parts and controls.......... 7 Getting Started Hooking up the system 12 Positioning the speakers 16 Setting the clock 19 Basic Operations Playing a CD/MP3...
Operating Instructions
Page 7
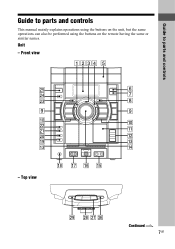
Top view qk qj qh qg wl wk wj wh Continued l 7GB Guide to parts and controls Guide to parts and controls This manual mainly explains operations using the buttons on the unit, but the same operations can also be performed using the buttons on the remote having the same or similar names. Unit - qs ql qd qd qf - Front view 1234 5 wg 6 wf 7 wd 8 9 9 q; q; ws wa qa w;
Top view qk qj qh qg wl wk wj wh Continued l 7GB Guide to parts and controls Guide to parts and controls This manual mainly explains operations using the buttons on the unit, but the same operations can also be performed using the buttons on the remote having the same or similar names. Unit - qs ql qd qd qf - Front view 1234 5 wg 6 wf 7 wd 8 9 9 q; q; ws wa qa w;
Operating Instructions
Page 23
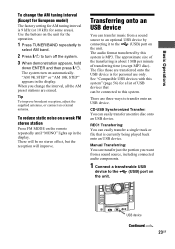
... easily transfer a single track or file that can be no stereo effect, but the reception will be connected to the (USB) port on the unit. Manual Transferring: You can transfer music from a sound source, including connected audio components. 1 Connect a transferable USB device to transfer onto an USB device. The files those...
... easily transfer a single track or file that can be no stereo effect, but the reception will be connected to the (USB) port on the unit. Manual Transferring: You can transfer music from a sound source, including connected audio components. 1 Connect a transferable USB device to transfer onto an USB device. The files those...
Operating Instructions
Page 24
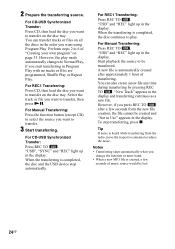
... NX. For REC1 Transferring: Press CD, then load the disc you press REC TO USB after approximately 1 hour of music source would be transferred. For Manual Transferring: Press the function button (except CD) to select the source you want to transfer on all the discs in the display. For... Manual Transferring: Press REC TO USB . For CD-USB Synchronized Transfer: Press CD, then load the disc you want to transfer. 3 Start transferring. You can also ...
... NX. For REC1 Transferring: Press CD, then load the disc you press REC TO USB after approximately 1 hour of music source would be transferred. For Manual Transferring: Press the function button (except CD) to select the source you want to transfer on all the discs in the display. For... Manual Transferring: Press REC TO USB . For CD-USB Synchronized Transfer: Press CD, then load the disc you want to transfer. 3 Start transferring. You can also ...
Operating Instructions
Page 26
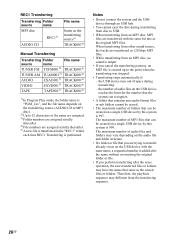
REC1 Transferring Transferring Folder source name MP3 disc REC15) AUDIO CD File name Same as the transferring source2) TRACK0014) Manual Transferring Transferring Folder File name source name TUNER FM TUFM0013) TRACK0014) TUNER AM TUAM0013) TRACK0014) AUDIO EXAU0013) TRACK0014) VIDEO EXVD0013) TRACK0014) TAPE TAPE0013) TRACK0014) 1) In ...
REC1 Transferring Transferring Folder source name MP3 disc REC15) AUDIO CD File name Same as the transferring source2) TRACK0014) Manual Transferring Transferring Folder File name source name TUNER FM TUFM0013) TRACK0014) TUNER AM TUAM0013) TRACK0014) AUDIO EXAU0013) TRACK0014) VIDEO EXVD0013) TRACK0014) TAPE TAPE0013) TRACK0014) 1) In ...
Operating Instructions
Page 36
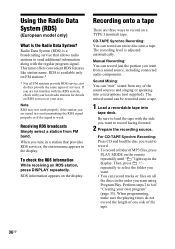
... audio components. RDS information appears on all FM stations provide RDS service, nor do not exceed the length of one side of the tape. 36GB Manual Recording: You can record just the portion you are not familiar with the RDS system, check with your local radio stations for details on FM...
... audio components. RDS information appears on all FM stations provide RDS service, nor do not exceed the length of one side of the tape. 36GB Manual Recording: You can record just the portion you are not familiar with the RDS system, check with your local radio stations for details on FM...
Operating Instructions
Page 37
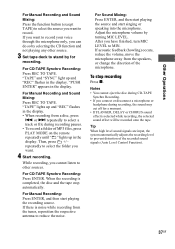
... . repeatedly to select the folder you connect or disconnect a microphone or headphone during recording, the sound may cut off for recording. For Manual Recording: Press ENTER, and then start singing or speaking into the microphone. For Sound Mixing: Press ENTER, and then start playing the source... or > repeatedly to select a track or file during CD-TAPE Synchro Recording. • If you want. 4 Start recording. Other Operations For Manual Recording and Sound Mixing: Press the function button (except TAPE) to select the source you have finished, turn MIC LEVEL to MIN. If acoustic ...
... . repeatedly to select the folder you connect or disconnect a microphone or headphone during recording, the sound may cut off for recording. For Manual Recording: Press ENTER, and then start singing or speaking into the microphone. For Sound Mixing: Press ENTER, and then start playing the source... or > repeatedly to select a track or file during CD-TAPE Synchro Recording. • If you want. 4 Start recording. Other Operations For Manual Recording and Sound Mixing: Press the function button (except TAPE) to select the source you have finished, turn MIC LEVEL to MIN. If acoustic ...
Operating Instructions
Page 41
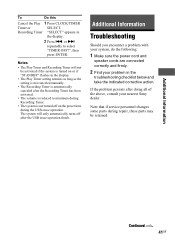
...off on or if "STANDBY" flashes in the display. • The Play Timer setting remains as long as the setting is not canceled manually. • The Recording Timer is automatically canceled after the USB erase operation finish. Additional Information Troubleshooting Should you encounter a problem with your... system, do the following: 1 Make sure the power cord and speaker cords are connected correctly and firmly. 2 Find your nearest Sony dealer. If the problem persists after doing all of the above, consult your problem in the display. 2 Press . Note that if service ...
...off on or if "STANDBY" flashes in the display. • The Play Timer setting remains as long as the setting is not canceled manually. • The Recording Timer is automatically canceled after the USB erase operation finish. Additional Information Troubleshooting Should you encounter a problem with your... system, do the following: 1 Make sure the power cord and speaker cords are connected correctly and firmly. 2 Find your nearest Sony dealer. If the problem persists after doing all of the above, consult your problem in the display. 2 Press . Note that if service ...

Operating Instructions
Page 57
... 31 Demonstration 14, 32 Display 11 Display mode 32 F FLANGER 31 FM MODE 23 H Handling discs 50 Hooking up the system 12 L LINK 30 M Manual Recording 36 Manual Transferring 23 MATRIX SURROUND 1, 2 30 Meter display 32 MP3 BOOSTER+ 30 Multi Session 5 N Non-playable disc 50 Normal Play 21, 28 O OPTIONS menu 30...
... 31 Demonstration 14, 32 Display 11 Display mode 32 F FLANGER 31 FM MODE 23 H Handling discs 50 Hooking up the system 12 L LINK 30 M Manual Recording 36 Manual Transferring 23 MATRIX SURROUND 1, 2 30 Meter display 32 MP3 BOOSTER+ 30 Multi Session 5 N Non-playable disc 50 Normal Play 21, 28 O OPTIONS menu 30...


