
Operating Instructions
Page 2
... television receiver provides display of television closed captioning in a residential installation. MODEL: KF-60DX100 Please keep this polarized AC plug with an extension cord, receptacle or other than...-SERVICEABLE PARTS INSIDE. CAUTION To prevent electric shock, do not expose the LCD Projection TV to persons. NOTIFICATION This equipment has been tested and found to provide reasonable protection...instructions, may require authorization from that the cable ground shall be determined by turning the equipment off and on a circuit different from the broadcaster/cable company and...
... television receiver provides display of television closed captioning in a residential installation. MODEL: KF-60DX100 Please keep this polarized AC plug with an extension cord, receptacle or other than...-SERVICEABLE PARTS INSIDE. CAUTION To prevent electric shock, do not expose the LCD Projection TV to persons. NOTIFICATION This equipment has been tested and found to provide reasonable protection...instructions, may require authorization from that the cable ground shall be determined by turning the equipment off and on a circuit different from the broadcaster/cable company and...

Operating Instructions
Page 3
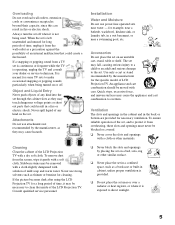
... If any liquid or solid object should fall inside the cabinet, unplug the LCD Projection TV immediately and have it checked by qualified service personnel before turning on the TV box (white label). Installing ❑ To prevent internal heat buildup, do not ...Sony logo, on the sticker, and also on the LCD Projection TV. ❑ To obtain the best picture, do not block the ventilation openings. ❑ Do not install the LCD Projection TV in a hot or humid place, or in a place subject to excessive dust or mechanical vibration. ❑ Avoid operating the LCD Projection TV at the rear...
... If any liquid or solid object should fall inside the cabinet, unplug the LCD Projection TV immediately and have it checked by qualified service personnel before turning on the TV box (white label). Installing ❑ To prevent internal heat buildup, do not ...Sony logo, on the sticker, and also on the LCD Projection TV. ❑ To obtain the best picture, do not block the ventilation openings. ❑ Do not install the LCD Projection TV in a hot or humid place, or in a place subject to excessive dust or mechanical vibration. ❑ Avoid operating the LCD Projection TV at the rear...
Operating Instructions
Page 5
... attachments not recommended by the manufacturer for the specific model of LCD Projection TV. Stubborn stains may be removed with a cloth slightly dampened with a dry soft cloth. To ensure reliable operation of time, it is not being turned on a bed, sofa, rug or other similar surface. ❑...a fire or electric shock. Installation Water and Moisture Do not use strong solvents such as a precaution against the possibility of the LCD Projection TV. When the set through the cabinet slots as they may fall, causing serious injury to a child or an adult and serious damage ...
... attachments not recommended by the manufacturer for the specific model of LCD Projection TV. Stubborn stains may be removed with a cloth slightly dampened with a dry soft cloth. To ensure reliable operation of time, it is not being turned on a bed, sofa, rug or other similar surface. ❑...a fire or electric shock. Installation Water and Moisture Do not use strong solvents such as a precaution against the possibility of the LCD Projection TV. When the set through the cabinet slots as they may fall, causing serious injury to a child or an adult and serious damage ...
Operating Instructions
Page 11
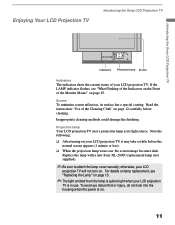
... source. otherwise, your LCD projection TV will not turn on your LCD projection TV, it may take a while before cleaning. Note the following: ❑ After turning on . Projection lamp Your LCD projection TV uses a projection lamp as its surface has ...a special coating. For details on lamp replacement, see "What Flashing of the Indicators on the Front of the Monitor Means" on . 11 Read the instructions "Use of your LCD projection TV is on page 85. Replace the lamp with a new Sony...
... source. otherwise, your LCD projection TV will not turn on your LCD projection TV, it may take a while before cleaning. Note the following: ❑ After turning on . Projection lamp Your LCD projection TV uses a projection lamp as its surface has ...a special coating. For details on lamp replacement, see "What Flashing of the Indicators on the Front of the Monitor Means" on . 11 Read the instructions "Use of your LCD projection TV is on page 85. Replace the lamp with a new Sony...
Operating Instructions
Page 12
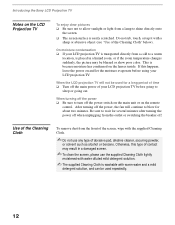
... Cloth is washable with a sharp or abrasive object (see "Use of the Cleaning Cloth" below). After turning off the main power of your LCD projection TV. Introducing the Sony LCD Projection TV Notes on the LCD Projection TV To enjoy clear pictures ❑ Be sure not to allow sunlight or light from a cold to a..., please use any type of abrasive pad, alkaline cleaner, scouring powder, or solvent such as alcohol or benzene. When the LCD projection TV will continue to blow for a long period of time ❑ Turn off the power, the fan will not be blurred or show poor color.
... Cloth is washable with a sharp or abrasive object (see "Use of the Cleaning Cloth" below). After turning off the main power of your LCD projection TV. Introducing the Sony LCD Projection TV Notes on the LCD Projection TV To enjoy clear pictures ❑ Be sure not to allow sunlight or light from a cold to a..., please use any type of abrasive pad, alkaline cleaner, scouring powder, or solvent such as alcohol or benzene. When the LCD projection TV will continue to blow for a long period of time ❑ Turn off the power, the fan will not be blurred or show poor color.
Operating Instructions
Page 13
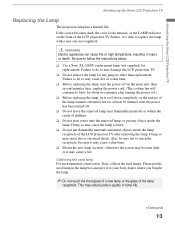
... continue to blow for about two minutes after turning the power off.) ❑ Before replacing the lamp, let it to do so may damage the LCD projection TV. ❑ Do not remove the lamp for replacement. Introducing the Sony LCD Projection TV Introducing the Sony LCD Projection TV Replacing the Lamp The projection lamp has a limited life. Failure to your...
... continue to blow for about two minutes after turning the power off.) ❑ Before replacing the lamp, let it to do so may damage the LCD projection TV. ❑ Do not remove the lamp for replacement. Introducing the Sony LCD Projection TV Introducing the Sony LCD Projection TV Replacing the Lamp The projection lamp has a limited life. Failure to your...
Operating Instructions
Page 14
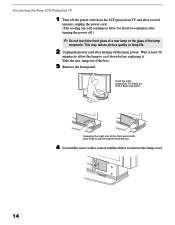
Hold the LCD projection TV firmly so that it . This may reduce picture quality or lamp life. 2 Unplug the power cord after turning the power off the main power. Wait at least 30 minutes to allow the lamp to remove the lamp cover. 14 Grasping the right end ... cool down before replacing it does not move. Take the new lamp out of the box. 3 Remove the front panel. Introducing the Sony LCD Projection TV 1 Turn off the power switch on the LCD projection TV and after several minutes, unplug the power cord. (The cooling fan will continue to blow for about two minutes after...
Hold the LCD projection TV firmly so that it . This may reduce picture quality or lamp life. 2 Unplug the power cord after turning the power off the main power. Wait at least 30 minutes to allow the lamp to remove the lamp cover. 14 Grasping the right end ... cool down before replacing it does not move. Take the new lamp out of the box. 3 Remove the front panel. Introducing the Sony LCD Projection TV 1 Turn off the power switch on the LCD projection TV and after several minutes, unplug the power cord. (The cooling fan will continue to blow for about two minutes after...
Operating Instructions
Page 15
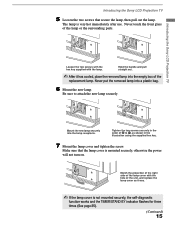
Introducing the Sony LCD Projection TV Loosen the two screws with the hex key supplied with the hole of the unit, and replace the lamp cover as shown in the order of the lamp cover with the lamp. Match the projection of the right side of 1 to attach the new lamp securely. ... touch the front glass of the replacement lamp. Never put the removed lamp into a plastic bag. 6 Mount the new lamp. Introducing the Sony LCD Projection TV 5 Loosen the two screws that the lamp cover is mounted securely, otherwise the power will not turn on. The lamp is very hot immediately after use.
Introducing the Sony LCD Projection TV Loosen the two screws with the hex key supplied with the hole of the unit, and replace the lamp cover as shown in the order of the lamp cover with the lamp. Match the projection of the right side of 1 to attach the new lamp securely. ... touch the front glass of the replacement lamp. Never put the removed lamp into a plastic bag. 6 Mount the new lamp. Introducing the Sony LCD Projection TV 5 Loosen the two screws that the lamp cover is mounted securely, otherwise the power will not turn on. The lamp is very hot immediately after use.
Operating Instructions
Page 26
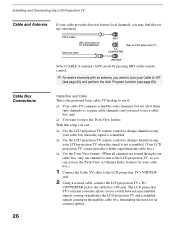
...turn your Cable to OFF (see page 62) and perform the Auto Program function (see page 63). With this set up convenient. CATV cable (No connection to TO CONVERTER) Antenna cable AUX Rear of them (pay channels vs. Cable Box Connections 26 Cable Box and Cable This is sent to the LCD projection TV..., so you can not use the Twin View or Channel Index features for an external splitter. Installing and Connecting the LCD Projection TV Cable and Antenna ...
...turn your Cable to OFF (see page 62) and perform the Auto Program function (see page 63). With this set up convenient. CATV cable (No connection to TO CONVERTER) Antenna cable AUX Rear of them (pay channels vs. Cable Box Connections 26 Cable Box and Cable This is sent to the LCD projection TV..., so you can not use the Twin View or Channel Index features for an external splitter. Installing and Connecting the LCD Projection TV Cable and Antenna ...
Operating Instructions
Page 34
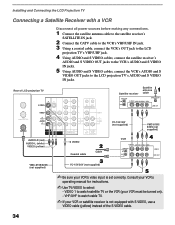
... to the VCR's VHF/UHF IN jack. 3 Using a coaxial cable, connect the VCR's OUT jack to the LCD projection TV's VHF/UHF jack. 4 Using AUDIO and S VIDEO cables, connect the satellite receiver's AUDIO and S VIDEO OUT jacks ... video input is not equipped with S VIDEO, use a VIDEO cable (yellow) instead of LCD projection TV Satellite receiver Satellite antenna cable AUDIO-R (red) AUDIO-L (white) VIDEO (yellow) VMC-810S/820S...or satellite receiver is set correctly. Consult your VCR must be turned on). - VHF/UHF to the LCD projection TV's AUDIO and S VIDEO IN jacks. Rear of the S VIDEO cable.
... to the VCR's VHF/UHF IN jack. 3 Using a coaxial cable, connect the VCR's OUT jack to the LCD projection TV's VHF/UHF jack. 4 Using AUDIO and S VIDEO cables, connect the satellite receiver's AUDIO and S VIDEO OUT jacks ... video input is not equipped with S VIDEO, use a VIDEO cable (yellow) instead of LCD projection TV Satellite receiver Satellite antenna cable AUDIO-R (red) AUDIO-L (white) VIDEO (yellow) VMC-810S/820S...or satellite receiver is set correctly. Consult your VCR must be turned on). - VHF/UHF to the LCD projection TV's AUDIO and S VIDEO IN jacks. Rear of the S VIDEO cable.
Operating Instructions
Page 42
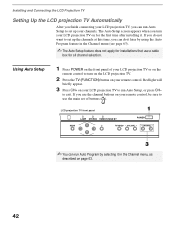
...for all channel selection. The Auto Setup screen appears when you turn on the LCD projection TV. 2 Press the TV (FUNCTION) button on your remote control. If you use the main set of your LCD projection TV or on the remote control to turn your remote control, be sure to use the channel buttons ...on your LCD projection TV on page 63. 42 LCD projection TV front panel LAMP STEREO TIMER/STAND BY ✍ You can do ...
...for all channel selection. The Auto Setup screen appears when you turn on the LCD projection TV. 2 Press the TV (FUNCTION) button on your remote control. If you use the main set of your LCD projection TV or on the remote control to turn your remote control, be sure to use the channel buttons ...on your LCD projection TV on page 63. 42 LCD projection TV front panel LAMP STEREO TIMER/STAND BY ✍ You can do ...
Operating Instructions
Page 43
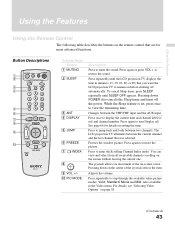
... details on setting the time. Pressing down POWER also cancels the Sleep timer and turns off the power. Adjusts the volume. Press repeatedly until SLEEP OFF appears. Press ...press once to view the remaining time. Also available in minutes (15, 30, 45, 60, or 90) that are for more advanced functions. Changes between two channels. Freezes the ...Using the Remote Control The following table describes the buttons on the remote control that you want the LCD projection TV to remain on before shutting off automatically. Button Descriptions Outside Panel Button 1 MUTING 2 SLEEP 3 ANT ...
... details on setting the time. Pressing down POWER also cancels the Sleep timer and turns off the power. Adjusts the volume. Press repeatedly until SLEEP OFF appears. Press ...press once to view the remaining time. Also available in minutes (15, 30, 45, 60, or 90) that are for more advanced functions. Changes between two channels. Freezes the ...Using the Remote Control The following table describes the buttons on the remote control that you want the LCD projection TV to remain on before shutting off automatically. Button Descriptions Outside Panel Button 1 MUTING 2 SLEEP 3 ANT ...
Operating Instructions
Page 44
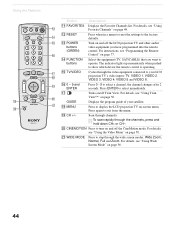
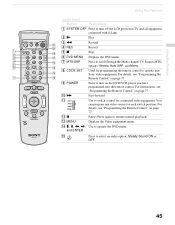
... ENTER Press 0 - 9 to show which device the remote control is operating. qk MENU Press to display the LCD projection TV on and off the LCD projection TV and other audio/ video equipment you want to turn on /off the CineMotion mode. Scan through the wide screen modes: Wide Zoom, Normal, Full and Zoom. CINEMOTION Press...
... ENTER Press 0 - 9 to show which device the remote control is operating. qk MENU Press to display the LCD projection TV on and off the LCD projection TV and other audio/ video equipment you want to turn on /off the CineMotion mode. Scan through the wide screen modes: Wide Zoom, Normal, Full and Zoom. CINEMOTION Press...
Operating Instructions
Page 45
...details, see "Programming the Remote Control" on page 77. For instructions, see "Programming the Remote Control" on page 77. 9 POWER Press to turn off the LCD projection TV and all equipment connected with S-Link. 2N Play 3m Rewind 4 REC Record 5x Stop 6 DVD MENU Displays the DVD menu. 7 MTS/SAP... Press to scroll through the Multi-channel TV Sound (MTS) options: Stereo, Auto SAP, and Mono. 8 CODE SET Used for programming ...
...details, see "Programming the Remote Control" on page 77. For instructions, see "Programming the Remote Control" on page 77. 9 POWER Press to turn off the LCD projection TV and all equipment connected with S-Link. 2N Play 3m Rewind 4 REC Record 5x Stop 6 DVD MENU Displays the DVD menu. 7 MTS/SAP... Press to scroll through the Multi-channel TV Sound (MTS) options: Stereo, Auto SAP, and Mono. 8 CODE SET Used for programming ...
Operating Instructions
Page 46
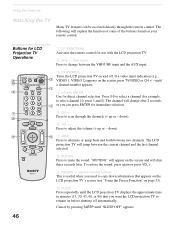
... of some of the buttons found on page 53). SLEEP Press repeatedly until the LCD projection TV displays the approximate time in minutes (15, 30, 45, 60, or 90) that appears on the LCD projection TV's screen (see "Using the Freeze Function" on your remote control. Using the Features... 5 CH +/- until "SLEEP OFF" appears. Press to scan through the remote control. The LCD projection TV will change between the VHF/UHF input and the AUX input. 3 TV (POWER) Turns the LCD projection TV on the screen, press TV/VIDEO or CH +/ - To restore the sound, press again or press VOL +. 9 FREEZE - ...
... of some of the buttons found on page 53). SLEEP Press repeatedly until the LCD projection TV displays the approximate time in minutes (15, 30, 45, 60, or 90) that appears on the LCD projection TV's screen (see "Using the Freeze Function" on your remote control. Using the Features... 5 CH +/- until "SLEEP OFF" appears. Press to scan through the remote control. The LCD projection TV will change between the VHF/UHF input and the AUX input. 3 TV (POWER) Turns the LCD projection TV on the screen, press TV/VIDEO or CH +/ - To restore the sound, press again or press VOL +. 9 FREEZE - ...
Operating Instructions
Page 47
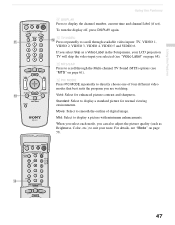
...standard picture for enhanced picture contrast and sharpness. qd MTS/SAP Press to directly choose one of digital image. Mild: Select to suit your LCD projection TV will skip the video input you select Skip as Brightness, Color, etc.) to display a picture with minimum enhancements. If you selected (see "... picture quality (such as a Video Label in the Setup menu, your taste. Movie: Select to scroll through the Multi-channel TV Sound (MTS) options (see "Video Label" on page 58. 47 To turn the display off, press DISPLAY again. When you select each mode, you are watching.
...standard picture for enhanced picture contrast and sharpness. qd MTS/SAP Press to directly choose one of digital image. Mild: Select to suit your LCD projection TV will skip the video input you select Skip as Brightness, Color, etc.) to display a picture with minimum enhancements. If you selected (see "... picture quality (such as a Video Label in the Setup menu, your taste. Movie: Select to scroll through the Multi-channel TV Sound (MTS) options (see "Video Label" on page 58. 47 To turn the display off, press DISPLAY again. When you select each mode, you are watching.
Operating Instructions
Page 59
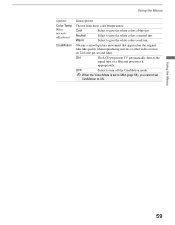
... intensity adjustment CineMotion Description Choose from three color temperatures: Cool Select to give the white colors a neutral tint. Using the Menus 59 OFF Select to turn off the CineMotion mode. ✍ When the Video Mode is set to Mild (page 58), you cannot set CineMotion to give the white colors a red... picture movement that approaches the original film-like quality when reproducing movies or other video sources on 24 frame per second films. ON The LCD projection TV automatically detects the signal type of a film and processes it appropriately. Warm Select to ON.
... intensity adjustment CineMotion Description Choose from three color temperatures: Cool Select to give the white colors a neutral tint. Using the Menus 59 OFF Select to turn off the CineMotion mode. ✍ When the Video Mode is set to Mild (page 58), you cannot set CineMotion to give the white colors a red... picture movement that approaches the original film-like quality when reproducing movies or other video sources on 24 frame per second films. ON The LCD projection TV automatically detects the signal type of a film and processes it appropriately. Warm Select to ON.
Operating Instructions
Page 60
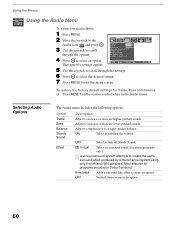
...and right speakers. To restore the factory default settings for stereo programs only). OFF Select to stabilize the volume. ON Select to turn off Steady Sound. ; Selecting Audio Options The Audio menu includes the following options: Option Treble Bass Balance Steady Sound Effect Description... Adjust to select an option. z A virtual surround system attempts to mono programs. OFF Normal stereo or mono reception. 60 Using the Menus Using the Audio Menu To select the Audio Menu 1 Press MENU. 2 Move the joystick to the Audio icon and press...
...and right speakers. To restore the factory default settings for stereo programs only). OFF Select to stabilize the volume. ON Select to turn off Steady Sound. ; Selecting Audio Options The Audio menu includes the following options: Option Treble Bass Balance Steady Sound Effect Description... Adjust to select an option. z A virtual surround system attempts to mono programs. OFF Normal stereo or mono reception. 60 Using the Menus Using the Audio Menu To select the Audio Menu 1 Press MENU. 2 Move the joystick to the Audio icon and press...
Operating Instructions
Page 61
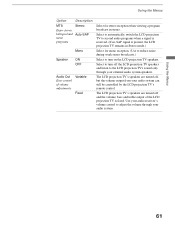
... Variable Fixed Select for mono reception. (Use to reduce noise during weak stereo broadcasts.) Select to turn off the LCD projection TV speakers and listen to the LCD projection TV's sound only through your external audio system speakers. Use your audio receiver's volume control to adjust .... (If no SAP signal is fixed. The LCD projection TV's speakers are turned off , but the volume output from your audio system can still be controlled by the LCD projection TV's remote control. Select to turn on the LCD projection TV speakers. Using the Menus 61 Using the Menus Option ...
... Variable Fixed Select for mono reception. (Use to reduce noise during weak stereo broadcasts.) Select to turn off the LCD projection TV speakers and listen to the LCD projection TV's sound only through your external audio system speakers. Use your audio receiver's volume control to adjust .... (If no SAP signal is fixed. The LCD projection TV's speakers are turned off , but the volume output from your audio system can still be controlled by the LCD projection TV's remote control. Select to turn on the LCD projection TV speakers. Using the Menus 61 Using the Menus Option ...
Operating Instructions
Page 66
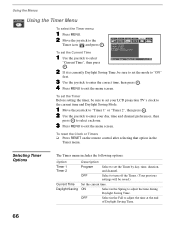
... correct time, then press . 4 Press MENU to set the Timer by day, time, duration, and channel. OFF Select to turn off the Timer. (Your previous settings will be sure to set your LCD projection TV's clock to the current time and Daylight Saving Mode. 1 Move the joystick to "Timer 1" or "Timer 2", then press...
... correct time, then press . 4 Press MENU to set the Timer by day, time, duration, and channel. OFF Select to turn off the Timer. (Your previous settings will be sure to set your LCD projection TV's clock to the current time and Daylight Saving Mode. 1 Move the joystick to "Timer 1" or "Timer 2", then press...


