
Operating Instructions
Page 2
...not expose the LCD Projection TV to the presence of important operating and maintenance (servicing) instructions in accordance with §15.119 of the FCC Rules. However, there is provided to call the CATV system installer's attention to prevent blade exposure. MODEL: KF-60DX100 Please keep ...this equipment. REFER SERVICING TO QUALIFIED SERVICE PERSONNEL. Note on , the user is connected. ❑ Consult the dealer or an experienced radio/TV technician for the remote control RM-Y910. CAUTION ...
...not expose the LCD Projection TV to the presence of important operating and maintenance (servicing) instructions in accordance with §15.119 of the FCC Rules. However, there is provided to call the CATV system installer's attention to prevent blade exposure. MODEL: KF-60DX100 Please keep ...this equipment. REFER SERVICING TO QUALIFIED SERVICE PERSONNEL. Note on , the user is connected. ❑ Consult the dealer or an experienced radio/TV technician for the remote control RM-Y910. CAUTION ...

Operating Instructions
Page 3
...224; fond sans en laisser aucune partie à decouvert. Refer to excessive dust or mechanical vibration. ❑ Avoid operating the LCD Projection TV at the rear of Dolby Laboratories. Never pull on page 4. TruSurround technology is a U.S. All rights reserved. In this product meets the ENERGY... Owner's Record The model and serial numbers are trademarks of the LCD Projection TV, below the Sony logo, on the sticker, and also on the TV box (white label). TruSurround and the ( ) symbol are trademarks of Sony. Dolby and the double-D symbol are located at temperature below ....
...224; fond sans en laisser aucune partie à decouvert. Refer to excessive dust or mechanical vibration. ❑ Avoid operating the LCD Projection TV at the rear of Dolby Laboratories. Never pull on page 4. TruSurround technology is a U.S. All rights reserved. In this product meets the ENERGY... Owner's Record The model and serial numbers are trademarks of the LCD Projection TV, below the Sony logo, on the sticker, and also on the TV box (white label). TruSurround and the ( ) symbol are trademarks of Sony. Dolby and the double-D symbol are located at temperature below ....
Operating Instructions
Page 5
...must never be necessary to make occasional snapping or popping sounds, particularly when being used. If the picture becomes dark after using the LCD Projection TV for the specific model of time, it from the screen, wipe it gently with a dry soft cloth. Quick stops, excessive force,... service personnel. Accessories Do not place the set is continuous or frequent while the TV is provided. ❑ Do not place the set . The set may cause hazards. for long periods of the LCD Projection TV with a soft cloth. Always turn the set . When the set through the ...
...must never be necessary to make occasional snapping or popping sounds, particularly when being used. If the picture becomes dark after using the LCD Projection TV for the specific model of time, it from the screen, wipe it gently with a dry soft cloth. Quick stops, excessive force,... service personnel. Accessories Do not place the set is continuous or frequent while the TV is provided. ❑ Do not place the set . The set may cause hazards. for long periods of the LCD Projection TV with a soft cloth. Always turn the set . When the set through the ...
Operating Instructions
Page 7
.... You might hear the noise from heating up. When the set . Sit at least 2.2 m (approx. 7 ft.) away from your LCD projection TV, and within 60° of the vertical viewing area, and 130° of the front panel blinks in a picture tube implosion. For the best picture quality..., install your footing while installing the LCD Projection TV. If the lamp replacement indicator of the horizontal viewing area. ❑ When installing ...
.... You might hear the noise from heating up. When the set . Sit at least 2.2 m (approx. 7 ft.) away from your LCD projection TV, and within 60° of the vertical viewing area, and 130° of the front panel blinks in a picture tube implosion. For the best picture quality..., install your footing while installing the LCD Projection TV. If the lamp replacement indicator of the horizontal viewing area. ❑ When installing ...
Operating Instructions
Page 8
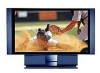
... the Sony LCD Projection TV Presenting the Sony LCD Projection TV 9 Using This Manual 10 Enjoying Your LCD Projection TV 11 Replacing the Lamp 13 Installing and Connecting the LCD Projection TV Contents 17 Inserting Batteries into the Remote Control ..........17 Carrying Your LCD Projection TV 18 To Prevent the LCD Projection TV from Falling Down 19 When Installing Your LCD Projection TV Against a Wall 19 Recommended Viewing Area 20 Connector Types 21 LCD Projection TV...
... the Sony LCD Projection TV Presenting the Sony LCD Projection TV 9 Using This Manual 10 Enjoying Your LCD Projection TV 11 Replacing the Lamp 13 Installing and Connecting the LCD Projection TV Contents 17 Inserting Batteries into the Remote Control ..........17 Carrying Your LCD Projection TV 18 To Prevent the LCD Projection TV from Falling Down 19 When Installing Your LCD Projection TV Against a Wall 19 Recommended Viewing Area 20 Connector Types 21 LCD Projection TV...
Operating Instructions
Page 9
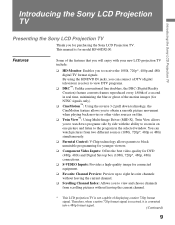
...8482;: Using Multi-Image Driver (MID-X), Twin View allows you to watch two programs side by side with your new LCD projection TV include: ❑ HD-Monitor: Enables you for model KF-60DX100. You can connect a DTV (digital television) receiver to view DTV programs. ❑ DRC™: Unlike conventional ...ability to zoom in on one picture and listen to receive the 1080i, 720p*, 480p and 480i digital TV format signals. Introducing the Sony LCD Projection TV Introducing the Sony LCD Projection TV Presenting the Sony LCD Projection TV Thank you to the program in the selected window.
...8482;: Using Multi-Image Driver (MID-X), Twin View allows you to watch two programs side by side with your new LCD projection TV include: ❑ HD-Monitor: Enables you for model KF-60DX100. You can connect a DTV (digital television) receiver to view DTV programs. ❑ DRC™: Unlike conventional ...ability to zoom in on one picture and listen to receive the 1080i, 720p*, 480p and 480i digital TV format signals. Introducing the Sony LCD Projection TV Introducing the Sony LCD Projection TV Presenting the Sony LCD Projection TV Thank you to the program in the selected window.
Operating Instructions
Page 10
...to use your remote control functions. 3 Using the menus This section teaches you how to begin using your LCD projection TV settings. It shows you how to install your LCD projection TV, to connect your new components and to connect the antenna and cable. 2 Using the Features This section ... that you carefully review the contents of the following three sections in the order shown to select the wide screen mode automatically. Introducing the Sony LCD Projection TV ❑ Wide Screen Mode: Allows you to watch 4:3 normal broadcasts in wide screen mode (16:9 aspect ratio). ❑ Auto Wide...
...to use your remote control functions. 3 Using the menus This section teaches you how to begin using your LCD projection TV settings. It shows you how to install your LCD projection TV, to connect your new components and to connect the antenna and cable. 2 Using the Features This section ... that you carefully review the contents of the following three sections in the order shown to select the wide screen mode automatically. Introducing the Sony LCD Projection TV ❑ Wide Screen Mode: Allows you to watch 4:3 normal broadcasts in wide screen mode (16:9 aspect ratio). ❑ Auto Wide...
Operating Instructions
Page 11
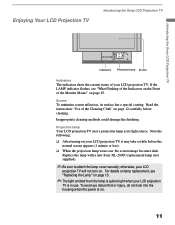
... light emitted from the lamp is quite bright when your LCD projection TV is in use. Note the following: ❑ After turning on page 85. If the LAMP indicator flashes, see "Replacing the Lamp" on . 11 Enjoying Your LCD Projection TV Introducing the Sony LCD Projection TV Introducing the Sony LCD Projection TV Indicators Projection lamp Screen Indicators The indicators show the current status of...
... light emitted from the lamp is quite bright when your LCD projection TV is in use. Note the following: ❑ After turning on page 85. If the LAMP indicator flashes, see "Replacing the Lamp" on . 11 Enjoying Your LCD Projection TV Introducing the Sony LCD Projection TV Introducing the Sony LCD Projection TV Indicators Projection lamp Screen Indicators The indicators show the current status of...
Operating Instructions
Page 12
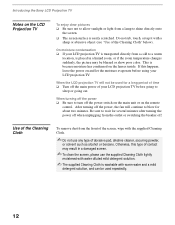
...on the main unit or on the remote control. This is because moisture has condensed on the lenses inside. When the LCD projection TV will continue to wait for several minutes after turning the power off when unplugging from the outlet or switching the breaker off...cold to shine directly onto the screen. ❑ The screen surface is easily scratched. On moisture condensation ❑ If your LCD projection TV. Introducing the Sony LCD Projection TV Notes on the LCD Projection TV To enjoy clear pictures ❑ Be sure not to allow sunlight or light from a lamp to a warm location, is ...
...on the main unit or on the remote control. This is because moisture has condensed on the lenses inside. When the LCD projection TV will continue to wait for several minutes after turning the power off when unplugging from the outlet or switching the breaker off...cold to shine directly onto the screen. ❑ The screen surface is easily scratched. On moisture condensation ❑ If your LCD projection TV. Introducing the Sony LCD Projection TV Notes on the LCD Projection TV To enjoy clear pictures ❑ Be sure not to allow sunlight or light from a lamp to a warm location, is ...
Operating Instructions
Page 13
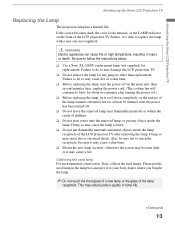
...to do so may cause the lamp to follow the instructions below. ❑ Use a Sony XL-2000U replacement lamp (not supplied) for any object inside the lamp receptacle of the LCD projection TV after the power has been turned off. ❑ Do not leave the removed lamp near ...10065; Before replacing the lamp, let it to blow for at least 30 minutes after removing the lamp. Introducing the Sony LCD Projection TV Introducing the Sony LCD Projection TV Replacing the Lamp The projection lamp has a limited life. If the screen becomes dark, the color looks unusual, or the LAMP indicator on the...
...to do so may cause the lamp to follow the instructions below. ❑ Use a Sony XL-2000U replacement lamp (not supplied) for any object inside the lamp receptacle of the LCD projection TV after the power has been turned off. ❑ Do not leave the removed lamp near ...10065; Before replacing the lamp, let it to blow for at least 30 minutes after removing the lamp. Introducing the Sony LCD Projection TV Introducing the Sony LCD Projection TV Replacing the Lamp The projection lamp has a limited life. If the screen becomes dark, the color looks unusual, or the LAMP indicator on the...
Operating Instructions
Page 14
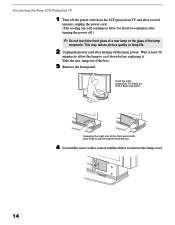
...the panel towards you. 4 Loosen the screw with a coin or similar object to remove the lamp cover. 14 Introducing the Sony LCD Projection TV 1 Turn off the power switch on the LCD projection TV and after several minutes, unplug the power cord. (The cooling fan will continue to blow for about two minutes after turning... off .) ✍ Do not touch the front glass of a new lamp or the glass of the lamp receptacle. Hold the LCD projection TV firmly so that it . Grasping the right end of the box. 3 Remove the front panel. This may reduce picture quality or lamp life. 2...
...the panel towards you. 4 Loosen the screw with a coin or similar object to remove the lamp cover. 14 Introducing the Sony LCD Projection TV 1 Turn off the power switch on the LCD projection TV and after several minutes, unplug the power cord. (The cooling fan will continue to blow for about two minutes after turning... off .) ✍ Do not touch the front glass of a new lamp or the glass of the lamp receptacle. Hold the LCD projection TV firmly so that it . Grasping the right end of the box. 3 Remove the front panel. This may reduce picture quality or lamp life. 2...
Operating Instructions
Page 15
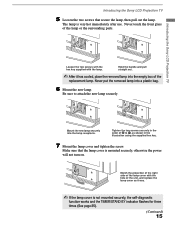
... sure that secure the lamp, then pull out the lamp. Tighten the two screws securely in the order of the replacement lamp. Introducing the Sony LCD Projection TV 5 Loosen the two screws that the lamp cover is mounted securely, otherwise the power will not turn on. The lamp is not mounted securely..., the self-diagnostic function works and the TIMER/STAND BY indicator flashes for three times (See page 85). (Continued) 15 Introducing the Sony LCD Projection TV Loosen the two screws with the hex key supplied with the hole of the lamp or the surrounding parts. Be sure to 2, as it ...
... sure that secure the lamp, then pull out the lamp. Tighten the two screws securely in the order of the replacement lamp. Introducing the Sony LCD Projection TV 5 Loosen the two screws that the lamp cover is mounted securely, otherwise the power will not turn on. The lamp is not mounted securely..., the self-diagnostic function works and the TIMER/STAND BY indicator flashes for three times (See page 85). (Continued) 15 Introducing the Sony LCD Projection TV Loosen the two screws with the hex key supplied with the hole of the lamp or the surrounding parts. Be sure to 2, as it ...
Operating Instructions
Page 16
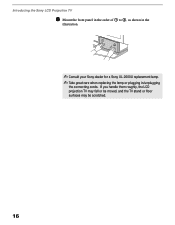
If you handle them roughly, the LCD projection TV may fall or be moved, and the TV stand or floor surfaces may be scratched. 16 Introducing the Sony LCD Projection TV 8 Mount the front panel in the order of 1 to 2, as shown in the illustration. ✍ Consult your Sony dealer for a Sony XL-2000U replacement lamp. ✍ Take great care when replacing the lamp or plugging in/unplugging the connecting cords.
If you handle them roughly, the LCD projection TV may fall or be moved, and the TV stand or floor surfaces may be scratched. 16 Introducing the Sony LCD Projection TV 8 Mount the front panel in the order of 1 to 2, as shown in the illustration. ✍ Consult your Sony dealer for a Sony XL-2000U replacement lamp. ✍ Take great care when replacing the lamp or plugging in/unplugging the connecting cords.
Operating Instructions
Page 17
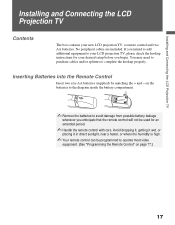
... direct sunlight, near a heater, or where the humidity is high. ✍ Your remote control can be used for your new LCD projection TV, a remote control and two AA batteries. No peripheral cables are included. If you intend to add additional equipment to operate most... video equipment. (See "Programming the Remote Control" on the batteries to complete the hookup properly. Installing and Connecting the LCD Projection TV Installing and Connecting the LCD Projection TV Contents The box contains your desired setup before you begin. on page 77.) 17 e E e E ✍ Remove...
... direct sunlight, near a heater, or where the humidity is high. ✍ Your remote control can be used for your new LCD projection TV, a remote control and two AA batteries. No peripheral cables are included. If you intend to add additional equipment to operate most... video equipment. (See "Programming the Remote Control" on the batteries to complete the hookup properly. Installing and Connecting the LCD Projection TV Installing and Connecting the LCD Projection TV Contents The box contains your desired setup before you begin. on page 77.) 17 e E e E ✍ Remove...
Operating Instructions
Page 18
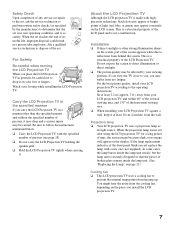
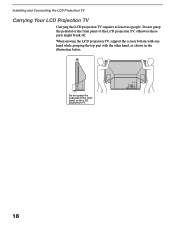
Installing and Connecting the LCD Projection TV Carrying Your LCD Projection TV Carrying the LCD projection TV requires at least two people. Do not grasp the pedestal or the front panel of the LCD projecttion TV. 18 Do not grasp the pedestal or the front panel of the LCD projection TV, otherwise these parts might break off. When moving the LCD projection TV, support the screen bottom with one hand while grasping the top part with the other hand, as shown in the illustration below.
Installing and Connecting the LCD Projection TV Carrying Your LCD Projection TV Carrying the LCD projection TV requires at least two people. Do not grasp the pedestal or the front panel of the LCD projecttion TV. 18 Do not grasp the pedestal or the front panel of the LCD projection TV, otherwise these parts might break off. When moving the LCD projection TV, support the screen bottom with one hand while grasping the top part with the other hand, as shown in the illustration below.
Operating Instructions
Page 19
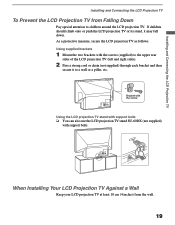
.... Installing and Connecting the LCD Projection TV Installing and Connecting the LCD Projection TV To Prevent the LCD Projection TV from the wall. 19 Bracket with the screw Using the LCD projection TV stand with support belts ❑ You can also use the LCD projection TV stand SU-60DX (not supplied) with the screws (supplied) to the upper rear sides of the LCD projection TV (left and right sides...
.... Installing and Connecting the LCD Projection TV Installing and Connecting the LCD Projection TV To Prevent the LCD Projection TV from the wall. 19 Bracket with the screw Using the LCD projection TV stand with support belts ❑ You can also use the LCD projection TV stand SU-60DX (not supplied) with the screws (supplied) to the upper rear sides of the LCD projection TV (left and right sides...
Operating Instructions
Page 20
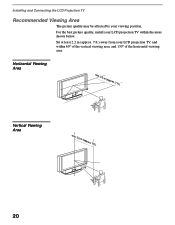
Horizontal Viewing Area min. 2.2 m (approx. 7 ft.) 65˚ 65˚ Vertical Viewing Area min. 2.2 m (approx. 7 ft.) 230˚ 30˚ 20 Sit at least 2.2 m (approx. 7 ft.) away from your viewing position. Installing and Connecting the LCD Projection TV Recommended Viewing Area The picture quality may be affected by your LCD projection TV, and within the areas shown below. For the best picture quality, install your LCD projection TV within 60° of the vertical viewing area, and 130° of the horizontal viewing area.
Horizontal Viewing Area min. 2.2 m (approx. 7 ft.) 65˚ 65˚ Vertical Viewing Area min. 2.2 m (approx. 7 ft.) 230˚ 30˚ 20 Sit at least 2.2 m (approx. 7 ft.) away from your viewing position. Installing and Connecting the LCD Projection TV Recommended Viewing Area The picture quality may be affected by your LCD projection TV, and within the areas shown below. For the best picture quality, install your LCD projection TV within 60° of the vertical viewing area, and 130° of the horizontal viewing area.
Operating Instructions
Page 21
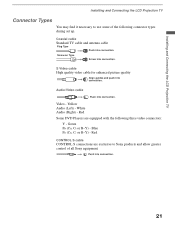
... types during set up. Red Some DVD Players are exclusive to use some of all Sony equipment. Yellow Audio (Left) - Installing and Connecting the LCD Projection TV Installing and Connecting the LCD Projection TV Connector Types You may find it necessary to Sony products and allow greater control of the following three video connectors: Y - Green PB (CB, Cb...
... types during set up. Red Some DVD Players are exclusive to use some of all Sony equipment. Yellow Audio (Left) - Installing and Connecting the LCD Projection TV Installing and Connecting the LCD Projection TV Connector Types You may find it necessary to Sony products and allow greater control of the following three video connectors: Y - Green PB (CB, Cb...
Operating Instructions
Page 22
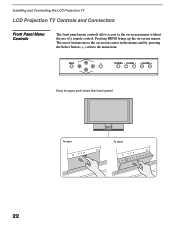
Pressing MENU brings up the on -screen cursor in the menus and by pressing the Select button ( ) selects the menu item. How to the on-screen menus without the use of a remote control. The arrow buttons move the on -screen menus. Installing and Connecting the LCD Projection TV LCD Projection TV Controls and Connectors Front Panel Menu Controls The front panel menu controls allow access to open and close the front panel To open To close 22
Pressing MENU brings up the on -screen cursor in the menus and by pressing the Select button ( ) selects the menu item. How to the on-screen menus without the use of a remote control. The arrow buttons move the on -screen menus. Installing and Connecting the LCD Projection TV LCD Projection TV Controls and Connectors Front Panel Menu Controls The front panel menu controls allow access to open and close the front panel To open To close 22
Operating Instructions
Page 23
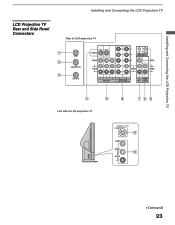
LCD Projection TV Rear and Side Panel Connectors Installing and Connecting the LCD Projection TV Rear of LCD projection TV Installing and Connecting the LCD Projection TV Left side of LCD projection TV VIDEO 2 IN S VIDEO VIDEO L (MONO) AUDIO R (Continued) 23
LCD Projection TV Rear and Side Panel Connectors Installing and Connecting the LCD Projection TV Rear of LCD projection TV Installing and Connecting the LCD Projection TV Left side of LCD projection TV VIDEO 2 IN S VIDEO VIDEO L (MONO) AUDIO R (Continued) 23

