
Operating Instructions
Page 2
...CAUTION To prevent electric shock, do not expose the LCD Projection TV to Part 15 of the FCC Rules. These limits are ... that may cause harmful interference with radio communications. NO USER-SERVICEABLE PARTS INSIDE. However, there is for the remote control RM-Y910. This symbol is intended to alert the user to operate this notice with the limits for ...rules. WARNING To prevent fire or shock hazard, do not use of the building, as practical. MODEL: KF-60DX100 Please keep this equipment. This symbol is intended to alert the user to prevent blade exposure. Note to ...
...CAUTION To prevent electric shock, do not expose the LCD Projection TV to Part 15 of the FCC Rules. These limits are ... that may cause harmful interference with radio communications. NO USER-SERVICEABLE PARTS INSIDE. However, there is for the remote control RM-Y910. This symbol is intended to alert the user to operate this notice with the limits for ...rules. WARNING To prevent fire or shock hazard, do not use of the building, as practical. MODEL: KF-60DX100 Please keep this equipment. This symbol is intended to alert the user to prevent blade exposure. Note to ...
Operating Instructions
Page 8
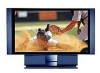
Contents Introducing the Sony LCD Projection TV Presenting the Sony LCD Projection TV 9 Using This Manual 10 Enjoying Your LCD Projection TV 11 Replacing the Lamp 13 Installing and Connecting the LCD Projection TV Contents 17 Inserting Batteries into the Remote Control ..........17 Carrying Your LCD Projection TV 18 To Prevent the LCD Projection TV from Falling Down 19 When Installing Your LCD Projection TV Against a Wall 19...
Contents Introducing the Sony LCD Projection TV Presenting the Sony LCD Projection TV 9 Using This Manual 10 Enjoying Your LCD Projection TV 11 Replacing the Lamp 13 Installing and Connecting the LCD Projection TV Contents 17 Inserting Batteries into the Remote Control ..........17 Carrying Your LCD Projection TV 18 To Prevent the LCD Projection TV from Falling Down 19 When Installing Your LCD Projection TV Against a Wall 19...
Operating Instructions
Page 10
... to ensure that you fully understand the operation of your new LCD projection TV. 1 Installing and Connecting the LCD Projection TV This section guides you how to access on the LCD projection TV console. 10 Similar controls are written for the remote control. Introducing the Sony LCD Projection TV ❑ Wide Screen Mode: Allows you to watch 4:3 normal broadcasts in...
... to ensure that you fully understand the operation of your new LCD projection TV. 1 Installing and Connecting the LCD Projection TV This section guides you how to access on the LCD projection TV console. 10 Similar controls are written for the remote control. Introducing the Sony LCD Projection TV ❑ Wide Screen Mode: Allows you to watch 4:3 normal broadcasts in...
Operating Instructions
Page 12
...; Be sure to blow for a long period of time ❑ Turn off the main power of the Cleaning Cloth" below). Introducing the Sony LCD Projection TV Notes on the LCD Projection TV To enjoy clear pictures ❑ Be sure not to allow sunlight or light from the outlet or switching the breaker off. This is... warm water and a mild detergent solution, and can be blurred or show poor color. When the LCD projection TV will continue to turn off the power switch on the main unit or on the remote control. Be sure to wait for several minutes after turning the power off the power, the fan will...
...; Be sure to blow for a long period of time ❑ Turn off the main power of the Cleaning Cloth" below). Introducing the Sony LCD Projection TV Notes on the LCD Projection TV To enjoy clear pictures ❑ Be sure not to allow sunlight or light from the outlet or switching the breaker off. This is... warm water and a mild detergent solution, and can be blurred or show poor color. When the LCD projection TV will continue to turn off the power switch on the main unit or on the remote control. Be sure to wait for several minutes after turning the power off the power, the fan will...
Operating Instructions
Page 17
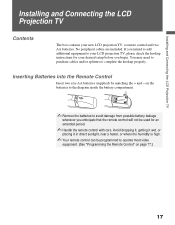
.../or splitters to the diagram inside the battery compartment. Installing and Connecting the LCD Projection TV Installing and Connecting the LCD Projection TV Contents The box contains your LCD projection TV, please check the hookup instructions for an extended period. ✍ Handle the remote control with care. No peripheral cables are included. If you anticipate that the...
.../or splitters to the diagram inside the battery compartment. Installing and Connecting the LCD Projection TV Installing and Connecting the LCD Projection TV Contents The box contains your LCD projection TV, please check the hookup instructions for an extended period. ✍ Handle the remote control with care. No peripheral cables are included. If you anticipate that the...
Operating Instructions
Page 22
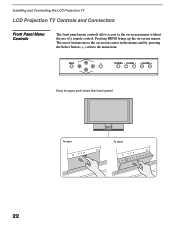
Installing and Connecting the LCD Projection TV LCD Projection TV Controls and Connectors Front Panel Menu Controls The front panel menu controls allow access to open and close the front panel To open To close 22 Pressing MENU brings up the on -screen menus without the use of a remote control. The arrow buttons move the on-screen cursor in the menus and by pressing the Select button ( ) selects the menu item. How to the on -screen menus.
Installing and Connecting the LCD Projection TV LCD Projection TV Controls and Connectors Front Panel Menu Controls The front panel menu controls allow access to open and close the front panel To open To close 22 Pressing MENU brings up the on -screen menus without the use of a remote control. The arrow buttons move the on-screen cursor in the menus and by pressing the Select button ( ) selects the menu item. How to the on -screen menus.
Operating Instructions
Page 24
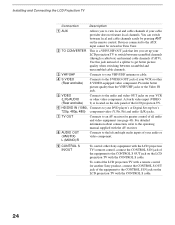
... cable provider does not feature local channels. Provides better picture quality than the VHF/UHF jacks or the Video IN jack. 5 VIDEO (L/R)/AUDIO (Rear and side) Connects to the audio and video OUT jacks on your VCR or other S VIDEO-equipped video component. Use this jack instead of... (MONO)/R Connects to the left and right audio inputs of your audio or video component. 9 CONTROL S IN/OUT To control other Sony equipment with the LCD projection TV's remote control, connect the CONTROL S IN jack of all audio and video equipment (see page 40). Devices connected to the AUX input cannot be...
... cable provider does not feature local channels. Provides better picture quality than the VHF/UHF jacks or the Video IN jack. 5 VIDEO (L/R)/AUDIO (Rear and side) Connects to the audio and video OUT jacks on your VCR or other S VIDEO-equipped video component. Use this jack instead of... (MONO)/R Connects to the left and right audio inputs of your audio or video component. 9 CONTROL S IN/OUT To control other Sony equipment with the LCD projection TV's remote control, connect the CONTROL S IN jack of all audio and video equipment (see page 40). Devices connected to the AUX input cannot be...
Operating Instructions
Page 26
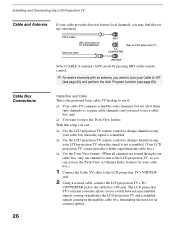
... (see page 63). With this set up convenient. CATV cable (No connection to TO CONVERTER) Antenna cable AUX Rear of them (pay channels vs. The LCD projection TV's internal converter allows you may find this setup you can not use the Twin View or Channel Index features for... one channel is sent to the LCD projection TV, so you can : ❑ Use the LCD projection TV remote control to change channels using your cable box when the signal is scrambled. ❑ Use the LCD projection TV remote control to change channels using your LCD projection TV when the signal is the preferred basic ...
... (see page 63). With this set up convenient. CATV cable (No connection to TO CONVERTER) Antenna cable AUX Rear of them (pay channels vs. The LCD projection TV's internal converter allows you may find this setup you can not use the Twin View or Channel Index features for... one channel is sent to the LCD projection TV, so you can : ❑ Use the LCD projection TV remote control to change channels using your cable box when the signal is scrambled. ❑ Use the LCD projection TV remote control to change channels using your LCD projection TV when the signal is the preferred basic ...
Operating Instructions
Page 27
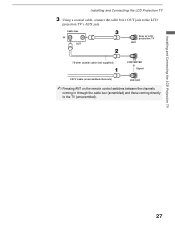
Installing and Connecting the LCD Projection TV Installing and Connecting the LCD Projection TV 3 Using a coaxial cable, connect the cable box's OUT jack to the TV (unscrambled). 27 Cable box IN OUT Rear of LCD projection TV AUX 75-ohm coaxial cable (not supplied) TO CONVERTER Signal CATV cable (unscrambled channels) VHF/UHF ✍ Pressing ANT on the remote control switches between the channels coming in through the cable box (scrambled) and those coming directly to the LCD projection TV's AUX jack.
Installing and Connecting the LCD Projection TV Installing and Connecting the LCD Projection TV 3 Using a coaxial cable, connect the cable box's OUT jack to the TV (unscrambled). 27 Cable box IN OUT Rear of LCD projection TV AUX 75-ohm coaxial cable (not supplied) TO CONVERTER Signal CATV cable (unscrambled channels) VHF/UHF ✍ Pressing ANT on the remote control switches between the channels coming in through the cable box (scrambled) and those coming directly to the LCD projection TV's AUX jack.
Operating Instructions
Page 28
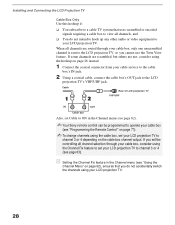
Cable Rear of LCD projection TV VHF/UHF IN OUT Cable box Also, set Cable to ON in the Channel menu (see page 63). When all channels, and ❑ You do not accidentally switch the channels using your LCD projection TV. 28 If you will be programmed to operate your cable ...box (see page 62). ✍ Your Sony remote control can be controlling all channel selection through your cable box, only one unscrambled channel...
Cable Rear of LCD projection TV VHF/UHF IN OUT Cable box Also, set Cable to ON in the Channel menu (see page 63). When all channels, and ❑ You do not accidentally switch the channels using your LCD projection TV. 28 If you will be programmed to operate your cable ...box (see page 62). ✍ Your Sony remote control can be controlling all channel selection through your cable box, only one unscrambled channel...
Operating Instructions
Page 30
To program your Sony remote control to operate your cable box, see "Programming the Remote Control" on page 77. ❑ Use the LCD projection TV remote control to change channels on your cable box when the signal is scrambled. Your LCD projection TV's tuner provides a better signal than the cable box. ❑ Use the Twin View feature. (When all...
To program your Sony remote control to operate your cable box, see "Programming the Remote Control" on page 77. ❑ Use the LCD projection TV remote control to change channels on your cable box when the signal is scrambled. Your LCD projection TV's tuner provides a better signal than the cable box. ❑ Use the Twin View feature. (When all...
Operating Instructions
Page 31
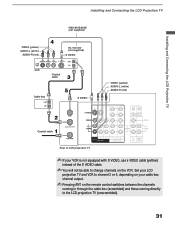
...Coaxial cable Cable box S VIDEO VIDEO (yellow) AUDIO-L (white) AUDIO-R (red) Coaxial cable Rear of the S VIDEO cable. ✍ You will not be able to the LCD projection TV (unscrambled). 31 Set your LCD projection TV and VCR to channel 3 or 4, depending on your VCR is not equipped with S VIDEO, ...use a VIDEO cable (yellow) instead of LCD projection TV ✍ If your cable box channel output. ✍ Pressing ANT on the remote control switches between the channels coming in through the cable box (scrambled) and those coming directly to change...
...Coaxial cable Cable box S VIDEO VIDEO (yellow) AUDIO-L (white) AUDIO-R (red) Coaxial cable Rear of the S VIDEO cable. ✍ You will not be able to the LCD projection TV (unscrambled). 31 Set your LCD projection TV and VCR to channel 3 or 4, depending on your VCR is not equipped with S VIDEO, ...use a VIDEO cable (yellow) instead of LCD projection TV ✍ If your cable box channel output. ✍ Pressing ANT on the remote control switches between the channels coming in through the cable box (scrambled) and those coming directly to change...
Operating Instructions
Page 32
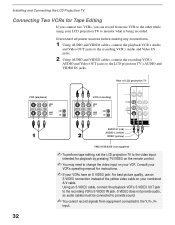
...from one VCR to the other while using your combined A/V cable. Rear of the yellow video cable on your VCR. Installing and Connecting the LCD Projection TV Connecting Two VCRs for playback by pressing TV/VIDEO on the remote control. ✍ You may need to change the video input on... your LCD projection TV to monitor what is being recorded. Disconnect all power sources before ...
...from one VCR to the other while using your combined A/V cable. Rear of the yellow video cable on your VCR. Installing and Connecting the LCD Projection TV Connecting Two VCRs for playback by pressing TV/VIDEO on the remote control. ✍ You may need to change the video input on... your LCD projection TV to monitor what is being recorded. Disconnect all power sources before ...
Operating Instructions
Page 37
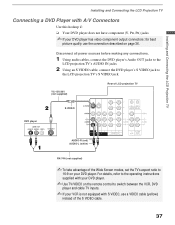
...remote control to switch between the VCR, DVD player and cable TV inputs. ✍ If your VCR is not equipped with A/V Connectors Use this hookup if: ❑ Your DVD player does not have component (Y, PB, PR) jacks. ✍ If your DVD player. YC-15V/30V (not supplied) Rear of LCD projection TV... DVD player S VIDEO AUDIO-R (red) AUDIO-L (white) RK-74A (not supplied) ✍ To take advantage of the S VIDEO cable. 37 For details, refer to the LCD projection TV's S VIDEO jack. Disconnect all power sources before making...
...remote control to switch between the VCR, DVD player and cable TV inputs. ✍ If your VCR is not equipped with A/V Connectors Use this hookup if: ❑ Your DVD player does not have component (Y, PB, PR) jacks. ✍ If your DVD player. YC-15V/30V (not supplied) Rear of LCD projection TV... DVD player S VIDEO AUDIO-R (red) AUDIO-L (white) RK-74A (not supplied) ✍ To take advantage of the S VIDEO cable. 37 For details, refer to the LCD projection TV's S VIDEO jack. Disconnect all power sources before making...
Operating Instructions
Page 41
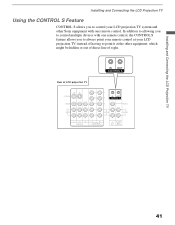
Rear of sight. Installing and Connecting the LCD Projection TV Installing and Connecting the LCD Projection TV Using the CONTROL S Feature CONTROL S allows you to point it at the other Sony equipment with one remote control. In addition to allowing you to control multiple devices with one remote control, the CONTROL S feature allows you to control your LCD projection TV, instead of having to always point your remote control at your LCD projection TV system and other equipment, which might be hidden or out of direct line of LCD projection TV 41
Rear of sight. Installing and Connecting the LCD Projection TV Installing and Connecting the LCD Projection TV Using the CONTROL S Feature CONTROL S allows you to point it at the other Sony equipment with one remote control. In addition to allowing you to control multiple devices with one remote control, the CONTROL S feature allows you to control your LCD projection TV, instead of having to always point your remote control at your LCD projection TV system and other equipment, which might be hidden or out of direct line of LCD projection TV 41
Operating Instructions
Page 42
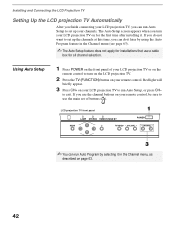
...the Channel menu, as described on page 63. 42 Installing and Connecting the LCD Projection TV Setting Up the LCD projection TV Automatically After you finish connecting your LCD projection TV, you use the channel buttons on your remote control, be sure to use a cable box for installations that use the main set... for all channel selection. Using Auto Setup 1 Press POWER on the front panel of buttons ( ). to set of your LCD projection TV or on the remote control to turn your channels. If you do it later by selecting it . The Auto Setup screen appears when you can run...
...the Channel menu, as described on page 63. 42 Installing and Connecting the LCD Projection TV Setting Up the LCD projection TV Automatically After you finish connecting your LCD projection TV, you use the channel buttons on your remote control, be sure to use a cable box for installations that use the main set... for all channel selection. Using Auto Setup 1 Press POWER on the front panel of buttons ( ). to set of your LCD projection TV or on the remote control to turn your channels. If you do it later by selecting it . The Auto Setup screen appears when you can run...
Operating Instructions
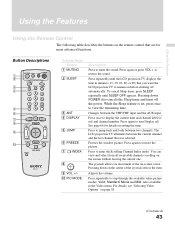
Page 43
Changes between two channels. Adjusts the volume. Using the Features Using the Features Using the Remote Control The following table describes the buttons on the remote control that you want the LCD projection TV to remain on before shutting off automatically. Button Descriptions Outside Panel Button 1 MUTING 2 SLEEP 3 ... Sleep timer, press SLEEP repeatedly until the LCD projection TV displays the time in the Video menu. The joystick allows for movement of the joystick selects the item. Also available in minutes (15, 30, 45, 60, or 90) that are for details on -screen...
Changes between two channels. Adjusts the volume. Using the Features Using the Features Using the Remote Control The following table describes the buttons on the remote control that you want the LCD projection TV to remain on before shutting off automatically. Button Descriptions Outside Panel Button 1 MUTING 2 SLEEP 3 ... Sleep timer, press SLEEP repeatedly until the LCD projection TV displays the time in the Video menu. The joystick allows for movement of the joystick selects the item. Also available in minutes (15, 30, 45, 60, or 90) that are for details on -screen...
Operating Instructions
Page 44
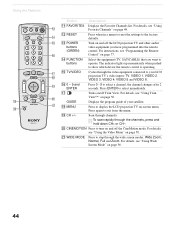
... CH-. Press again to select immediately. w; For details, see "Programming the Remote Control" on page 77. qf FUNCTION buttons Select the equipment (TV, SAT/CABLE) that you have programmed into the remote control. GUIDE Displays the program guide of your LCD projection TV's video inputs: TV, VIDEO 1, VIDEO 2, VIDEO 3, VIDEO 4, VIDEO 5 and VIDEO 6. ql CH +/- qj...
... CH-. Press again to select immediately. w; For details, see "Programming the Remote Control" on page 77. qf FUNCTION buttons Select the equipment (TV, SAT/CABLE) that you have programmed into the remote control. GUIDE Displays the program guide of your LCD projection TV's video inputs: TV, VIDEO 1, VIDEO 2, VIDEO 3, VIDEO 4, VIDEO 5 and VIDEO 6. ql CH +/- qj...
Operating Instructions
Page 45
.... q; qf M, m, You can program one video source for connected video equipment. For details, see "Programming the Remote Control" on page 77. 9 POWER Press to turn off the LCD projection TV and all equipment connected with S-Link. 2N Play 3m Rewind 4 REC Record 5x Stop 6 DVD MENU Displays the DVD menu. 7 MTS/SAP Press...
.... q; qf M, m, You can program one video source for connected video equipment. For details, see "Programming the Remote Control" on page 77. 9 POWER Press to turn off the LCD projection TV and all equipment connected with S-Link. 2N Play 3m Rewind 4 REC Record 5x Stop 6 DVD MENU Displays the DVD menu. 7 MTS/SAP Press...
Operating Instructions
Page 46
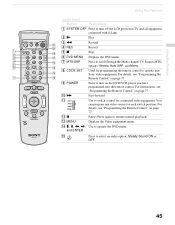
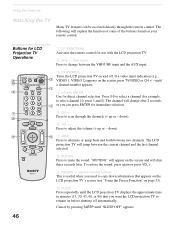
...the LCD projection TV displays the approximate time in minutes (15, 30, 45, 60, or 90) that appears on the LCD projection TV's screen (see "Using the Freeze Function" on before shutting off . If a video input indication (e.g., VIDEO 1, VIDEO 2) appears on your remote control. ...select a channel (for example, to mute the sound. Buttons for LCD Projection TV Operations 46 1 TV (FUNCTION) Activates the remote control for direct channel selection. "MUTING" will jump between two channels. The LCD projection TV will appear on and off automatically. Cancel by pressing SLEEP until a ...
...the LCD projection TV displays the approximate time in minutes (15, 30, 45, 60, or 90) that appears on the LCD projection TV's screen (see "Using the Freeze Function" on before shutting off . If a video input indication (e.g., VIDEO 1, VIDEO 2) appears on your remote control. ...select a channel (for example, to mute the sound. Buttons for LCD Projection TV Operations 46 1 TV (FUNCTION) Activates the remote control for direct channel selection. "MUTING" will jump between two channels. The LCD projection TV will appear on and off automatically. Cancel by pressing SLEEP until a ...


