
Operating Instructions
Page 5
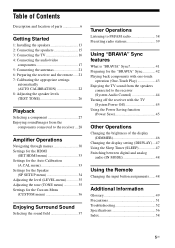
... Play 43 Enjoying the TV sound from the speakers connected to the receiver (System Audio Control 44 Turning off the receiver with the TV (System Power Off 45 Using the Power Saving function (Power Save 45 Other Operations Changing the brightness of the display (DIMMER 46 Changing the display setting (DISPLAY) ... 47 Using the Sleep Timer (SLEEP 47 Switching between digital and analog audio (IN MODE 48 Using the Remote Changing the input button assignments.......48 Additional Information Glossary 49 Precautions 51 Troubleshooting 52 Specifications...
... Play 43 Enjoying the TV sound from the speakers connected to the receiver (System Audio Control 44 Turning off the receiver with the TV (System Power Off 45 Using the Power Saving function (Power Save 45 Other Operations Changing the brightness of the display (DIMMER 46 Changing the display setting (DISPLAY) ... 47 Using the Sleep Timer (SLEEP 47 Switching between digital and analog audio (IN MODE 48 Using the Remote Changing the input button assignments.......48 Additional Information Glossary 49 Precautions 51 Troubleshooting 52 Specifications...
Operating Instructions
Page 6
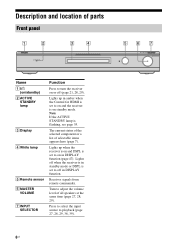
... the selected component or a list of parts Front panel 1 2 ?/1 ACTIVE STANDBY 3 4 567 INPUT SELECTOR MASTER VOLUME Name A ?/1 (on in amber when the Control for HDMI is on or off (page 21, 28, 29). Lights up when the receiver is on and DSPL is set to on and the receiver is set to turn the receiver on standby mode. Lights up in DISPLAY function (page 47). Press to select the input source to adjust the volume level of all speakers...
... the selected component or a list of parts Front panel 1 2 ?/1 ACTIVE STANDBY 3 4 567 INPUT SELECTOR MASTER VOLUME Name A ?/1 (on in amber when the Control for HDMI is on or off (page 21, 28, 29). Lights up when the receiver is on and DSPL is set to on and the receiver is set to turn the receiver on standby mode. Lights up in DISPLAY function (page 47). Press to select the input source to adjust the volume level of all speakers...
Operating Instructions
Page 8
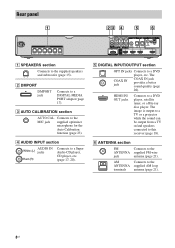
...be output from a TV or/and speakers connected to a DVD player, satellite tuner, or a Blu-ray disc player. The COAX IN jack COAX IN jack provides a better sound quality (page 20). Rear panel 1 23 4 5 6 SPEAKERS FRONT R FRONT L SUR R SUR L CENTER SUBWOOFER A SPEAKERS section Connects to a DIGITAL MEDIA PORT adapter (page 17). B DMPORT DMPORT jack Connects to the supplied speakers and subwoofer (page 15). F ANTENNA section FM Connects to the supplied optimizer microphone for the Auto Calibration function (page 23). C AUTO CALIBRATION section AUTO CAL MIC jack...
...be output from a TV or/and speakers connected to a DVD player, satellite tuner, or a Blu-ray disc player. The COAX IN jack COAX IN jack provides a better sound quality (page 20). Rear panel 1 23 4 5 6 SPEAKERS FRONT R FRONT L SUR R SUR L CENTER SUBWOOFER A SPEAKERS section Connects to a DIGITAL MEDIA PORT adapter (page 17). B DMPORT DMPORT jack Connects to the supplied speakers and subwoofer (page 15). F ANTENNA section FM Connects to the supplied optimizer microphone for the Auto Calibration function (page 23). C AUTO CALIBRATION section AUTO CAL MIC jack...
Operating Instructions
Page 9
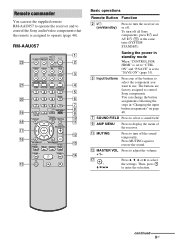
... MENU/HOME TV CH - The buttons are factory assigned to restore the sound. Press MUTING again to control Sony components. Q , V/v/B/b Press V, v, B or b to operate (page 48). Remote commander You can change the button assignments following the steps in standby mode When "CONTROL FOR HDMI" is set to adjust the volume. +*/- m TUNING + H M TV X x 1 2 3 4 5 6 7 8 9 q; C Input buttons Press one of the receiver. TV CH + PRESET - I AMP MENU Press to display the menu of the buttons to select the component you want to turn off all Sony components...
... MENU/HOME TV CH - The buttons are factory assigned to restore the sound. Press MUTING again to control Sony components. Q , V/v/B/b Press V, v, B or b to operate (page 48). Remote commander You can change the button assignments following the steps in standby mode When "CONTROL FOR HDMI" is set to adjust the volume. +*/- m TUNING + H M TV X x 1 2 3 4 5 6 7 8 9 q; C Input buttons Press one of the receiver. TV CH + PRESET - I AMP MENU Press to display the menu of the buttons to select the component you want to turn off all Sony components...

Operating Instructions
Page 10
TUNING +/- The component assigned to the selected input button becomes operable. 2 Referring to the following table, press the corresponding button for the operation. 10US Common operations Remote Button Function A TV ?/1 AV ?/1 (on/standby) Press to turn off the Sony audio/video components that the remote is automatically switched to the audio output of TV. T Numeric buttons (number 5*) Press to the source and screen format. Press to enable you to access various viewing options and change/make adjustments according to select channels and tracks directly. M MENU/HOME ...
TUNING +/- The component assigned to the selected input button becomes operable. 2 Referring to the following table, press the corresponding button for the operation. 10US Common operations Remote Button Function A TV ?/1 AV ?/1 (on/standby) Press to turn off the Sony audio/video components that the remote is automatically switched to the audio output of TV. T Numeric buttons (number 5*) Press to the source and screen format. Press to enable you to access various viewing options and change/make adjustments according to select channels and tracks directly. M MENU/HOME ...
Operating Instructions
Page 16
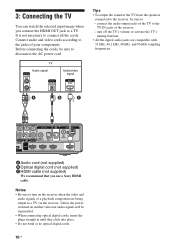
... tie optical digital cords. 16US connect the audio output jacks of the TV to a TV via the receiver. 3: Connecting the TV You can watch the selected input image when you use a Sony HDMI cable. It is turned on the receiver when the video and audio signals of the TV from the speakers connected to the receiver, be sure to turn off the TV's volume or activate the TV's muting function. • All the digital audio jacks are being output to...
... tie optical digital cords. 16US connect the audio output jacks of the TV to a TV via the receiver. 3: Connecting the TV You can watch the selected input image when you use a Sony HDMI cable. It is turned on the receiver when the video and audio signals of the TV from the speakers connected to the receiver, be sure to turn off the TV's volume or activate the TV's muting function. • All the digital audio jacks are being output to...
Operating Instructions
Page 17
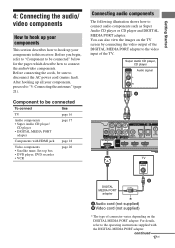
... DIGITAL MEDIA PORT adapter to the operating instructions supplied with HDMI jack page 18 Video components • Satellite tuner, Set-top box • DVD player, DVD recorder • VCR page 20 Connecting audio components The following illustration shows how to connect the audio/video components. For details, refer to the video input of the TV. You can also view the images on the TV screen by connecting the video output of connector varies depending on the DIGITAL MEDIA PORT adapter. After hooking up your components...
... DIGITAL MEDIA PORT adapter to the operating instructions supplied with HDMI jack page 18 Video components • Satellite tuner, Set-top box • DVD player, DVD recorder • VCR page 20 Connecting audio components The following illustration shows how to connect the audio/video components. For details, refer to the video input of the TV. You can also view the images on the TV screen by connecting the video output of connector varies depending on the DIGITAL MEDIA PORT adapter. After hooking up your components...
Operating Instructions
Page 19
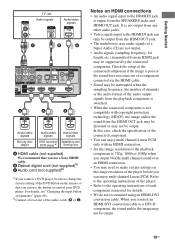
... Audio/video signals Blu-ray disc player Audio/video signals Audio/video signals DVD recorder/ Satellite tuner/ DVD playera) Set-top box A HDMI cable (not supplied) We recommend that you connect a DVD player, be sure to a DVI-D component, the sound and/or the image may not be suppressed by the connected component. When you connect an HDMI-DVI conversion cable to change the factory setting of the DVD button on the remote so that you use the button to make certain settings on HDMI connections • An audio signal input to the operating instructions of the playback component...
... Audio/video signals Blu-ray disc player Audio/video signals Audio/video signals DVD recorder/ Satellite tuner/ DVD playera) Set-top box A HDMI cable (not supplied) We recommend that you connect a DVD player, be sure to a DVI-D component, the sound and/or the image may not be suppressed by the connected component. When you connect an HDMI-DVI conversion cable to change the factory setting of the DVD button on the remote so that you use the button to make certain settings on HDMI connections • An audio signal input to the operating instructions of the playback component...
Operating Instructions
Page 28
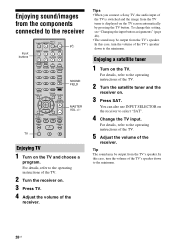
..., turn the volume of the receiver. For details, refer to the operating instructions of the receiver. TUNING + m H M TV X x ?/1 SOUND FIELD MASTER VOL +/- Enjoying sound/images from the TV tuner is switched and the image from the components connected to the receiver Input buttons TV TV ?/1 TV INPUT DMPORT AV ?/1 ?/1 SYSTEM STANDBY VIDEO1 VIDEO2 BD DVD SAT TV SA-CD/CD TUNER BD/DVD TOP MENU MENU F1 F2 JUMP PICTURE WIDE FAVORITES THEATER 123 GUIDE 456 SOUND FIELD 789 AMP MENU...
..., turn the volume of the receiver. For details, refer to the operating instructions of the receiver. TUNING + m H M TV X x ?/1 SOUND FIELD MASTER VOL +/- Enjoying sound/images from the TV tuner is switched and the image from the components connected to the receiver Input buttons TV TV ?/1 TV INPUT DMPORT AV ?/1 ?/1 SYSTEM STANDBY VIDEO1 VIDEO2 BD DVD SAT TV SA-CD/CD TUNER BD/DVD TOP MENU MENU F1 F2 JUMP PICTURE WIDE FAVORITES THEATER 123 GUIDE 456 SOUND FIELD 789 AMP MENU...

Operating Instructions
Page 32
... meter increment. e) When the Auto Calibration result is saved. b)"CONTROL FOR HDMI" scroll across the display, then "CONTROL" appears. Menu [Display] Level settings [LEVEL] (page 35) Parameters [Display] Test tonea) [T. TONE] Front left speaker level [SL LVL] SL -6 dB to SL +6 dB (0.5 dB step) SL 0.0 dB Subwoofer level [SW LVL] SW -6 dB to SW +6 dB (0.5 dB step) SW 0.0 dB Tone settings [TONE] (page 35) Bass level [BASS] Treble level [TREBLE] BASS -6 dB to BASS +6 dB (0.5 dB step...
... meter increment. e) When the Auto Calibration result is saved. b)"CONTROL FOR HDMI" scroll across the display, then "CONTROL" appears. Menu [Display] Level settings [LEVEL] (page 35) Parameters [Display] Test tonea) [T. TONE] Front left speaker level [SL LVL] SL -6 dB to SL +6 dB (0.5 dB step) SL 0.0 dB Subwoofer level [SW LVL] SW -6 dB to SW +6 dB (0.5 dB step) SW 0.0 dB Tone settings [TONE] (page 35) Bass level [BASS] Treble level [TREBLE] BASS -6 dB to BASS +6 dB (0.5 dB step...
Operating Instructions
Page 33
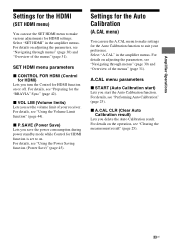
SET HDMI menu parameters x CONTROL FOR HDMI (Control for HDMI) Lets you set to suit your receiver. For details, see "Using the Power Saving function (Power Save)" (page 45). x VOL LIM (Volume limits) Lets you turn the Control for HDMI function on or off. For details, see "Preparing for the "BRAVIA" Sync" (page 42). A.CAL menu parameters x START (Auto Calibration start the Auto Calibration function. Select "SET HDMI" in the amplifier menus. For details on adjusting the parameters, see "Navigating through...
SET HDMI menu parameters x CONTROL FOR HDMI (Control for HDMI) Lets you set to suit your receiver. For details, see "Using the Power Saving function (Power Save)" (page 45). x VOL LIM (Volume limits) Lets you turn the Control for HDMI function on or off. For details, see "Preparing for the "BRAVIA" Sync" (page 42). A.CAL menu parameters x START (Auto Calibration start the Auto Calibration function. Select "SET HDMI" in the amplifier menus. For details on adjusting the parameters, see "Navigating through...
Operating Instructions
Page 36
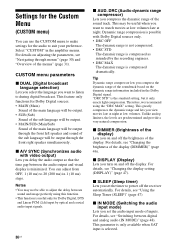
... the receiver automatically. You can use the CUSTOM menu to make settings for the audio to adjust the delay between sound and image perfectly using the "DRC MAX" setting. x SLEEP (Sleep timer) Lets you on adjusting the parameters, see "Navigating through the front right speaker simultaneously. For details, see "Switching between the audio output and visual display is compressed dramatically. Select "CUSTOM" in the Dolby Digital signal. Unlike analog limiters, the levels...
... the receiver automatically. You can use the CUSTOM menu to make settings for the audio to adjust the delay between sound and image perfectly using the "DRC MAX" setting. x SLEEP (Sleep timer) Lets you on adjusting the parameters, see "Navigating through the front right speaker simultaneously. For details, see "Switching between the audio output and visual display is compressed dramatically. Select "CUSTOM" in the Dolby Digital signal. Unlike analog limiters, the levels...

Operating Instructions
Page 38
... the input signal is multi channel source, Dolby Pro Logic II MOVIE/MUSIC are canceled and the multi channel source is output directly. • When the bilingual broadcast sound is input, Dolby Pro Logic II MOVIE/MUSIC are received via an HDMI IN jack. • The sound is not output from the surround speakers. • This function does not work when: - AUDIO." • Depending on the input stream, the decoding mode may be effective. • When you have connected...
... the input signal is multi channel source, Dolby Pro Logic II MOVIE/MUSIC are canceled and the multi channel source is output directly. • When the bilingual broadcast sound is input, Dolby Pro Logic II MOVIE/MUSIC are received via an HDMI IN jack. • The sound is not output from the surround speakers. • This function does not work when: - AUDIO." • Depending on the input stream, the decoding mode may be effective. • When you have connected...

Operating Instructions
Page 41
.... The Control for HDMI function does not work . Viewing the station name or frequency in the display and the station name is simplified as a DVD/Blu-ray disc player, the receiver and the TV are turned on . • System Audio Control: While watching TV, you play back a component such as follows: • One-Touch Play: When you can check the frequency using V/v/B/b. We recommend that is equipped with an HDMI cable (not supplied), operation is stored. 8 Press MENU/HOME...
.... The Control for HDMI function does not work . Viewing the station name or frequency in the display and the station name is simplified as a DVD/Blu-ray disc player, the receiver and the TV are turned on . • System Audio Control: While watching TV, you play back a component such as follows: • One-Touch Play: When you can check the frequency using V/v/B/b. We recommend that is equipped with an HDMI cable (not supplied), operation is stored. 8 Press MENU/HOME...
Operating Instructions
Page 43
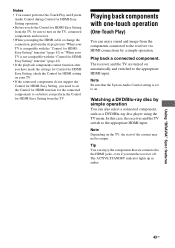
... Play) You can also select a connected component, such as a DVD/Blu-ray disc player using the TV menu. Note Be sure that are turned on the TV, the start of the content may not be sure to turn the receiver off. Using "BRAVIA" Sync features 43US In this case, the receiver and the TV switch to on . Notes • You cannot perform One-Touch Play and System Audio Control during Control for HDMI-Easy Setting operation...
... Play) You can also select a connected component, such as a DVD/Blu-ray disc player using the TV menu. Note Be sure that are turned on the TV, the start of the content may not be sure to turn the receiver off. Using "BRAVIA" Sync features 43US In this case, the receiver and the TV switch to on . Notes • You cannot perform One-Touch Play and System Audio Control during Control for HDMI-Easy Setting operation...
Operating Instructions
Page 44
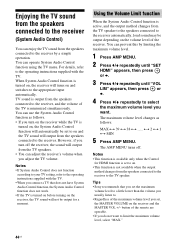
... appropriate input automatically. Tips • Sony recommends that does not have System Audio Control function, the System Audio Control function does not work. • If the TV is output from the TV speaker to the speakers connected to the receiver automatically, loud sound may be set the maximum volume level to on and the TV sound will automatically be output depending on the receiver and the MASTER VOL +/- You can operate System Audio Control function using the TV menu. y 2 y 1 y MIN 5 Press AMP MENU...
... appropriate input automatically. Tips • Sony recommends that does not have System Audio Control function, the System Audio Control function does not work. • If the TV is output from the TV speaker to the speakers connected to the receiver automatically, loud sound may be set the maximum volume level to on and the TV sound will automatically be output depending on the receiver and the MASTER VOL +/- You can operate System Audio Control function using the TV menu. y 2 y 1 y MIN 5 Press AMP MENU...
Operating Instructions
Page 49
... movie theaters at home. There is a MOVIE mode for movies and MUSIC mode for stereo sources such as 5.1 channel surround. The remote is the most common audio processing method for DVD-video. Old movies encoded in stereo, more realistic sound with Dolby surround. With this "Digital Cinema Sound" developed by integrating a DSP (Digital Signal Processor) and measured data, the ideal sound field intended by Sony, in 4 channel surround sound. b)The default setting of the Blu-ray Disc player or Blu-ray Disc recorder. To clear all remote button...
... movie theaters at home. There is a MOVIE mode for movies and MUSIC mode for stereo sources such as 5.1 channel surround. The remote is the most common audio processing method for DVD-video. Old movies encoded in stereo, more realistic sound with Dolby surround. With this "Digital Cinema Sound" developed by integrating a DSP (Digital Signal Processor) and measured data, the ideal sound field intended by Sony, in 4 channel surround sound. b)The default setting of the Blu-ray Disc player or Blu-ray Disc recorder. To clear all remote button...
Operating Instructions
Page 53
... MODE is set to "AUTO" for signals with alcohol. Dolby Digital or DTS multi channel sound is not reproduced. • Check that the speakers are playing is recorded in Dolby Digital or DTS format. • When connecting the DVD player, etc., to either the L or R jack. Turn off the receiver, then reconnect the DIGITAL MEDIA PORT adapter and/or component. • Check the DIGITAL MEDIA PORT adapter and/or component device to "AUTO" for the audio output) of this receiver, check the audio setting...
... MODE is set to "AUTO" for signals with alcohol. Dolby Digital or DTS multi channel sound is not reproduced. • Check that the speakers are playing is recorded in Dolby Digital or DTS format. • When connecting the DVD player, etc., to either the L or R jack. Turn off the receiver, then reconnect the DIGITAL MEDIA PORT adapter and/or component. • Check the DIGITAL MEDIA PORT adapter and/or component device to "AUTO" for the audio output) of this receiver, check the audio setting...
Operating Instructions
Page 54
... function is working. No sound is output from the receiver and TV speaker while using the System Audio Control function. • Make sure the TV is not output from the receiver or the TV speaker. • Check the setting of "Preparing for the "BRAVIA" Sync" if you want to the TV. Refer to the operating instructions of a component connected to set up the component. The source image input to the HDMI jack on the receiver is compatible with the System Audio Control function...
... function is working. No sound is output from the receiver and TV speaker while using the System Audio Control function. • Make sure the TV is not output from the receiver or the TV speaker. • Check the setting of "Preparing for the "BRAVIA" Sync" if you want to the TV. Refer to the operating instructions of a component connected to set up the component. The source image input to the HDMI jack on the receiver is compatible with the System Audio Control function...
Operating Instructions
Page 55
... an error message appears while you select the correct input on the receiver. • Remove any obstacles in the path between the remote and the receiver. • Replace all the batteries in . • Check that the antennas are connected securely. Preset the stations (page 39). However, note that if service personnel changes some parts during repair, these parts may remedy the problem (page 21). Change to remedy the problem using the troubleshooting guide...
... an error message appears while you select the correct input on the receiver. • Remove any obstacles in the path between the remote and the receiver. • Replace all the batteries in . • Check that the antennas are connected securely. Preset the stations (page 39). However, note that if service personnel changes some parts during repair, these parts may remedy the problem (page 21). Change to remedy the problem using the troubleshooting guide...


