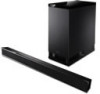
Operating Instructions
Page 2
... provided plug does not fit into your outlet, consult an electrician for replacement of the obsolete outlet. 10) Protect the power cord from the apparatus. 11) Only use attachments/accessories specified by the manufacturer. 12) Use only with the cart, stand, tripod, bracket, or table specified by the manufacturer, or sold with the manufacturer's instructions. 8) Do not install near...
... provided plug does not fit into your outlet, consult an electrician for replacement of the obsolete outlet. 10) Protect the power cord from the apparatus. 11) Only use attachments/accessories specified by the manufacturer. 12) Use only with the cart, stand, tripod, bracket, or table specified by the manufacturer, or sold with the manufacturer's instructions. 8) Do not install near...
Operating Instructions
Page 5
... Sync 20 Preparing for "BRAVIA" Sync 20 Enjoying Blu-ray Disc/DVD 21 (One-Touch Play) Enjoying the TV sound from the system 22 (System Audio Control) Turning off the system, TV and the connected components 23 (System Power Off) Using the power saving function ...........23 (HDMI SIGNAL PASS THRU) Setting the Audio Return Channel function to off 24 Advanced Settings Controlling connected Sony components with the remote 25 Changing the input button assignments of the remote 28 Settings and adjustments using the amplifier menu 30 Additional Information Troubleshooting 34 Specifications...
... Sync 20 Preparing for "BRAVIA" Sync 20 Enjoying Blu-ray Disc/DVD 21 (One-Touch Play) Enjoying the TV sound from the system 22 (System Audio Control) Turning off the system, TV and the connected components 23 (System Power Off) Using the power saving function ...........23 (HDMI SIGNAL PASS THRU) Setting the Audio Return Channel function to off 24 Advanced Settings Controlling connected Sony components with the remote 25 Changing the input button assignments of the remote 28 Settings and adjustments using the amplifier menu 30 Additional Information Troubleshooting 34 Specifications...
Operating Instructions
Page 11
... digital optical cord (page 24). • You can enjoy image and sound from the component on the system function in the AMP menu (page 32). • Connect a "PlayStation 3," etc., to on. • Depending on HDMI connections • Use a High Speed HDMI cable. If you use the ARC function. • The ARC function is available only when Control for the input source of audio output signals from the playback component is switched. • When the connected component is not compatible...
... digital optical cord (page 24). • You can enjoy image and sound from the component on the system function in the AMP menu (page 32). • Connect a "PlayStation 3," etc., to on. • Depending on HDMI connections • Use a High Speed HDMI cable. If you use the ARC function. • The ARC function is available only when Control for the input source of audio output signals from the playback component is switched. • When the connected component is not compatible...
Operating Instructions
Page 13
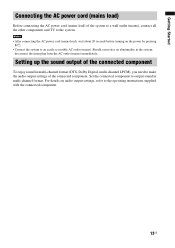
... output sound in the system, disconnect the main plug from the AC outlet (mains) immediately. Should you need to make the audio output settings of the connected component To enjoy sound in multi-channel format (DTS, Dolby Digital, multi-channel LPCM), you notice an abnormality in multi-channel format. For details on the power by pressing ?/1. • Connect the system to the operating instructions supplied with the connected component. 13US Setting up the sound output of the connected component. Notes • After connecting the AC power cord...
... output sound in the system, disconnect the main plug from the AC outlet (mains) immediately. Should you need to make the audio output settings of the connected component To enjoy sound in multi-channel format (DTS, Dolby Digital, multi-channel LPCM), you notice an abnormality in multi-channel format. For details on the power by pressing ?/1. • Connect the system to the operating instructions supplied with the connected component. 13US Setting up the sound output of the connected component. Notes • After connecting the AC power cord...
Operating Instructions
Page 15
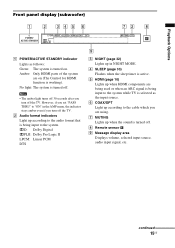
... selected as follows: Green: The system is working). E HDMI (page 10) Lights up when the sound is active. Note • The amber light turns off 30 seconds after you turn off the TV. F COAX/OPT Light up according to the audio format that is being input to "ON" in NIGHT MODE. Playback Options Front panel display (subwoofer) POWER/ ACTIVE STANDBY A POWER/ACTIVE STANDBY indicator Lights as the input source. Amber: Only HDMI parts of the system are using. B Audio format...
... selected as follows: Green: The system is working). E HDMI (page 10) Lights up when the sound is active. Note • The amber light turns off 30 seconds after you turn off the TV. F COAX/OPT Light up according to the audio format that is being input to "ON" in NIGHT MODE. Playback Options Front panel display (subwoofer) POWER/ ACTIVE STANDBY A POWER/ACTIVE STANDBY indicator Lights as the input source. Amber: Only HDMI parts of the system are using. B Audio format...

Operating Instructions
Page 18
... are using the TV's remote. connected to the DMPORT jack 4 For video components, change the TV's input to the TV jack BD Blu-ray Disc player, etc. If you turn off the TV first and then reset the power of your TV. 5 Adjust the volume by pressing MASTER VOL +/-. connected to the DIGITAL COAX IN VIDEO jack CD player, etc. connected to the DVD jack Satellite tuner or cable television tuner, etc. When you are also turned on if sound was being output...
... are using the TV's remote. connected to the DMPORT jack 4 For video components, change the TV's input to the TV jack BD Blu-ray Disc player, etc. If you turn off the TV first and then reset the power of your TV. 5 Adjust the volume by pressing MASTER VOL +/-. connected to the DIGITAL COAX IN VIDEO jack CD player, etc. connected to the DVD jack Satellite tuner or cable television tuner, etc. When you are also turned on if sound was being output...
Operating Instructions
Page 20
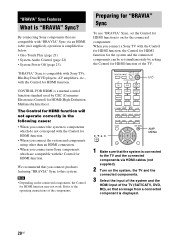
... HDMI cable (not supplied), operation is simplified as below: • One-Touch Play (page 21) • System Audio Control (page 22) • System Power Off (page 23) "BRAVIA" Sync is compatible with Sony TVs, Blu-Ray Disc/DVD players, AV amplifiers, etc., with the Control for HDMI function, the Control for HDMI function for the system and the connected components can be set the Control for HDMI function. Note • Depending on for HDMI (High-Definition Multimedia Interface). Preparing for "BRAVIA" Sync To use...
... HDMI cable (not supplied), operation is simplified as below: • One-Touch Play (page 21) • System Audio Control (page 22) • System Power Off (page 23) "BRAVIA" Sync is compatible with Sony TVs, Blu-Ray Disc/DVD players, AV amplifiers, etc., with the Control for HDMI function, the Control for HDMI function for the system and the connected components can be set the Control for HDMI function. Note • Depending on for HDMI (High-Definition Multimedia Interface). Preparing for "BRAVIA" Sync To use...

Operating Instructions
Page 22
... the system. buttons of the component on the TV screen, in the same way it would appear when you adjust the TV's volume. You can enjoy the TV sound from the speaker of the system using TV's remote, the volume level appears on the TV. Using the Volume Limit function When the System Audio Control function is active and the output method changes from the system speakers to the system speakers automatically, loud sound may be output depending...
... the system. buttons of the component on the TV screen, in the same way it would appear when you adjust the TV's volume. You can enjoy the TV sound from the speaker of the system using TV's remote, the volume level appears on the TV. Using the Volume Limit function When the System Audio Control function is active and the output method changes from the system speakers to the system speakers automatically, loud sound may be output depending...

Operating Instructions
Page 23
... the system is in standby mode is also reduced automatically when the TV is turned off if "PASS THRU" is "AUTO." The default setting is set to "AUTO." TV (yellow) While pressing and holding TV (yellow), press AV ?/1. Using the power saving function (HDMI SIGNAL PASS THRU) When using "BRAVIA" Sync, you can enjoy image and sound from a Blu-ray Disc, etc., on the status, the connected components may not be turned off...
... the system is in standby mode is also reduced automatically when the TV is turned off if "PASS THRU" is "AUTO." The default setting is set to "AUTO." TV (yellow) While pressing and holding TV (yellow), press AV ?/1. Using the power saving function (HDMI SIGNAL PASS THRU) When using "BRAVIA" Sync, you can enjoy image and sound from a Blu-ray Disc, etc., on the status, the connected components may not be turned off...
Operating Instructions
Page 24
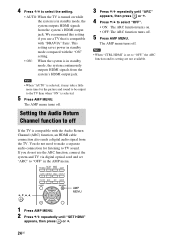
... via digital optical cord and set to "OFF," the ARC function and its setting are not available. The AMP menu turns off . Note • When "CTRL HDMI" is set "ARC" to "OFF" in standby mode, the system continuously outputs HDMI signals from the system's HDMI output jack. Setting the Audio Return Channel function to off . 5 Press AMP MENU. The AMP menu turns off . This setting saves power in standby mode compared with the Audio Return Channel (ARC) function, an HDMI cable connection also sends a digital audio signal from the system's HDMI output jack. 4 Press X/x to select...
... via digital optical cord and set to "OFF," the ARC function and its setting are not available. The AMP menu turns off . Note • When "CTRL HDMI" is set "ARC" to "OFF" in standby mode, the system continuously outputs HDMI signals from the system's HDMI output jack. Setting the Audio Return Channel function to off . 5 Press AMP MENU. The AMP menu turns off . This setting saves power in standby mode compared with the Audio Return Channel (ARC) function, an HDMI cable connection also sends a digital audio signal from the system's HDMI output jack. 4 Press X/x to select...
Operating Instructions
Page 26
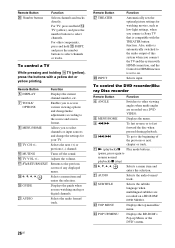
... system with a yellow dot or yellow printing. ql GUIDE Displays the guide when you connect a Sony TV that is set to resume normal playback)/x (stop) qk C, X, x, c, Selects a menu item and enters the selection. Remote Button Function 5 DISPLAY Displays the current channel number, etc. 7 TOOLS/ OPTIONS Enables you to access various viewing options and change/make adjustments according to the source and screen format. 8 MENU/HOME Allows you to select channels or input sources and change the settings for watching movies, such as low-light settings...
... system with a yellow dot or yellow printing. ql GUIDE Displays the guide when you connect a Sony TV that is set to resume normal playback)/x (stop) qk C, X, x, c, Selects a menu item and enters the selection. Remote Button Function 5 DISPLAY Displays the current channel number, etc. 7 TOOLS/ OPTIONS Enables you to access various viewing options and change/make adjustments according to the source and screen format. 8 MENU/HOME Allows you to select channels or input sources and change the settings for watching movies, such as low-light settings...
Operating Instructions
Page 27
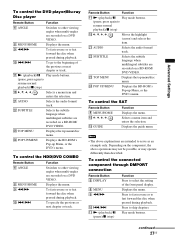
... control the DVD player/Blu-ray Disc player Remote Button Function 6 ANGLE Switches to other viewing angles when multi-angles are intended to the beginning of the front panel display. qa N (playback)/X Play mode buttons. (pause, press again to resume normal playback)/x (stop ) qk C, X, x, c, Moves the highlight (cursor) and selects the item. To control the SAT Remote Button 8 MENU/HOME qk C, X, x, c, ql GUIDE Function Displays the menu. ws SUBTITLE Selects the subtitle language when multilingual subtitles are recorded on a DVD VIDEO. 8 MENU/HOME Displays...
... control the DVD player/Blu-ray Disc player Remote Button Function 6 ANGLE Switches to other viewing angles when multi-angles are intended to the beginning of the front panel display. qa N (playback)/X Play mode buttons. (pause, press again to resume normal playback)/x (stop ) qk C, X, x, c, Moves the highlight (cursor) and selects the item. To control the SAT Remote Button 8 MENU/HOME qk C, X, x, c, ql GUIDE Function Displays the menu. ws SUBTITLE Selects the subtitle language when multilingual subtitles are recorded on a DVD VIDEO. 8 MENU/HOME Displays...

Operating Instructions
Page 29
... remote button assignments While holding down MASTER VOL -, press ?/1 and INPUT. For details on the BD1 or BD3 setting, refer to its initial settings. 29US Sony DVD recorders are operated with a DVD1 or DVD3 setting. Then, release the buttons. Advanced Settings Categories and the corresponding buttons for BD, DVD, SAT/CATV, VIDEO and SACD/CD Categories Blu-ray Disc player (command mode BD1)a) Blu-ray Disc recorder (command mode BD3) DVD player (command mode DVD1)b) DVD recorder (command mode...
... remote button assignments While holding down MASTER VOL -, press ?/1 and INPUT. For details on the BD1 or BD3 setting, refer to its initial settings. 29US Sony DVD recorders are operated with a DVD1 or DVD3 setting. Then, release the buttons. Advanced Settings Categories and the corresponding buttons for BD, DVD, SAT/CATV, VIDEO and SACD/CD Categories Blu-ray Disc player (command mode BD1)a) Blu-ray Disc recorder (command mode BD3) DVD player (command mode DVD1)b) DVD recorder (command mode...

Operating Instructions
Page 30
... default settings are underlined. C, X, x, c, AMP MENU 1 Press AMP MENU to turn off the AMP menu. 30US AMP MENU LEVEL CNT LEVEL -6, -5, ... 0, ... +5, +6 SW LEVEL -6, -5, ... 0, ... +5, +6 TONE AUDIO DRC BASS MAX STD OFF -6, -5, ... 0, ... +5, +6 TREBLE -6, -5, ... 0, ... +5, +6 AUDIO A/V SYNC ON OFF DUAL MONO NIGHT MODE INPUT MODE MAIN SUB MAIN/SUB ON OFF AUTO OPT SET HDMI* CTRL HDMI ON OFF VOL LIMIT** MAX, 49, 48, ... 2, 1, MIN PASS THRU** ARC** AUTO ON ON OFF SYSTEM DIMMER DISPLAY ON OFF ON OFF SLEEP OFF, 10M, 20M, ... 80M, 90M AUTO...
... default settings are underlined. C, X, x, c, AMP MENU 1 Press AMP MENU to turn off the AMP menu. 30US AMP MENU LEVEL CNT LEVEL -6, -5, ... 0, ... +5, +6 SW LEVEL -6, -5, ... 0, ... +5, +6 TONE AUDIO DRC BASS MAX STD OFF -6, -5, ... 0, ... +5, +6 TREBLE -6, -5, ... 0, ... +5, +6 AUDIO A/V SYNC ON OFF DUAL MONO NIGHT MODE INPUT MODE MAIN SUB MAIN/SUB ON OFF AUTO OPT SET HDMI* CTRL HDMI ON OFF VOL LIMIT** MAX, 49, 48, ... 2, 1, MIN PASS THRU** ARC** AUTO ON ON OFF SYSTEM DIMMER DISPLAY ON OFF ON OFF SLEEP OFF, 10M, 20M, ... 80M, 90M AUTO...

Operating Instructions
Page 31
... center speaker and subwoofer. 1 Select "LEVEL" in the AMP menu, then press or c. 2 Select "BASS" or "TREBLE," then press or c. • BASS : Adjusts the bass level. • TREBLE : Adjusts the treble level. 3 Select the parameter you want and press . Advanced Settings Tip • These settings are retained even if you disconnect the AC power cord (mains lead). The following pages show details for Dolby Digital, DTS and Linear PCM (2ch) input via digital coaxial cord, digital optical cord or HDMI cable...
... center speaker and subwoofer. 1 Select "LEVEL" in the AMP menu, then press or c. 2 Select "BASS" or "TREBLE," then press or c. • BASS : Adjusts the bass level. • TREBLE : Adjusts the treble level. 3 Select the parameter you want and press . Advanced Settings Tip • These settings are retained even if you disconnect the AC power cord (mains lead). The following pages show details for Dolby Digital, DTS and Linear PCM (2ch) input via digital coaxial cord, digital optical cord or HDMI cable...

Operating Instructions
Page 32
... c. 3 Select the setting and press . • MAIN: Plays back only the main channel. • SUB: Plays back only the sub channel. • MAIN/SUB: Main sound is output from the left speaker and sub sound is output from the satellite tuner (INPUT MODE) Even if you need to connect a digital satellite tuner to the system with an optical cable or coaxial cable, and set to one of the digital satellite tuner to Dolby Digital sound at a low volume level using AUDIO DRC (page 31). Enjoying the sound at low volume...
... c. 3 Select the setting and press . • MAIN: Plays back only the main channel. • SUB: Plays back only the sub channel. • MAIN/SUB: Main sound is output from the left speaker and sub sound is output from the satellite tuner (INPUT MODE) Even if you need to connect a digital satellite tuner to the system with an optical cable or coaxial cable, and set to one of the digital satellite tuner to Dolby Digital sound at a low volume level using AUDIO DRC (page 31). Enjoying the sound at low volume...

Operating Instructions
Page 33
... to flash in the AMP menu, then press or c. 2 Select "AUTO STBY," then press or c. 3 Select the setting and press . • ON: Turns on automatically when you turn off the function. The system enters standby mode automatically when you do not operate the system for about two minutes before the system enters standby mode. Advanced Settings Changing the display setting (DISPLAY) You can change the display behavior of input signal (digital input only) when you press DISPLAY, even if you set "DISPLAY...
... to flash in the AMP menu, then press or c. 2 Select "AUTO STBY," then press or c. 3 Select the setting and press . • ON: Turns on automatically when you turn off the function. The system enters standby mode automatically when you do not operate the system for about two minutes before the system enters standby mode. Advanced Settings Changing the display setting (DISPLAY) You can change the display behavior of input signal (digital input only) when you press DISPLAY, even if you set "DISPLAY...
Operating Instructions
Page 34
... TV speaker settings. To enjoy the TV sound via the system, you need to set to the system speakers. • The Volume Limit function is connected securely. For details, refer to "ON." If "5.1CH," etc., is displayed, the signal contains multiple channels, but the surround effect may not work . • Change the setting of the TV to the digital input jacks of the digital optical cord or audio cord that the AC power cord (mains lead) is working (page...
... TV speaker settings. To enjoy the TV sound via the system, you need to set to the system speakers. • The Volume Limit function is connected securely. For details, refer to "ON." If "5.1CH," etc., is displayed, the signal contains multiple channels, but the surround effect may not work . • Change the setting of the TV to the digital input jacks of the digital optical cord or audio cord that the AC power cord (mains lead) is working (page...
Operating Instructions
Page 35
... the system is in standby mode, there is no sound is set to "ON" in the AMP menu if you connect components not compatible with "BRAVIA" Sync to "OFF." • When the system is in standby mode, image and sound are weak. • Make sure you plug in the remote with new ones, if they are output from specific speakers. • Check that the connectors of the speaker cord are fully inserted into the jacks...
... the system is in standby mode, there is no sound is set to "ON" in the AMP menu if you connect components not compatible with "BRAVIA" Sync to "OFF." • When the system is in standby mode, image and sound are weak. • Make sure you plug in the remote with new ones, if they are output from specific speakers. • Check that the connectors of the speaker cord are fully inserted into the jacks...
Operating Instructions
Page 36
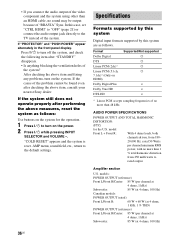
... holes of the system. AUDIO POWER SPECIFICATIONS POWER OUTPUT AND TOTAL HARMONIC DISTORTION: (FTC) for the operation. 1 Press ?/1 to the default settings. Amplifier section U.S. Specifications Formats supported by this system Digital input formats supported by this case, set "CTRL HDMI" to "OFF" (page 21) or connect the audio output jack directly to rated output. If "PROTECTOR" and "PUSH POWER" appear alternately in the front panel display. models: POWER OUTPUT (reference) Front L/Front R/Center: 85 W (per channel at 4 ohms, 1 kHz) Subwoofer: 85 W (at 4 ohms...
... holes of the system. AUDIO POWER SPECIFICATIONS POWER OUTPUT AND TOTAL HARMONIC DISTORTION: (FTC) for the operation. 1 Press ?/1 to the default settings. Amplifier section U.S. Specifications Formats supported by this system Digital input formats supported by this case, set "CTRL HDMI" to "OFF" (page 21) or connect the audio output jack directly to rated output. If "PROTECTOR" and "PUSH POWER" appear alternately in the front panel display. models: POWER OUTPUT (reference) Front L/Front R/Center: 85 W (per channel at 4 ohms, 1 kHz) Subwoofer: 85 W (at 4 ohms...


