
Installation Manual
Page 4
...die Sammelboxen beim Handel oder den Kommunen. Install the equipment while taking the operating temperature of the equipment into consideration For the operating temperature of the equipment, refer to uneven mechanical loading When this product is ...16 inches) or more Für Kunden in Deutschland Entsorgungshinweis: Bitte werfen Sie nur entladene Batterien in Taiwan only 2 (P) HDW-1800/D1800 For the customers in the Netherlands Voor de klanten in Nederland Hoe u de batterijen moet verwijderen, leest u in der... due to obtain proper exhaust and radiation of the Operation Manual. 6.
...die Sammelboxen beim Handel oder den Kommunen. Install the equipment while taking the operating temperature of the equipment into consideration For the operating temperature of the equipment, refer to uneven mechanical loading When this product is ...16 inches) or more Für Kunden in Deutschland Entsorgungshinweis: Bitte werfen Sie nur entladene Batterien in Taiwan only 2 (P) HDW-1800/D1800 For the customers in the Netherlands Voor de klanten in Nederland Hoe u de batterijen moet verwijderen, leest u in der... due to obtain proper exhaust and radiation of the Operation Manual. 6.
Installation Manual
Page 5
...Operation Mode Settings 1-17 (E) 1-11-1. Installation Procedure 1-1 (E) 1-2. Taking Out the Cassette in Board 1-22 (E) 1-17. Settings for Time Code 1-21 (E) 1-15-2. Reference System 1-20 (E) 1-15. VTR Constant Values Settings of Destination Selection Mode 1-17 (E) 1-12. Voltage and Power Requirements 1-2 (E) 1-4-2. Installation 1-1. Removing/Reattaching Plug-in Tape Slacking 1-23 (E) Appendix A Setting Check Sheet HDW-1800.../D1800 1 (E) Table of Contents Manual Structure Purpose of this manual 2 (E) Related manuals 2 (E) 1. Power Supply 1-2 (E) 1-4-1.
...Operation Mode Settings 1-17 (E) 1-11-1. Installation Procedure 1-1 (E) 1-2. Taking Out the Cassette in Board 1-22 (E) 1-17. Settings for Time Code 1-21 (E) 1-15-2. Reference System 1-20 (E) 1-15. VTR Constant Values Settings of Destination Selection Mode 1-17 (E) 1-12. Voltage and Power Requirements 1-2 (E) 1-4-2. Installation 1-1. Removing/Reattaching Plug-in Tape Slacking 1-23 (E) Appendix A Setting Check Sheet HDW-1800.../D1800 1 (E) Table of Contents Manual Structure Purpose of this manual 2 (E) Related manuals 2 (E) 1. Power Supply 1-2 (E) 1-4-1.
Installation Manual
Page 6
... to install (environment, connection information, initial setting, etc.) and the setting check sheet. Operation Manual (Supplied with the CD-ROM. Part number: 9-968-546-0X 2 (E) HDW-1800/D1800 Related manuals Besides this manual This manual is necessary for this unit. . Manual Structure Purpose of this "installation manual", the following manuals are available for semiconductors used together with this unit.) This...
... to install (environment, connection information, initial setting, etc.) and the setting check sheet. Operation Manual (Supplied with the CD-ROM. Part number: 9-968-546-0X 2 (E) HDW-1800/D1800 Related manuals Besides this manual This manual is necessary for this unit. . Manual Structure Purpose of this "installation manual", the following manuals are available for semiconductors used together with this unit.) This...
Installation Manual
Page 7
... with much electrical noise. . Areas with strong magnetic field. . HDW-1800/D1800 1-1 (E) Power Supply 1-5. Rack Mounting *Connection 1-7. Reference System 1-15. Place the unit in location with much static electricity. . The operation manual is shown on the time data display area, refer to the operation manual. (For more than 30d.) c Fix the unit securely to avoid drop...
... with much electrical noise. . Areas with strong magnetic field. . HDW-1800/D1800 1-1 (E) Power Supply 1-5. Rack Mounting *Connection 1-7. Reference System 1-15. Place the unit in location with much static electricity. . The operation manual is shown on the time data display area, refer to the operation manual. (For more than 30d.) c Fix the unit securely to avoid drop...
Installation Manual
Page 20
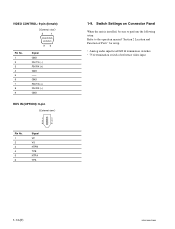
Refer to perform the following setup. GND RM TX (+) RM RX (_) GND HDV IN (OPTION): 6-pin External view 1 2 3 4 5 6 Pin No. 1 2 3 4 5 6 Signal VP VG NTPB TPB NTPA TPA 1-9. Switch Settings on Connector Panel When the unit is installed, be sure to the operation manual "Section 2 Location and Function of reference video input 1-14 (E) HDW-1800/D1800 VIDEO CONTROL: 9-pin (female) External view 5 1 Pin No. 1 2 3 4 5 6 7 8 9 96 Signal GND RM TX (_) RM RX (+) GND -- Analog audio input level/600 Z termination switches . 75 Z termination switch of Parts" for setup. .
Refer to perform the following setup. GND RM TX (+) RM RX (_) GND HDV IN (OPTION): 6-pin External view 1 2 3 4 5 6 Pin No. 1 2 3 4 5 6 Signal VP VG NTPB TPB NTPA TPA 1-9. Switch Settings on Connector Panel When the unit is installed, be sure to the operation manual "Section 2 Location and Function of reference video input 1-14 (E) HDW-1800/D1800 VIDEO CONTROL: 9-pin (female) External view 5 1 Pin No. 1 2 3 4 5 6 7 8 9 96 Signal GND RM TX (_) RM RX (+) GND -- Analog audio input level/600 Z termination switches . 75 Z termination switch of Parts" for setup. .
Installation Manual
Page 23
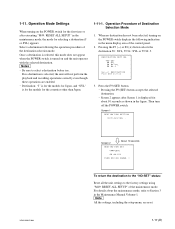
...11-1. Push SET button. 3. Screen 1 DESTINATION SETTING INITIALIZING... HDW-1800/D1800 Screen 2 About 10 seconds DESTINATION SET COMPLETE 59.94:SYL TURN OFF/ON POWER !! For details about 10 seconds as shown in the Maintenance Manual Volume-1. Select a destination following indication in the maintenance mode,...POWER switch for the first time or after Screen 1 is selected, the unit will not perform the playback and recording operations correctly even though these operations are reset. 1-17 (E) DESTINATION SETTING * NO-SET 50:SYL 59.94:SYL 59.94:J Select DESTINATION. To...
...11-1. Push SET button. 3. Screen 1 DESTINATION SETTING INITIALIZING... HDW-1800/D1800 Screen 2 About 10 seconds DESTINATION SET COMPLETE 59.94:SYL TURN OFF/ON POWER !! For details about 10 seconds as shown in the Maintenance Manual Volume-1. Select a destination following indication in the maintenance mode,...POWER switch for the first time or after Screen 1 is selected, the unit will not perform the playback and recording operations correctly even though these operations are reset. 1-17 (E) DESTINATION SETTING * NO-SET 50:SYL 59.94:SYL 59.94:J Select DESTINATION. To...
Installation Manual
Page 31
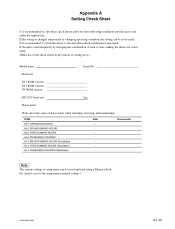
... the value of setting error.) Model name: Serial No . If the unit is used frequently by changing operating condition, the setting can be reset easily. ITEM H01: OPERATION HOURS H02: DRUM RUNNING HOURS H03: TAPE RUNNING HOURS H04: THREADING COUNTER H12: DRUM RUNNING HOURS (Resettable...(Make use of the check sheets in prevention of hours meter when checking, servicing, and maintaining. HDW-1800/D1800 A-1 (E) Appendix A Setting Check Sheet It is recommended to the maintenance manual volume 1. It is recommended to attach the sheets to the unit when check, maintenance and repair....
... the value of setting error.) Model name: Serial No . If the unit is used frequently by changing operating condition, the setting can be reset easily. ITEM H01: OPERATION HOURS H02: DRUM RUNNING HOURS H03: TAPE RUNNING HOURS H04: THREADING COUNTER H12: DRUM RUNNING HOURS (Resettable...(Make use of the check sheets in prevention of hours meter when checking, servicing, and maintaining. HDW-1800/D1800 A-1 (E) Appendix A Setting Check Sheet It is recommended to the maintenance manual volume 1. It is recommended to attach the sheets to the unit when check, maintenance and repair....


