Operating Guide
Page 6
... of the camcorder. Note on the LCD screen (p. 33). The scenes may appear different from the actual images of the viewfinder (HDRSR7/SR8) and the LCD screen. • Unless otherwise specially indicated, illustrations in this case, an indicator appears in each local language are captured using a computer. Do not apply shock or vibration to "Handycam Handbook" (PDF...
... of the camcorder. Note on the LCD screen (p. 33). The scenes may appear different from the actual images of the viewfinder (HDRSR7/SR8) and the LCD screen. • Unless otherwise specially indicated, illustrations in this case, an indicator appears in each local language are captured using a computer. Do not apply shock or vibration to "Handycam Handbook" (PDF...
Operating Guide
Page 11
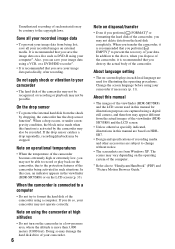
... and time do not appear during recording, but they are automatically recorded on the hard disk, and can change the on the LCD screen. Getting Started 1 While pressing the green button, slide the POWER switch repeatedly in a specified language. Changing the language setting You can be...camcorder for the first time, the [CLOCK SET] screen appears on (Still) lamp, the screen aspect ratio is changed to show messages in the direction of the arrow until the respective lamp lights up. (Movie): To record movies (Still): To record still images • When you turn on the LCD screen...
... and time do not appear during recording, but they are automatically recorded on the hard disk, and can change the on the LCD screen. Getting Started 1 While pressing the green button, slide the POWER switch repeatedly in a specified language. Changing the language setting You can be...camcorder for the first time, the [CLOCK SET] screen appears on (Still) lamp, the screen aspect ratio is changed to show messages in the direction of the arrow until the respective lamp lights up. (Movie): To record movies (Still): To record still images • When you turn on the LCD screen...
Operating Guide
Page 12
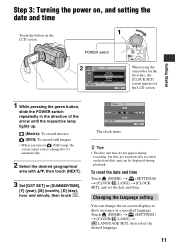
Viewfinder Viewfinder lens adjustment lever Move it to the best angle to record or play (2). 290 degrees (max.) 190 degrees to avoid wearing down the battery, or when the image seen on the LCD screen is clear. 12 Step 4: Preparing for recording Adjusting the LCD panel Open the LCD panel 90 degrees to the camcorder (1), then rotate it until the image is poor. DISP/BATT INFO 2180 degrees (max.) Adjusting the Viewfinder (HDRSR7/SR8) You can view images using the viewfinder to the camcorder Fastening the grip belt Fasten the grip belt and hold your camcorder correctly.
Viewfinder Viewfinder lens adjustment lever Move it to the best angle to record or play (2). 290 degrees (max.) 190 degrees to avoid wearing down the battery, or when the image seen on the LCD screen is clear. 12 Step 4: Preparing for recording Adjusting the LCD panel Open the LCD panel 90 degrees to the camcorder (1), then rotate it until the image is poor. DISP/BATT INFO 2180 degrees (max.) Adjusting the Viewfinder (HDRSR7/SR8) You can view images using the viewfinder to the camcorder Fastening the grip belt Fasten the grip belt and hold your camcorder correctly.
Operating Guide
Page 14
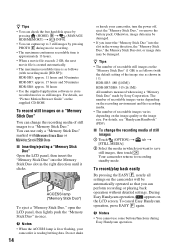
...camcorder is lit or flashing, your camcorder, turn the power off, eject the "Memory Stick Duo," or remove the battery pack. HDR-SR5: approx. 11 hours and 50 minutes HDR-SR7: approx. 17 hours and 50 minutes HDR-SR8... on the LCD screen. During Easy Handycam operation, appears on the supplied CD-ROM. For details, see "Handycam Handbook" (...PDF). b Notes • When the ACCESS lamp is reading/writing data. z Tips • You can check the free hard disk space by pressing (HOME) B t (MANAGE HDD/MEMORY) t [ INFO]. • You can capture up to 3 still images by Sony...
...camcorder is lit or flashing, your camcorder, turn the power off, eject the "Memory Stick Duo," or remove the battery pack. HDR-SR5: approx. 11 hours and 50 minutes HDR-SR7: approx. 17 hours and 50 minutes HDR-SR8... on the LCD screen. During Easy Handycam operation, appears on the supplied CD-ROM. For details, see "Handycam Handbook" (...PDF). b Notes • When the ACCESS lamp is reading/writing data. z Tips • You can check the free hard disk space by pressing (HOME) B t (MANAGE HDD/MEMORY) t [ INFO]. • You can capture up to 3 still images by Sony...
Operating Guide
Page 15
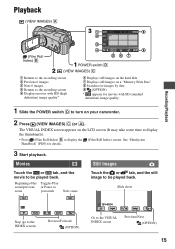
... back. Slide show Stop (go to the INDEX screen) Reverse/Forward (OPTION) Go to display the (Film Roll Index) screen. Movies Still Images Touch the or tab, and the movie to be played back. See "Handycam Handbook" (PDF) for movies with HD (high ...C 1 Returns to the recording screen 2 Previous 6 images 3 Next 6 images 4 Returns to the recording screen 5 Displays movies with SD (standard definition) image quality. 1 Slide the POWER switch D to turn on your camcorder. 2 Press (VIEW IMAGES) C (or A). The VISUAL INDEX screen appears on the LCD screen (It may take some time...
... back. Slide show Stop (go to the INDEX screen) Reverse/Forward (OPTION) Go to display the (Film Roll Index) screen. Movies Still Images Touch the or tab, and the movie to be played back. See "Handycam Handbook" (PDF) for movies with HD (high ...C 1 Returns to the recording screen 2 Previous 6 images 3 Next 6 images 4 Returns to the recording screen 5 Displays movies with SD (standard definition) image quality. 1 Slide the POWER switch D to turn on your camcorder. 2 Press (VIEW IMAGES) C (or A). The VISUAL INDEX screen appears on the LCD screen (It may take some time...
Operating Guide
Page 16
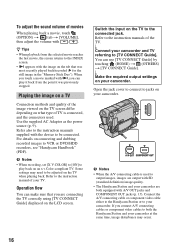
... Notes • When recording, set [X.V.COLOR] to [ON] to be connected. Some settings may occur. 16 You can play back on the LCD screen. b Notes • When the A/V connecting cable is connected, and the connectors used to the instruction manual of the TV. When you can ... see "Handycam Handbook" (PDF). Refer to [TV CONNECT Guide]. r Connect your camcorder and TV referring to the instruction manuals of your camcorder at the same time, image disturbance may need to play it back from the selected movie reaches the last movie, the screen returns to the INDEX screen. •...
... Notes • When recording, set [X.V.COLOR] to [ON] to be connected. Some settings may occur. 16 You can play back on the LCD screen. b Notes • When the A/V connecting cable is connected, and the connectors used to the instruction manual of the TV. When you can ... see "Handycam Handbook" (PDF). Refer to [TV CONNECT Guide]. r Connect your camcorder and TV referring to the instruction manuals of your camcorder at the same time, image disturbance may need to play it back from the selected movie reaches the last movie, the screen returns to the INDEX screen. •...
Operating Guide
Page 18
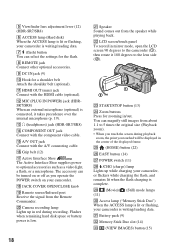
... 18 wa Speaker Sound comes out from the Remote Commander. 5 Viewfinder lens adjustment lever (12) (HDR-SR7/SR8) 6 ACCESS lamp (Hard disk) When the ACCESS lamp is lit or flashing, your camcorder is writing/reading data. 7 (flash) button You can be displayed in the center of the displayed... degrees to the camcorder (1), then rotate it takes precedence over the internal microphone (p. 19). ea Battery pack (9) es Memory Stick Duo slot (14) ed (VIEW IMAGES) button (15) qs MIC (PLUG IN POWER) jack (HDRSR7/SR8) When an external microphone (optional) is complete. ws LCD screen/touch panel To ...
... 18 wa Speaker Sound comes out from the Remote Commander. 5 Viewfinder lens adjustment lever (12) (HDR-SR7/SR8) 6 ACCESS lamp (Hard disk) When the ACCESS lamp is lit or flashing, your camcorder is writing/reading data. 7 (flash) button You can be displayed in the center of the displayed... degrees to the camcorder (1), then rotate it takes precedence over the internal microphone (p. 19). ea Battery pack (9) es Memory Stick Duo slot (14) ed (VIEW IMAGES) button (15) qs MIC (PLUG IN POWER) jack (HDRSR7/SR8) When an external microphone (optional) is complete. ws LCD screen/touch panel To ...

Operating Guide
Page 29
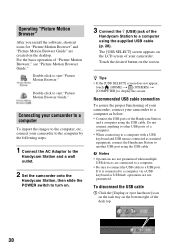
... a computer 2 Set the camcorder onto the Handycam Station, then slide the POWER switch to turn on. 3 Connect the (USB) jack of the Handycam Station to the (USB) jack of the computer using the supplied USB cable. 4 Touch [ COMPUTER] on the LCD screen of your computer appears, you... to restart your camcorder. 9 Click [Next] on the connection confirmation screen of the computer. 10Follow the on-screen instructions to install the...
... a computer 2 Set the camcorder onto the Handycam Station, then slide the POWER switch to turn on. 3 Connect the (USB) jack of the Handycam Station to the (USB) jack of the computer using the supplied USB cable. 4 Touch [ COMPUTER] on the LCD screen of your computer appears, you... to restart your camcorder. 9 Click [Next] on the connection confirmation screen of the computer. 10Follow the on-screen instructions to install the...
Operating Guide
Page 30
...[Unplug or eject hardware] icon on the task tray on the screen. Connecting your camcorder to a computer To import the images to the computer, etc., connect your camcorder to a computer as standard equipment, connect the Handycam Station to a USB port. Touch the desired button on the ... Connect the USB ports of the Handycam Station and a computer using the USB cable. Operating "Picture Motion Browser" After you install the software, shortcut icons for "Picture Motion Browser" and "Picture Motion Browser Guide" are created on the LCD screen of your camcorder. b Notes • Operations are...
...[Unplug or eject hardware] icon on the task tray on the screen. Connecting your camcorder to a computer To import the images to the computer, etc., connect your camcorder to a computer as standard equipment, connect the Handycam Station to a USB port. Touch the desired button on the ... Connect the USB ports of the Handycam Station and a computer using the USB cable. Operating "Picture Motion Browser" After you install the software, shortcut icons for "Picture Motion Browser" and "Picture Motion Browser Guide" are created on the LCD screen of your camcorder. b Notes • Operations are...

Operating Guide
Page 33
... AC Adaptor to install it. • Install it for a while in the viewfinder (HDR-SR7/SR8) or on the LCD screen, check the following. Self-diagnosis display/Warning indicators If indicators appear in a cool/warm place...Handycam Station, and restart the computer, then connect the computer and your camcorder is full. "Picture Motion Browser" does not work correctly. • Quit "Picture Motion Browser" and restart your Sony dealer or local authorized Sony service facility. Reconnect it and operate your Sony dealer or local authorized Sony service facility. Turn off your camcorder...
... AC Adaptor to install it. • Install it for a while in the viewfinder (HDR-SR7/SR8) or on the LCD screen, check the following. Self-diagnosis display/Warning indicators If indicators appear in a cool/warm place...Handycam Station, and restart the computer, then connect the computer and your camcorder is full. "Picture Motion Browser" does not work correctly. • Quit "Picture Motion Browser" and restart your Sony dealer or local authorized Sony service facility. Reconnect it and operate your Sony dealer or local authorized Sony service facility. Turn off your camcorder...

Operating Guide
Page 35
...camcorder may malfunction. Near windows or outdoors, where the LCD screen, the viewfinder (HDR-SR7/SR8), or the lens may have it checked by placing anything heavy on the LCD screen. This damages the inside the casing, unplug your camcorder, the back of the viewfinder (HDR-SR7/SR8) or the LCD screen...might cause heat to clean it . x To clean the LCD screen If fingerprints or dust make the LCD screen dirty, it is not a malfunction. • While using your camcorder. • Do not wrap your local authorized Sony service facility. - This is accidentally swallowed, consult a ...
...camcorder may malfunction. Near windows or outdoors, where the LCD screen, the viewfinder (HDR-SR7/SR8), or the lens may have it checked by placing anything heavy on the LCD screen. This damages the inside the casing, unplug your camcorder, the back of the viewfinder (HDR-SR7/SR8) or the LCD screen...might cause heat to clean it . x To clean the LCD screen If fingerprints or dust make the LCD screen dirty, it is not a malfunction. • While using your camcorder. • Do not wrap your local authorized Sony service facility. - This is accidentally swallowed, consult a ...
Operating Guide
Page 38
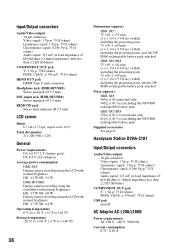
...Ω (ohms) HDMI OUT jack HDMI Type C mini connector Headphone jack (HDR-SR7/SR8) Stereo minijack (Ø 3.5 mm) MIC input jack (HDR-SR7/SR8) Stereo minijack (Ø 3.5 mm) REMOTE jack Stereo mini-minijack (Ø 2.5 mm) LCD screen Image 6.7 cm (2.7 type, aspect ratio 16:9) Total dot number 211 200 (...g (1 lb 3 oz) including the NP-FH60 rechargeable battery pack HDR-SR7/SR8: 530 g (1 lb 2 oz) main unit only 610 g (1 lb 5 oz) including the NP-FH60 rechargeable battery pack Supplied accessories See page 8. Handycam Station DCRA-C181 Input/Output connectors Audio/Video output 10-pin connector ...
...Ω (ohms) HDMI OUT jack HDMI Type C mini connector Headphone jack (HDR-SR7/SR8) Stereo minijack (Ø 3.5 mm) MIC input jack (HDR-SR7/SR8) Stereo minijack (Ø 3.5 mm) REMOTE jack Stereo mini-minijack (Ø 2.5 mm) LCD screen Image 6.7 cm (2.7 type, aspect ratio 16:9) Total dot number 211 200 (...g (1 lb 3 oz) including the NP-FH60 rechargeable battery pack HDR-SR7/SR8: 530 g (1 lb 2 oz) main unit only 610 g (1 lb 5 oz) including the NP-FH60 rechargeable battery pack Supplied accessories See page 8. Handycam Station DCRA-C181 Input/Output connectors Audio/Video output 10-pin connector ...


