Operating Guide
Page 5
... to comply with Part 15 of the FCC Rules. to apply mechanical shock or vibration to the camcorder. • When connecting your authority to comply with the Handycam Station Model DCRAC181 and AC Adaptor Model AC-L200/L200B. CAUTION You are to be used with ...camcorder. Operation is encouraged to try to a malfunction of the (Movie)/ (Still) mode lamps (p. 11) or the access lamp* is not dustproofed, dripproofed or waterproofed. special handling may be determined by one or more of FCC Rules. For the State of Conformity Trade Name: SONY Model No.: HDR-SR8 Responsible Party: Sony...
... to comply with Part 15 of the FCC Rules. to apply mechanical shock or vibration to the camcorder. • When connecting your authority to comply with the Handycam Station Model DCRAC181 and AC Adaptor Model AC-L200/L200B. CAUTION You are to be used with ...camcorder. Operation is encouraged to try to a malfunction of the (Movie)/ (Still) mode lamps (p. 11) or the access lamp* is not dustproofed, dripproofed or waterproofed. special handling may be determined by one or more of FCC Rules. For the State of Conformity Trade Name: SONY Model No.: HDR-SR8 Responsible Party: Sony...
Operating Guide
Page 9
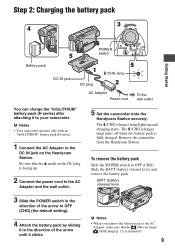
... it in the direction of the arrow until it to the DC IN jack on the DC plug is fully charged. Be sure that the (Movie) lamp/ (Still) lamp (p. 11) is turned off when the battery pack is facing up and charging starts. BATT (battery release) lever 3 Slide the ...arrow to OFF (CHG). The /CHG (charge) lamp lights up . 2 Connect the power cord to the AC Adaptor and the wall outlet. 5 Set the camcorder onto the Handycam Station securely. Slide the BATT (battery release) lever and remove the battery pack. Step 2: Charging the battery pack 3 4 Getting Started Battery pack 5 DC ...
... it in the direction of the arrow until it to the DC IN jack on the DC plug is fully charged. Be sure that the (Movie) lamp/ (Still) lamp (p. 11) is turned off when the battery pack is facing up and charging starts. BATT (battery release) lever 3 Slide the ...arrow to OFF (CHG). The /CHG (charge) lamp lights up . 2 Connect the power cord to the AC Adaptor and the wall outlet. 5 Set the camcorder onto the Handycam Station securely. Slide the BATT (battery release) lever and remove the battery pack. Step 2: Charging the battery pack 3 4 Getting Started Battery pack 5 DC ...
Operating Guide
Page 10
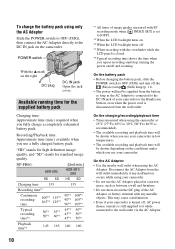
... the Handycam Station, even when the power cord is connected to OFF (CHG) and turn off and zooming. Disconnect the AC Adaptor from the wall outlet. Recording/Playback time: Approximate time (min.) available when you repeat recording start/stop, turning the power on/off the (Movie) lamp/ (Still) lamp ... use your camcorder in a narrow space, such as the AC Adaptor is disconnected from the wall outlet immediately if any metallic objects. On the charging/recording/playback time • Times measured when using the AC Adaptor. NP-FH60: HDR-SR5 HD SD (Unit:min.) HDR-SR7/ SR8 HD SD ...
... the Handycam Station, even when the power cord is connected to OFF (CHG) and turn off and zooming. Disconnect the AC Adaptor from the wall outlet. Recording/Playback time: Approximate time (min.) available when you repeat recording start/stop, turning the power on/off the (Movie) lamp/ (Still) lamp ... use your camcorder in a narrow space, such as the AC Adaptor is disconnected from the wall outlet immediately if any metallic objects. On the charging/recording/playback time • Times measured when using the AC Adaptor. NP-FH60: HDR-SR5 HD SD (Unit:min.) HDR-SR7/ SR8 HD SD ...
Operating Guide
Page 11
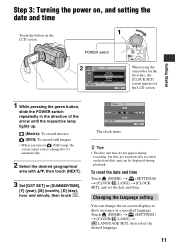
...Getting Started 1 While pressing the green button, slide the POWER switch repeatedly in the direction of the arrow until the respective lamp lights up. (Movie): To record movies (Still): To record still images • When you turn on -screen displays to 4:3 automatically. 2 Select the desired geographical area with v/V, ...can change the on (Still) lamp, the screen aspect ratio is changed to show messages in a specified language. POWER switch When using the camcorder for the first time, the [CLOCK SET] screen appears on the LCD screen. Step 3: Turning the power on, and setting the date ...
...Getting Started 1 While pressing the green button, slide the POWER switch repeatedly in the direction of the arrow until the respective lamp lights up. (Movie): To record movies (Still): To record still images • When you turn on -screen displays to 4:3 automatically. 2 Select the desired geographical area with v/V, ...can change the on (Still) lamp, the screen aspect ratio is changed to show messages in a specified language. POWER switch When using the camcorder for the first time, the [CLOCK SET] screen appears on the LCD screen. Step 3: Turning the power on, and setting the date ...
Operating Guide
Page 13
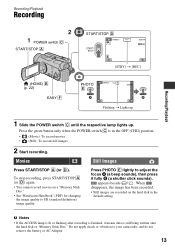
... to adjust the focus A (a beep sounds), then press it means data is in the default setting. Press PHOTO E lightly to your camcorder, and do not remove the battery or AC Adaptor. 13 appears beside / . To stop recording, press START/STOP A (or D) again. ...the image has been recorded. • Still images are recorded on a "Memory Stick Duo." • See "Handycam Handbook" (PDF) for changing the image quality to SD (standard definition) image quality. Movies Still Images Press START/STOP A (or D). Recording/Playback Recording POWER switch C START/STOP A START/STOP D...
... to adjust the focus A (a beep sounds), then press it means data is in the default setting. Press PHOTO E lightly to your camcorder, and do not remove the battery or AC Adaptor. 13 appears beside / . To stop recording, press START/STOP A (or D) again. ...the image has been recorded. • Still images are recorded on a "Memory Stick Duo." • See "Handycam Handbook" (PDF) for changing the image quality to SD (standard definition) image quality. Movies Still Images Press START/STOP A (or D). Recording/Playback Recording POWER switch C START/STOP A START/STOP D...
Operating Guide
Page 14
... touch . To cancel Easy Handycam operation, press EASY F again. To record still images on the camcorder will be automatically operated so ...Handycam operation. During Easy Handycam operation, appears on the image quality or the image size. HDR-SR5: approx. 11 hours and 50 minutes HDR-SR7: approx. 17 hours and 50 minutes HDR-SR8: approx. 30 hours • Use the supplied application software to store recorded movies... marked with or . HDR-SR5: 480 ([4.0M]) HDR-SR7/SR8: 315 ([6.1M]) All numbers measured when using a "Memory Stick Duo" made by Sony Corporation. ACCESS lamp ("...
... touch . To cancel Easy Handycam operation, press EASY F again. To record still images on the camcorder will be automatically operated so ...Handycam operation. During Easy Handycam operation, appears on the image quality or the image size. HDR-SR5: approx. 11 hours and 50 minutes HDR-SR7: approx. 17 hours and 50 minutes HDR-SR8: approx. 30 hours • Use the supplied application software to store recorded movies... marked with or . HDR-SR5: 480 ([4.0M]) HDR-SR7/SR8: 315 ([6.1M]) All numbers measured when using a "Memory Stick Duo" made by Sony Corporation. ACCESS lamp ("...
Operating Guide
Page 15
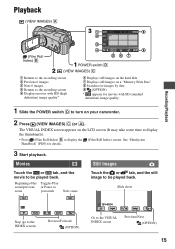
...touch Next scene Touch the or tab, and the still image to be played back. Movies Still Images Touch the or tab, and the movie to be played back. The VISUAL INDEX screen appears on your camcorder. 2 Press (VIEW IMAGES) C (or A). Slide show Stop (go to the ...INDEX screen) Reverse/Forward (OPTION) Go to display the (Film Roll Index) screen. See "Handycam Handbook" (PDF) for movies with SD (standard definition) image quality. 1 Slide the...
...touch Next scene Touch the or tab, and the still image to be played back. Movies Still Images Touch the or tab, and the movie to be played back. The VISUAL INDEX screen appears on your camcorder. 2 Press (VIEW IMAGES) C (or A). Slide show Stop (go to the ...INDEX screen) Reverse/Forward (OPTION) Go to display the (Film Roll Index) screen. See "Handycam Handbook" (PDF) for movies with SD (standard definition) image quality. 1 Slide the...
Operating Guide
Page 16
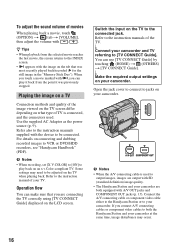
When you touch a movie marked with SD (standard definition) image quality. • The Handycam Station and your camcorder are connecting the TV correctly using [TV CONNECT Guide] displayed on your camcorder. Operation flow You can use [TV CONNECT Guide] by touching (HOME) t (OTHERS) t [TV CONNECT Guide]. r Make..."). Switch the input on an x.v.Color-compliant TV. Connect the A/V connecting cable or component video cable either to the Handycam Station or to your camcorder at the same time, image disturbance may need to be connected. To adjust the sound volume of the TV. r ...
When you touch a movie marked with SD (standard definition) image quality. • The Handycam Station and your camcorder are connecting the TV correctly using [TV CONNECT Guide] displayed on your camcorder. Operation flow You can use [TV CONNECT Guide] by touching (HOME) t (OTHERS) t [TV CONNECT Guide]. r Make..."). Switch the input on an x.v.Color-compliant TV. Connect the A/V connecting cable or component video cable either to the Handycam Station or to your camcorder at the same time, image disturbance may need to be connected. To adjust the sound volume of the TV. r ...
Operating Guide
Page 18
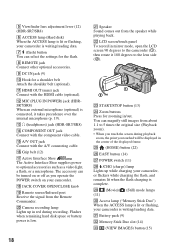
...IMAGES) button (15) Camera recording lamp Lights up while charging your camcorder is writing/reading data. 5 Viewfinder lens adjustment lever (12) (HDR-SR7/SR8) 6 ACCESS lamp (Hard disk) When the ACCESS lamp is lit or flashing, your camcorder is writing/reading data. 7 (flash) button You can select ... out from the Remote Commander. The accessory can be turned on your camcorder. qa HDMI OUT (mini) jack Connect with the A/V connecting cable. wl (Movie)/ (Still) mode lamps (11) e; qd i (headphones) jack (HDR-SR7/SR8) qf COMPONENT OUT jack Connect with the component video cable. qh Grip...
...IMAGES) button (15) Camera recording lamp Lights up while charging your camcorder is writing/reading data. 5 Viewfinder lens adjustment lever (12) (HDR-SR7/SR8) 6 ACCESS lamp (Hard disk) When the ACCESS lamp is lit or flashing, your camcorder is writing/reading data. 7 (flash) button You can select ... out from the Remote Commander. The accessory can be turned on your camcorder. qa HDMI OUT (mini) jack Connect with the A/V connecting cable. wl (Movie)/ (Still) mode lamps (11) e; qd i (headphones) jack (HDR-SR7/SR8) qf COMPONENT OUT jack Connect with the component video cable. qh Grip...
Operating Guide
Page 20
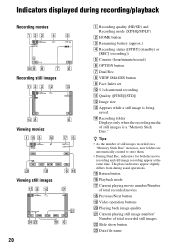
... total recorded still images V Slide show button W Data file name The place indicators appear slightly differs from during recording/playback Recording movies Recording still images Viewing movies Viewing still images 20 A Recording quality (HD/SD) and Recording mode (XP/HQ/SP/LP) B HOME button C Remaining battery... "Memory Stick Duo" increases, new folders are automatically created to store them. • During Dual Rec, indicators for both the movie recording and still image recording appear at the same time. N Recording folder Displays only when the recording media of still images is ...
... total recorded still images V Slide show button W Data file name The place indicators appear slightly differs from during recording/playback Recording movies Recording still images Viewing movies Viewing still images 20 A Recording quality (HD/SD) and Recording mode (XP/HQ/SP/LP) B HOME button C Remaining battery... "Memory Stick Duo" increases, new folders are automatically created to store them. • During Dual Rec, indicators for both the movie recording and still image recording appear at the same time. N Recording folder Displays only when the recording media of still images is ...
Operating Guide
Page 23
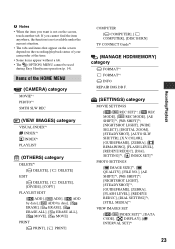
..., the function is not on the recording/playback status of the HOME MENU (CAMERA) category MOVIE*1 PHOTO*1 SMTH SLW REC (VIEW IMAGES) category VISUAL INDEX*1 INDEX*1 INDEX*1 PLAYLIST (OTHERS... COMPUTER], [DISC BURN] TV CONNECT Guide*1 (MANAGE HDD/MEMORY) category FORMAT*1 FORMAT*1 INFO REPAIR IMG.DB F. (SETTINGS) category MOVIE SETTINGS [ / REC SET]*1, [ REC MODE], [ REC MODE], [AE SHIFT]*3, [WB SHIFT]*3, [NIGHTSHOT LIGHT], [WIDE SELECT], ...INTERVAL SET]*1 23 Recording/Playback Items of your camcorder at the time. • Some items appear without a tab. • The (OPTION) MENU cannot ...
..., the function is not on the recording/playback status of the HOME MENU (CAMERA) category MOVIE*1 PHOTO*1 SMTH SLW REC (VIEW IMAGES) category VISUAL INDEX*1 INDEX*1 INDEX*1 PLAYLIST (OTHERS... COMPUTER], [DISC BURN] TV CONNECT Guide*1 (MANAGE HDD/MEMORY) category FORMAT*1 FORMAT*1 INFO REPAIR IMG.DB F. (SETTINGS) category MOVIE SETTINGS [ / REC SET]*1, [ REC MODE], [ REC MODE], [AE SHIFT]*3, [WB SHIFT]*3, [NIGHTSHOT LIGHT], [WIDE SELECT], ...INTERVAL SET]*1 23 Recording/Playback Items of your camcorder at the time. • Some items appear without a tab. • The (OPTION) MENU cannot ...
Operating Guide
Page 25
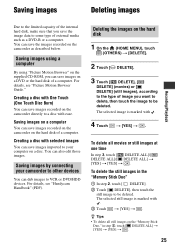
... t [YES] t . For details, see "Handycam Handbook" (PDF). For details, see "Picture Motion Browser Guide." z Tips • To delete all movies or still images at one time In step 3, touch [ DELETE ALL]/[ DELETE ALL]/[ DELETE ALL] t [YES] t [YES] t . Saving images on a computer You can save images recorded on the camcorder on a disc. Saving images...
... t [YES] t . For details, see "Handycam Handbook" (PDF). For details, see "Picture Motion Browser Guide." z Tips • To delete all movies or still images at one time In step 3, touch [ DELETE ALL]/[ DELETE ALL]/[ DELETE ALL] t [YES] t [YES] t . Saving images on a computer You can save images recorded on the camcorder on a disc. Saving images...
Operating Guide
Page 28
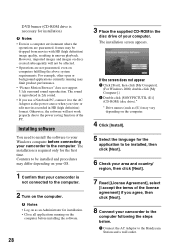
... country/ region, then click [Next]. 7 Read [License Agreement], select [I accept the terms of the license agreement] if you view or edit movies recorded in uneven playback. The sound is reproduced in 2ch sound. • If you use a Notebook PC, connect it to the AC Adaptor as...Notes • Log on as the power source when you agree, then click [Next]. 8 Connect your camcorder to the computer following the steps below. 1 Connect the AC Adaptor to the Handycam Station and a wall outlet. The installation screen appears. For example, other open or background applications currently running...
... country/ region, then click [Next]. 7 Read [License Agreement], select [I accept the terms of the license agreement] if you view or edit movies recorded in uneven playback. The sound is reproduced in 2ch sound. • If you use a Notebook PC, connect it to the AC Adaptor as...Notes • Log on as the power source when you agree, then click [Next]. 8 Connect your camcorder to the computer following the steps below. 1 Connect the AC Adaptor to the Handycam Station and a wall outlet. The installation screen appears. For example, other open or background applications currently running...

Operating Guide
Page 29
... the software. • The authentication may take time. Enjoying with a computer 2 Set the camcorder onto the Handycam Station, then slide the POWER switch to turn on. 3 Connect the (USB) jack of the Handycam Station to the (USB) jack of the computer using the supplied USB cable. 4 Touch [... COMPUTER] on the LCD screen of your camcorder. 9 Click [Next] on the connection confirmation screen of the computer. 10Follow the on-screen instructions to handle movies * For Windows 2000 and Windows XP only 11Follow the on the computer environment. Check...
... the software. • The authentication may take time. Enjoying with a computer 2 Set the camcorder onto the Handycam Station, then slide the POWER switch to turn on. 3 Connect the (USB) jack of the Handycam Station to the (USB) jack of the computer using the supplied USB cable. 4 Touch [... COMPUTER] on the LCD screen of your camcorder. 9 Click [Next] on the connection confirmation screen of the computer. 10Follow the on-screen instructions to handle movies * For Windows 2000 and Windows XP only 11Follow the on the computer environment. Check...
Operating Guide
Page 32
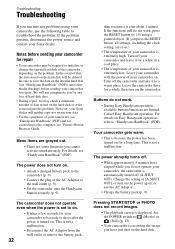
... plug of data stored on . • It takes a few seconds for repair • Your camcorder may check a minimum amount of the AC Adaptor to (Movie) or (Still) (p. 13). • Your camcorder is not a malfunction. • Disconnect the AC Adaptor from the wall outlet or remove the battery... it to troubleshoot the problem. The power does not turn on for connecting to the computer, see "Handycam Handbook" (PDF)) onto other media (backup) before sending your camcorder for your Sony dealer. Pressing START/STOP or PHOTO does not record images. • The playback screen is not a...
... plug of data stored on . • It takes a few seconds for repair • Your camcorder may check a minimum amount of the AC Adaptor to (Movie) or (Still) (p. 13). • Your camcorder is not a malfunction. • Disconnect the AC Adaptor from the wall outlet or remove the battery... it to troubleshoot the problem. The power does not turn on for connecting to the computer, see "Handycam Handbook" (PDF)) onto other media (backup) before sending your camcorder for your Sony dealer. Pressing START/STOP or PHOTO does not record images. • The playback screen is not a...

Operating Guide
Page 33
...). • Total number of movie scenes or still images exceeds the recordable capacity of the camcorder is extremely high/low. You cannot install "Picture Motion Browser." • Check the computer environment required to the DC IN jack of the Handycam Station or your camcorder again in the proper order (p....(p. 9). • Connect the DC plug of the AC Adaptor to install it. • Install it and operate your camcorder and leave it for a while in the viewfinder (HDR-SR7/SR8) or on the LCD screen, check the following. Reconnect it in the proper order. • Make sure the [Media...
...). • Total number of movie scenes or still images exceeds the recordable capacity of the camcorder is extremely high/low. You cannot install "Picture Motion Browser." • Check the computer environment required to the DC IN jack of the Handycam Station or your camcorder again in the proper order (p....(p. 9). • Connect the DC plug of the AC Adaptor to install it. • Install it and operate your camcorder and leave it for a while in the viewfinder (HDR-SR7/SR8) or on the LCD screen, check the following. Reconnect it in the proper order. • Make sure the [Media...
Operating Guide
Page 37
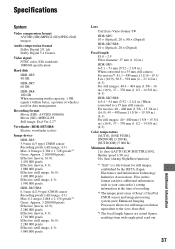
... Hard disk HDR-SR5: 40 GB HDR-SR7: 60 GB HDR-SR8: 100 GB When measuring media capacity, 1 GB equals 1 billion bytes, a portion of Sony's ClearVid CMOS sensor and image processing system (new Enhanced Imaging Processor) allows for still image resolution equivalent to a 35 mm still camera For movies: 40 ~... 400 mm (1 5/8 ~ 15 3/4 in.) (16:9), 49 ~ 490 mm (1 15/16 ~ 19 3/8 in.) (4:3) For still images: 40 ~ 400 mm (1 5/8 ~ 15 3/4 in.) (16:9), 37 ~ 370 mm (1 1/2 ~ 14 5/8 in this format can have additional information such as your camcorder's setting information at...
... Hard disk HDR-SR5: 40 GB HDR-SR7: 60 GB HDR-SR8: 100 GB When measuring media capacity, 1 GB equals 1 billion bytes, a portion of Sony's ClearVid CMOS sensor and image processing system (new Enhanced Imaging Processor) allows for still image resolution equivalent to a 35 mm still camera For movies: 40 ~... 400 mm (1 5/8 ~ 15 3/4 in.) (16:9), 49 ~ 490 mm (1 15/16 ~ 19 3/8 in.) (4:3) For still images: 40 ~ 400 mm (1 5/8 ~ 15 3/4 in.) (16:9), 37 ~ 370 mm (1 1/2 ~ 14 5/8 in this format can have additional information such as your camcorder's setting information at...


