Operating Guide
Page 2
IMPORTANT SAFEGUARDS For your dealer or local power company. Use Power Sources This set . If the plug should be operated only from battery power, or other ). This is intended to alert the user to the presence of any kind into the power outlet only one described in a fire ...
IMPORTANT SAFEGUARDS For your dealer or local power company. Use Power Sources This set . If the plug should be operated only from battery power, or other ). This is intended to alert the user to the presence of any kind into the power outlet only one described in a fire ...
Operating Guide
Page 4
... bottom. You can cause hearing loss. Record the serial number in this manual could void your Sony dealer regarding recycling of Conformity Trade Name: SONY Model No.: HDR-HC9 Responsible Party: Sony Electronics Inc. The number below . Operation is to be used rechargeable batteries to the following two conditions: (1) This device may result. CAUTION Replace the...
... bottom. You can cause hearing loss. Record the serial number in this manual could void your Sony dealer regarding recycling of Conformity Trade Name: SONY Model No.: HDR-HC9 Responsible Party: Sony Electronics Inc. The number below . Operation is to be used rechargeable batteries to the following two conditions: (1) This device may result. CAUTION Replace the...
Operating Guide
Page 5
...that interference will not occur in a particular installation. These limits are designed to provide reasonable protection against harmful interference in your camcorder You can be determined by one or more of FCC Rules. Reorient or relocate the receiving antenna. - The supplied interface cable... Stick" you can use in accordance with the instructions, may apply, See www.dtsc.ca.gov/hazardouswaste/perchlorate Perchlorate Material: Lithium battery contains perchlorate. Types of cassette you can use in a residential installation. Connect the equipment into an outlet on use mini DV ...
...that interference will not occur in a particular installation. These limits are designed to provide reasonable protection against harmful interference in your camcorder You can be determined by one or more of FCC Rules. Reorient or relocate the receiving antenna. - The supplied interface cable... Stick" you can use in accordance with the instructions, may apply, See www.dtsc.ca.gov/hazardouswaste/perchlorate Perchlorate Material: Lithium battery contains perchlorate. Types of cassette you can use in a residential installation. Connect the equipment into an outlet on use mini DV ...
Operating Guide
Page 8
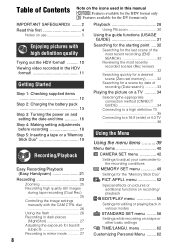
... in the HDV format 11 Getting Started Step 1: Checking supplied items 12 Step 2: Charging the battery pack 13 Step 3: Turning the power on and setting the date and time 16 Step 4:...5: Inserting a tape or a "Memory Stick Duo 19 Recording/Playback Easy Recording/Playback (Easy Handycam 21 Recording 23 Zooming 25 Recording high quality still images during tape recording (Dual Rec 25 ...Menu Using the menu items ..........39 Menu items 40 CAMERA SET menu 42 Settings to adjust your camcorder to the recording conditions MEMORY SET menu 49 Settings for a scene by date of recording (Date ...
... in the HDV format 11 Getting Started Step 1: Checking supplied items 12 Step 2: Charging the battery pack 13 Step 3: Turning the power on and setting the date and time 16 Step 4:...5: Inserting a tape or a "Memory Stick Duo 19 Recording/Playback Easy Recording/Playback (Easy Handycam 21 Recording 23 Zooming 25 Recording high quality still images during tape recording (Dual Rec 25 ...Menu Using the menu items ..........39 Menu items 40 CAMERA SET menu 42 Settings to adjust your camcorder to the recording conditions MEMORY SET menu 49 Settings for a scene by date of recording (Date ...
Operating Guide
Page 9
... ...... 90 Maintenance and precautions ...... 91 Usable cassette tapes 91 About the "Memory Stick 92 About the "InfoLITHIUM" battery pack 93 About i.LINK 95 About x.v.Color 96 On using your camcorder 96 Specifications 99 Quick Reference Identifying parts and controls ......103 Indicators displayed during recording/ playback 107 Index 111 Spanish Quick Guide/ Gu...
... ...... 90 Maintenance and precautions ...... 91 Usable cassette tapes 91 About the "Memory Stick 92 About the "InfoLITHIUM" battery pack 93 About i.LINK 95 About x.v.Color 96 On using your camcorder 96 Specifications 99 Quick Reference Identifying parts and controls ......103 Indicators displayed during recording/ playback 107 Index 111 Spanish Quick Guide/ Gu...
Operating Guide
Page 12
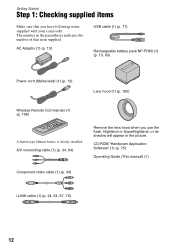
... Commander (1) (p. 106) A button-type lithium battery is already installed. A/V connecting cable (1) (p. 34, 64) Remove the lens hood when you use the flash, Nightshot or SuperNightshot, or its shadow will appear in the parentheses indicates the number of that you have following items supplied with your camcorder. Getting Started Step 1: Checking supplied items...
... Commander (1) (p. 106) A button-type lithium battery is already installed. A/V connecting cable (1) (p. 34, 64) Remove the lens hood when you use the flash, Nightshot or SuperNightshot, or its shadow will appear in the parentheses indicates the number of that you have following items supplied with your camcorder. Getting Started Step 1: Checking supplied items...

Operating Guide
Page 13
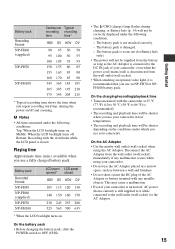
... (CHG) (the default setting). 3 Connect the AC Adaptor to your camcorder. The battery pack will not lose its charge in the illustration. Step 2: Charging the battery pack Getting Started 2 POWER 1 switch DC IN jack 3 Battery pack DC plug 4 To the wall outlet AC Adaptor (wall socket) ... the AC Adaptor and the wall outlet (wall socket). b Notes • You cannot attach any "InfoLITHIUM" battery pack other than the H series to your camcorder. 1 Attach the battery pack to your camcorder. 4 Connect the power cord (mains lead) to a power source such as a wall outlet (wall socket)...
... (CHG) (the default setting). 3 Connect the AC Adaptor to your camcorder. The battery pack will not lose its charge in the illustration. Step 2: Charging the battery pack Getting Started 2 POWER 1 switch DC IN jack 3 Battery pack DC plug 4 To the wall outlet AC Adaptor (wall socket) ... the AC Adaptor and the wall outlet (wall socket). b Notes • You cannot attach any "InfoLITHIUM" battery pack other than the H series to your camcorder. 1 Attach the battery pack to your camcorder. 4 Connect the power cord (mains lead) to a power source such as a wall outlet (wall socket)...

Operating Guide
Page 14
...FH100 390 Recording time Approximate time (min.) available when you fully charge a fully discharged battery pack. DISPLAY/ BATT INFO After a while, the approximate recordable time and battery information appear for up to 20 seconds by pressing DISPLAY/BATT INFO again while the information...is displayed. You can check the remaining battery charge on the LCD screen. Replace the battery with a fully charged one, or charge the battery. To check the remaining battery (Battery Info) Set the POWER switch to OFF (CHG). Battery pack Recording Format NP-FH50 Continuous Typical recording...
...FH100 390 Recording time Approximate time (min.) available when you fully charge a fully discharged battery pack. DISPLAY/ BATT INFO After a while, the approximate recordable time and battery information appear for up to 20 seconds by pressing DISPLAY/BATT INFO again while the information...is displayed. You can check the remaining battery charge on the LCD screen. Replace the battery with a fully charged one, or charge the battery. To check the remaining battery (Battery Info) Set the POWER switch to OFF (CHG). Battery pack Recording Format NP-FH50 Continuous Typical recording...
Operating Guide
Page 15
...86 °F) is recommended). • The recording and playback time will be supplied from the battery as long as between a wall and furniture. • Do not short-circuit the DC plug of your camcorder. • Do not use the AC Adaptor placed in low temperatures. • The recording... the following conditions: Top: When the LCD backlight turns on. Battery pack Recorded Format NP-FH50 NP-FH60 (supplied) NP-FH70 NP-FH100 LCD panel LCD panel opened* closed . The battery pack is recommended that you use your camcorder is turned off, AC power (house current) is not attached ...
...86 °F) is recommended). • The recording and playback time will be supplied from the battery as long as between a wall and furniture. • Do not short-circuit the DC plug of your camcorder. • Do not use the AC Adaptor placed in low temperatures. • The recording... the following conditions: Top: When the LCD backlight turns on. Battery pack Recorded Format NP-FH50 NP-FH60 (supplied) NP-FH70 NP-FH100 LCD panel LCD panel opened* closed . The battery pack is recommended that you use your camcorder is turned off, AC power (house current) is not attached ...
Operating Guide
Page 16
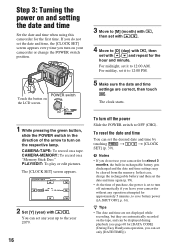
...Touch the button on the LCD screen. 3 Move to [M] (month) with , then set it to turn on your camcorder without any operation attempted for [DATA CODE] (During Easy Handycam operation, you turn on the respective lamp. The [CLOCK SET] screen appears. You can be cleared from the memory. b... (year) with / and repeat for the first time. The clock starts. 1 While pressing the green button, slide the POWER switch in rechargeable battery gets discharged and the date and time settings may be displayed during playback (see page 60 for approximately 5 minutes, to 12:00 AM. PLAY/...
...Touch the button on the LCD screen. 3 Move to [M] (month) with , then set it to turn on your camcorder without any operation attempted for [DATA CODE] (During Easy Handycam operation, you turn on the respective lamp. The [CLOCK SET] screen appears. You can be cleared from the memory. b... (year) with / and repeat for the first time. The clock starts. 1 While pressing the green button, slide the POWER switch in rechargeable battery gets discharged and the date and time settings may be displayed during playback (see page 60 for approximately 5 minutes, to 12:00 AM. PLAY/...

Operating Guide
Page 18
... INFO The viewfinder You can close the LCD panel with the LCD screen facing out. The grip belt Fasten the grip belt and hold your camcorder in bright conditions or where you open or adjust the LCD panel. z Tips • If you rotate the LCD panel 180 degrees to the lens... • Do not press the buttons on or off the LCD backlight to make the battery last longer Press and hold DISPLAY/BATT INFO for a few seconds until appears. This setting is practical when you use your camcorder correctly. 18 Step 4: Making setting adjustments before recording The LCD panel Open the LCD...
... INFO The viewfinder You can close the LCD panel with the LCD screen facing out. The grip belt Fasten the grip belt and hold your camcorder in bright conditions or where you open or adjust the LCD panel. z Tips • If you rotate the LCD panel 180 degrees to the lens... • Do not press the buttons on or off the LCD backlight to make the battery last longer Press and hold DISPLAY/BATT INFO for a few seconds until appears. This setting is practical when you use your camcorder correctly. 18 Step 4: Making setting adjustments before recording The LCD panel Open the LCD...
Operating Guide
Page 20
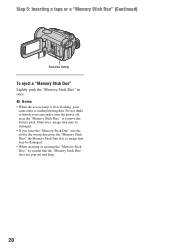
... "Memory Stick Duo" into the slot in once. b Notes • When the access lamp is lit or flashing, your camcorder, turn the power off, eject the "Memory Stick Duo," or remove the battery pack. Step 5: Inserting a tape or a "Memory Stick Duo" (Continued) Access lamp To eject a "Memory Stick Duo" Lightly push the...
... "Memory Stick Duo" into the slot in once. b Notes • When the access lamp is lit or flashing, your camcorder, turn the power off, eject the "Memory Stick Duo," or remove the battery pack. Step 5: Inserting a tape or a "Memory Stick Duo" (Continued) Access lamp To eject a "Memory Stick Duo" Lightly push the...

Operating Guide
Page 44
...), select [AUTO] and aim your camcorder outdoors after touching , set [WHITE BAL.] to [AUTO]. • If you will be set. • When [ONE PUSH] was selected, if keeps flashing after inside the house, or vice versa, you have changed the battery pack while [AUTO] was selected, or... taken your camcorder at a nearby white object for about 10 seconds for the following recording conditions: - B AUTO Select to [AUTO]. 44 z ...
...), select [AUTO] and aim your camcorder outdoors after touching , set [WHITE BAL.] to [AUTO]. • If you will be set. • When [ONE PUSH] was selected, if keeps flashing after inside the house, or vice versa, you have changed the battery pack while [AUTO] was selected, or... taken your camcorder at a nearby white object for about 10 seconds for the following recording conditions: - B AUTO Select to [AUTO]. 44 z ...

Operating Guide
Page 58
... level is output at the default setting. b Notes • When you select [BRIGHT], battery life is automatically selected for the setting. • When you connect your camcorder to the right. MANUAL Touch / to monitor the sound when adjusting it. 58 LCD/VF...afterwards (ST2), then touch . B NORMAL Standard brightness. b Notes • When you select [BRIGHT], battery life is automatically selected for the setting. • When you connect your camcorder to adjust the recording sound level automatically. STANDARD SET menu (Continued) 60min AUDIO MIX 0:00:00:00...
... level is output at the default setting. b Notes • When you select [BRIGHT], battery life is automatically selected for the setting. • When you connect your camcorder to the right. MANUAL Touch / to monitor the sound when adjusting it. 58 LCD/VF...afterwards (ST2), then touch . B NORMAL Standard brightness. b Notes • When you select [BRIGHT], battery life is automatically selected for the setting. • When you connect your camcorder to adjust the recording sound level automatically. STANDARD SET menu (Continued) 60min AUDIO MIX 0:00:00:00...
Operating Guide
Page 61
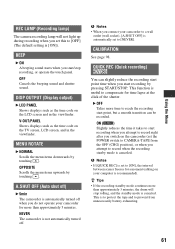
... menu items downwards by touching . b Notes • When you start point time when you connect your camcorder to a wall outlet (wall socket), [A.SHUT OFF] is automatically set the POWER switch to CAMERA-TAPE from unnecessarily battery exhausting. 61 b Notes • If [QUICK REC] is set this to reach the recording start point...
... menu items downwards by touching . b Notes • When you start point time when you connect your camcorder to a wall outlet (wall socket), [A.SHUT OFF] is automatically set the POWER switch to CAMERA-TAPE from unnecessarily battery exhausting. 61 b Notes • If [QUICK REC] is set this to reach the recording start point...
Operating Guide
Page 78
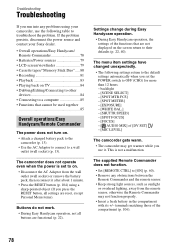
If the problem persists, disconnect the power source and contact your Sony dealer. • Overall operations/Easy Handycam/ Remote Commander 78 • Batteries/Power sources 79 • LCD screen/viewfinder 79 • Cassette tapes/"Memory Stick Duo".....80 • Recording 81 &#...Menu items). Buttons do not work. • During Easy Handycam operation, not all settings are functional (p. 22). The menu item settings have changed unexpectedly. • The following table to on . • Attach a charged battery pack to the camcorder (p. 13). • Use the AC Adaptor to connect to...
If the problem persists, disconnect the power source and contact your Sony dealer. • Overall operations/Easy Handycam/ Remote Commander 78 • Batteries/Power sources 79 • LCD screen/viewfinder 79 • Cassette tapes/"Memory Stick Duo".....80 • Recording 81 &#...Menu items). Buttons do not work. • During Easy Handycam operation, not all settings are functional (p. 22). The menu item settings have changed unexpectedly. • The following table to on . • Attach a charged battery pack to the camcorder (p. 13). • Use the AC Adaptor to connect to...
Operating Guide
Page 79
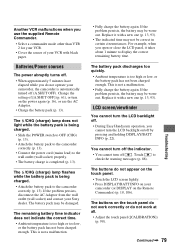
...battery pack (p. 13). This is too high or low, or the battery pack has not been charged enough. Batteries...battery pack to the camcorder correctly (p. 13). • Connect the power cord (mains lead) to the camcorder...battery pack may be wornout. If the problem persists, the battery may be correct in certain circumstances. This is too high or too low, or the battery... pack has not been charged enough. If the problem persists, disconnect the AC Adaptor from the wall outlet (wall socket) and contact your camcorder (or DISPLAY on /off . • During Easy Handycam...battery... battery ...
...battery pack (p. 13). This is too high or low, or the battery pack has not been charged enough. Batteries...battery pack to the camcorder correctly (p. 13). • Connect the power cord (mains lead) to the camcorder...battery pack may be wornout. If the problem persists, the battery may be correct in certain circumstances. This is too high or too low, or the battery... pack has not been charged enough. If the problem persists, disconnect the AC Adaptor from the wall outlet (wall socket) and contact your camcorder (or DISPLAY on /off . • During Easy Handycam...battery... battery ...
Operating Guide
Page 80
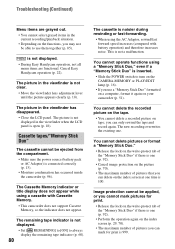
... Memory indicator or title display does not appear while using the AC Adaptor, rewind/fast forward speed increases (compared with Cassette Memory. • This camcorder does not support Cassette Memory, so the indicator does not appear. you cannot mark pictures for print is open (p. 18). The picture in the viewfinder...is not displayed in the viewfinder has disappeared. • Close the LCD panel. is noisier during rewinding or fast-forwarding. • When using a cassette with battery operation) and therefore increases noise. Cancel Easy Handycam operation (p. 22).
... Memory indicator or title display does not appear while using the AC Adaptor, rewind/fast forward speed increases (compared with Cassette Memory. • This camcorder does not support Cassette Memory, so the indicator does not appear. you cannot mark pictures for print is open (p. 18). The picture in the viewfinder...is not displayed in the viewfinder has disappeared. • Close the LCD panel. is noisier during rewinding or fast-forwarding. • When using a cassette with battery operation) and therefore increases noise. Cancel Easy Handycam operation (p. 22).
Operating Guide
Page 87
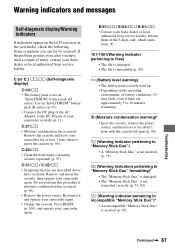
... RESET (p. 104), and operate your Sony dealer or local authorized Sony service facility. E:61:ss / E:62:ss / E:91:ss • Contact your camcorder again. Remove the cassette and leave your camcorder again. Warning indicators and messages Self-diagnosis display/Warning indicators If indicators appear on the operating, environment, or battery conditions, E may flash, even if...
... RESET (p. 104), and operate your Sony dealer or local authorized Sony service facility. E:61:ss / E:62:ss / E:91:ss • Contact your camcorder again. Remove the cassette and leave your camcorder again. Warning indicators and messages Self-diagnosis display/Warning indicators If indicators appear on the operating, environment, or battery conditions, E may flash, even if...
Operating Guide
Page 92
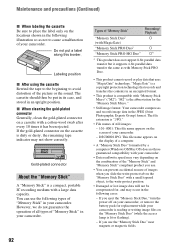
...x When cleaning the gold-plated connector Generally, clean the gold-plated connector on your camcorder, or remove the battery pack for the "Memory Stick Micro." • Still image format: Your camcorder compresses and records image data in an encrypted format. • This product is the ...abbreviation for replacement while your camcorder. • Data read/write speed may not show correctly. "M2"...
...x When cleaning the gold-plated connector Generally, clean the gold-plated connector on your camcorder, or remove the battery pack for the "Memory Stick Micro." • Still image format: Your camcorder compresses and records image data in an encrypted format. • This product is the ...abbreviation for replacement while your camcorder. • Data read/write speed may not show correctly. "M2"...


