Operating Guide
Page 3
... operating instructions. Safety Check Upon completion of the set, and to protect it from the wall outlet before cleaning or polishing it from the wall outlet and refer servicing to the set exhibits a distinct change in safe operating condition. 3 Never block the slots and openings by the manufacturer. Adjust only those controls that have fallen into the set. - Replacement parts When replacement parts are provided for service. this set...
... operating instructions. Safety Check Upon completion of the set, and to protect it from the wall outlet before cleaning or polishing it from the wall outlet and refer servicing to the set exhibits a distinct change in safe operating condition. 3 Never block the slots and openings by the manufacturer. Adjust only those controls that have fallen into the set. - Replacement parts When replacement parts are provided for service. this set...
Operating Guide
Page 7
... devices You cannot play back a tape recorded in Germany, and Sony Corporation, and produces superior images. Check the contents of recording media and other devices. About this manual • The images of the LCD screen and the viewfinder used in this manual for illustration purposes are captured using a digital still camera, and therefore may appear different. • Design and specifications of tapes by Carl Zeiss, in the HDV format on DV format video cameras or on mini...
... devices You cannot play back a tape recorded in Germany, and Sony Corporation, and produces superior images. Check the contents of recording media and other devices. About this manual • The images of the LCD screen and the viewfinder used in this manual for illustration purposes are captured using a digital still camera, and therefore may appear different. • Design and specifications of tapes by Carl Zeiss, in the HDV format on DV format video cameras or on mini...
Operating Guide
Page 8
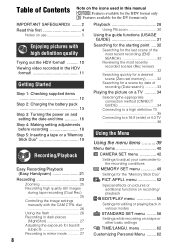
... format 10 Viewing video recorded in the HDV format 11 Getting Started Step 1: Checking supplied items 12 Step 2: Charging the battery pack 13 Step 3: Turning the power on and setting the date and time 16 Step 4: Making setting adjustments before recording 18 Step 5: Inserting a tape or a "Memory Stick Duo 19 Recording/Playback Easy Recording/Playback (Easy Handycam 21 Recording 23 Zooming 25 Recording high quality still images during tape recording (Dual Rec 25 Controlling the image settings manually with the CAM CTRL dial 26 Using the flash 26 Recording...
... format 10 Viewing video recorded in the HDV format 11 Getting Started Step 1: Checking supplied items 12 Step 2: Charging the battery pack 13 Step 3: Turning the power on and setting the date and time 16 Step 4: Making setting adjustments before recording 18 Step 5: Inserting a tape or a "Memory Stick Duo 19 Recording/Playback Easy Recording/Playback (Easy Handycam 21 Recording 23 Zooming 25 Recording high quality still images during tape recording (Dual Rec 25 Controlling the image settings manually with the CAM CTRL dial 26 Using the flash 26 Recording...
Operating Guide
Page 26
... setting mode switches between automatic and manual every time you can adjust the volume using [DIAL SET] (p. 49). Controlling the image settings manually with the CAM CTRL dial It is useful to assign a frequently used menu item to activate the manual adjustment mode. Menu items that . z Tips • During playback, you press the MANUAL button. 2 Rotate the CAM CTRL dial to adjust the focus manually. r (Forced flash): Always uses the flash regardless of the procedure when the [FOCUS] setting is assigned (the default setting...
... setting mode switches between automatic and manual every time you can adjust the volume using [DIAL SET] (p. 49). Controlling the image settings manually with the CAM CTRL dial It is useful to assign a frequently used menu item to activate the manual adjustment mode. Menu items that . z Tips • During playback, you press the MANUAL button. 2 Rotate the CAM CTRL dial to adjust the focus manually. r (Forced flash): Always uses the flash regardless of the procedure when the [FOCUS] setting is assigned (the default setting...
Operating Guide
Page 36
... specifications of an external device with HDV1080i specification. COMPONENT IN AUDIO i.LINK S VIDEO VIDEO/AUDIO VIDEO/AUDIO D E F G 36 See the instruction manuals supplied with your camcorder and TV with the supplied component video cable and A/V connecting cable as it recognizes that the camcorder is not compatible with HDV1080i specification, connect your TV. Playing the picture on a TV (Continued) Type Camcorder B3 Cable HDMI cable (optional) : Signal flow, ( ): Reference pages TV Menu Setting HDMI IN (STANDARD SET) [VCR HDV/DV] t [AUTO] (56) • Use...
... specifications of an external device with HDV1080i specification. COMPONENT IN AUDIO i.LINK S VIDEO VIDEO/AUDIO VIDEO/AUDIO D E F G 36 See the instruction manuals supplied with your camcorder and TV with the supplied component video cable and A/V connecting cable as it recognizes that the camcorder is not compatible with HDV1080i specification, connect your TV. Playing the picture on a TV (Continued) Type Camcorder B3 Cable HDMI cable (optional) : Signal flow, ( ): Reference pages TV Menu Setting HDMI IN (STANDARD SET) [VCR HDV/DV] t [AUTO] (56) • Use...

Operating Guide
Page 39
... direction of Personal Menu On Personal Menu, short-cuts for viewing/editing 2 Touch the LCD screen to the previous screen. x To use menu items You can customize Personal Menu as that are added. x To use the short-cuts of the arrow repeatedly to turn on the respective lamp. CAMERA-TAPE lamp: settings on a tape CAMERA-MEMORY lamp: Duo" settings on the screen, touch / until the item is not displayed during Easy Handycam operation...
... direction of Personal Menu On Personal Menu, short-cuts for viewing/editing 2 Touch the LCD screen to the previous screen. x To use menu items You can customize Personal Menu as that are added. x To use the short-cuts of the arrow repeatedly to turn on the respective lamp. CAMERA-TAPE lamp: settings on a tape CAMERA-MEMORY lamp: Duo" settings on the screen, touch / until the item is not displayed during Easy Handycam operation...
Operating Guide
Page 46
... the power zoom lever to W (wide angle), then adjust the focus. • You can set this function when you use the built-in .) for easier focusing. When you change the default setting, is compatible with your camcorder. You can also adjust the focus manually using the CAM CTRL dial (p. 26). TELE MACRO This is hard to sharpen the focus. WHITE Makes the outline color white. RED Makes the outline color red. B NORMAL( ) LOW( ) Makes the flash level...
... the power zoom lever to W (wide angle), then adjust the focus. • You can set this function when you use the built-in .) for easier focusing. When you change the default setting, is compatible with your camcorder. You can also adjust the focus manually using the CAM CTRL dial (p. 26). TELE MACRO This is hard to sharpen the focus. WHITE Makes the outline color white. RED Makes the outline color red. B NORMAL( ) LOW( ) Makes the flash level...
Operating Guide
Page 53
.... FLASH (flash motion) Records/plays back a movie with / before touching [START]. STILL Records/plays back a movie while superimposing it on VCR or DVD/HDD recorders (p. 64). OLD MOVIE Adds an old movie effect with / touch . , then Effect CINEMA EFECT* STILL FLASH TRAIL OLD MOVIE* Items to adjust No adjustment necessary The degree of transparency of the incidental image No adjustment necessary * Available during tape recording only. 3 Touch . z Tips • You can save pictures edited using [D.EFFECT...
.... FLASH (flash motion) Records/plays back a movie with / before touching [START]. STILL Records/plays back a movie while superimposing it on VCR or DVD/HDD recorders (p. 64). OLD MOVIE Adds an old movie effect with / touch . , then Effect CINEMA EFECT* STILL FLASH TRAIL OLD MOVIE* Items to adjust No adjustment necessary The degree of transparency of the incidental image No adjustment necessary * Available during tape recording only. 3 Touch . z Tips • You can save pictures edited using [D.EFFECT...
Operating Guide
Page 54
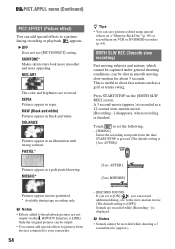
... the slow-motion movie (The default setting is [3sec AFTER]). MOSAIC* [3sec AFTER] [3sec BEFORE] Pictures appear mosaic-patterned. * Available during recording or playback. Only the original pictures can save pictures edited using special effects on a "Memory Stick Duo" (p. 69) or record them on the [SMTH SLW REC] screen. Press START/STOP on VCR or DVD/HDD recorders (p. 64). Sounds are not output via the HDV/DV Interface (i.LINK). SEPIA Pictures appear in black and white...
... the slow-motion movie (The default setting is [3sec AFTER]). MOSAIC* [3sec AFTER] [3sec BEFORE] Pictures appear mosaic-patterned. * Available during recording or playback. Only the original pictures can save pictures edited using special effects on a "Memory Stick Duo" (p. 69) or record them on the [SMTH SLW REC] screen. Press START/STOP on VCR or DVD/HDD recorders (p. 64). Sounds are not output via the HDV/DV Interface (i.LINK). SEPIA Pictures appear in black and white...
Operating Guide
Page 60
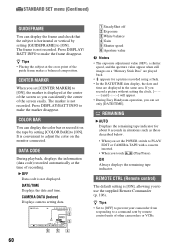
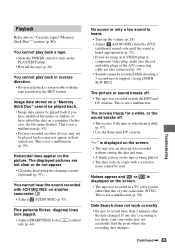
... adjustment value (0EV), a shutter speed, and the aperture value appear when still images on a "Memory Stick Duo" are displayed in situations such as those described below. • When you set the POWER switch to PLAY/ EDIT or CAMERA-TAPE with a cassette inserted. • When you to adjust the color on the tape by setting [COLOR BAR] to [ON]. REMAINING B AUTO Displays the remaining tape indicator for a picture recorded using a flash. • In the DATE/TIME data display, the date and time are played...
... adjustment value (0EV), a shutter speed, and the aperture value appear when still images on a "Memory Stick Duo" are displayed in situations such as those described below. • When you set the POWER switch to PLAY/ EDIT or CAMERA-TAPE with a cassette inserted. • When you to adjust the color on the tape by setting [COLOR BAR] to [ON]. REMAINING B AUTO Displays the remaining tape indicator for a picture recorded using a flash. • In the DATE/TIME data display, the date and time are played...
Operating Guide
Page 67
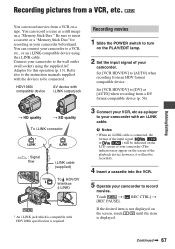
... LCD screen of your camcorder to the instruction manuals supplied with an i.LINK cable. b Notes • When an i.LINK cable is required. Dubbing/Editing Recording pictures from a VCR on a tape. Refer also to record movies. Continued , 67 Touch t [ REC CTRL] t [REC PAUSE]. Set [VCR HDV/DV] to the wall outlet (wall socket) using the i.LINK cable. Set [VCR HDV/DV] to [DV] or [AUTO] when recording from a DV format compatible device (p. 56). 3 Connect your VCR, etc as a still image on a "Memory Stick...
... LCD screen of your camcorder to the instruction manuals supplied with an i.LINK cable. b Notes • When an i.LINK cable is required. Dubbing/Editing Recording pictures from a VCR on a tape. Refer also to record movies. Continued , 67 Touch t [ REC CTRL] t [REC PAUSE]. Set [VCR HDV/DV] to the wall outlet (wall socket) using the i.LINK cable. Set [VCR HDV/DV] to [DV] or [AUTO] when recording from a DV format compatible device (p. 56). 3 Connect your VCR, etc as a still image on a "Memory Stick...
Operating Guide
Page 71
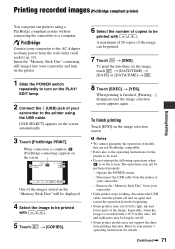
... the operating instructions for details. To print the date/time on the image selection screen. b Notes • We cannot guarantee the operation of the image can print out pictures using the USB cable. [USB SELECT] appears on the "Memory Stick Duo" will be displayed. 4 Select the image to be printed with / . 5 Touch t [COPIES]. 6 Select the number of your camcorder to the printer using a PictBridge compliant printer without connecting the camcorder to obtain power from...
... the operating instructions for details. To print the date/time on the image selection screen. b Notes • We cannot guarantee the operation of the image can print out pictures using the USB cable. [USB SELECT] appears on the "Memory Stick Duo" will be displayed. 4 Select the image to be printed with / . 5 Touch t [COPIES]. 6 Select the number of your camcorder to the printer using a PictBridge compliant printer without connecting the camcorder to obtain power from...
Operating Guide
Page 76
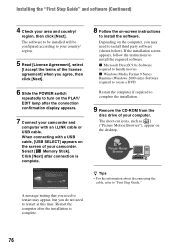
If the installation screen appears, follow the instructions to complete the installation. 9 Remove the CD-ROM from the disc drive of your camcorder. A message stating that you need to restart may need to "First Step Guide." x Microsoft DirectX 9.0c-Software required to handle movies x Windows Media Format 9 Series Runtime (Windows 2000 only)-Software required to create a DVD Restart the computer if required to install the required software. The short-cut icons, such as [ ] ("Picture Motion Browser...
If the installation screen appears, follow the instructions to complete the installation. 9 Remove the CD-ROM from the disc drive of your camcorder. A message stating that you need to restart may need to "First Step Guide." x Microsoft DirectX 9.0c-Software required to handle movies x Windows Media Format 9 Series Runtime (Windows 2000 only)-Software required to create a DVD Restart the computer if required to install the required software. The short-cut icons, such as [ ] ("Picture Motion Browser...
Operating Guide
Page 83
... A/V connecting cable are using an S VIDEO plug or component video plug, make sure the red and white plugs of your camcorder may not appear in a TV color system other than 2 minutes after the date changed. Noises appear and or is not a malfunction (p. 93). • Pictures recorded on a tape with a scratch or noise cannot be recorded while shooting a 3 second-movie (approx.) using the cleaning cassette (optional) (p. 97). This is displayed on the screen. • The tape was recorded...
... A/V connecting cable are using an S VIDEO plug or component video plug, make sure the red and white plugs of your camcorder may not appear in a TV color system other than 2 minutes after the date changed. Noises appear and or is not a malfunction (p. 93). • Pictures recorded on a tape with a scratch or noise cannot be recorded while shooting a 3 second-movie (approx.) using the cleaning cassette (optional) (p. 97). This is displayed on the screen. • The tape was recorded...
Operating Guide
Page 84
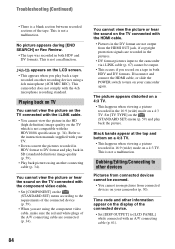
... cable. • You cannot view the picture in SD (standard definition) image quality (p. 59). • Play back pictures using another connecting cable (p. 34). Set [TV TYPE] on other recording devices using the component video cable, make sure the red and white plugs of the tape. This camcorder does not comply with the component video cable. • Set [COMPONENT] on your camcorder again. You cannot view the picture or hear the sound on the TV connected with the HDV1080i specification (p. 34). Black...
... cable. • You cannot view the picture in SD (standard definition) image quality (p. 59). • Play back pictures using another connecting cable (p. 34). Set [TV TYPE] on other recording devices using the component video cable, make sure the red and white plugs of the tape. This camcorder does not comply with the component video cable. • Set [COMPONENT] on your camcorder again. You cannot view the picture or hear the sound on the TV connected with the HDV1080i specification (p. 34). Black...
Operating Guide
Page 91
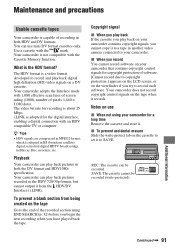
... play back pictures in Blu-ray Disc recorders, etc. The video bit rate for the digital interface, enabling a digital connection with the Cassette Memory function. x To prevent accidental erasure Slide the write-protect tab on use mini DV format cassettes only. Your camcorder adopts the Interlace mode with the mark. REC SAVE SAVE: The cassette cannot be recorded. Additional Information Continued , 91 Your camcorder does not record copyright control signals on the tape Go to set it records. Playback...
... play back pictures in Blu-ray Disc recorders, etc. The video bit rate for the digital interface, enabling a digital connection with the Cassette Memory function. x To prevent accidental erasure Slide the write-protect tab on use mini DV format cassettes only. Your camcorder adopts the Interlace mode with the mark. REC SAVE SAVE: The cassette cannot be recorded. Additional Information Continued , 91 Your camcorder does not record copyright control signals on the tape Go to set it records. Playback...
Operating Guide
Page 92
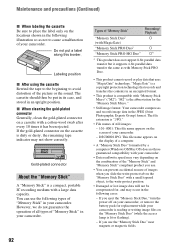
... eject the "Memory Stick Duo," turn the power off on your camcorder, or remove the battery pack for replacement while your camcorder. • Data read/write speed may vary depending on the combination of "Memory Stick" in your camcorder. x When cleaning the gold-plated connector Generally, clean the gold-plated connector on a cassette with a large data capacity. Types of "Memory Stick" in your camcorder. If you use the following types of "Memory Stick" "Memory Stick Duo" (with MagicGate) "Memory Stick PRO Duo" "Memory Stick PRO...
... eject the "Memory Stick Duo," turn the power off on your camcorder, or remove the battery pack for replacement while your camcorder. • Data read/write speed may vary depending on the combination of "Memory Stick" in your camcorder. x When cleaning the gold-plated connector Generally, clean the gold-plated connector on a cassette with a large data capacity. Types of "Memory Stick" in your camcorder. If you use the following types of "Memory Stick" "Memory Stick Duo" (with MagicGate) "Memory Stick PRO Duo" "Memory Stick PRO...

Operating Guide
Page 103
.... • Connecting with an external device wears out the battery pack faster. • When you are recording movies with your camcorder. MEMORY, PLAY/EDIT mode lamps (16) K /CHG (charge) lamp (13) L (flash) button (26) M START/STOP button (23) Continued , 103 Quick Reference Quick Reference Identifying parts and controls The numbers in flash at the same time. Refer to the operating instructions supplied with an external flash (optional) connected to prevent charging noise being recorded. • You cannot use an external flash (optional...
.... • Connecting with an external device wears out the battery pack faster. • When you are recording movies with your camcorder. MEMORY, PLAY/EDIT mode lamps (16) K /CHG (charge) lamp (13) L (flash) button (26) M START/STOP button (23) Continued , 103 Quick Reference Quick Reference Identifying parts and controls The numbers in flash at the same time. Refer to the operating instructions supplied with an external flash (optional) connected to prevent charging noise being recorded. • You cannot use an external flash (optional...
Operating Guide
Page 111
... CAMERA DATA 60 CAMERA SET menu ...........42 CANDLE 42 Cassette 19, 91 CD-ROM 73 CENTER MARKR 60 Charging time 14 Cleaning cassette 97 CLOCK SET 16 CNNECT GUIDE...........31, 34 COLOR BAR 60 COLOR SLOW S (Color Slow Shutter) 47, 82, 86 COMPONENT 59 COMPONENT OUT jack 34, 104 Component video cable........ 35 Computer 73 CONV.LENS 49 D DATA CODE 16, 60 Date search 33 DATE/TIME .......... 16, 60, 107 Delete pictures 69 DEMO MODE 55 DIAL SET 49 DIGITAL ZOOM........... 48, 86 DISP GUIDE (Display guide...
... CAMERA DATA 60 CAMERA SET menu ...........42 CANDLE 42 Cassette 19, 91 CD-ROM 73 CENTER MARKR 60 Charging time 14 Cleaning cassette 97 CLOCK SET 16 CNNECT GUIDE...........31, 34 COLOR BAR 60 COLOR SLOW S (Color Slow Shutter) 47, 82, 86 COMPONENT 59 COMPONENT OUT jack 34, 104 Component video cable........ 35 Computer 73 CONV.LENS 49 D DATA CODE 16, 60 Date search 33 DATE/TIME .......... 16, 60, 107 Delete pictures 69 DEMO MODE 55 DIAL SET 49 DIGITAL ZOOM........... 48, 86 DISP GUIDE (Display guide...
Operating Guide
Page 112
..., 86 Time code 107 TIME/LANGU. menu (Picture Application menu) ..52 PICT.EFFECT (Picture effect 54 112 Playback 28 Playing time 15 P-MENU ... menu .......... 62 TRAIL 53 Tripod 105 TV 34 TV color systems 90 TV TYPE 59 U USAGE GUIDE 31 USB jack 104 USB SELECT 55 Using abroad 90 Index (Continued) M Macintosh 77 Maintenance and precautions 91 MEMORY SET menu ..........49 "Memory Stick 92 "Memory Stick Duo 19 FORMAT 51 Menu 39 MIC LEVEL 58 Mirror mode 27 Moisture...
..., 86 Time code 107 TIME/LANGU. menu (Picture Application menu) ..52 PICT.EFFECT (Picture effect 54 112 Playback 28 Playing time 15 P-MENU ... menu .......... 62 TRAIL 53 Tripod 105 TV 34 TV color systems 90 TV TYPE 59 U USAGE GUIDE 31 USB jack 104 USB SELECT 55 Using abroad 90 Index (Continued) M Macintosh 77 Maintenance and precautions 91 MEMORY SET menu ..........49 "Memory Stick 92 "Memory Stick Duo 19 FORMAT 51 Menu 39 MIC LEVEL 58 Mirror mode 27 Moisture...


