Operating Guide
Page 1
http://www.sony.net/ Printed in Japan 2-319-806-11(1) Digital HD Video Camera Recorder Operating Guide HDR-HC5/HC7 Enjoying pictures with high definition quality 11 Getting Started 13 Recording/ Playback 22 Using the Menu 40 Dubbing/Editing 65 Using a Computer 74 Troubleshooting 79 Additional Information 91 Quick Reference 105 Spanish Quick Guide/ Guía rápida en español 116 US US © 2007 Sony Corporation Additional information on this product and answers to frequently asked questions can be found at our Customer Support Website.
http://www.sony.net/ Printed in Japan 2-319-806-11(1) Digital HD Video Camera Recorder Operating Guide HDR-HC5/HC7 Enjoying pictures with high definition quality 11 Getting Started 13 Recording/ Playback 22 Using the Menu 40 Dubbing/Editing 65 Using a Computer 74 Troubleshooting 79 Additional Information 91 Quick Reference 105 Spanish Quick Guide/ Guía rápida en español 116 US US © 2007 Sony Corporation Additional information on this product and answers to frequently asked questions can be found at our Customer Support Website.
Operating Guide
Page 7
... depending on a TV, you need an NTSC system-based TV. • Television programs, films, video tapes, and other materials may be contrary to the copyright laws. Doing so might cause your camcorder to a malfunction of your recordings on the country/region. Continued , 7 See "On using your... camcorder to another device with an HDMI cable, component video cable, USB or i.LINK cable, be provided, even if recording...
... depending on a TV, you need an NTSC system-based TV. • Television programs, films, video tapes, and other materials may be contrary to the copyright laws. Doing so might cause your camcorder to a malfunction of your recordings on the country/region. Continued , 7 See "On using your... camcorder to another device with an HDMI cable, component video cable, USB or i.LINK cable, be provided, even if recording...
Operating Guide
Page 8
...HDR-HC7. The model name is indicated on other devices. Also, the lens for your camcorder is equipped with a Carl Zeiss lens, which was developed jointly by playing them back on the bottom of your camcorder...and Sony Corporation, and produces superior images. It adopts the MTF measurement system for illustration purposes are subject to change without notice. About the Carl Zeiss lens Your camcorder is...in this manual for video cameras and offers a quality typical of tapes by Carl Zeiss, in the HDV format on DV format video cameras or on this camcorder prior to suppress ...
...HDR-HC7. The model name is indicated on other devices. Also, the lens for your camcorder is equipped with a Carl Zeiss lens, which was developed jointly by playing them back on the bottom of your camcorder...and Sony Corporation, and produces superior images. It adopts the MTF measurement system for illustration purposes are subject to change without notice. About the Carl Zeiss lens Your camcorder is...in this manual for video cameras and offers a quality typical of tapes by Carl Zeiss, in the HDV format on DV format video cameras or on this camcorder prior to suppress ...

Operating Guide
Page 9
...37 Using the Menu Recording/Playback Easy Recording/Playback (Easy Handycam 22 Recording 24 Zooming 26 Recording high quality still images during tape recording (Dual Rec 26 Controlling the image settings manually with the CAM CTRL dial (HDR-HC7 27 Using the flash 27 Recording in dark places (NightShot ...with high definition quality Trying out the new HDV format! ... 11 Viewing video recorded in mirror mode 28 Using the menu items .......... 40 Menu items 41 CAMERA SET menu 43 Settings to adjust your camcorder to the recording conditions MEMORY SET menu 50 Settings for a scene by ...
...37 Using the Menu Recording/Playback Easy Recording/Playback (Easy Handycam 22 Recording 24 Zooming 26 Recording high quality still images during tape recording (Dual Rec 26 Controlling the image settings manually with the CAM CTRL dial (HDR-HC7 27 Using the flash 27 Recording in dark places (NightShot ...with high definition quality Trying out the new HDV format! ... 11 Viewing video recorded in mirror mode 28 Using the menu items .......... 40 Menu items 41 CAMERA SET menu 43 Settings to adjust your camcorder to the recording conditions MEMORY SET menu 50 Settings for a scene by ...
Operating Guide
Page 11
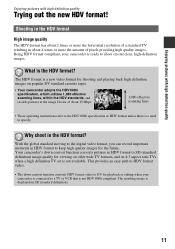
...more the horizontal resolution of pixels providing high quality images. This provides an easy path to specify. Your camcorder's down convert function converts HDV format video to shoot crystal clear, high-definition images. The resulting image is displayed in HDV format to SD (standard...definition) image quality for playback or editing when your camcorder is a need to HDV format video. • The down convert function converts pictures in SD (standard definition). 11 Being HDV format compliant, your camcorder is connected to keep high quality images for shooting ...
...more the horizontal resolution of pixels providing high quality images. This provides an easy path to specify. Your camcorder's down convert function converts HDV format video to shoot crystal clear, high-definition images. The resulting image is displayed in HDV format to SD (standard...definition) image quality for playback or editing when your camcorder is a need to HDV format video. • The down convert function converts pictures in SD (standard definition). 11 Being HDV format compliant, your camcorder is connected to keep high quality images for shooting ...

Operating Guide
Page 12
...camcorder can import movies from a tape or still images from a "Memory Stick Duo" to SD (standard definition) image quality for playback on a conventional TV. Dubbing to VCR or DVD/HDD recorders (p. 65) Connecting to an HDV1080i device A supplied i.LINK cable allows you can down convert video... Viewing on HDV1080i compliant TVs, see page 35. You can down convert HDV format video to SD (standard definition) image quality to copy pictures in the HDV format to the...wide)/4:3 TV (p. 37) Your camcorder can also edit the imported movies and create a DVD-video in the HDV format!
...camcorder can import movies from a tape or still images from a "Memory Stick Duo" to SD (standard definition) image quality for playback on a conventional TV. Dubbing to VCR or DVD/HDD recorders (p. 65) Connecting to an HDV1080i device A supplied i.LINK cable allows you can down convert video... Viewing on HDV1080i compliant TVs, see page 35. You can down convert HDV format video to SD (standard definition) image quality to copy pictures in the HDV format to the...wide)/4:3 TV (p. 37) Your camcorder can also edit the imported movies and create a DVD-video in the HDV format!
Operating Guide
Page 13
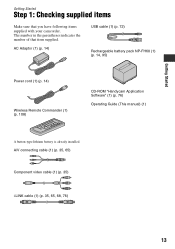
... that you have following items supplied with your camcorder. AC Adaptor (1) (p. 14) USB cable (1) (p. 72) Rechargeable battery pack NP-FH60 (1) (p. 14, 95) Power cord (1) (p. 14) Wireless Remote Commander (1) (p. 108) CD-ROM "Handycam Application Software" (1) (p. 76) Operating Guide... (This manual) (1) A button-type lithium battery is already installed. A/V connecting cable (1) (p. 35, 65) Component video cable (1) (p. 35) i.LINK cable (1) (p. 35, 65, 68, 76)...
... that you have following items supplied with your camcorder. AC Adaptor (1) (p. 14) USB cable (1) (p. 72) Rechargeable battery pack NP-FH60 (1) (p. 14, 95) Power cord (1) (p. 14) Wireless Remote Commander (1) (p. 108) CD-ROM "Handycam Application Software" (1) (p. 76) Operating Guide... (This manual) (1) A button-type lithium battery is already installed. A/V connecting cable (1) (p. 35, 65) Component video cable (1) (p. 35) i.LINK cable (1) (p. 35, 65, 68, 76)...
Operating Guide
Page 17
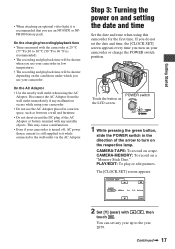
...of the arrow to turn on the respective lamp. Disconnect the AC Adaptor from the wall outlet immediately if any malfunction occurs while using this camcorder for the first time. POWER switch Touch the button on the LCD screen. 1 While pressing the green button, slide the POWER switch in...recording and playback time will be shorter depending on the conditions under which you turn on your camcorder. CAMERA-TAPE: To record on a "Memory Stick Duo." Getting Started • When attaching an optional video light, it is still supplied to it while connected to the wall outlet via the AC ...
...of the arrow to turn on the respective lamp. Disconnect the AC Adaptor from the wall outlet immediately if any malfunction occurs while using this camcorder for the first time. POWER switch Touch the button on the LCD screen. 1 While pressing the green button, slide the POWER switch in...recording and playback time will be shorter depending on the conditions under which you turn on your camcorder. CAMERA-TAPE: To record on a "Memory Stick Duo." Getting Started • When attaching an optional video light, it is still supplied to it while connected to the wall outlet via the AC ...

Operating Guide
Page 35
... connection for your camcorder is connected and connectors used. Use the supplied AC Adaptor as SD (standard definition) images regardless of your device. b Notes • Make all menu settings on the TV when playing back. Some settings may not recognize the video signal properly if the... [VCR HDV/DV] or [i.LINK CONV] setting is changed after the TV and your camcorder before connecting. The output setting of the connection. • When recording, set automatically. ...
... connection for your camcorder is connected and connectors used. Use the supplied AC Adaptor as SD (standard definition) images regardless of your device. b Notes • Make all menu settings on the TV when playing back. Some settings may not recognize the video signal properly if the... [VCR HDV/DV] or [i.LINK CONV] setting is changed after the TV and your camcorder before connecting. The output setting of the connection. • When recording, set automatically. ...
Operating Guide
Page 36
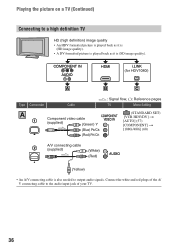
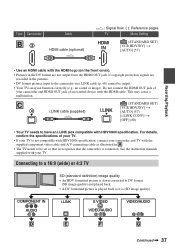
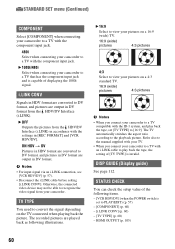
COMPONENT IN AUDIO HDMI i.LINK (for HDV1080i) A B C Type Camcorder Cable A 1 Component video cable (supplied) (Green) Y (Blue) PB/CB (Red) PR/CR : Signal flow, ( ): Reference pages TV Menu Setting (STANDARD SET) [VCR HDV/DV] t [AUTO] (57) [COMPONENT] t [1080i/480i] (60) 2 A/V connecting cable (supplied) (White) (Red) (Yellow) • An A/V connecting cable is (SD image quality). Connect...
COMPONENT IN AUDIO HDMI i.LINK (for HDV1080i) A B C Type Camcorder Cable A 1 Component video cable (supplied) (Green) Y (Blue) PB/CB (Red) PR/CR : Signal flow, ( ): Reference pages TV Menu Setting (STANDARD SET) [VCR HDV/DV] t [AUTO] (57) [COMPONENT] t [1080i/480i] (60) 2 A/V connecting cable (supplied) (White) (Red) (Yellow) • An A/V connecting cable is (SD image quality). Connect...
Operating Guide
Page 37
... compatible with HDV1080i specification, connect your TV. For details, confirm the specifications of an external device with the supplied component video cable and A/V connecting cable as it recognizes that the camcorder is connected. C 4 i.LINK cable (supplied) (STANDARD SET) [VCR HDV/DV] t [AUTO] (57) [i....specification. See the instruction manuals supplied with your camcorder and TV with the HDMI cable. COMPONENT IN AUDIO i.LINK S VIDEO VIDEO/AUDIO VIDEO/AUDIO D E F G Continued , 37 Do not connect the HDMI OUT jack of your camcorder and HDMI OUT jack of your TV. &#...
... compatible with HDV1080i specification, connect your TV. For details, confirm the specifications of an external device with the supplied component video cable and A/V connecting cable as it recognizes that the camcorder is connected. C 4 i.LINK cable (supplied) (STANDARD SET) [VCR HDV/DV] t [AUTO] (57) [i....specification. See the instruction manuals supplied with your camcorder and TV with the HDMI cable. COMPONENT IN AUDIO i.LINK S VIDEO VIDEO/AUDIO VIDEO/AUDIO D E F G Continued , 37 Do not connect the HDMI OUT jack of your camcorder and HDMI OUT jack of your TV. &#...
Operating Guide
Page 38
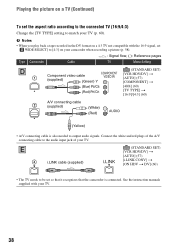
...] to [4:3] on a TV (Continued) To set so that it recognizes that the camcorder is also needed to match your TV (p. 60). Playing the picture on your camcorder when recording a picture (p. 58). : Signal flow, ( ): Reference pages Type Camcorder Cable TV Menu Setting D 1 Component video cable (supplied) (Green) Y (Blue) PB/CB (Red) PR/CR (STANDARD SET...
...] to [4:3] on a TV (Continued) To set so that it recognizes that the camcorder is also needed to match your TV (p. 60). Playing the picture on your camcorder when recording a picture (p. 58). : Signal flow, ( ): Reference pages Type Camcorder Cable TV Menu Setting D 1 Component video cable (supplied) (Green) Y (Blue) PB/CB (Red) PR/CR (STANDARD SET...
Operating Guide
Page 39
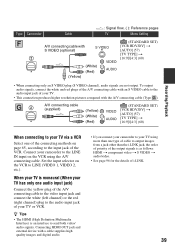
...), audio signals are not output. z Tips • The HDMI (High Definition Multimedia Interface) is as follows: HDMI t component video t S VIDEO t audio/video. • See page 96 for the details of i.LINK. 39 Type Camcorder Cable A/V connecting cable with the A/V connecting cable (Type ). 2 A/V connecting cable (supplied) (Yellow) (White) (Red) ...To output audio signals, connect the white and red plugs of the A/V connecting cable with an S VIDEO cable to the audio input jack of your camcorder to the LINE IN input on the VCR using more than the i.LINK jack, the order of ...
...), audio signals are not output. z Tips • The HDMI (High Definition Multimedia Interface) is as follows: HDMI t component video t S VIDEO t audio/video. • See page 96 for the details of i.LINK. 39 Type Camcorder Cable A/V connecting cable with the A/V connecting cable (Type ). 2 A/V connecting cable (supplied) (Yellow) (White) (Red) ...To output audio signals, connect the white and red plugs of the A/V connecting cable with an S VIDEO cable to the audio input jack of your camcorder to the LINE IN input on the VCR using more than the i.LINK jack, the order of ...
Operating Guide
Page 44
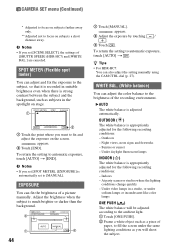
...AUTO] t . appears. 2 Adjust the exposure by touching / . 3 Touch . WHITE BAL. (White balance) You can fix the brightness of [SHUTTR SPEED] (HDR-HC7) and [WHITE BAL.] are canceled. Outdoors - Indoors - At party scenes or studios where the lighting conditions change quickly - b Notes • If you want to...recorded in the spotlight on stage. 1 2 1 Touch the point where you set [SCENE SELECT], the settings of a picture manually. Under video lamps in a studio, or under the same lighting conditions as you set to focus on subjects a short distance away. EXPOSURE You can adjust...
...AUTO] t . appears. 2 Adjust the exposure by touching / . 3 Touch . WHITE BAL. (White balance) You can fix the brightness of [SHUTTR SPEED] (HDR-HC7) and [WHITE BAL.] are canceled. Outdoors - Indoors - At party scenes or studios where the lighting conditions change quickly - b Notes • If you want to...recorded in the spotlight on stage. 1 2 1 Touch the point where you set [SCENE SELECT], the settings of a picture manually. Under video lamps in a studio, or under the same lighting conditions as you set to focus on subjects a short distance away. EXPOSURE You can adjust...
Operating Guide
Page 58
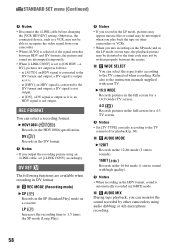
...the HDV1080i specification. a DV signal is not output. DV SET The following functions are output as a VCR, may not be able to recognize the video signal from your TV. Refer also to 1.5 times the SP mode (Long Play). STANDARD SET menu (Continued) b Notes • Disconnect the .... Otherwise, the connected device, such as follows: - an HDV signal is not output. - REC FORMAT You can monitor the sound recorded by other camcorders or VCRs. • When you output the recording picture using audio dubbing or 4ch microphone recording. 58 B HDV1080i ( ) Records in the SP (...
...the HDV1080i specification. a DV signal is not output. DV SET The following functions are output as a VCR, may not be able to recognize the video signal from your TV. Refer also to 1.5 times the SP mode (Long Play). STANDARD SET menu (Continued) b Notes • Disconnect the .... Otherwise, the connected device, such as follows: - an HDV signal is not output. - REC FORMAT You can monitor the sound recorded by other camcorders or VCRs. • When you output the recording picture using audio dubbing or 4ch microphone recording. 58 B HDV1080i ( ) Records in the SP (...
Operating Guide
Page 60
... TV connected when playing back the picture. Otherwise, the connected video device may not be able to recognize the video signal from the HDV/DV Interface (i.LINK). The TV automatically switches the aspect ratio according to [16:9]. B 1080i/480i Select when connecting your camcorder to a TV with the component input jack. The recorded pictures...
... TV connected when playing back the picture. Otherwise, the connected video device may not be able to recognize the video signal from the HDV/DV Interface (i.LINK). The TV automatically switches the aspect ratio according to [16:9]. B 1080i/480i Select when connecting your camcorder to a TV with the component input jack. The recorded pictures...
Operating Guide
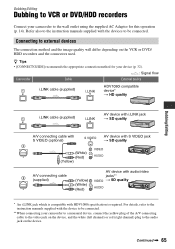
Page 65
...Red) AV device with S VIDEO jack t SD quality AV device with audio/video jacks** t SD quality * An i.LINK jack which is compatible with HDV1080i specification is required. For details, refer to the instruction manuals supplied with the devices to be connected. ** When connecting your camcorder to a monaural device, ...connect the yellow plug of the A/V connecting cable to the video jack on the device, and the white (left channel) or red (right channel) plug to...
...Red) AV device with S VIDEO jack t SD quality AV device with audio/video jacks** t SD quality * An i.LINK jack which is compatible with HDV1080i specification is required. For details, refer to the instruction manuals supplied with the devices to be connected. ** When connecting your camcorder to a monaural device, ...connect the yellow plug of the A/V connecting cable to the video jack on the device, and the white (left channel) or red (right channel) plug to...
Operating Guide
Page 66
...; Pictures recorded in both HDV1080i compatible devices such as HDRHC5/HC7 and are connected with the i.LINK cable, after pausing or stopping and then resuming the recording, the images will not be output when you connect with S VIDEO jack instead of the connection. HDV/DV A/V OUT 1 ...formats, the picture and sound are interrupted temporarily. • When the player and the recorder are dubbed as video input1 and video input2). Insert the recorded cassette. If your camcorder for playback. Jacks on the PLAY/EDIT lamp. 2 When dubbing to be compliant with an A/V connecting cable...
...; Pictures recorded in both HDV1080i compatible devices such as HDRHC5/HC7 and are connected with the i.LINK cable, after pausing or stopping and then resuming the recording, the images will not be output when you connect with S VIDEO jack instead of the connection. HDV/DV A/V OUT 1 ...formats, the picture and sound are interrupted temporarily. • When the player and the recorder are dubbed as video input1 and video input2). Insert the recorded cassette. If your camcorder for playback. Jacks on the PLAY/EDIT lamp. 2 When dubbing to be compliant with an A/V connecting cable...
Operating Guide
Page 67
... ( or ) will be indicated on the device or application. - Data codes (date/time/camera settings data) may not operate your camcorder on your DVD recorder even if its instruction manual says you can. Pictures edited with an i.LINK cable: - Dubbing/Editing b Notes ... 54) - If you use an i.LINK cable, the video and sound signals are transmitted digitally, producing high quality pictures. • When an i.LINK cable is connected, the format of your camcorder. Titles that are recorded on other camcorders • Pictures recorded in the HDV format are not output...
... ( or ) will be indicated on the device or application. - Data codes (date/time/camera settings data) may not operate your camcorder on your DVD recorder even if its instruction manual says you can. Pictures edited with an i.LINK cable: - Dubbing/Editing b Notes ... 54) - If you use an i.LINK cable, the video and sound signals are transmitted digitally, producing high quality pictures. • When an i.LINK cable is connected, the format of your camcorder. Titles that are recorded on other camcorders • Pictures recorded in the HDV format are not output...
Operating Guide
Page 69
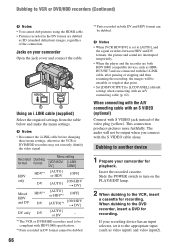
...to record. If you pause or stop the recording and restart it, the picture may not be recorded smoothly. • When a 4:3 video signal is paused on a VCR while recording to your camcorder. Touch (Stop) or [REC PAUSE]. 9 Touch t . The recorded picture becomes rough when a picture is input, it fully. ... the right and left sides on the screen of your VCR. The picture played on the connected device appears on the LCD screen of your camcorder. - Check the image and press it appears with an i.LINK cable: - b Notes • You need an i.LINK cable for this operation. •...
...to record. If you pause or stop the recording and restart it, the picture may not be recorded smoothly. • When a 4:3 video signal is paused on a VCR while recording to your camcorder. Touch (Stop) or [REC PAUSE]. 9 Touch t . The recorded picture becomes rough when a picture is input, it fully. ... the right and left sides on the screen of your VCR. The picture played on the connected device appears on the LCD screen of your camcorder. - Check the image and press it appears with an i.LINK cable: - b Notes • You need an i.LINK cable for this operation. •...


