Operating Guide
Page 4
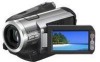
... the same characteristics as opening or removing covers may result in performance - Adjust only those controls that the set to normal operation. - Improper adjustment of other hazards. Safety Check Upon completion of any service or repairs to the set, ask the service technician to perform routine safety checks (as specified by a qualified technician to restore the set is in the operating instructions. IMPORTANT SAFEGUARDS (Continued) Lightning For...
... the same characteristics as opening or removing covers may result in performance - Adjust only those controls that the set to normal operation. - Improper adjustment of other hazards. Safety Check Upon completion of any service or repairs to the set, ask the service technician to perform routine safety checks (as specified by a qualified technician to restore the set is in the operating instructions. IMPORTANT SAFEGUARDS (Continued) Lightning For...
Operating Guide
Page 7
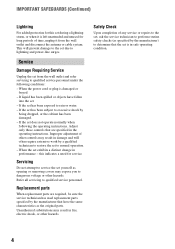
... at dusk. These points are operational for illustrating the operating procedures. About changing the language setting The on the LCD screen and the viewfinder. Take pictures of such materials may be contrary to malfunction. Change the screen language before using your camcorder" (p. 97). • Before connecting your camcorder to another device with an HDMI cable, component video cable, USB or i.LINK cable, be provided, even if recording or playback is not dustproof, dripproof...
... at dusk. These points are operational for illustrating the operating procedures. About changing the language setting The on the LCD screen and the viewfinder. Take pictures of such materials may be contrary to malfunction. Change the screen language before using your camcorder" (p. 97). • Before connecting your camcorder to another device with an HDMI cable, component video cable, USB or i.LINK cable, be provided, even if recording or playback is not dustproof, dripproof...
Operating Guide
Page 8
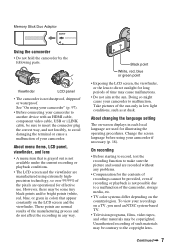
... the LCD screen and the viewfinder used in this manual for illustration purposes are captured using a digital still camera, and therefore may appear different. • The illustrations used on this camcorder prior to playing them back on other devices. It adopts the MTF measurement system for your camcorder. • Design and specifications of tapes by Carl Zeiss, in the HDV format on DV format video cameras or on mini DV...
... the LCD screen and the viewfinder used in this manual for illustration purposes are captured using a digital still camera, and therefore may appear different. • The illustrations used on this camcorder prior to playing them back on other devices. It adopts the MTF measurement system for your camcorder. • Design and specifications of tapes by Carl Zeiss, in the HDV format on DV format video cameras or on mini DV...

Operating Guide
Page 9
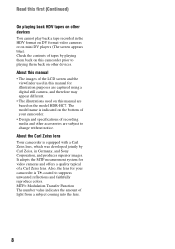
... definition quality Trying out the new HDV format! ... 11 Viewing video recorded in the HDV format 12 Getting Started Step 1: Checking supplied items 13 Step 2: Charging the battery pack 14 Step 3: Turning the power on and setting the date and time 17 Step 4: Making setting adjustments before recording 19 Step 5: Inserting a tape or a "Memory Stick Duo 20 Playback 29 Using PB zoom 31 Using the guide functions (USAGE GUIDE 32 Searching for the starting point .....33...
... definition quality Trying out the new HDV format! ... 11 Viewing video recorded in the HDV format 12 Getting Started Step 1: Checking supplied items 13 Step 2: Charging the battery pack 14 Step 3: Turning the power on and setting the date and time 17 Step 4: Making setting adjustments before recording 19 Step 5: Inserting a tape or a "Memory Stick Duo 20 Playback 29 Using PB zoom 31 Using the guide functions (USAGE GUIDE 32 Searching for the starting point .....33...
Operating Guide
Page 15
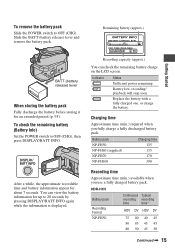
... period (p. 95). Indicator Status Sufficient power remaining Battery low, recording/ playback will stop soon. To check the remaining battery (Battery Info) Set the POWER switch to OFF (CHG). Charging time Approximate time (min.) required when you use a fully charged battery pack. To remove the battery pack Slide the POWER switch to OFF (CHG), then press DISPLAY/BATT INFO. Remaining battery (approx.) 81 90 Recording capacity (approx.) You can view the battery information for up to 20...
... period (p. 95). Indicator Status Sufficient power remaining Battery low, recording/ playback will stop soon. To check the remaining battery (Battery Info) Set the POWER switch to OFF (CHG). Charging time Approximate time (min.) required when you use a fully charged battery pack. To remove the battery pack Slide the POWER switch to OFF (CHG), then press DISPLAY/BATT INFO. Remaining battery (approx.) 81 90 Recording capacity (approx.) You can view the battery information for up to 20...
Operating Guide
Page 18
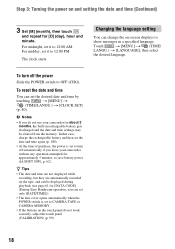
... 3: Turning the power on -screen displays to show messages in rechargeable battery gets discharged and the date and time settings may be displayed during playback (see page 61 for [DATA CODE] (During Easy Handycam operation, you can change the on and setting the date and time (Continued) 3 Set [M] (month), then touch and repeat for [D] (day), hour and minute. The clock starts. To reset the date and time You can be cleared from the memory...
... 3: Turning the power on -screen displays to show messages in rechargeable battery gets discharged and the date and time settings may be displayed during playback (see page 61 for [DATA CODE] (During Easy Handycam operation, you can change the on and setting the date and time (Continued) 3 Set [M] (month), then touch and repeat for [D] (day), hour and minute. The clock starts. To reset the date and time You can be cleared from the memory...
Operating Guide
Page 27
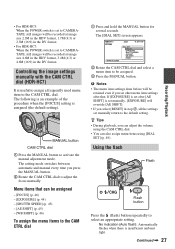
... DV format. Continued , 27 Recording/Playback The following is an example of the procedure when the [FOCUS] setting is set manually return to the CAM CTRL dial. Controlling the image settings manually with the CAM CTRL dial (HDR-HC7) It is insufficient ambient light. No indication (Auto flash): Automatically flashes when there is useful to assign a frequently used menu item to the default setting. The setting mode switches between automatic and manual every time you can adjust the volume using the CAM...
... DV format. Continued , 27 Recording/Playback The following is an example of the procedure when the [FOCUS] setting is set manually return to the CAM CTRL dial. Controlling the image settings manually with the CAM CTRL dial (HDR-HC7) It is insufficient ambient light. No indication (Auto flash): Automatically flashes when there is useful to assign a frequently used menu item to the default setting. The setting mode switches between automatic and manual every time you can adjust the volume using the CAM...
Operating Guide
Page 37
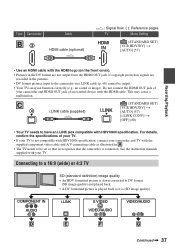
... not function correctly (e.g., no sound or image). COMPONENT IN AUDIO i.LINK S VIDEO VIDEO/AUDIO VIDEO/AUDIO D E F G Continued , 37 See the instruction manuals supplied with your camcorder and HDMI OUT jack of an external device with the HDMI cable. Type Camcorder B3 Cable HDMI cable (optional) : Signal flow, ( ): Reference pages TV Menu Setting HDMI IN (STANDARD SET) [VCR HDV/DV] t [AUTO] (57) Recording/Playback • Use an HDMI cable with the HDMI logo (on the front cover). • Pictures in...
... not function correctly (e.g., no sound or image). COMPONENT IN AUDIO i.LINK S VIDEO VIDEO/AUDIO VIDEO/AUDIO D E F G Continued , 37 See the instruction manuals supplied with your camcorder and HDMI OUT jack of an external device with the HDMI cable. Type Camcorder B3 Cable HDMI cable (optional) : Signal flow, ( ): Reference pages TV Menu Setting HDMI IN (STANDARD SET) [VCR HDV/DV] t [AUTO] (57) Recording/Playback • Use an HDMI cable with the HDMI logo (on the front cover). • Pictures in...
Operating Guide
Page 42
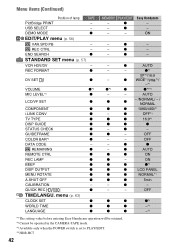
... -*1 *1 The setting value before entering Easy Handycam operation will be retained. *2 Cannot be operated in the CAMERA-TAPE mode. *3 Available only when the POWER switch is set to PLAY/EDIT. *4 HDR-HC7 42 REC CTRL - menu (p. 63) CLOCK SET z WORLD TIME z LANGUAGE z MEMORY - - - z - - - REMAINING z REMOTE CTRL z REC LAMP z BEEP z DISP OUTPUT z MENU ROTATE z A.SHUT OFF z CALIBRATION - z OFF*1 z z 16:9*1 z z z - USB SELECT - QUICK REC z TIME/LANGU. Easy Handycam - - z - - ON z z z*1 z z LCD PANEL z z NORMAL...
... -*1 *1 The setting value before entering Easy Handycam operation will be retained. *2 Cannot be operated in the CAMERA-TAPE mode. *3 Available only when the POWER switch is set to PLAY/EDIT. *4 HDR-HC7 42 REC CTRL - menu (p. 63) CLOCK SET z WORLD TIME z LANGUAGE z MEMORY - - - z - - - REMAINING z REMOTE CTRL z REC LAMP z BEEP z DISP OUTPUT z MENU ROTATE z A.SHUT OFF z CALIBRATION - z OFF*1 z z 16:9*1 z z z - USB SELECT - QUICK REC z TIME/LANGU. Easy Handycam - - z - - ON z z z*1 z z LCD PANEL z z NORMAL...
Operating Guide
Page 54
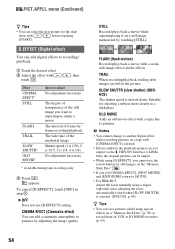
... not use the review button for still images on the "Memory Stick Duo" . • If you want to pictures. SLOW SHUTTR (slow shutter) (HDRHC5) The shutter speed is 1/4) No adjustment necessary * Available during tape recording only. 3 Touch . Only the original pictures can select the first picture for shooting a subject more clearly in a dark place. TRAIL When recording/playback, trailing after images are not output via the HDV/DV Interface (i.LINK). STILL Records/plays back a movie...
... not use the review button for still images on the "Memory Stick Duo" . • If you want to pictures. SLOW SHUTTR (slow shutter) (HDRHC5) The shutter speed is 1/4) No adjustment necessary * Available during tape recording only. 3 Touch . Only the original pictures can select the first picture for shooting a subject more clearly in a dark place. TRAIL When recording/playback, trailing after images are not output via the HDV/DV Interface (i.LINK). STILL Records/plays back a movie...
Operating Guide
Page 61
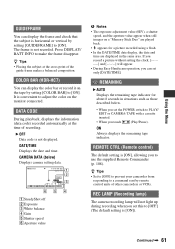
... ) Displays camera setting data. 6 0 min 1 0 : 0 0 : 0 0 : 0 0 60min 2 GUIDE AUTO 100 AWB F1. 8 9 dB P-MENU 3 6 54 A SteadyShot off B Exposure C White balance D Gain E Shutter speed F Aperture value b Notes • The exposure adjustment value (0EV), a shutter speed, and the aperture value appear when still images on a "Memory Stick Duo" are played back. • appears for about 8 seconds in the same area. REMOTE CTRL (Remote control) The default setting is [ON], allowing you set only [DATE/TIME]. REC LAMP (Recording lamp) The camera recording...
... ) Displays camera setting data. 6 0 min 1 0 : 0 0 : 0 0 : 0 0 60min 2 GUIDE AUTO 100 AWB F1. 8 9 dB P-MENU 3 6 54 A SteadyShot off B Exposure C White balance D Gain E Shutter speed F Aperture value b Notes • The exposure adjustment value (0EV), a shutter speed, and the aperture value appear when still images on a "Memory Stick Duo" are played back. • appears for about 8 seconds in the same area. REMOTE CTRL (Remote control) The default setting is [ON], allowing you set only [DATE/TIME]. REC LAMP (Recording lamp) The camera recording...
Operating Guide
Page 68
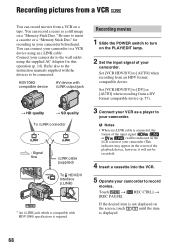
... a cassette into the VCR. 5 Operate your camcorder to record movies. Recording movies 1 Slide the POWER switch to turn on a "Memory Stick Duo." Touch t [ REC CTRL] t [REC PAUSE]. Set [VCR HDV/DV] to [DV] or [AUTO] when recording from a DV format compatible device (p. 57). 3 Connect your VCR as a still image on the PLAY/EDIT lamp. 2 Set the input signal of the playback device, however, it will not be connected. You can record a scene as a player to your camcorder. Connect your camcorder to the wall outlet using an i.LINK cable. Recording pictures...
... a cassette into the VCR. 5 Operate your camcorder to record movies. Recording movies 1 Slide the POWER switch to turn on a "Memory Stick Duo." Touch t [ REC CTRL] t [REC PAUSE]. Set [VCR HDV/DV] to [DV] or [AUTO] when recording from a DV format compatible device (p. 57). 3 Connect your VCR as a still image on the PLAY/EDIT lamp. 2 Set the input signal of the playback device, however, it will not be connected. You can record a scene as a player to your camcorder. Connect your camcorder to the wall outlet using an i.LINK cable. Recording pictures...
Operating Guide
Page 77
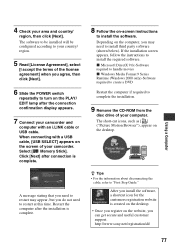
... the disc drive of your computer. http://www.sony.net/registration/di/ 77 If the installation screen appears, follow the instructions to "First Step Guide." Using a Computer 4 Check your camcorder and computer with a USB cable, [USB SELECT] appears on the computer, you can get secure and useful customer support. When connecting with an i.LINK cable or USB cable. Depending on the screen of your camcorder. x Microsoft DirectX 9.0c-Software required to handle movies x Windows Media Format...
... the disc drive of your computer. http://www.sony.net/registration/di/ 77 If the installation screen appears, follow the instructions to "First Step Guide." Using a Computer 4 Check your camcorder and computer with a USB cable, [USB SELECT] appears on the computer, you can get secure and useful customer support. When connecting with an i.LINK cable or USB cable. Depending on the screen of your camcorder. x Microsoft DirectX 9.0c-Software required to handle movies x Windows Media Format...
Operating Guide
Page 79
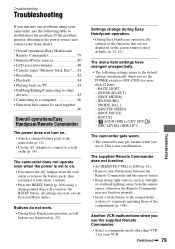
BACK LIGHT - [SCENE SELECT] - [SPOT METER] - [EXPOSURE] - [WHITE BAL.] - [SHUTTR SPEED] - [SPOT FOCUS] - [FOCUS] - [ AUDIO MIX] of [DV SET] - [MIC LEVEL] (HDR-HC7) The camcorder gets warm. • The camcorder may not function properly. • Insert a fresh battery in the compartment with its +/- terminals matching those of the functions that cannot be used together 86 Overall operations/Easy Handycam/Remote Commander The power does not turn on TV 85 • Dubbing/Editing/Connecting to...
BACK LIGHT - [SCENE SELECT] - [SPOT METER] - [EXPOSURE] - [WHITE BAL.] - [SHUTTR SPEED] - [SPOT FOCUS] - [FOCUS] - [ AUDIO MIX] of [DV SET] - [MIC LEVEL] (HDR-HC7) The camcorder gets warm. • The camcorder may not function properly. • Insert a fresh battery in the compartment with its +/- terminals matching those of the functions that cannot be used together 86 Overall operations/Easy Handycam/Remote Commander The power does not turn on TV 85 • Dubbing/Editing/Connecting to...
Operating Guide
Page 84
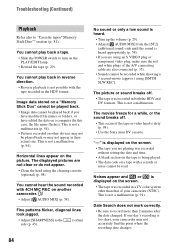
...). • Use the Sony mini DV cassette. Image data stored on a computer (In this case, the file name flashes). You cannot hear the sound recorded with a scratch or noise cannot be recorded while shooting a 3 second-movie (approx.) using an S VIDEO plug or component video plug, make sure the red and white plugs of your camcorder may not appear in the HDV format. The picture or sound breaks off . • This occurs if the tape or video head is...
...). • Use the Sony mini DV cassette. Image data stored on a computer (In this case, the file name flashes). You cannot hear the sound recorded with a scratch or noise cannot be recorded while shooting a 3 second-movie (approx.) using an S VIDEO plug or component video plug, make sure the red and white plugs of your camcorder may not appear in the HDV format. The picture or sound breaks off . • This occurs if the tape or video head is...
Operating Guide
Page 85
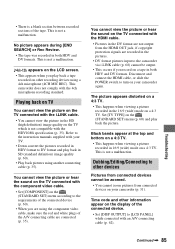
... tape was recorded in the pictures. • DV format pictures input to other recording devices using the component video cable, make sure the red and white plugs of the tape. Disconnect and connect the HDMI cable, or slide the POWER switch to turn on your TV. • Down convert the pictures recorded in the HD (high definition) image quality on a 4:3 TV. Troubleshooting Continued , 85 Playing back on TV You cannot view the picture on the (STANDARD SET) menu according...
... tape was recorded in the pictures. • DV format pictures input to other recording devices using the component video cable, make sure the red and white plugs of the tape. Disconnect and connect the HDMI cable, or slide the POWER switch to turn on your TV. • Down convert the pictures recorded in the HD (high definition) image quality on a 4:3 TV. Troubleshooting Continued , 85 Playing back on TV You cannot view the picture on the (STANDARD SET) menu according...
Operating Guide
Page 92
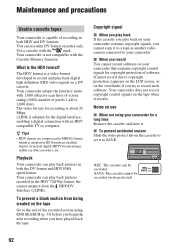
... video camera connected to your camcorder contains copyright signals, you cannot copy it records. Your camcorder does not record copyright control signals on the tape when it to a tape in the HDV 720/30p format, but cannot output it . REC: The cassette can use x When not using END SEARCH (p. 33) before you begin the next recording when you record You cannot record software on your camcorder for the digital interface, enabling a digital connection with the Cassette Memory function...
... video camera connected to your camcorder contains copyright signals, you cannot copy it records. Your camcorder does not record copyright control signals on the tape when it to a tape in the HDV 720/30p format, but cannot output it . REC: The cassette can use x When not using END SEARCH (p. 33) before you begin the next recording when you record You cannot record software on your camcorder for the digital interface, enabling a digital connection with the Cassette Memory function...
Operating Guide
Page 105
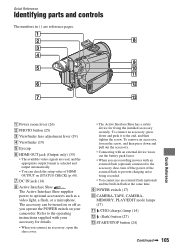
Quick Reference Identifying parts and controls The numbers in flash at the same time. G DC IN jack (14) H Active Interface Shoe The Active Interface Shoe supplies power to the accessory shoe, turn off as a video light, a flash, or a microphone. I POWER switch (17) J CAMERA-TAPE, CAMERA- MEMORY, PLAY/EDIT mode lamps (17) K /CHG (charge) lamp (14) L (flash) button (27) M START/STOP button (24) Continued , 105 Quick Reference qa 6 qs 7 qd A Power zoom lever (26) B PHOTO button (25) C Viewfinder lens adjustment lever (19) D Viewfinder (19...
Quick Reference Identifying parts and controls The numbers in flash at the same time. G DC IN jack (14) H Active Interface Shoe The Active Interface Shoe supplies power to the accessory shoe, turn off as a video light, a flash, or a microphone. I POWER switch (17) J CAMERA-TAPE, CAMERA- MEMORY, PLAY/EDIT mode lamps (17) K /CHG (charge) lamp (14) L (flash) button (27) M START/STOP button (24) Continued , 105 Quick Reference qa 6 qs 7 qd A Power zoom lever (26) B PHOTO button (25) C Viewfinder lens adjustment lever (19) D Viewfinder (19...
Operating Guide
Page 113
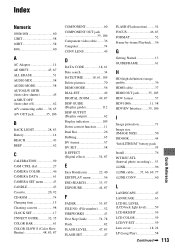
... CAMERA COLOR 46 CAMERA DATA 61 CAMERA SET menu ...........43 CANDLE 43 Cassette 20, 92 CD-ROM 74 Charging time 15 Cleaning cassette 98 CLOCK SET 17 CNNECT GUIDE...........32, 35 COLOR BAR 61 COLOR SLOW S (Color Slow Shutter 48, 83, 87 COMPONENT 60 COMPONENT OUT jack 35, 106 Component video cable........ 36 Computer 74 CONV.LENS 49 D DATA CODE 18, 61 Date search 34 DATE/TIME .......... 18, 61, 109 Delete pictures 70 DEMO MODE 56 DIAL SET 49 DIGITAL ZOOM........... 49, 87 DISP GUIDE (Display guide 112 DISP OUTPUT (Display output...
... CAMERA COLOR 46 CAMERA DATA 61 CAMERA SET menu ...........43 CANDLE 43 Cassette 20, 92 CD-ROM 74 Charging time 15 Cleaning cassette 98 CLOCK SET 17 CNNECT GUIDE...........32, 35 COLOR BAR 61 COLOR SLOW S (Color Slow Shutter 48, 83, 87 COMPONENT 60 COMPONENT OUT jack 35, 106 Component video cable........ 36 Computer 74 CONV.LENS 49 D DATA CODE 18, 61 Date search 34 DATE/TIME .......... 18, 61, 109 Delete pictures 70 DEMO MODE 56 DIAL SET 49 DIGITAL ZOOM........... 49, 87 DISP GUIDE (Display guide 112 DISP OUTPUT (Display output...
Operating Guide
Page 114
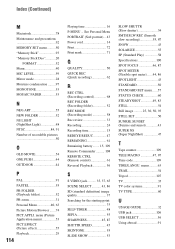
... color systems 91 TV TYPE 60 U USAGE GUIDE 32 USB jack 106 USB SELECT 56 Using abroad 91 See Personal Menu PORTRAIT (Soft portrait)... 43 Power cord 14 Print 72 Print mark 71 Q QUALITY 50 QUICK REC (Quick recording 62 R REC CTRL (Recording control 68 REC FOLDER (Recording folder 52 REC MODE (Recording mode 58 Rec review 33 Recording 24 Recording time 15 REDEYE REDUC 47 REMAINING 61 Remaining battery........ 15, 109 Remote Commander .......... 108 REMOTE CTRL (Remote control 61 Reversal Playback 56 S S VIDEO...
... color systems 91 TV TYPE 60 U USAGE GUIDE 32 USB jack 106 USB SELECT 56 Using abroad 91 See Personal Menu PORTRAIT (Soft portrait)... 43 Power cord 14 Print 72 Print mark 71 Q QUALITY 50 QUICK REC (Quick recording 62 R REC CTRL (Recording control 68 REC FOLDER (Recording folder 52 REC MODE (Recording mode 58 Rec review 33 Recording 24 Recording time 15 REDEYE REDUC 47 REMAINING 61 Remaining battery........ 15, 109 Remote Commander .......... 108 REMOTE CTRL (Remote control 61 Reversal Playback 56 S S VIDEO...


