Operating Guide
Page 10
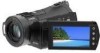
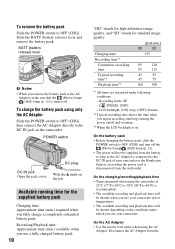
...backlight is recommended). • The available recording and playback time will be shorter when you use a fully charged battery pack. 10 "HD" stands for high definition image quality, and "SD" stands for the supplied battery pack Charging time: Approximate time (min.) required when you remove the battery pack or the ... only the AC Adaptor Slide the POWER switch to OFF (CHG), then connect the AC Adaptor directly to the DC IN jack of your camcorder or the Handycam Station, even when the power cord is turned off the (Movie) lamp/ (Still) lamp (p. 12). • The power will be supplied ...
...backlight is recommended). • The available recording and playback time will be shorter when you use a fully charged battery pack. 10 "HD" stands for high definition image quality, and "SD" stands for the supplied battery pack Charging time: Approximate time (min.) required when you remove the battery pack or the ... only the AC Adaptor Slide the POWER switch to OFF (CHG), then connect the AC Adaptor directly to the DC IN jack of your camcorder or the Handycam Station, even when the power cord is turned off the (Movie) lamp/ (Still) lamp (p. 12). • The power will be supplied ...
Operating Guide
Page 16
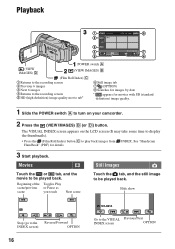
... to the Reverse/Forward INDEX screen) OPTION 16 Go to be played back. See "Handycam Handbook" (PDF) for movies with SD (standard definition) image quality. 1 Slide the POWER switch A to turn on the LCD screen (...(Film Roll Index) C 1 Returns to the recording screen 2 Previous 6 images 3 Next 6 images 4 Returns to the recording screen 5 HD (high definition) image quality movie tab* 6 Still image tab 7 (OPTION) 8 Searches for images by date * appears for details. 3 Start playback. Beginning... VISUAL INDEX screen appears on your camcorder. 2 Press the (VIEW IMAGES) B (or D) button.
... to the Reverse/Forward INDEX screen) OPTION 16 Go to be played back. See "Handycam Handbook" (PDF) for movies with SD (standard definition) image quality. 1 Slide the POWER switch A to turn on the LCD screen (...(Film Roll Index) C 1 Returns to the recording screen 2 Previous 6 images 3 Next 6 images 4 Returns to the recording screen 5 HD (high definition) image quality movie tab* 6 Still image tab 7 (OPTION) 8 Searches for images by date * appears for details. 3 Start playback. Beginning... VISUAL INDEX screen appears on your camcorder. 2 Press the (VIEW IMAGES) B (or D) button.
Operating Guide
Page 28
... Minimum 1,024 × 768 dots, High Color (16 bit color) Others: USB port (this must be used with your computer. http://guide.d-imaging.sony.co.jp/mac/ ms/us/ 28 ... Disc™ player/recorder or other compatible device. b Notes • This camcorder captures high definition footage in SD (standard definition) image quality Memory: Windows 2000, Windows XP: 512 MB or more (1 ... Creating a disc with images taken with your camcorder by one simple operation By pressing DISC BURN (p. 20) on the Handycam Station, you can be played on your camcorder connected to the computer - x Using a ...
... Minimum 1,024 × 768 dots, High Color (16 bit color) Others: USB port (this must be used with your computer. http://guide.d-imaging.sony.co.jp/mac/ ms/us/ 28 ... Disc™ player/recorder or other compatible device. b Notes • This camcorder captures high definition footage in SD (standard definition) image quality Memory: Windows 2000, Windows XP: 512 MB or more (1 ... Creating a disc with images taken with your camcorder by one simple operation By pressing DISC BURN (p. 20) on the Handycam Station, you can be played on your camcorder connected to the computer - x Using a ...
Operating Guide
Page 29
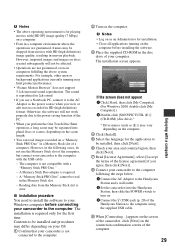
...images recorded on a "Memory Stick PRO Duo" in the following the steps below. 1 Connect the AC Adaptor to the Handycam Station and a wall outlet. 2 Set the camcorder onto the Handycam Station, then slide the POWER switch to turn on. 3 Connect the (USB) jack (p. 20) of your computer. ... on the scene length. • You can read in the disc drive of the Handycam Station to the computer with the USB cable: - Reading data from movies with HD (high definition) image quality, resulting in HD (high definition) format. b Notes • The above system requirements. A Memory Stick Duo adaptor ...
...images recorded on a "Memory Stick PRO Duo" in the following the steps below. 1 Connect the AC Adaptor to the Handycam Station and a wall outlet. 2 Set the camcorder onto the Handycam Station, then slide the POWER switch to turn on. 3 Connect the (USB) jack (p. 20) of your computer. ... on the scene length. • You can read in the disc drive of the Handycam Station to the computer with the USB cable: - Reading data from movies with HD (high definition) image quality, resulting in HD (high definition) format. b Notes • The above system requirements. A Memory Stick Duo adaptor ...


