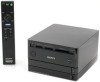
Operating Instructions
Page 6
... device such as a digital still camera 21 Importing All Photos to the Unit 22 6 Importing Selected Photos or Folders to the Unit 24 Importing a single photo to the unit 24 Importing multiple photos to the unit 25 Enjoying Photos Viewing Photos (Photo Browser 27 Viewing photos stored in a memory card or disc 30 Playing a slideshow 31 Enjoying Photo Albums ("x-ScrapBook 32 Browsing...
... device such as a digital still camera 21 Importing All Photos to the Unit 22 6 Importing Selected Photos or Folders to the Unit 24 Importing a single photo to the unit 24 Importing multiple photos to the unit 25 Enjoying Photos Viewing Photos (Photo Browser 27 Viewing photos stored in a memory card or disc 30 Playing a slideshow 31 Enjoying Photo Albums ("x-ScrapBook 32 Browsing...
Operating Instructions
Page 8
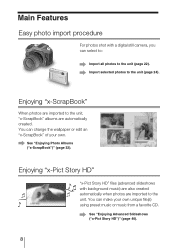
... the unit. You can make your own. See "Enjoying Photo Albums ("x-ScrapBook")" (page 32). Enjoying "x-Pict Story HD" "x-Pict Story HD" files (advanced slideshows with a digital still camera, you can select to: Import all photos to the unit (page 22). You can change the wallpaper or edit an "x-ScrapBook" of your own unique file(s) using...
... the unit. You can make your own. See "Enjoying Photo Albums ("x-ScrapBook")" (page 32). Enjoying "x-Pict Story HD" "x-Pict Story HD" files (advanced slideshows with a digital still camera, you can select to: Import all photos to the unit (page 22). You can change the wallpaper or edit an "x-ScrapBook" of your own unique file(s) using...
Operating Instructions
Page 21
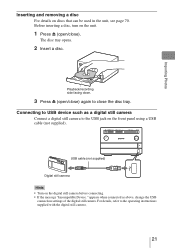
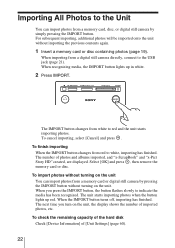
...USB connection settings of the digital still camera. CF/Microdrive EXPORT IMPORT USB cable (not supplied) Digital still camera Hints • Turn on the front panel using a USB cable (not supplied). appears when connected as a digital still camera Connect a digital still camera to the USB jack on the digital still camera before connecting. • If... that can be used in the unit, see page 70. For details, refer to the operating instructions supplied with the digital still camera. 21 Importing Photos A Playback/recording side facing down. 3 Press Z (open /close the disc tray.
...USB connection settings of the digital still camera. CF/Microdrive EXPORT IMPORT USB cable (not supplied) Digital still camera Hints • Turn on the front panel using a USB cable (not supplied). appears when connected as a digital still camera Connect a digital still camera to the USB jack on the digital still camera before connecting. • If... that can be used in the unit, see page 70. For details, refer to the operating instructions supplied with the digital still camera. 21 Importing Photos A Playback/recording side facing down. 3 Press Z (open /close the disc tray.
Operating Instructions
Page 22
... hard disk Check [Device Information] of photos and albums imported, and "x-ScrapBook" and "x-Pict Story HD" created, are displayed. When the IMPORT button turns off, importing has finished. To finish importing When the IMPORT button changes from red to the Unit You can import photos from a digital still camera directly, connect to red and the...
... hard disk Check [Device Information] of photos and albums imported, and "x-ScrapBook" and "x-Pict Story HD" created, are displayed. When the IMPORT button turns off, importing has finished. To finish importing When the IMPORT button changes from red to the Unit You can import photos from a digital still camera directly, connect to red and the...
Operating Instructions
Page 23
... the unit. • If you stop importing while the unit is creating "x-ScrapBook" album(s)/"x-Pict Story HD" file(s), all photos are connected/inserted at the same time, the unit imports from the computer ("Connecting to a Computer" page 50). • If a digital still camera, memory cards, and/or a disc are stored in an automatically created...
... the unit. • If you stop importing while the unit is creating "x-ScrapBook" album(s)/"x-Pict Story HD" file(s), all photos are connected/inserted at the same time, the unit imports from the computer ("Connecting to a Computer" page 50). • If a digital still camera, memory cards, and/or a disc are stored in an automatically created...

Operating Instructions
Page 24
Importing Selected Photos or Folders to the Unit Importing a single photo to the unit INPUT TV HOME INFO DISPLAY RETURN OPTIONS HOME TV VOL CH M/m/
Importing Selected Photos or Folders to the Unit Importing a single photo to the unit INPUT TV HOME INFO DISPLAY RETURN OPTIONS HOME TV VOL CH M/m/
Operating Instructions
Page 27
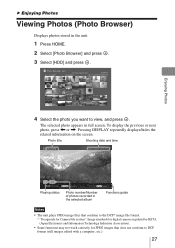
The selected photo appears in the selected album Functions guide Notes • The unit plays JPEG image files that conform to the DCF* image file format. * "Design rule for Camera File system": Image standards for digital cameras regulated by JEITA (Japan Electronics and Information Technology Industries Association). • Some functions may not work correctly for JPEG...
The selected photo appears in the selected album Functions guide Notes • The unit plays JPEG image files that conform to the DCF* image file format. * "Design rule for Camera File system": Image standards for digital cameras regulated by JEITA (Japan Electronics and Information Technology Industries Association). • Some functions may not work correctly for JPEG...
Operating Instructions
Page 30
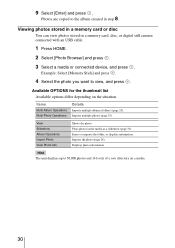
..., disc, or digital still camera connected with an USB cable. 1 Press HOME. 2 Select [Photo Browser] and press . 3 Select a media or connected device, and press . Displays photo information. Imports multiple photos (page 25). Erases or imports the folder, or displays information. Example: Select [Memory Stick] and press . 4 Select the photo you want to the album created in step...
..., disc, or digital still camera connected with an USB cable. 1 Press HOME. 2 Select [Photo Browser] and press . 3 Select a media or connected device, and press . Displays photo information. Imports multiple photos (page 25). Erases or imports the folder, or displays information. Example: Select [Memory Stick] and press . 4 Select the photo you want to the album created in step...
Operating Instructions
Page 63
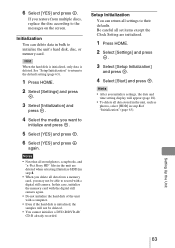
... Setup Initialization You can delete data in step 4 of the unit with a digital still camera. Notes • Note that all data stored in the unit, such as photos, select [HDD] in bulk to record with a computer. • Even...is initialized, only data is initialized, the samples will appear (page 18). • To delete all stored photos, scrapbooks, and "x-Pict Story HD" files in step 4. • When you delete all settings to the ... this case, initialize the memory card with the digital still camera again. • Do not initialize the hard disk of "Initialization" (page 63).
... Setup Initialization You can delete data in step 4 of the unit with a digital still camera. Notes • Note that all data stored in the unit, such as photos, select [HDD] in bulk to record with a computer. • Even...is initialized, only data is initialized, the samples will appear (page 18). • To delete all stored photos, scrapbooks, and "x-Pict Story HD" files in step 4. • When you delete all settings to the ... this case, initialize the memory card with the digital still camera again. • Do not initialize the hard disk of "Initialization" (page 63).
Operating Instructions
Page 64
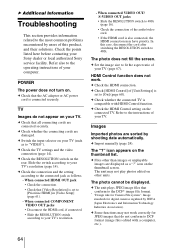
... appear on your TV's resolution (page 14). In this product, and their solutions. HDMI Control function does not work correctly for digital cameras regulated by JEITA (Japan Electronics and Information Technology Industries Association). c The unit plays JPEG image files that the AC adaptor or AC... or local authorized Sony service facility. c Check the connection and the setting according to 480i (page 16). • Check the connection of the audio/video cord. • If the HDMI cord is connected securely. The photo cannot be displayed. c Check the TV settings and the ...
... appear on your TV's resolution (page 14). In this product, and their solutions. HDMI Control function does not work correctly for digital cameras regulated by JEITA (Japan Electronics and Information Technology Industries Association). c The unit plays JPEG image files that the AC adaptor or AC... or local authorized Sony service facility. c Check the connection and the setting according to 480i (page 16). • Check the connection of the audio/video cord. • If the HDMI cord is connected securely. The photo cannot be displayed. c Check the TV settings and the ...

Operating Instructions
Page 71
Maximum number* of which is used is displayed as 1,073,741,824 bytes. Connectors USB (Type A) (for connecting digital still camera/USB keyboard) (1) USB (mini-B) (for connecting PictBridge printer/computer) (1) LAN (1) HDMI OUT (480i/480p/720p/1080i) (1) COMPONENT ... GB on the hard disk. Additional Information 71 When measuring media capacity, 1 GB equals 1 billion bytes, a portion of photos/ albums Albums: 3,000 Photos: 50,000 Photos for data management.) Media slots "Memory Stick" slot (1) SD Memory Card/MultiMediaCard/ xD-Picture Card slot (1) CompactFlash/Microdrive slot...
Maximum number* of which is used is displayed as 1,073,741,824 bytes. Connectors USB (Type A) (for connecting digital still camera/USB keyboard) (1) USB (mini-B) (for connecting PictBridge printer/computer) (1) LAN (1) HDMI OUT (480i/480p/720p/1080i) (1) COMPONENT ... GB on the hard disk. Additional Information 71 When measuring media capacity, 1 GB equals 1 billion bytes, a portion of photos/ albums Albums: 3,000 Photos: 50,000 Photos for data management.) Media slots "Memory Stick" slot (1) SD Memory Card/MultiMediaCard/ xD-Picture Card slot (1) CompactFlash/Microdrive slot...
Operating Instructions
Page 73
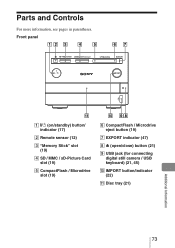
Front panel CF/Microdrive EXPORT IMPORT A "/1 (on/standby) button/ indicator (17) B Remote sensor (12) C "Memory Stick" slot (19) D SD / MMC / xD-Picture Card slot (19) E CompactFlash / Microdrive slot (19) F CompactFlash / Microdrive eject button (19) G EXPORT indicator (47) H Z (open/close) button (21) I USB jack (for connecting digital still camera / USB keyboard) (21, 45) J IMPORT button/indicator (22) K Disc tray (21) Additional Information 73 Parts and Controls For more information, see pages in parentheses.
Front panel CF/Microdrive EXPORT IMPORT A "/1 (on/standby) button/ indicator (17) B Remote sensor (12) C "Memory Stick" slot (19) D SD / MMC / xD-Picture Card slot (19) E CompactFlash / Microdrive slot (19) F CompactFlash / Microdrive eject button (19) G EXPORT indicator (47) H Z (open/close) button (21) I USB jack (for connecting digital still camera / USB keyboard) (21, 45) J IMPORT button/indicator (22) K Disc tray (21) Additional Information 73 Parts and Controls For more information, see pages in parentheses.
Operating Instructions
Page 76
...C [Change Theme] x-Pict Story HD 42 x-ScrapBook 35 Clock 18 [Clock Set] 60 CompactFlash (CF) 19 COMPONENT VIDEO OUT 16 Computer environment 50 Connecting digital still camera using a USB cable 21 power cord 17 to a computer with a USB cable 50 to the network 51 to TV 14 Controlling a TV with the remote... Information] 61 Disc tray 21 Disc types 70 DISPLAY 11, 27, 32 Display 10 E Editing x-Pict Story HD 41 x-ScrapBook 35 Entering characters 45 Erasing albums or photos 46 x-Pict Story HD 44 x-ScrapBook 39 [Export Page] 39 Exporting 47 to a computer via a network 58 to a computer via a USB cable 57 ...
...C [Change Theme] x-Pict Story HD 42 x-ScrapBook 35 Clock 18 [Clock Set] 60 CompactFlash (CF) 19 COMPONENT VIDEO OUT 16 Computer environment 50 Connecting digital still camera using a USB cable 21 power cord 17 to a computer with a USB cable 50 to the network 51 to TV 14 Controlling a TV with the remote... Information] 61 Disc tray 21 Disc types 70 DISPLAY 11, 27, 32 Display 10 E Editing x-Pict Story HD 41 x-ScrapBook 35 Entering characters 45 Erasing albums or photos 46 x-Pict Story HD 44 x-ScrapBook 39 [Export Page] 39 Exporting 47 to a computer via a network 58 to a computer via a USB cable 57 ...


