
Operating Instructions
Page 1
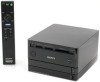
... Media Storage HDMS-S1D Operating Instructions C 2007 Sony Corporation Thank you for purchasing the High Definition Media Storage HDMS-S1D. Printed on 70% or more recycled paper using VOC (Volatile Organic Compound)free vegetable oil based ink. Printed in Japan 3-274-542-12(1) 3-274-542-12(1) Preparations Importing Photos Enjoying Photos Editing Photos Exporting Photos Printing Photos Connecting to prepare your unit for future reference. Before operating the unit, please read...
... Media Storage HDMS-S1D Operating Instructions C 2007 Sony Corporation Thank you for purchasing the High Definition Media Storage HDMS-S1D. Printed on 70% or more recycled paper using VOC (Volatile Organic Compound)free vegetable oil based ink. Printed in Japan 3-274-542-12(1) 3-274-542-12(1) Preparations Importing Photos Enjoying Photos Editing Photos Exporting Photos Printing Photos Connecting to prepare your unit for future reference. Before operating the unit, please read...
Operating Instructions
Page 2
... optical instruments with the limits for a digital device pursuant to constitute a risk of important operating and maintenance (servicing) instructions in a particular installation. To avoid electrical shock, do not attempt to excessive heat such as sunshine, fire or the like. Batteries or batteries installed apparatus shall not be used in a residential installation. The shielded Interface cable must be exposed to disassemble the cabinet...
... optical instruments with the limits for a digital device pursuant to constitute a risk of important operating and maintenance (servicing) instructions in a particular installation. To avoid electrical shock, do not attempt to excessive heat such as sunshine, fire or the like. Batteries or batteries installed apparatus shall not be used in a residential installation. The shielded Interface cable must be exposed to disassemble the cabinet...
Operating Instructions
Page 3
... ventilation openings. Regulatory Information Declaration of the unit. Owner's Record The model and serial number are provided for the FCC related matters only. A polarized plug has two blades with the apparatus. HDMS-S1D Serial No. Servicing is for your Sony dealer regarding this apparatus near any other purpose than the other apparatus (including amplifiers) that the "Memory Stick" containing images and...
... ventilation openings. Regulatory Information Declaration of the unit. Owner's Record The model and serial number are provided for the FCC related matters only. A polarized plug has two blades with the apparatus. HDMS-S1D Serial No. Servicing is for your Sony dealer regarding this apparatus near any other purpose than the other apparatus (including amplifiers) that the "Memory Stick" containing images and...
Operating Instructions
Page 5
... the hard disk drive may not be playable by Sony. • If the hard disk needs to be formatted or replaced, it will be played on . • When disconnecting the AC power cord, turn off ). • Do not move the unit with copyright protection technologies are turned off the power and make sure that among those discs, there are some record companies. Disc • Music discs...
... the hard disk drive may not be playable by Sony. • If the hard disk needs to be formatted or replaced, it will be played on . • When disconnecting the AC power cord, turn off ). • Do not move the unit with copyright protection technologies are turned off the power and make sure that among those discs, there are some record companies. Disc • Music discs...
Operating Instructions
Page 6
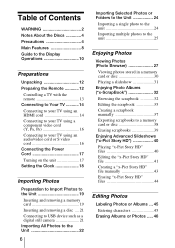
... Connecting to your TV using a component video cord (Y, PB, PR 16 Connecting to your TV using an audio/video cord or S video cord 16 Connecting the Power Cord 17 Turning on the unit 17 Setting the Clock 18 Importing Photos Preparation to Import Photos to the Unit 19 Inserting and removing a memory card 19 Inserting and removing a disc .... 21 Connecting to USB device such as a digital still camera 21 Importing All Photos to the Unit 22 6 Importing Selected Photos or Folders...
... Connecting to your TV using a component video cord (Y, PB, PR 16 Connecting to your TV using an audio/video cord or S video cord 16 Connecting the Power Cord 17 Turning on the unit 17 Setting the Clock 18 Importing Photos Preparation to Import Photos to the Unit 19 Inserting and removing a memory card 19 Inserting and removing a disc .... 21 Connecting to USB device such as a digital still camera 21 Importing All Photos to the Unit 22 6 Importing Selected Photos or Folders...

Operating Instructions
Page 7
... via a USB cable ..........57 Importing photos from a computer via a network 58 Exporting photos in the unit to a computer via a network 58 Additional Information Troubleshooting 64 Wide Screen Mode 67 Supported Memory Card Types 68 Supported Disc Types 70 Note on using discs 70 Specifications 71 Parts and Controls 73 Index 76 Setting Up the Unit How to Set Up the Unit .......... 59 Application Settings 60 Unit Settings 60 Video Setup 61...
... via a USB cable ..........57 Importing photos from a computer via a network 58 Exporting photos in the unit to a computer via a network 58 Additional Information Troubleshooting 64 Wide Screen Mode 67 Supported Memory Card Types 68 Supported Disc Types 70 Note on using discs 70 Specifications 71 Parts and Controls 73 Index 76 Setting Up the Unit How to Set Up the Unit .......... 59 Application Settings 60 Unit Settings 60 Video Setup 61...

Operating Instructions
Page 14
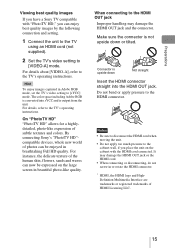
...; Be sure to turn on resolution, refer to the TV's operating instructions. 480i 720p Connecting to your TV's resolution. 480i: Outputs images from all the jacks. 480p, 720p, 1080i: Outputs images from the HDMI OUT and COMPONENT VIDEO OUT jacks. Connecting to Your TV You can view stored photos on cord. Connect the unit and TV with HDMI Control function, you can output...
...; Be sure to turn on resolution, refer to the TV's operating instructions. 480i 720p Connecting to your TV's resolution. 480i: Outputs images from all the jacks. 480p, 720p, 1080i: Outputs images from the HDMI OUT and COMPONENT VIDEO OUT jacks. Connecting to Your TV You can view stored photos on cord. Connect the unit and TV with HDMI Control function, you can output...
Operating Instructions
Page 15
... of photos can enjoy best quality images by the following connection and setting. 1 Connect the unit to the TV using an HDMI cord (not supplied). 2 Set the TV's video setting to the TV's operating instructions. The color space including Adobe RGB is not upside down Not straight Insert the HDMI connector straight into sYCC and is output from the unit. By connecting Sony's "PhotoTV HD"compatible devices, whole new...
... of photos can enjoy best quality images by the following connection and setting. 1 Connect the unit to the TV using an HDMI cord (not supplied). 2 Set the TV's video setting to the TV's operating instructions. The color space including Adobe RGB is not upside down Not straight Insert the HDMI connector straight into sYCC and is output from the unit. By connecting Sony's "PhotoTV HD"compatible devices, whole new...
Operating Instructions
Page 22
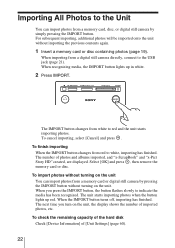
... remove the memory card or disc. The next time you press the IMPORT button, the button flashes slowly to the USB jack (page 21). When importing from a memory card or digital still camera by simply pressing the IMPORT button. When you turn on the unit, the display shows the number of imported photos, etc. To check the remaining capacity of the hard disk Check [Device Information] of photos and albums imported...
... remove the memory card or disc. The next time you press the IMPORT button, the button flashes slowly to the USB jack (page 21). When importing from a memory card or digital still camera by simply pressing the IMPORT button. When you turn on the unit, the display shows the number of imported photos, etc. To check the remaining capacity of the hard disk Check [Device Information] of photos and albums imported...

Operating Instructions
Page 28
... photo to multiple photos. You cannot view hidden photos. Displays the next search results. Image files smaller than 6,145 (width) × 4,097 (height). - Progressive JPEG images files. - JPEG image files exceeding 16 MB. • Image files with extreme aspect ratios may be cut off. Slideshow/Pause Actual Size Rotate (right) Rotate (left) Rename Set Tag Print Export View Info Hide/Show Plays/pauses slideshow (page 31). Items Standard/Full Screen Slideshow speed Details [Standard]: Displays...
... photo to multiple photos. You cannot view hidden photos. Displays the next search results. Image files smaller than 6,145 (width) × 4,097 (height). - Progressive JPEG images files. - JPEG image files exceeding 16 MB. • Image files with extreme aspect ratios may be cut off. Slideshow/Pause Actual Size Rotate (right) Rotate (left) Rename Set Tag Print Export View Info Hide/Show Plays/pauses slideshow (page 31). Items Standard/Full Screen Slideshow speed Details [Standard]: Displays...
Operating Instructions
Page 41
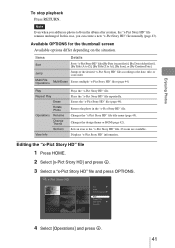
... are available. Play Repeat Play Erase Rotate Photo Operations Rename Change Theme Set Icon View Info Plays the "x-Pict Story HD" file. Erases the "x-Pict Story HD" file (page 44). Changes the design theme or BGM (page 42). Album25 Sat 11/ 3/2007 Sort Jump Multi-File Operations Play Repeat Play Operations View Info 4 Select [Operations] and press . 41 Note Even when you can create a new "x-Pict Story HD" file manually (page 43). Sets an icon...
... are available. Play Repeat Play Erase Rotate Photo Operations Rename Change Theme Set Icon View Info Plays the "x-Pict Story HD" file. Erases the "x-Pict Story HD" file (page 44). Changes the design theme or BGM (page 42). Album25 Sat 11/ 3/2007 Sort Jump Multi-File Operations Play Repeat Play Operations View Info 4 Select [Operations] and press . 41 Note Even when you can create a new "x-Pict Story HD" file manually (page 43). Sets an icon...
Operating Instructions
Page 57
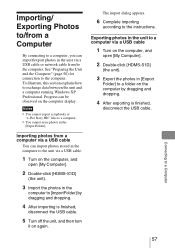
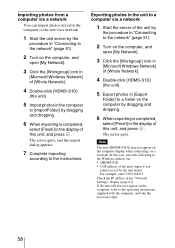
... the Unit and the Computer" (page 50) for connection to exchange data between the unit and a computer running Windows XP Professional. Exporting photos in the unit to a computer via a USB cable 1 Turn on the computer, and open [My Computer]. 2 Double-click [HDMS-S1D] (the unit). 3 Import the photos in [Export Folder] to a folder on the computer by dragging and dropping. 4 After importing...
... the Unit and the Computer" (page 50) for connection to exchange data between the unit and a computer running Windows XP Professional. Exporting photos in the unit to a computer via a USB cable 1 Turn on the computer, and open [My Computer]. 2 Double-click [HDMS-S1D] (the unit). 3 Import the photos in [Export Folder] to a folder on the computer by dragging and dropping. 4 After importing...
Operating Instructions
Page 58
... importing according to the operating instructions supplied with the computer, and take the necessary steps. 58 If the unit still does not appear on the computer, refer to the instructions. Exporting photos in the "Network Settings" display (page 61). The server quits. In this case, enter the following in the Windows address bar: • \\HDMS-S1D • \\ (IP address of...
... importing according to the operating instructions supplied with the computer, and take the necessary steps. 58 If the unit still does not appear on the computer, refer to the instructions. Exporting photos in the "Network Settings" display (page 61). The server quits. In this case, enter the following in the Windows address bar: • \\HDMS-S1D • \\ (IP address of...
Operating Instructions
Page 61
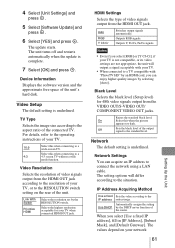
... operating instructions of video signals output from the HDMI OUT jack according to a TV compatible with your TV is complete. 7 Select [OK] and press . Auto RGB Y Cb Cr Switches output signals automatically. Outputs Y, PB/CB, PR/CR signals. Network The default setting is underlined. The update starts. Video Setup The default setting is underlined. IP Address Acquiring Method Use a fixed Sets the value according to connect...
... operating instructions of video signals output from the HDMI OUT jack according to a TV compatible with your TV is complete. 7 Select [OK] and press . Auto RGB Y Cb Cr Switches output signals automatically. Outputs Y, PB/CB, PR/CR signals. Network The default setting is underlined. The update starts. Video Setup The default setting is underlined. IP Address Acquiring Method Use a fixed Sets the value according to connect...
Operating Instructions
Page 63
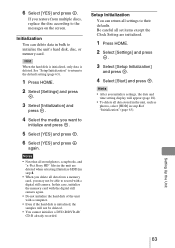
... [Settings] and press . 3 Select [Setup Initialization] and press . 4 Select [Start] and press . Setup Initialization You can delete data in bulk to initialize the unit's hard disk, disc, or memory card. Setting Up the Unit 63 See "Setup Initialization" to return to the default setting (page 63). 1 Press HOME. 2 Select [Settings] and press . 3 Select [Initialization] and press . 4 Select the media you initialize settings, the date and time setting display...
... [Settings] and press . 3 Select [Setup Initialization] and press . 4 Select [Start] and press . Setup Initialization You can delete data in bulk to initialize the unit's hard disk, disc, or memory card. Setting Up the Unit 63 See "Setup Initialization" to return to the default setting (page 63). 1 Press HOME. 2 Select [Settings] and press . 3 Select [Initialization] and press . 4 Select the media you initialize settings, the date and time setting display...
Operating Instructions
Page 64
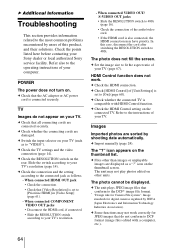
... fill the screen. HDMI Control function does not work correctly for digital cameras regulated by JEITA (Japan Electronics and Information Technology Industries Association). c Check [HDMI Control] of the audio/video cord. • If the HDMI cord is set to [Prioritize HDMI] in [Video Setup] (page 61). - Check the points listed here before contacting your Sony dealer or local authorized Sony service facility. c Check that [Video Resolution] is compatible with...
... fill the screen. HDMI Control function does not work correctly for digital cameras regulated by JEITA (Japan Electronics and Information Technology Industries Association). c Check [HDMI Control] of the audio/video cord. • If the HDMI cord is set to [Prioritize HDMI] in [Video Setup] (page 61). - Check the points listed here before contacting your Sony dealer or local authorized Sony service facility. c Check that [Video Resolution] is compatible with...
Operating Instructions
Page 65
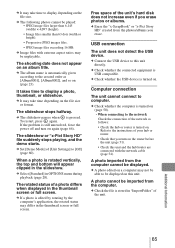
... this unit. USB connection The unit does not detect the USB device. c Check whether the USB device is pressed. To restart, press again. c Set [Demo Mode] of the unit. The rotated status of a photo differs when displayed in "ImportFolder" of [Unit Settings] to the instructions of the network as [Album0001], [Album0002], and so on an album title. A photo cannot be played: • JPEG image files larger than 6,145...
... this unit. USB connection The unit does not detect the USB device. c Check whether the USB device is pressed. To restart, press again. c Set [Demo Mode] of the unit. The rotated status of a photo differs when displayed in "ImportFolder" of [Unit Settings] to the instructions of the network as [Album0001], [Album0002], and so on an album title. A photo cannot be played: • JPEG image files larger than 6,145...
Operating Instructions
Page 66
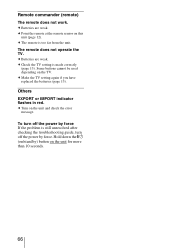
... unresolved after checking the troubleshooting guide, turn off the power by force. c Batteries are weak. The remote does not operate the TV. Some buttons cannot be used depending on the unit for more than 10 seconds. 66 To turn off the power by force If the problem is too far from the unit. c Batteries are weak. c Check the TV setting is made correctly (page...
... unresolved after checking the troubleshooting guide, turn off the power by force. c Batteries are weak. The remote does not operate the TV. Some buttons cannot be used depending on the unit for more than 10 seconds. 66 To turn off the power by force If the problem is too far from the unit. c Batteries are weak. c Check the TV setting is made correctly (page...

Operating Instructions
Page 71
Resolution of which is used is displayed as 1,073,741,824 bytes. Connectors USB (Type A) (for connecting digital still camera/USB keyboard) (1) USB (mini-B) (for "x-ScrapBook"/"x-Pict Story HD": 50,000 Photos within a single album/"xScrapBook"/"x-Pict Story HD" file: 9,999 * Maximum number includes the samples in .) (W × H × D, without protruding parts) Mass Approx. 2.7 kg (6 lbs.) Supported file formats Still image JPEG: JPG RAW*: SRF, SR2, ARW * Thumbnail of...
Resolution of which is used is displayed as 1,073,741,824 bytes. Connectors USB (Type A) (for connecting digital still camera/USB keyboard) (1) USB (mini-B) (for "x-ScrapBook"/"x-Pict Story HD": 50,000 Photos within a single album/"xScrapBook"/"x-Pict Story HD" file: 9,999 * Maximum number includes the samples in .) (W × H × D, without protruding parts) Mass Approx. 2.7 kg (6 lbs.) Supported file formats Still image JPEG: JPG RAW*: SRF, SR2, ARW * Thumbnail of...
Operating Instructions
Page 76
... Settings] 60 AUDIO OUT 16 [Auto Creation (x-ScrapBook/ x-Pict Story)] 60 [Auto Group] 60 B [Backup/Restore] 62 Battery 12 BGM x-Pict Story HD 42 x-ScrapBook 36 [Black Level] 61 "BRAVIA" Theatre Sync 14 C [Change Theme] x-Pict Story HD 42 x-ScrapBook 35 Clock 18 [Clock Set] 60 CompactFlash (CF) 19 COMPONENT VIDEO OUT 16 Computer environment 50 Connecting digital still camera using a USB cable 21 power cord 17 to a computer with a USB cable...
... Settings] 60 AUDIO OUT 16 [Auto Creation (x-ScrapBook/ x-Pict Story)] 60 [Auto Group] 60 B [Backup/Restore] 62 Battery 12 BGM x-Pict Story HD 42 x-ScrapBook 36 [Black Level] 61 "BRAVIA" Theatre Sync 14 C [Change Theme] x-Pict Story HD 42 x-ScrapBook 35 Clock 18 [Clock Set] 60 CompactFlash (CF) 19 COMPONENT VIDEO OUT 16 Computer environment 50 Connecting digital still camera using a USB cable 21 power cord 17 to a computer with a USB cable...


