
Operating Instructions
Page 2
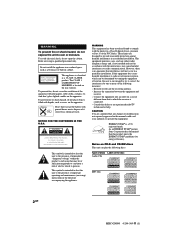
... one or more of the following discs: Type of electric shock to Part 15 of important operating and maintenance (servicing) instructions in a particular installation. Connect the equipment into an outlet on CD-R and CD-RW discs This unit can radiate radio frequency energy and, if not installed and used in accordance with the limits for a Class B digital device, pursuant to persons. Notes on...
... one or more of the following discs: Type of electric shock to Part 15 of important operating and maintenance (servicing) instructions in a particular installation. Connect the equipment into an outlet on CD-R and CD-RW discs This unit can radiate radio frequency energy and, if not installed and used in accordance with the limits for a Class B digital device, pursuant to persons. Notes on...
Operating Instructions
Page 3
...of multi-session CD-R/CD-RW is used for models MHC-GN900, MHC-GN800, MHCGN700, MHC-GX8800 and MHC-GN600. Tuner/CD player/Stereo cassette deck/Amplifier (main unit) HCD-GN600 - Program Play 13 Tuner Presetting radio stations 14 Listening to a tape -- CD Synchro Recording/ Recording Manually/ Program Edit 17 Timer-recording radio programs ......... 18 1) MHC-GN800 only. continued 3GB MHC-GN800 4-244-569-11 (1) Tuner/CD player/Stereo cassette deck/Amplifier (main unit) HCD-GN900 - Tuner/CD player/Stereo cassette deck/Amplifier (main unit) HCD-GN800 - Subwoofer SS...
...of multi-session CD-R/CD-RW is used for models MHC-GN900, MHC-GN800, MHCGN700, MHC-GX8800 and MHC-GN600. Tuner/CD player/Stereo cassette deck/Amplifier (main unit) HCD-GN600 - Program Play 13 Tuner Presetting radio stations 14 Listening to a tape -- CD Synchro Recording/ Recording Manually/ Program Edit 17 Timer-recording radio programs ......... 18 1) MHC-GN800 only. continued 3GB MHC-GN800 4-244-569-11 (1) Tuner/CD player/Stereo cassette deck/Amplifier (main unit) HCD-GN900 - Tuner/CD player/Stereo cassette deck/Amplifier (main unit) HCD-GN800 - Subwoofer SS...
Operating Instructions
Page 4
... display 23 Changing the power illuminator .......... 23 Turning off the display - Sleep Timer 26 Waking up optional components ........ 28 Listening to audio from a connected component 29 Recording on a connected component 29 Connecting external antennas 29 Troubleshooting Problems and remedies 30 Messages 32 Additional Information Precautions 33 Specifications 34 1) MHC-GN800/GN700/GX8800 only. 2) MHC-GN800 only. 4GB MHC-GN800 4-244-569-11 (1) Game Sync 25 Mixing video game sound with other sound source - Power Saving Mode 23 Using...
... display 23 Changing the power illuminator .......... 23 Turning off the display - Sleep Timer 26 Waking up optional components ........ 28 Listening to audio from a connected component 29 Recording on a connected component 29 Connecting external antennas 29 Troubleshooting Problems and remedies 30 Messages 32 Additional Information Precautions 33 Specifications 34 1) MHC-GN800/GN700/GX8800 only. 2) MHC-GN800 only. 4GB MHC-GN800 4-244-569-11 (1) Game Sync 25 Mixing video game sound with other sound source - Power Saving Mode 23 Using...
Operating Instructions
Page 12
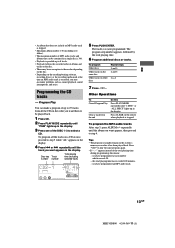
... power turns on and CD is stopped Press one of the DISC 1~3 buttons or DISC SKIP EX-CHANGE (or D.SKIP on the disc, it at the same time. *4 The current track is cancelled. Select a track Press > (to go backward). Switch to go forward) or . (to CD function Press CD or one of tracks or unneccessary album on all discs in random order. Set...
... power turns on and CD is stopped Press one of the DISC 1~3 buttons or DISC SKIP EX-CHANGE (or D.SKIP on the disc, it at the same time. *4 The current track is cancelled. Select a track Press > (to go backward). Switch to go forward) or . (to CD function Press CD or one of tracks or unneccessary album on all discs in random order. Set...
Operating Instructions
Page 13
... media used at once, proceed to select a CD. you have programmed an MP3 audio track. 13GB MHC-GN800 4-244-569-11 (1) Programming the CD tracks -- Program Play You can be an exception to play the same program again. • If "--.--" appears instead of the total playing time during programming, this Press PLAY MODE repeatedly until the album you want appears in the display. Other Operations To Cancel Program Play...
... media used at once, proceed to select a CD. you have programmed an MP3 audio track. 13GB MHC-GN800 4-244-569-11 (1) Programming the CD tracks -- Program Play You can be an exception to play the same program again. • If "--.--" appears instead of the total playing time during programming, this Press PLAY MODE repeatedly until the album you want appears in the display. Other Operations To Cancel Program Play...
Operating Instructions
Page 14
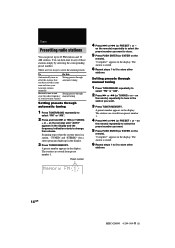
... stations Setting presets through manual tuning 1 Press TUNER/BAND repeatedly to store. 5 Press PUSH ENTER (or ENTER on the remote). on the remote) repeatedly to select the preset number you want . 5 Press PUSH ENTER (or ENTER on the remote). A preset number appears in and Setting presets through store the radio frequency manual tuning of the stations that automatic tuning can then tune in a station. To Do this Automatically tune in Setting presets through all of your favourite stations manually Manually tune...
... stations Setting presets through manual tuning 1 Press TUNER/BAND repeatedly to store. 5 Press PUSH ENTER (or ENTER on the remote). on the remote) repeatedly to select the preset number you want . 5 Press PUSH ENTER (or ENTER on the remote). A preset number appears in and Setting presets through store the radio frequency manual tuning of the stations that automatic tuning can then tune in a station. To Do this Automatically tune in Setting presets through all of your favourite stations manually Manually tune...
Operating Instructions
Page 15
... the AMP MENU button, turn off , the power turns on page 14). 1 Press TUNER/BAND repeatedly to a radio station either by selecting a preset station, or by manually tuning in a station (Automatic Tuning). • To record from step 1. The default setting is poor, set the CD power manage function to non-preset radio station - "CD POWER OFF" appears. To change the AM tuning interval (Except Middle Eastern models) The factory settings for half a day even if you unplug the power cord or if a power...
... the AMP MENU button, turn off , the power turns on page 14). 1 Press TUNER/BAND repeatedly to a radio station either by selecting a preset station, or by manually tuning in a station (Automatic Tuning). • To record from step 1. The default setting is poor, set the CD power manage function to non-preset radio station - "CD POWER OFF" appears. To change the AM tuning interval (Except Middle Eastern models) The factory settings for half a day even if you unplug the power cord or if a power...
Operating Instructions
Page 17
... antenna to reduce the noise. • For recording from a CD to a tape manually: You can record from the reverse side: After step 1, press TAPE A/B to select deck B and press hH twice to start playback of "Recording Manually" and then press REC PAUSE/START to start from the component connected to the GAME INPUT jacks with another function such as CD, tape, radio or MD connected...
... antenna to reduce the noise. • For recording from a CD to a tape manually: You can record from the reverse side: After step 1, press TAPE A/B to select deck B and press hH twice to start playback of "Recording Manually" and then press REC PAUSE/START to start from the component connected to the GAME INPUT jacks with another function such as CD, tape, radio or MD connected...
Operating Instructions
Page 18
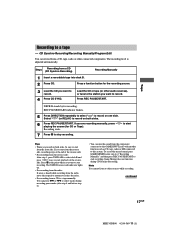
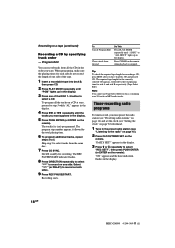
... the tape. 1 Insert a recordable tape into deck B, then press CD. 2 Press PLAY MODE repeatedly until "PGM" lights up in the display. 3 Press one side. "ON" appears and the hour indication flashes in the preset radio station (see "Listening to select a CD. Deck B standby for recording a CD, press EDIT after you must preset the radio station (see "Presetting radio stations" on page 14) and set the clock (see "Setting the clock" on the remote. Select...
... the tape. 1 Insert a recordable tape into deck B, then press CD. 2 Press PLAY MODE repeatedly until "PGM" lights up in the display. 3 Press one side. "ON" appears and the hour indication flashes in the preset radio station (see "Listening to select a CD. Deck B standby for recording a CD, press EDIT after you must preset the radio station (see "Presetting radio stations" on page 14) and set the clock (see "Setting the clock" on the remote. Select...

Operating Instructions
Page 20
... bass and create a more powerful sound. The indicator lights up . 20GB MHC-GN800 4-244-569-11 (1) V-GROOVE The volume switches to power mode and the equalizer curve changes to adjust the level. on . Each time you want . MHC-GN800 only Press SURROUND SPEAKER MODE repeatedly (or turn on the main unit, the last selected SURROUND SPEAKER MODE indicator on the subwoofer lights up when the subwoofer is reinforced. The surround sound is turned on the remote) to adjust the volume of the subwoofer...
... bass and create a more powerful sound. The indicator lights up . 20GB MHC-GN800 4-244-569-11 (1) V-GROOVE The volume switches to power mode and the equalizer curve changes to adjust the level. on . Each time you want . MHC-GN800 only Press SURROUND SPEAKER MODE repeatedly (or turn on the main unit, the last selected SURROUND SPEAKER MODE indicator on the subwoofer lights up when the subwoofer is reinforced. The surround sound is turned on the remote) to adjust the volume of the subwoofer...
Operating Instructions
Page 24
... tracks, the current track title is a program. Setting the time. - Pressing a function button to operate in Power Saving Mode. • During Power Saving Mode, the following item do not functions: - Using the CD display When a CD TEXT disc is selected. - Each time you can check the information stored on . - Turning off the display (continued) Tips • The @/1 indicator lights up in the display. Switching the function of the current album (for a few...
... tracks, the current track title is a program. Setting the time. - Pressing a function button to operate in Power Saving Mode. • During Power Saving Mode, the following item do not functions: - Using the CD display When a CD TEXT disc is selected. - Each time you can check the information stored on . - Turning off the display (continued) Tips • The @/1 indicator lights up in the display. Switching the function of the current album (for a few...

Operating Instructions
Page 25
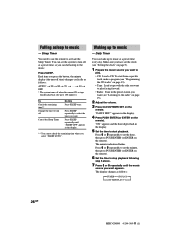
... function during CD Synchro Recording. Game Sync You need to connect an optional microphone. 1 Turn MIC LEVEL to MIN to turn down the microphone volume. 2 Connect an optional microphone to MIC jack. 3 Start playing the music and adjust the volume. 4 Adjust the microphone volume by selecting the CD function and not playing a CD. • When high level sound signals are input, the system automatically adjust the recording level to connect a video game player (see "Recording Manually" on even if the function is selected as follows: MIXING LOW...
... function during CD Synchro Recording. Game Sync You need to connect an optional microphone. 1 Turn MIC LEVEL to MIN to turn down the microphone volume. 2 Connect an optional microphone to MIC jack. 3 Start playing the music and adjust the volume. 4 Adjust the microphone volume by selecting the CD function and not playing a CD. • When high level sound signals are input, the system automatically adjust the recording level to connect a video game player (see "Recording Manually" on even if the function is selected as follows: MIXING LOW...
Operating Instructions
Page 26
... time you select "SLEEP AUTO". Press SLEEP repeatedly until the music source you want appears. The minute indication flashes. Press M or m repeatedly to set the clock (see "Listening to select the time you want . Waking up to start from a specific track, make a program (see "Programming the CD tracks" on page 13). • Tape: Load a tape with the side you want to play facing forward. • Radio: Tune...
... time you select "SLEEP AUTO". Press SLEEP repeatedly until the music source you want appears. The minute indication flashes. Press M or m repeatedly to set the clock (see "Listening to select the time you want . Waking up to start from a specific track, make a program (see "Programming the CD tracks" on page 13). • Tape: Load a tape with the side you want to play facing forward. • Radio: Tune...
Operating Instructions
Page 28
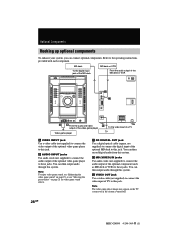
... (VIDEO) IN jacks Use audio cords (not supplied) to connect the audio output of TV to these jacks. C CD DIGITAL OUT jack Use a digital optical cable (square, not supplied) to connect the digital input of the optional video game player to the operating instructions provided with each component. Note To enjoy video game sound, see "Enhancing the video game sound" on page 25, or see "Selecting the preset effect" on the TV screen even if the system is turned off. 28GB MHC...
... (VIDEO) IN jacks Use audio cords (not supplied) to connect the audio output of TV to these jacks. C CD DIGITAL OUT jack Use a digital optical cable (square, not supplied) to connect the digital input of the optional video game player to the operating instructions provided with each component. Note To enjoy video game sound, see "Enhancing the video game sound" on page 25, or see "Selecting the preset effect" on the TV screen even if the system is turned off. 28GB MHC...
Operating Instructions
Page 30
... up to a connected VCR" on the power. • The demonstration mode started. The clock/timer setting is cancelled. • The power cord is not pointing in the display when you press MD (VIDEO), switch to "MD" function (see step 6 on page 9). Redo "Presetting radio stations" (on the remote. • Set the timer correctly. • Set the clock. Inserting the vinyl portion of the problem cannot be found...
... up to a connected VCR" on the power. • The demonstration mode started. The clock/timer setting is cancelled. • The power cord is not pointing in the display when you press MD (VIDEO), switch to "MD" function (see step 6 on page 9). Redo "Presetting radio stations" (on the remote. • Set the timer correctly. • Set the clock. Inserting the vinyl portion of the problem cannot be found...
Operating Instructions
Page 31
... one channel or unbalanced left and right volume. • Check the speaker connection and speaker placement. The album title, track title, and ID3 tag do not appear properly. • The character code that the speaker's + and - Upper cases (A to Z) - Remove the disc and leave the system turned on the front panel display. • Contact your Sony dealer or local authorized Sony service facility. Press PLAY MODE...
... one channel or unbalanced left and right volume. • Check the speaker connection and speaker placement. The album title, track title, and ID3 tag do not appear properly. • The character code that the speaker's + and - Upper cases (A to Z) - Remove the disc and leave the system turned on the front panel display. • Contact your Sony dealer or local authorized Sony service facility. Press PLAY MODE...
Operating Instructions
Page 32
... ("TUNED" or "STEREO" flashes in the display). • Adjust the antenna. • The signal is no tape in sound level. • The tape heads are dirty. (See "Cleaning the tape heads" on page 34). A stereo FM program cannot be received in . 3 Press x, AMP MENU and ?/1 at the same time. 4 Press ?/1 to program 26 or more tracks (steps). No Disc • There is too weak. Push STOP! • You pressed PLAY MODE during operation...
... ("TUNED" or "STEREO" flashes in the display). • Adjust the antenna. • The signal is no tape in sound level. • The tape heads are dirty. (See "Cleaning the tape heads" on page 34). A stereo FM program cannot be received in . 3 Press x, AMP MENU and ?/1 at the same time. 4 Press ?/1 to program 26 or more tracks (steps). No Disc • There is too weak. Push STOP! • You pressed PLAY MODE during operation...

Operating Instructions
Page 33
...use solvents. • Do not expose the CD to direct sunlight or heat sources. • Discs with non-standard shapes (e.g., heart, square, star) cannot be aware that conform to the Compact Disc (CD) standard. Refer to the instructions of the tape deck and become damaged. To disconnect the cord... the tape. Recently, various music discs encoded with copyright protection technologies are some record companies. Additional Information Precautions On operating voltage Before operating the unit, check that have been specially treated (with wax, oil, polish, etc.) as it is connected to ...
...use solvents. • Do not expose the CD to direct sunlight or heat sources. • Discs with non-standard shapes (e.g., heart, square, star) cannot be aware that conform to the Compact Disc (CD) standard. Refer to the instructions of the tape deck and become damaged. To disconnect the cord... the tape. Recently, various music discs encoded with copyright protection technologies are some record companies. Additional Information Precautions On operating voltage Before operating the unit, check that have been specially treated (with wax, oil, polish, etc.) as it is connected to ...
Operating Instructions
Page 34
... tape heads after playing an old tape. negative load impedance 75 ohms PHONES: accepts headphones of (stereo mini jack) 8 ohms or more FRONT SPEAKER: accepts impedance of 6 to the instructions of the cleaning cassette. Use separately sold demagnetizing cassette. For details, refer to 16 ohms SURROUND SPEAKER: accepts impedance of (MHC-GN800/GN700/ 24 ohms or more GX8800 only) SUBWOOFER: accept impedance of use . Specifications AUDIO POWER SPECIFICATIONS (MHC-GX8800 USA model only) POWER OUTPUT AND TOTAL HARMONIC DISTORTION: With 6-ohm loads, both channels...
... tape heads after playing an old tape. negative load impedance 75 ohms PHONES: accepts headphones of (stereo mini jack) 8 ohms or more FRONT SPEAKER: accepts impedance of 6 to the instructions of the cleaning cassette. Use separately sold demagnetizing cassette. For details, refer to 16 ohms SURROUND SPEAKER: accepts impedance of (MHC-GN800/GN700/ 24 ohms or more GX8800 only) SUBWOOFER: accept impedance of use . Specifications AUDIO POWER SPECIFICATIONS (MHC-GX8800 USA model only) POWER OUTPUT AND TOTAL HARMONIC DISTORTION: With 6-ohm loads, both channels...
Operating Instructions
Page 35
... CD OPTICAL DIGITAL OUT (Square optical connector jack, rear panel) Wave length 660 nm Output Level -18 dBm Tape player section Recording system Frequency response Wow and flutter 4-track 2-channel stereo 50 - 13,000 Hz (±3 dB), using Sony TYPE I cassette ±0.15% W.Peak (IEC) 0.1% W.RMS (NAB) ±0.2% W.Peak (DIN) Tuner section FM stereo, FM/AM superheterodyne tuner FM tuner section Tuning range Antenna Antenna terminals Intermediate frequency 87.5 - 108.0 MHz FM lead antenna 75 ohm...
... CD OPTICAL DIGITAL OUT (Square optical connector jack, rear panel) Wave length 660 nm Output Level -18 dBm Tape player section Recording system Frequency response Wow and flutter 4-track 2-channel stereo 50 - 13,000 Hz (±3 dB), using Sony TYPE I cassette ±0.15% W.Peak (IEC) 0.1% W.RMS (NAB) ±0.2% W.Peak (DIN) Tuner section FM stereo, FM/AM superheterodyne tuner FM tuner section Tuning range Antenna Antenna terminals Intermediate frequency 87.5 - 108.0 MHz FM lead antenna 75 ohm...

