
Operating Instructions
Page 2
This appliance is encouraged to try to provide reasonable protection against harmful interference in this manual could void your authority to operate this equipment does cause harmful interference to constitute a risk of it correctly as chemical waste. NOTICE FOR THE ...the equipment into an outlet on a circuit different from that to rain or moisture. ENERGY STAR® is connected. - As an ENERGY STAR® partner, Sony Corporation has determined that interference will not occur in a confined space, such as a CLASS 1 LASER product. To prevent fire or shock hazard, do not ...
This appliance is encouraged to try to provide reasonable protection against harmful interference in this manual could void your authority to operate this equipment does cause harmful interference to constitute a risk of it correctly as chemical waste. NOTICE FOR THE ...the equipment into an outlet on a circuit different from that to rain or moisture. ENERGY STAR® is connected. - As an ENERGY STAR® partner, Sony Corporation has determined that interference will not occur in a confined space, such as a CLASS 1 LASER product. To prevent fire or shock hazard, do not ...
Operating Instructions
Page 3
.... Speaker System • Front speakers SS-GN900 The MHC-GN800 consists of the following components: - Subwoofer SS-WG800 - Tuner/CD player/Stereo cassette deck/Amplifier (main unit) HCD-GN700/ HCD-GX8800 - continued 3GB MHC-GN800 4-244-569-11 (1) In this manual, the MHC-GN800 is not supported. * A process necessary for a recorded CD-R/CD-RW disc...
.... Speaker System • Front speakers SS-GN900 The MHC-GN800 consists of the following components: - Subwoofer SS-WG800 - Tuner/CD player/Stereo cassette deck/Amplifier (main unit) HCD-GN700/ HCD-GX8800 - continued 3GB MHC-GN800 4-244-569-11 (1) In this manual, the MHC-GN800 is not supported. * A process necessary for a recorded CD-R/CD-RW disc...
Operating Instructions
Page 14
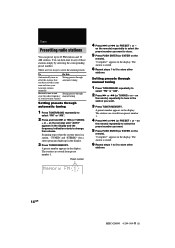
...all of the stations that automatic tuning can be received in your area and store your favourite stations manually Manually tune in and Setting presets through store the radio frequency manual tuning of those stations simply by selecting the corresponding preset number. A preset number appears in the ...want . 3 Press TUNER MEMORY. on the remote). on the remote). You can then tune in any of your favourite stations Setting presets through manual tuning 1 Press TUNER/BAND repeatedly to select the preset number you want . 5 Press PUSH ENTER (or ENTER on the remote) repeatedly to ...
...all of the stations that automatic tuning can be received in your area and store your favourite stations manually Manually tune in and Setting presets through store the radio frequency manual tuning of those stations simply by selecting the corresponding preset number. A preset number appears in the ...want . 3 Press TUNER MEMORY. on the remote). on the remote). You can then tune in any of your favourite stations Setting presets through manual tuning 1 Press TUNER/BAND repeatedly to select the preset number you want . 5 Press PUSH ENTER (or ENTER on the remote) repeatedly to ...
Operating Instructions
Page 15
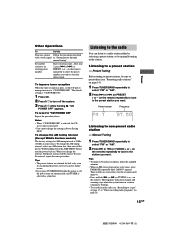
...station Follow the procedure described with a weak signal in Power Saving Mode. To reset to a radio station either by selecting a preset station, or by manually tuning in the station. To change the interval, AM preset stations will improve. • Press and hold M or m (or TUNING + or ...1 Press CD. 2 Press @/1 to select the preset number you want to a tape" on page 17 or "Timer-recording radio programs" on . Manual Tuning 1 Press TUNER/BAND repeatedly to non-preset radio station - Tips • To improve broadcast reception, adjust the supplied antennas. • When an...
...station Follow the procedure described with a weak signal in Power Saving Mode. To reset to a radio station either by selecting a preset station, or by manually tuning in the station. To change the interval, AM preset stations will improve. • Press and hold M or m (or TUNING + or ...1 Press CD. 2 Press @/1 to select the preset number you want to a tape" on page 17 or "Timer-recording radio programs" on . Manual Tuning 1 Press TUNER/BAND repeatedly to non-preset radio station - Tips • To improve broadcast reception, adjust the supplied antennas. • When an...
Operating Instructions
Page 17
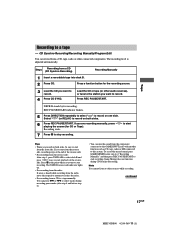
...cannot listen to record. 4 Press CD SYNC. Press a function button for the recording source. 3 Load the CD you want to other connected components. REC PAUSE/START indicator flashes. 5 Press DIRECTION repeatedly to select "g" to stop recording. Game Mixing does not function during recording pause mode ... during CD Synchro Recording. Tape Recording to record on both sides, be sure to start playback of "Recording Manually" and then press REC PAUSE/START to a tape manually: You can mix the sound from the front side. The TAPE B reverse side indicator lights up. •...
...cannot listen to record. 4 Press CD SYNC. Press a function button for the recording source. 3 Load the CD you want to other connected components. REC PAUSE/START indicator flashes. 5 Press DIRECTION repeatedly to select "g" to stop recording. Game Mixing does not function during recording pause mode ... during CD Synchro Recording. Tape Recording to record on both sides, be sure to start playback of "Recording Manually" and then press REC PAUSE/START to a tape manually: You can mix the sound from the front side. The TAPE B reverse side indicator lights up. •...

Operating Instructions
Page 25
... Turn MIC LEVEL to MIN to turn down the microphone volume. 2 Connect an optional microphone to MIN and disconnect the microphone from the component connected to prevent distortion of the recorded sound signals (Auto Level Control Function). 25GB MHC-GN800 4-244-569-11 (1) Tip If you press...page 17 and then press REC PAUSE/START to connect a video game player (see "Recording Manually" on page 28). Press GAME. You need to start recording. • The GAME MIXING indicator lights up optional components" on page 17. To stop recording, press x. • If acoustic feedback (howling) ...
... Turn MIC LEVEL to MIN to turn down the microphone volume. 2 Connect an optional microphone to MIN and disconnect the microphone from the component connected to prevent distortion of the recorded sound signals (Auto Level Control Function). 25GB MHC-GN800 4-244-569-11 (1) Tip If you press...page 17 and then press REC PAUSE/START to connect a video game player (see "Recording Manually" on page 28). Press GAME. You need to start recording. • The GAME MIXING indicator lights up optional components" on page 17. To stop recording, press x. • If acoustic feedback (howling) ...

