Operating Guide
Page 1
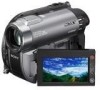
... vegetable oil based ink. Printed in China US Digital Video Camera Recorder Operating Guide DCR-DVD610/DVD710/ DVD810 3-285-366-11(1) Enjoying with Your Camcorder 12 Getting Started 20 Recording/Playback 34 Editing 50 Utilizing... Media 66 Customizing Your 78 Camcorder Performing with Your 97 Computer Troubleshooting 101 Additional 114 Information Quick 129 Reference Spanish Quick Guide/ 140 Guía rápida en español © 2008 Sony...
... vegetable oil based ink. Printed in China US Digital Video Camera Recorder Operating Guide DCR-DVD610/DVD710/ DVD810 3-285-366-11(1) Enjoying with Your Camcorder 12 Getting Started 20 Recording/Playback 34 Editing 50 Utilizing... Media 66 Customizing Your 78 Camcorder Performing with Your 97 Computer Troubleshooting 101 Additional 114 Information Quick 129 Reference Spanish Quick Guide/ 140 Guía rápida en español © 2008 Sony...
Operating Guide
Page 6
... PRO Duo"/"Memory Stick PRO-HG Duo" (This size can be used with your camcorder.) "Memory Stick" (You cannot use it is not dustproofed, dripproofed or waterproofed. See "About handling of your camcorder to another device with a *(for VIDEO CAMERA) mark for the recordable time of a "Memory Stick PRO Duo." b Note • Using...
... PRO Duo"/"Memory Stick PRO-HG Duo" (This size can be used with your camcorder.) "Memory Stick" (You cannot use it is not dustproofed, dripproofed or waterproofed. See "About handling of your camcorder to another device with a *(for VIDEO CAMERA) mark for the recordable time of a "Memory Stick PRO Duo." b Note • Using...
Operating Guide
Page 7
... of a Carl Zeiss lens. DCR-DVD610/DVD710 Use a DVD-RW/DVD+RW...camcorder is equipped with a Carl Zeiss lens, which was developed jointly by Carl Zeiss, in low light conditions, such as at the sun. DCR...-DVD810 Make trial recording on another type of the manufacturing process and do not affect the recording in any problems. - In such a case, save your camcorder...destroy the actual body of the camcorder. These points are effective. On... images for video cameras and offers a quality typical of your camcorder to a ... your camcorder to ... 99.99% of the camcorder, recording media, etc....
... of a Carl Zeiss lens. DCR-DVD610/DVD710 Use a DVD-RW/DVD+RW...camcorder is equipped with a Carl Zeiss lens, which was developed jointly by Carl Zeiss, in low light conditions, such as at the sun. DCR...-DVD810 Make trial recording on another type of the manufacturing process and do not affect the recording in any problems. - In such a case, save your camcorder...destroy the actual body of the camcorder. These points are effective. On... images for video cameras and offers a quality typical of your camcorder to a ... your camcorder to ... 99.99% of the camcorder, recording media, etc....
Operating Guide
Page 13
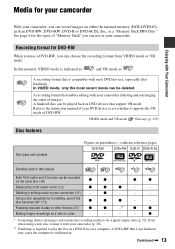
... to play the disc in parentheses ( ) indicate reference pages. See page 6 for DVD-RW When you use in your camcorder (p. 30). ** Finalizing is indicated as and VR mode as . VIDEO mode and VR mode Glossary (p. 135) Disc features Disc types and symbols Figures in a DVD drive on the same disc ... devices that is not finalized may cause the computer to the instruction manual of "Memory Stick" you can record images on either the internal memory (DCR-DVD810), an 8cm DVD-RW, DVD+RW, DVD-R or DVD+R DL disc, or a "Memory Stick PRO Duo." z z Deleting the most DVD devices, especially...
... to play the disc in parentheses ( ) indicate reference pages. See page 6 for DVD-RW When you use in your camcorder (p. 30). ** Finalizing is indicated as and VR mode as . VIDEO mode and VR mode Glossary (p. 135) Disc features Disc types and symbols Figures in a DVD drive on the same disc ... devices that is not finalized may cause the computer to the instruction manual of "Memory Stick" you can record images on either the internal memory (DCR-DVD810), an 8cm DVD-RW, DVD+RW, DVD-R or DVD+R DL disc, or a "Memory Stick PRO Duo." z z Deleting the most DVD devices, especially...

Operating Guide
Page 24
... Adaptor from the wall outlet (wall socket). • When attaching an optional video light, it while connected to 86 °F) is recommended). • The available recording and playback time will be shorter when you use your camcorder. On the battery pack • Before changing the battery pack, turn the ... off , AC power source (mains) is still supplied to it is recommended that you use an NP-FH70/NPFH100 battery pack (DCR-DVD710/DVD810). • We do not recommend using the camcorder at 25 °C (77 °F) (10 °C to 30 °C (50 °F to the wall outlet (wall socket) ...
... Adaptor from the wall outlet (wall socket). • When attaching an optional video light, it while connected to 86 °F) is recommended). • The available recording and playback time will be shorter when you use your camcorder. On the battery pack • Before changing the battery pack, turn the ... off , AC power source (mains) is still supplied to it is recommended that you use an NP-FH70/NPFH100 battery pack (DCR-DVD710/DVD810). • We do not recommend using the camcorder at 25 °C (77 °F) (10 °C to 30 °C (50 °F to the wall outlet (wall socket) ...
Operating Guide
Page 31
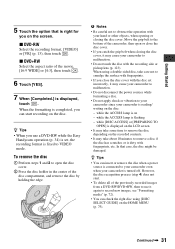
.... 2 Press the disc holder in the center of the previously recorded images from a DVD-RW/DVD+RW, then to use a DVD-RW while the Easy Handycam operation (p. 34) is set incorrectly, it again to record new images, see "Formatting media" (p. 72). • You can check the right disc using a... on the screen. When the formatting is on the disc. x DVD-RW Select the recording format, [VIDEO] or [VR] (p. 13), then touch . while the ACCESS lamp is completed, you use it may cause your camcorder to malfunction. • Do not disconnect the power sources while formatting a disc. • Do not ...
.... 2 Press the disc holder in the center of the previously recorded images from a DVD-RW/DVD+RW, then to use a DVD-RW while the Easy Handycam operation (p. 34) is set incorrectly, it again to record new images, see "Formatting media" (p. 72). • You can check the right disc using a... on the screen. When the formatting is on the disc. x DVD-RW Select the recording format, [VIDEO] or [VR] (p. 13), then touch . while the ACCESS lamp is completed, you use it may cause your camcorder to malfunction. • Do not disconnect the power sources while formatting a disc. • Do not ...

Operating Guide
Page 37
...devices or a computer, you finalize the disc even if the disc has free space. • You cannot record additional movies on a finalized disc during Easy Handycam operation Touch (HOME) C (or B) to "finalize" the disc. For details on other devices (Finalize) To view movies stored on a disc on finalizing... operation, see page 79. • DVD-RW is formatted with VIDEO mode (p. 13). • You cannot use some menu items are automatically set (p. 79). b Notes • For DVD-R, DVD+R DL, you cannot ...
...devices or a computer, you finalize the disc even if the disc has free space. • You cannot record additional movies on a finalized disc during Easy Handycam operation Touch (HOME) C (or B) to "finalize" the disc. For details on other devices (Finalize) To view movies stored on a disc on finalizing... operation, see page 79. • DVD-RW is formatted with VIDEO mode (p. 13). • You cannot use some menu items are automatically set (p. 79). b Notes • For DVD-R, DVD+R DL, you cannot ...
Operating Guide
Page 48
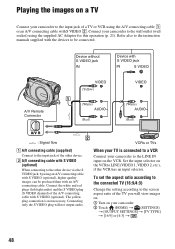
... of the A/V connecting cable with the devices to be produced than with S VIDEO 2. Set the input selector on your TV is not necessary. Playing the images on a TV Connect your camcorder to the wall outlet (wall socket) using the supplied AC Adaptor for this ...to the other device via the S VIDEO jack, by using the A/V connecting cable 1 or an A/V connecting cable with an A/V connecting cable. Connect your camcorder to the input jack of the other device. 2 A/V connecting cable with S VIDEO (optional) When connecting to LINE (VIDEO 1, VIDEO 2, etc.), if the VCR has an...
... of the A/V connecting cable with the devices to be produced than with S VIDEO 2. Set the input selector on your TV is not necessary. Playing the images on a TV Connect your camcorder to the wall outlet (wall socket) using the supplied AC Adaptor for this ...to the other device via the S VIDEO jack, by using the A/V connecting cable 1 or an A/V connecting cable with an A/V connecting cable. Connect your camcorder to the input jack of the other device. 2 A/V connecting cable with S VIDEO (optional) When connecting to LINE (VIDEO 1, VIDEO 2, etc.), if the VCR has an...

Operating Guide
Page 49
...:9]. When your TV is monaural (When your TV has only one audio input jack) Connect the yellow plug of the A/V connecting cable to the video input jack and connect the white (left channel) or the red (right channel) plug to the audio input jack of your TV or VCR. ... [4:3]. Also, when the recorded image's aspect ratio switches between 16:9 (wide) and 4:3, the image may deteriorate. Recording/Playback b Notes • When you connect your camcorder to a TV compatible with the ID-1/ID-2 system, set [TV TYPE] to [4:3], the image quality may jitter. • When you play back an image recorded...
...:9]. When your TV is monaural (When your TV has only one audio input jack) Connect the yellow plug of the A/V connecting cable to the video input jack and connect the white (left channel) or the red (right channel) plug to the audio input jack of your TV or VCR. ... [4:3]. Also, when the recorded image's aspect ratio switches between 16:9 (wide) and 4:3, the image may deteriorate. Recording/Playback b Notes • When you connect your camcorder to a TV compatible with the ID-1/ID-2 system, set [TV TYPE] to [4:3], the image quality may jitter. • When you play back an image recorded...

Operating Guide
Page 62
... using the supplied AC Adaptor for this operation (p. 21). Device without S VIDEO jack IN Device with S VIDEO (optional). Connect your camcorder to other recording devices, such as a counter on your camcorder to the wall outlet (wall socket) using an A/V connecting cable with S VIDEO (optional), higher quality movies can dub movies played back on the screen...
... using the supplied AC Adaptor for this operation (p. 21). Device without S VIDEO jack IN Device with S VIDEO (optional). Connect your camcorder to other recording devices, such as a counter on your camcorder to the wall outlet (wall socket) using an A/V connecting cable with S VIDEO (optional), higher quality movies can dub movies played back on the screen...
Operating Guide
Page 63
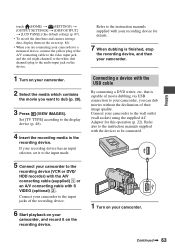
... be connected. 1 Turn on your camcorder. Connecting a device with S VIDEO (optional) 2. Continued , 63 If your recording device has an input selector, set it on the recording device. Connect your camcorder to the input jacks of the recording device. 6 Start playback on your camcorder, and record it to the input ...and camera settings data, display them on the screen (p. 84). • When you are connecting your camcorder to a monaural device, connect the yellow plug of the A/V connecting cable to the video input jack, and the red (right channel) or the white (left channel) plug to the audio...
... be connected. 1 Turn on your camcorder. Connecting a device with S VIDEO (optional) 2. Continued , 63 If your recording device has an input selector, set it on the recording device. Connect your camcorder to the input jacks of the recording device. 6 Start playback on your camcorder, and record it to the input ...and camera settings data, display them on the screen (p. 84). • When you are connecting your camcorder to a monaural device, connect the yellow plug of the A/V connecting cable to the video input jack, and the red (right channel) or the white (left channel) plug to the audio...
Operating Guide
Page 65
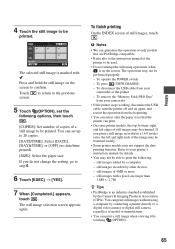
... If you do not change the setting, go to be printed. Touch to return to the previous screen. 5 Touch (OPTION), set up to a digital video camera or digital still camera, regardless of the image may be trimmed widely. • Some printer models may be performed properly. - The still image selection...can print still images without using a computer by touching (OPTION). 65 still images of still images, touch . To disconnect the USB cable from your camcorder • If the printer stops working, disconnect the USB cable, turn the printer off and on the screen to your...
... If you do not change the setting, go to be printed. Touch to return to the previous screen. 5 Touch (OPTION), set up to a digital video camera or digital still camera, regardless of the image may be trimmed widely. • Some printer models may be performed properly. - The still image selection...can print still images without using a computer by touching (OPTION). 65 still images of still images, touch . To disconnect the USB cable from your camcorder • If the printer stops working, disconnect the USB cable, turn the printer off and on the screen to your...

Operating Guide
Page 69
... you want to create a DVD menu and finalize the disc, the DVD menu appears for finalizing. 1 Place your camcorder in the case of DVD-RW (VIDEO mode). Go to step 5 if you set to your camcorder. 3 Insert the disc to finalize a disc. b Notes • When you finalize a double-sided disc, you... and disconnect the AC Adaptor after the (Movie) or (Still) lamp goes off. Continued , 69 When you connect the AC Adaptor and turn on your camcorder is completed, touch . The shorter the amount of pattern with / . To select a DVD menu style 1 In step 4, touch (OPTION) t [DVD MENU]. 2 Select ...
... you want to create a DVD menu and finalize the disc, the DVD menu appears for finalizing. 1 Place your camcorder in the case of DVD-RW (VIDEO mode). Go to step 5 if you set to your camcorder. 3 Insert the disc to finalize a disc. b Notes • When you finalize a double-sided disc, you... and disconnect the AC Adaptor after the (Movie) or (Still) lamp goes off. Continued , 69 When you connect the AC Adaptor and turn on your camcorder is completed, touch . The shorter the amount of pattern with / . To select a DVD menu style 1 In step 4, touch (OPTION) t [DVD MENU]. 2 Select ...
Operating Guide
Page 72
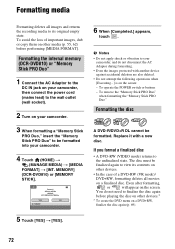
... Adaptor during formatting. • Even the images protected with a new disc. Formatting the internal memory (DCR-DVD810) or "Memory Stick PRO Duo" 1 Connect the AC Adaptor to the DC IN jack on your camcorder, then connect the power cord (mains lead) to the wall outlet (wall socket). 2 Turn on ...your camcorder. 3 When formatting a "Memory Stick PRO Duo," insert the "Memory Stick PRO Duo" to be formatted. If you format a finalized disc • A DVD-RW (VIDEO mode) returns to finalize the disc again before playing the disc on other ...
... Adaptor during formatting. • Even the images protected with a new disc. Formatting the internal memory (DCR-DVD810) or "Memory Stick PRO Duo" 1 Connect the AC Adaptor to the DC IN jack on your camcorder, then connect the power cord (mains lead) to the wall outlet (wall socket). 2 Turn on ...your camcorder. 3 When formatting a "Memory Stick PRO Duo," insert the "Memory Stick PRO Duo" to be formatted. If you format a finalized disc • A DVD-RW (VIDEO mode) returns to finalize the disc again before playing the disc on other ...
Operating Guide
Page 73
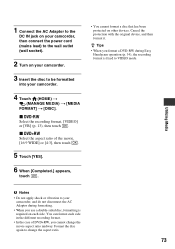
...Utilizing Media b Notes • Do not apply shock or vibration to your camcorder, and do not disconnect the AC Adaptor during formatting. • When you format a DVD-RW during Easy Handycam operation (p. 34), the recording format is required on other devices. x DVD-...RW Select the recording format, [VIDEO] or [VR] (p. 13), then touch . Format the disc again to be formatted into your camcorder. 4 Touch (HOME) t (MANAGE MEDIA) t [MEDIA FORMAT...
...Utilizing Media b Notes • Do not apply shock or vibration to your camcorder, and do not disconnect the AC Adaptor during formatting. • When you format a DVD-RW during Easy Handycam operation (p. 34), the recording format is required on other devices. x DVD-...RW Select the recording format, [VIDEO] or [VR] (p. 13), then touch . Format the disc again to be formatted into your camcorder. 4 Touch (HOME) t (MANAGE MEDIA) t [MEDIA FORMAT...
Operating Guide
Page 74
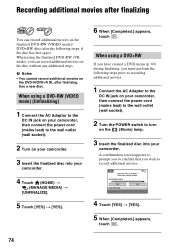
...) (Unfinalizing) 1 Connect the AC Adaptor to the DC IN jack on your camcorder, then connect the power cord (mains lead) to turn on the finalized DVD-RW (VIDEO mode)/ DVD+RW discs after the following steps, if the disc has free space. Use a new disc. b Notes • You cannot ...record additional movies on your camcorder. 3 Insert the finalized disc into your camcorder. When using the finalized DVD-RW (VR mode),...
...) (Unfinalizing) 1 Connect the AC Adaptor to the DC IN jack on your camcorder, then connect the power cord (mains lead) to turn on the finalized DVD-RW (VIDEO mode)/ DVD+RW discs after the following steps, if the disc has free space. Use a new disc. b Notes • You cannot ...record additional movies on your camcorder. 3 Insert the finalized disc into your camcorder. When using the finalized DVD-RW (VR mode),...
Operating Guide
Page 94
...where the lighting conditions change quickly - SNOW** ( ) Select this to focus on glass or metal mesh in windows that comes in between the camcorder and the subject. OUTDOOR ( ) The white balance is adjusted and stored in a studio, or under the same lighting conditions as a piece ...light. 1 Touch [ONE PUSH]. 2 Frame a white object such as you set [SCENE SELECTION]. Under video lamps in the memory, the indicator stops flashing. This setting also prevents your camcorder from appearing excessively white when subjects are lit by strong light. WHITE BAL. (White balance) You can ...
...where the lighting conditions change quickly - SNOW** ( ) Select this to focus on glass or metal mesh in windows that comes in between the camcorder and the subject. OUTDOOR ( ) The white balance is adjusted and stored in a studio, or under the same lighting conditions as a piece ...light. 1 Touch [ONE PUSH]. 2 Frame a white object such as you set [SCENE SELECTION]. Under video lamps in the memory, the indicator stops flashing. This setting also prevents your camcorder from appearing excessively white when subjects are lit by strong light. WHITE BAL. (White balance) You can ...
Operating Guide
Page 97
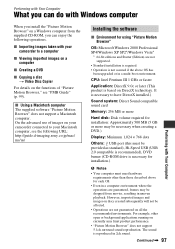
...to a computer x Viewing imported images on a computer x Creating a DVD x Copying a disc t Video Disc Copier For details on currently may be affected. • Operations are not guaranteed on discs created ..., resulting in uneven playback. On the advanced use of images on your camcorder connected to your camcorder to have DirectX installed.) Sound system: Direct Sound compatible sound card Memory... Windows computer from the supplied CD-ROM, you can enjoy the following URL: http://guide.d-imaging.sony.co.jp/mac/ ms/us/ Installing the software x Environment for each OS. • Even...
...to a computer x Viewing imported images on a computer x Creating a DVD x Copying a disc t Video Disc Copier For details on currently may be affected. • Operations are not guaranteed on discs created ..., resulting in uneven playback. On the advanced use of images on your camcorder connected to your camcorder to have DirectX installed.) Sound system: Direct Sound compatible sound card Memory... Windows computer from the supplied CD-ROM, you can enjoy the following URL: http://guide.d-imaging.sony.co.jp/mac/ ms/us/ Installing the software x Environment for each OS. • Even...
Operating Guide
Page 101
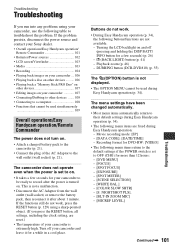
... you run into any problems using your camcorder, use the following menu items are fixed during Easy Handycam operation (p. 34). Turn off (pressing and... problem persists, disconnect the power source and contact your Sony dealer. • Overall operations/Easy Handycam operation/ Remote Commander 101 • Batteries/Power sources ...automatically return to OFF (CHG) for DVD-RW: [VIDEO] • The following menu items return to the ... displayed. • The OPTION MENU cannot be used during Easy Handycam operation: - DUBBING button (DCR-DVD810) (p. 55) The (OPTION) button is set to on...
... you run into any problems using your camcorder, use the following menu items are fixed during Easy Handycam operation (p. 34). Turn off (pressing and... problem persists, disconnect the power source and contact your Sony dealer. • Overall operations/Easy Handycam operation/ Remote Commander 101 • Batteries/Power sources ...automatically return to OFF (CHG) for DVD-RW: [VIDEO] • The following menu items return to the ... displayed. • The OPTION MENU cannot be used during Easy Handycam operation: - DUBBING button (DCR-DVD810) (p. 55) The (OPTION) button is set to on...
Operating Guide
Page 103
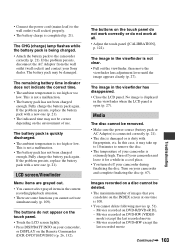
...The battery pack has not been charged enough. The image in a cool place. • You turned off your camcorder and complete finalizing the disc (p. 67). Turn on DVD-RW (VIDEO mode) except the last recorded movie - Movies recorded on DVD-R/DVD+R DL - The remaining battery time indicator does ...• Touch the LCD screen lightly. • Press DISP/BATT INFO on your Sony dealer. Media The disc cannot be deleted. • The maximum number of use. The buttons on the Remote Commander (DCR-DVD710/DVD810) (p. 26, 132). Fully charge the battery pack again. Fully charge the ...
...The battery pack has not been charged enough. The image in a cool place. • You turned off your camcorder and complete finalizing the disc (p. 67). Turn on DVD-RW (VIDEO mode) except the last recorded movie - Movies recorded on DVD-R/DVD+R DL - The remaining battery time indicator does ...• Touch the LCD screen lightly. • Press DISP/BATT INFO on your Sony dealer. Media The disc cannot be deleted. • The maximum number of use. The buttons on the Remote Commander (DCR-DVD710/DVD810) (p. 26, 132). Fully charge the battery pack again. Fully charge the ...


