Operating Guide
Page 1
... in China US Digital Video Camera Recorder Operating Guide DCR-DVD610/DVD710/ DVD810 3-285-366-11(1) Enjoying with Your Camcorder 12 Getting Started 20 Recording/Playback 34 Editing 50 Utilizing Media 66 Customizing Your 78 Camcorder Performing with Your 97 Computer Troubleshooting 101 Additional 114 ...Information Quick 129 Reference Spanish Quick Guide/ 140 Guía rápida en español © 2008 Sony Corporation http://www.sony.net/ Printed on this product...
... in China US Digital Video Camera Recorder Operating Guide DCR-DVD610/DVD710/ DVD810 3-285-366-11(1) Enjoying with Your Camcorder 12 Getting Started 20 Recording/Playback 34 Editing 50 Utilizing Media 66 Customizing Your 78 Camcorder Performing with Your 97 Computer Troubleshooting 101 Additional 114 ...Information Quick 129 Reference Spanish Quick Guide/ 140 Guía rápida en español © 2008 Sony Corporation http://www.sony.net/ Printed on this product...
Operating Guide
Page 4
...The use of optical instruments with the specified type only. Use of controls or adjustments or performance of Conformity Trade Name: SONY Model No.: DCR-DVD710 Responsible Party:Sony Electronics Inc. You can help preserve our environment by returning your used rechargeable batteries to these numbers whenever you may cause ...result. Owner's Record The model and serial numbers are recyclable. Record the serial number in the U.S.A. Read this before operating your camcorder Before operating the unit, please read this manual thoroughly, and retain it for the FCC related matters only.
...The use of optical instruments with the specified type only. Use of controls or adjustments or performance of Conformity Trade Name: SONY Model No.: DCR-DVD710 Responsible Party:Sony Electronics Inc. You can help preserve our environment by returning your used rechargeable batteries to these numbers whenever you may cause ...result. Owner's Record The model and serial numbers are recyclable. Record the serial number in the U.S.A. Read this before operating your camcorder Before operating the unit, please read this manual thoroughly, and retain it for the FCC related matters only.

Operating Guide
Page 5
... a computer connected (stored on a circuit different from that may cause harmful interference to Part 15 of Conformity Trade Name: SONY Model No.: DCR-DVD810 Responsible Party:Sony Electronics Inc. "Operating Guide" (This manual) - Telephone No.: 858-942-2230 This device complies with Part 15 of ...received, including interference that interference will not occur in this device must be determined by turning the equipment off and on use Your camcorder is connected. - However, there is subject to the following two conditions: (1) This device may apply, See www.dtsc.ca...
... a computer connected (stored on a circuit different from that may cause harmful interference to Part 15 of Conformity Trade Name: SONY Model No.: DCR-DVD810 Responsible Party:Sony Electronics Inc. "Operating Guide" (This manual) - Telephone No.: 858-942-2230 This device complies with Part 15 of ...received, including interference that interference will not occur in this device must be determined by turning the equipment off and on use Your camcorder is connected. - However, there is subject to the following two conditions: (1) This device may apply, See www.dtsc.ca...
Operating Guide
Page 6
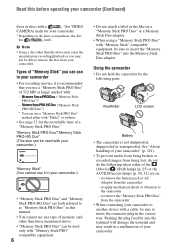
...adaptor. • When using a "Memory Stick PRO Duo" with "Mark2" or without. • See page 33 for your camcorder. Using the camcorder • Do not hold the camcorder by the following when either with "Memory Stick" compatible equipment, be used only with "Memory Stick PRO" compatible equipment. 6 ...• Do not attach a label or the like on : - to as "Memory Stick PRO Duo" in this before operating your camcorder (Continued) discs or discs with a *(for VIDEO CAMERA) mark for the recordable time of 512 MB or larger marked with: - Types of "Memory...
...adaptor. • When using a "Memory Stick PRO Duo" with "Mark2" or without. • See page 33 for your camcorder. Using the camcorder • Do not hold the camcorder by the following when either with "Memory Stick" compatible equipment, be used only with "Memory Stick PRO" compatible equipment. 6 ...• Do not attach a label or the like on : - to as "Memory Stick PRO Duo" in this before operating your camcorder (Continued) discs or discs with a *(for VIDEO CAMERA) mark for the recordable time of 512 MB or larger marked with: - Types of "Memory...
Operating Guide
Page 7
..., video tapes, and other materials may not be saved or recorded. However, there may cause malfunctions. • Do not aim at dusk. DCR-DVD610/DVD710 Use a DVD-RW/DVD+RW for video cameras and offers a quality typical of the pixels are recorded without any way. In such a case..., save your camcorder (p. 72), data may be provided, even if recording or playback is not possible due to direct sunlight for illustrating the operating procedures. About language setting The on-screen displays in Germany, and Sony Corporation, and produces superior images. Change the...
..., video tapes, and other materials may not be saved or recorded. However, there may cause malfunctions. • Do not aim at dusk. DCR-DVD610/DVD710 Use a DVD-RW/DVD+RW for video cameras and offers a quality typical of the pixels are recorded without any way. In such a case..., save your camcorder (p. 72), data may be provided, even if recording or playback is not possible due to direct sunlight for illustrating the operating procedures. About language setting The on-screen displays in Germany, and Sony Corporation, and produces superior images. Change the...
Operating Guide
Page 8
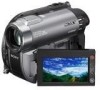
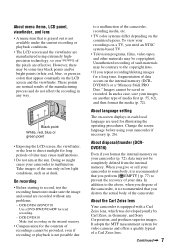
About this manual • The LCD screens and the viewfinder images and indicators shown in this manual are based on DCR-DVD810. • Design and specifications of light from what you can use for a particular operation. About the marks used in this manual... refers to 8cm DVD discs. • In this manual, the internal memory (DCR-DVD810), a disc and a "Memory Stick PRO Duo" are called the media. • Unless otherwise specifically indicated, illustrations in this before operating your camcorder (Continued) MTF = Modulation Transfer Function. Read this manual were taken with a ...
About this manual • The LCD screens and the viewfinder images and indicators shown in this manual are based on DCR-DVD810. • Design and specifications of light from what you can use for a particular operation. About the marks used in this manual... refers to 8cm DVD discs. • In this manual, the internal memory (DCR-DVD810), a disc and a "Memory Stick PRO Duo" are called the media. • Unless otherwise specifically indicated, illustrations in this before operating your camcorder (Continued) MTF = Modulation Transfer Function. Read this manual were taken with a ...
Operating Guide
Page 9
... "Memory Stick PRO Duo 30 Recording/Playback Recording and playing back with ease (Easy Handycam operation) ....... 34 Recording 38 Zooming 40 Recording sound with more presence (5.1ch surround recording) (DCR-DVD710/ DVD810 40 Starting to record quickly (QUICK ON 41 Recording in dark places (NightShot ...Turning the power on, and setting the date and time 25 Changing the language setting .. 26 Step 4: Making adjustments before operating your camcorder 15 " HOME" and " OPTION" - Taking advantage of two types of Contents 9 Subject examples and solutions ... 11 Enjoying with playback...
... "Memory Stick PRO Duo 30 Recording/Playback Recording and playing back with ease (Easy Handycam operation) ....... 34 Recording 38 Zooming 40 Recording sound with more presence (5.1ch surround recording) (DCR-DVD710/ DVD810 40 Starting to record quickly (QUICK ON 41 Recording in dark places (NightShot ...Turning the power on, and setting the date and time 25 Changing the language setting .. 26 Step 4: Making adjustments before operating your camcorder 15 " HOME" and " OPTION" - Taking advantage of two types of Contents 9 Subject examples and solutions ... 11 Enjoying with playback...
Operating Guide
Page 10
...disc (DISC SELECT GUIDE 75 Repairing the image database file 76 Preventing data on the internal memory from being recovered (DCR-DVD810 77 Customizing Your Camcorder What you can do with the (SETTINGS) category of the HOME MENU 78 Using the HOME MENU 78 List ...What you can do with Windows computer 97 Troubleshooting Troubleshooting 101 Warning indicators and messages 110 Additional Information Using your camcorder abroad .... 114 File/folder structure on the internal memory (DCR-DVD810) and a "Memory Stick PRO Duo" ......... 116 Maintenance and precautions .... 117 About the disc 117 ...
...disc (DISC SELECT GUIDE 75 Repairing the image database file 76 Preventing data on the internal memory from being recovered (DCR-DVD810 77 Customizing Your Camcorder What you can do with the (SETTINGS) category of the HOME MENU 78 Using the HOME MENU 78 List ...What you can do with Windows computer 97 Troubleshooting Troubleshooting 101 Warning indicators and messages 110 Additional Information Using your camcorder abroad .... 114 File/folder structure on the internal memory (DCR-DVD810) and a "Memory Stick PRO Duo" ......... 116 Maintenance and precautions .... 117 About the disc 117 ...
Operating Guide
Page 12
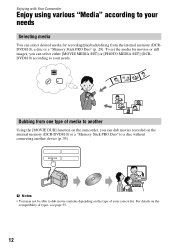
...type of media to a disc without connecting another device (p. 55). For details on the internal memory (DCR-DVD810) or a "Memory Stick PRO Duo" to another Using the [MOVIE DUB] function on the camcorder, you can select either [MOVIE MEDIA SET] or [PHOTO MEDIA SET] (DCRDVD810) according to your... needs Selecting media You can dub movies recorded on the compatibility of your needs. Enjoying with Your Camcorder Enjoy using various "Media" according to your camcorder. Dubbing from the internal memory (DCRDVD810), a disc or a "Memory Stick PRO Duo" (p. 28).
...type of media to a disc without connecting another device (p. 55). For details on the internal memory (DCR-DVD810) or a "Memory Stick PRO Duo" to another Using the [MOVIE DUB] function on the camcorder, you can select either [MOVIE MEDIA SET] or [PHOTO MEDIA SET] (DCRDVD810) according to your... needs Selecting media You can dub movies recorded on the compatibility of your needs. Enjoying with Your Camcorder Enjoy using various "Media" according to your camcorder. Dubbing from the internal memory (DCRDVD810), a disc or a "Memory Stick PRO Duo" (p. 28).
Operating Guide
Page 13
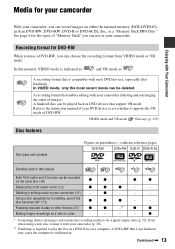
...support VR mode. Using a disc repeatedly by formatting, even if the disc becomes full* (72) z z z - - Media for your camcorder Enjoying with Your Camcorder With your camcorder, you can choose the recording format from VIDEO mode or VR mode. Recording format for the types of a disc - - - - A recording...can record images on a computer. z - - - See page 6 for DVD-RW When you use in a DVD drive on either the internal memory (DCR-DVD810), an 8cm DVD-RW, DVD+RW, DVD-R or DVD+R DL disc, or a "Memory Stick PRO Duo." z * Formatting deletes all images and...
...support VR mode. Using a disc repeatedly by formatting, even if the disc becomes full* (72) z z z - - Media for your camcorder Enjoying with Your Camcorder With your camcorder, you can choose the recording format from VIDEO mode or VR mode. Recording format for the types of a disc - - - - A recording...can record images on a computer. z - - - See page 6 for DVD-RW When you use in a DVD drive on either the internal memory (DCR-DVD810), an 8cm DVD-RW, DVD+RW, DVD-R or DVD+R DL disc, or a "Memory Stick PRO Duo." z * Formatting deletes all images and...
Operating Guide
Page 14
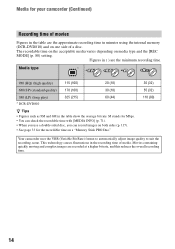
... of media. Media type * 9M (HQ) (high quality) 115 (100) 20 (18) 6M (SP) (standard quality) 170 (100) 30 (18) 3M (LP) (long play) * DCR-DVD810 325 (215) 60 (44) z Tips • Figures such as 9M and 6M in ( ) are recorded at a higher bit rate, and this reduces the overall... [MEDIA INFO] (p. 71). • When you use a double-sided disc, you can record images on both sides (p. 117). • See page 33 for your camcorder (Continued) Recording time of movies Figures in the table are the approximate recording time in the recording time of a disc. Media for the recordable time...
... of media. Media type * 9M (HQ) (high quality) 115 (100) 20 (18) 6M (SP) (standard quality) 170 (100) 30 (18) 3M (LP) (long play) * DCR-DVD810 325 (215) 60 (44) z Tips • Figures such as 9M and 6M in ( ) are recorded at a higher bit rate, and this reduces the overall... [MEDIA INFO] (p. 71). • When you use a double-sided disc, you can record images on both sides (p. 117). • See page 33 for your camcorder (Continued) Recording time of movies Figures in the table are the approximate recording time in the recording time of a disc. Media for the recordable time...

Operating Guide
Page 15
... images to a computer, and save them on a disc. Yes No For long recording * Select the recording format and format the disc on your camcorder? Enjoying with Your Camcorder Using your camcorder 1Selecting media (p. 28) You can select the disc from [DISC SELECT GUIDE] (p. 75). 2Recording images (p. 38) 3Editing/Saving images The available functions... depend on the selected media. Continued , 15 Yes No Do you want to delete or edit images on your camcorder (p. 30). Do you want to delete images and reuse the disc?
... images to a computer, and save them on a disc. Yes No For long recording * Select the recording format and format the disc on your camcorder? Enjoying with Your Camcorder Using your camcorder 1Selecting media (p. 28) You can select the disc from [DISC SELECT GUIDE] (p. 75). 2Recording images (p. 38) 3Editing/Saving images The available functions... depend on the selected media. Continued , 15 Yes No Do you want to delete or edit images on your camcorder (p. 30). Do you want to delete images and reuse the disc?

Operating Guide
Page 16
... compatibility Playback compatibility with all DVD devices is free space left. x Playing the disc on other devices, you to finalize the disc first. Using your camcorder (Continued) 4Viewing on other devices x Viewing images on a TV (p. 48) You can view the images recorded and edited on your...
... compatibility Playback compatibility with all DVD devices is free space left. x Playing the disc on other devices, you to finalize the disc first. Using your camcorder (Continued) 4Viewing on other devices x Viewing images on a TV (p. 48) You can view the images recorded and edited on your...

Operating Guide
Page 17
...*1 72 UNFINALIZE 74 DISC SELECT GUIDE 75 REPAIR IMG.DB F. 76 (SETTINGS) category*1 To customize your camcorder (p. 78). *1 You can also set these items during Easy Handycam operation (p. 34) when you select [INT. For items available in the (SETTINGS) category, see page 79...item is available during Easy Handycam operation (p. 34). MEMORY] (DCR-DVD810) or [MEMORY STICK] on [MOVIE MEDIA SET] (p. 28). *3 You may not be able to use this item depending on your camcorder (HELP) Displays a description of the item (p. 18) Enjoying with Your Camcorder Category B Categories and items...
...*1 72 UNFINALIZE 74 DISC SELECT GUIDE 75 REPAIR IMG.DB F. 76 (SETTINGS) category*1 To customize your camcorder (p. 78). *1 You can also set these items during Easy Handycam operation (p. 34) when you select [INT. For items available in the (SETTINGS) category, see page 79...item is available during Easy Handycam operation (p. 34). MEMORY] (DCR-DVD810) or [MEMORY STICK] on [MOVIE MEDIA SET] (p. 28). *3 You may not be able to use this item depending on your camcorder (HELP) Displays a description of the item (p. 18) Enjoying with Your Camcorder Category B Categories and items...
Operating Guide
Page 18
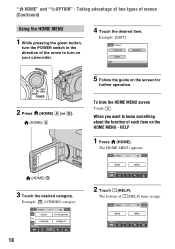
When you want to turn on your camcorder. 4 Touch the desired item. Example: (OTHERS) category 2 Touch (HELP). To hide the HOME MENU screen Touch . HELP 1 Press (HOME). The bottom of each item on ...
When you want to turn on your camcorder. 4 Touch the desired item. Example: (OTHERS) category 2 Touch (HELP). To hide the HOME MENU screen Touch . HELP 1 Press (HOME). The bottom of each item on ...

Operating Guide
Page 19
To deactivate the HELP Touch (HELP) again in step 2. Using the OPTION MENU Just a touch on the screen. To apply the option, touch [YES], otherwise, touch [NO]. When you want to make various settings. See page 90 for further details. (OPTION) 19 Enjoying with Your Camcorder 3 Touch the item you touch an item, its explanation appears on the screen during shooting or playback displays the functions available at that moment. You will find it easy to know the content.
To deactivate the HELP Touch (HELP) again in step 2. Using the OPTION MENU Just a touch on the screen. To apply the option, touch [YES], otherwise, touch [NO]. When you want to make various settings. See page 90 for further details. (OPTION) 19 Enjoying with Your Camcorder 3 Touch the item you touch an item, its explanation appears on the screen during shooting or playback displays the functions available at that moment. You will find it easy to know the content.
Operating Guide
Page 20
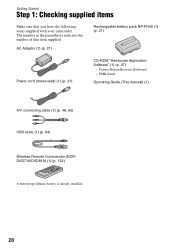
... the number of that you have the following items supplied with your camcorder. Getting Started Step 1: Checking supplied items Make sure that item supplied. AC Adaptor (1) (p. 21) Rechargeable battery pack NP-FH40 (1) (p. 21) Power cord (mains lead) (1) (p. 21) CD-ROM "Handycam Application Software" (1) (p. 97) - PMB Guide Operating Guide (This manual) (1) A/V connecting cable...
... the number of that you have the following items supplied with your camcorder. Getting Started Step 1: Checking supplied items Make sure that item supplied. AC Adaptor (1) (p. 21) Rechargeable battery pack NP-FH40 (1) (p. 21) Power cord (mains lead) (1) (p. 21) CD-ROM "Handycam Application Software" (1) (p. 97) - PMB Guide Operating Guide (This manual) (1) A/V connecting cable...
Operating Guide
Page 21
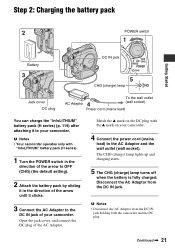
Open the jack cover, and connect the DC plug of your camcorder. Match the v mark on the DC plug with "InfoLITHIUM" battery pack (H series). 1 Turn the... (the default setting). 2 Attach the battery pack by sliding it in the direction of the arrow until it to your camcorder. 4 Connect the power cord (mains lead) to the DC IN jack of the AC Adaptor. Step 2: Charging the ... b Notes • Disconnect the AC Adaptor from the DC IN jack. b Notes • Your camcorder operates only with the v mark on your camcorder. Disconnect the AC Adaptor from the DC IN jack holding both the...
Open the jack cover, and connect the DC plug of your camcorder. Match the v mark on the DC plug with "InfoLITHIUM" battery pack (H series). 1 Turn the... (the default setting). 2 Attach the battery pack by sliding it in the direction of the arrow until it to your camcorder. 4 Connect the power cord (mains lead) to the DC IN jack of the AC Adaptor. Step 2: Charging the ... b Notes • Disconnect the AC Adaptor from the DC IN jack. b Notes • Your camcorder operates only with the v mark on your camcorder. Disconnect the AC Adaptor from the DC IN jack holding both the...

Operating Guide
Page 24
... pack NP-FH40 (supplied) NP-FH50 NP-FH70 NP-FH100 LCD panel opened* 120 LCD panel closed 135 140 155 300 330 680 745 DCR-DVD710/DVD810 Battery pack NP-FH40 (supplied) NP-FH50 NP-FH70 NP-FH100 LCD panel opened* 115 LCD panel closed 135 135 155 290 330 ... is recommended). • The available recording and playback time will be shorter when you use an NP-FH70/NPFH100 battery pack (DCR-DVD710/DVD810). • We do not recommend using your camcorder. • Do not use the AC Adaptor placed in low temperatures. • The available recording and playback time will not...
... pack NP-FH40 (supplied) NP-FH50 NP-FH70 NP-FH100 LCD panel opened* 120 LCD panel closed 135 140 155 300 330 680 745 DCR-DVD710/DVD810 Battery pack NP-FH40 (supplied) NP-FH50 NP-FH70 NP-FH100 LCD panel opened* 115 LCD panel closed 135 135 155 290 330 ... is recommended). • The available recording and playback time will be shorter when you use an NP-FH70/NPFH100 battery pack (DCR-DVD710/DVD810). • We do not recommend using your camcorder. • Do not use the AC Adaptor placed in low temperatures. • The available recording and playback time will not...

Operating Guide
Page 25
Step 3: Turning the power on, and setting the date and time Set the date and time when using this camcorder for the first time. 2 Touch (HOME) t (SETTINGS) t [CLOCK/ LANG] t [CLOCK SET]. The [CLOCK SET] screen appears. 6 Select [M] with / , then set the month with / . Touch the .... You can set , then touch . For midnight, set it to 12:00 PM. For midday, set it to 12:00 AM. To turn on your camcorder for the first time. The clock starts. Getting Started POWER switch 1 While pressing the green button, turn the POWER switch repeatedly in the same way...
Step 3: Turning the power on, and setting the date and time Set the date and time when using this camcorder for the first time. 2 Touch (HOME) t (SETTINGS) t [CLOCK/ LANG] t [CLOCK SET]. The [CLOCK SET] screen appears. 6 Select [M] with / , then set the month with / . Touch the .... You can set , then touch . For midnight, set it to 12:00 PM. For midday, set it to 12:00 AM. To turn on your camcorder for the first time. The clock starts. Getting Started POWER switch 1 While pressing the green button, turn the POWER switch repeatedly in the same way...


