
Operating Instructions
Page 1
Model No. DSR-250 Serial No. DSR-250 ©2000 Sony Corporation DSR-250 3-064-678-12 (1) Digital Camcorder Operating Instructions Before operating the unit, please read this product. Record the serial number in the space provided below. Owner's Record The model and serial numbers are located on the bottom. Refer to these numbers whenever you call upon your Sony dealer regarding this manual thoroughly, and retain it for future reference.
Model No. DSR-250 Serial No. DSR-250 ©2000 Sony Corporation DSR-250 3-064-678-12 (1) Digital Camcorder Operating Instructions Before operating the unit, please read this product. Record the serial number in the space provided below. Owner's Record The model and serial numbers are located on the bottom. Refer to these numbers whenever you call upon your Sony dealer regarding this manual thoroughly, and retain it for future reference.
Operating Instructions
Page 2
... manual could void your purchase of lithium ion batteries in which case the user will soon be of sufficient magnitude to your Digital camcorder, you call 1-800-222-SONY (United States only). With your nearest Sony Service Center or Factory Service Center. Your Digital camcorder ... cautioned that any interference received, including interference that may cause undesired operation. Operation of this Sony Digital camcorder. "Memory Stick" For customers in CANADA This Class B digital apparatus complies with superior picture and sound quality. For customers in the U.S.A.
... manual could void your purchase of lithium ion batteries in which case the user will soon be of sufficient magnitude to your Digital camcorder, you call 1-800-222-SONY (United States only). With your nearest Sony Service Center or Factory Service Center. Your Digital camcorder ... cautioned that any interference received, including interference that may cause undesired operation. Operation of this Sony Digital camcorder. "Memory Stick" For customers in CANADA This Class B digital apparatus complies with superior picture and sound quality. For customers in the U.S.A.

Operating Instructions
Page 3
...50 Using the guide frame 52 Marking an Index 53 Adjusting the recording level manually - Memory Photo recording 134 Recording an image from a tape as a ...a cassette 116 Erasing the cassette memory data 118 Customizing Your Camcorder Advanced Recording Operations Changing the menu settings 120 Shooting with digital effects ......... 84 Step 1 Installing the microphone 7 Step 2...Maintenance information and precautions ... 172 Specifications 176 Quick Reference Searching the boundaries of DVCAM and Using the fader function 67 DV formats 156 Using special effects - Image ...
...50 Using the guide frame 52 Marking an Index 53 Adjusting the recording level manually - Memory Photo recording 134 Recording an image from a tape as a ...a cassette 116 Erasing the cassette memory data 118 Customizing Your Camcorder Advanced Recording Operations Changing the menu settings 120 Shooting with digital effects ......... 84 Step 1 Installing the microphone 7 Step 2...Maintenance information and precautions ... 172 Specifications 176 Quick Reference Searching the boundaries of DVCAM and Using the fader function 67 DV formats 156 Using special effects - Image ...
Operating Instructions
Page 4
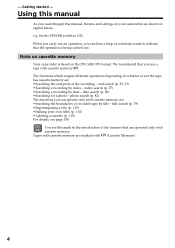
... - The functions you can hear a beep or a melody sound to ON. title search (p. 79) •Superimposing a title (p. 110) •Making your camcorder are operated only with cassette memory . end search (p. 29, 33) •Searching a recording by date - date search (p. 80) •Searching for a ... tape by title - You see page 158. The functions which require different operations depending on the DVCAM/DV format. Tapes with (Cassette Memory). 4 Getting started - Using this manual As you use a tape with cassette memory. e.g. When you carry out an operation, you can...
... - The functions you can hear a beep or a melody sound to ON. title search (p. 79) •Superimposing a title (p. 110) •Making your camcorder are operated only with cassette memory . end search (p. 29, 33) •Searching a recording by date - date search (p. 80) •Searching for a ... tape by title - You see page 158. The functions which require different operations depending on the DVCAM/DV format. Tapes with (Cassette Memory). 4 Getting started - Using this manual As you use a tape with cassette memory. e.g. When you carry out an operation, you can...
Operating Instructions
Page 5
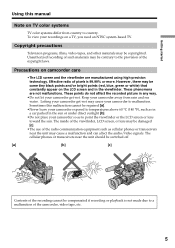
...above 60 °C (140 °F), such as in a car parked in the viewfinder. Keep your camcorder get wet. Letting your camcorder away from country to malfunction. Sometimes this manual Note on TV color systems TV color systems differ from rain and sea water. Unauthorized recording of such ...video signals. These phenomena are manufactured using high-precision technology. Effective ratio of pixels is not made due to the provision of the camcorder, video tape, etc. 5 The cellular phones or transceivers near the unit may be compensated if recording or playback is 99.99% ...
...above 60 °C (140 °F), such as in a car parked in the viewfinder. Keep your camcorder get wet. Letting your camcorder away from country to malfunction. Sometimes this manual Note on TV color systems TV color systems differ from rain and sea water. Unauthorized recording of such ...video signals. These phenomena are manufactured using high-precision technology. Effective ratio of pixels is not made due to the provision of the camcorder, video tape, etc. 5 The cellular phones or transceivers near the unit may be compensated if recording or playback is 99.99% ...

Operating Instructions
Page 7
... the microphone Install the supplied microphone. MIC LOW CUT switch When you manually adjust the audio level, see "Adjusting the recording level manually - Sound recording level" on page 54. 1 2 3 4 5 AUDIO INPUT AUDIO SELECT FRONT REAR AUTO MANUAL CH-1 FRONT REAR AUTO MANUAL CH-2 When the wind is only activated for both channels 1 and 2. Set...
... the microphone Install the supplied microphone. MIC LOW CUT switch When you manually adjust the audio level, see "Adjusting the recording level manually - Sound recording level" on page 54. 1 2 3 4 5 AUDIO INPUT AUDIO SELECT FRONT REAR AUTO MANUAL CH-1 FRONT REAR AUTO MANUAL CH-2 When the wind is only activated for both channels 1 and 2. Set...
Operating Instructions
Page 17
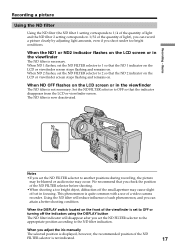
... filter is displayed, however, the recommended position of light), you shoot under too bright conditions. ND FILTER OFF 1 2 Notes •If you adjust the iris manually The selected position is not necessary. Basics Recording a picture Using the ND filter Using the ND filter (the ND filter 1 setting corresponds to 1/4 of the...
... filter is displayed, however, the recommended position of light), you shoot under too bright conditions. ND FILTER OFF 1 2 Notes •If you adjust the iris manually The selected position is not necessary. Basics Recording a picture Using the ND filter Using the ND filter (the ND filter 1 setting corresponds to 1/4 of the...
Operating Instructions
Page 18
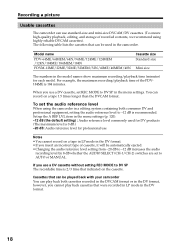
...in the menu settings. When you cannot play back both consumer DV and professional equipment, setting the audio reference level to AUTO or MANUAL. The following table lists the cassettes that can record on the cassette. To set to -12 dB is recommended. Model name PDV... set the audio reference level When using highly reliable DVCAM cassettes). If you insert an incorrect type of the PDV184ME is 2/3 time that indicated on a tape 1.5 times longer than the DVCAM format. Recording a picture Usable cassettes The camcorder can play back cassettes that were recorded in LP mode...
...in the menu settings. When you cannot play back both consumer DV and professional equipment, setting the audio reference level to AUTO or MANUAL. The following table lists the cassettes that can record on the cassette. To set to -12 dB is recommended. Model name PDV... set the audio reference level When using highly reliable DVCAM cassettes). If you insert an incorrect type of the PDV184ME is 2/3 time that indicated on a tape 1.5 times longer than the DVCAM format. Recording a picture Usable cassettes The camcorder can play back cassettes that were recorded in LP mode...
Operating Instructions
Page 27
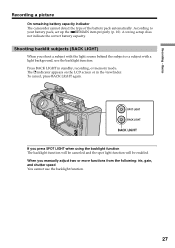
... the correct battery capacity. indicator appears on the LCD screen or in standby, recording, or memory mode. SPOT LIGHT BACK LIGHT BACK LIGHT If you manually adjust two or more functions from the following: iris, gain, and shutter speed You cannot use the backlight function. Recording - Shooting backlit subjects (BACK LIGHT... be canceled and the spot light function will be enabled. Press BACK LIGHT in the viewfinder. Basics Recording a picture On remaining battery capacity indicator The camcorder cannot detect the type of the battery pack automatically.
... the correct battery capacity. indicator appears on the LCD screen or in standby, recording, or memory mode. SPOT LIGHT BACK LIGHT BACK LIGHT If you manually adjust two or more functions from the following: iris, gain, and shutter speed You cannot use the backlight function. Recording - Shooting backlit subjects (BACK LIGHT... be canceled and the spot light function will be enabled. Press BACK LIGHT in the viewfinder. Basics Recording a picture On remaining battery capacity indicator The camcorder cannot detect the type of the battery pack automatically.

Operating Instructions
Page 28
... indicator appears on the LCD screen or in the theater. Shutter speed value of 1/30 or smaller - SPOT LIGHT SPOT LIGHT BACK LIGHT If you manually adjust two or more functions from appearing excessively white when shooting subjects lit by strong light, such as in the viewfinder. Recording a picture Spot light...
... indicator appears on the LCD screen or in the theater. Shutter speed value of 1/30 or smaller - SPOT LIGHT SPOT LIGHT BACK LIGHT If you manually adjust two or more functions from appearing excessively white when shooting subjects lit by strong light, such as in the viewfinder. Recording a picture Spot light...

Operating Instructions
Page 36
...if the AUTO MODE switch is set to let the unit adjust the iris, gain, shutter speed, and white balance automatically. Shooting with manual adjustment Under normal conditions, this unit automatically makes various adjustments as it shoots. Functions you can adjust the following describes how to suit your... Functions you can adjust by using other selectors/rings ND filter, zebra pattern, focus, AE shift, and zoom The following functions manually to adjust all the functions mentioned above except ND filter (p. 17), zoom (p. 24), focus (p. 45), and white balance (p. 47) .
...if the AUTO MODE switch is set to let the unit adjust the iris, gain, shutter speed, and white balance automatically. Shooting with manual adjustment Under normal conditions, this unit automatically makes various adjustments as it shoots. Functions you can adjust the following describes how to suit your... Functions you can adjust by using other selectors/rings ND filter, zebra pattern, focus, AE shift, and zoom The following functions manually to adjust all the functions mentioned above except ND filter (p. 17), zoom (p. 24), focus (p. 45), and white balance (p. 47) .

Operating Instructions
Page 37
The iris indicator appears on the depth of field. (1) Set the AUTO MODE switch to OFF while the camcorder is in front. The depth of field. For a smaller aperture, select a higher value. Zooming in telephoto position offers a smaller depth of field while the depth ... PUSH AUTO. About the depth of field The depth of field. The automatic adjustment functions while you set the AUTO MODE switch to ON, other manual adjustments (gain, shutter speed, and white balance) will be also canceled. Advanced Recording Operations 2 IRIS MAN AUTO F2.8 PUSH AUTO 1 AUTO MODE ON OFF 3 To...
The iris indicator appears on the depth of field. (1) Set the AUTO MODE switch to OFF while the camcorder is in front. The depth of field. For a smaller aperture, select a higher value. Zooming in telephoto position offers a smaller depth of field while the depth ... PUSH AUTO. About the depth of field The depth of field. The automatic adjustment functions while you set the AUTO MODE switch to ON, other manual adjustments (gain, shutter speed, and white balance) will be also canceled. Advanced Recording Operations 2 IRIS MAN AUTO F2.8 PUSH AUTO 1 AUTO MODE ON OFF 3 To...

Operating Instructions
Page 38
... (orange) in the menu settings. The gain value can be also canceled. However, when you set the AUTO MODE switch to ON, other manual adjustments (iris, shutter speed, and white balance) will be selected between three positions (H/M/L) and each value is select from the LCD or viewfinder ... appears on the LCD screen or in the viewfinder. (3) Switch the GAIN selector to OFF. Shooting with manual adjustment Adjusting the gain (1) Set the AUTO MODE switch to OFF while the camcorder is in standby, recording, or memory mode. (2) Set the AGC switch to select the desired gain value...
... (orange) in the menu settings. The gain value can be also canceled. However, when you set the AUTO MODE switch to ON, other manual adjustments (iris, shutter speed, and white balance) will be selected between three positions (H/M/L) and each value is select from the LCD or viewfinder ... appears on the LCD screen or in the viewfinder. (3) Switch the GAIN selector to OFF. Shooting with manual adjustment Adjusting the gain (1) Set the AUTO MODE switch to OFF while the camcorder is in standby, recording, or memory mode. (2) Set the AGC switch to select the desired gain value...

Operating Instructions
Page 39
... GA I N LEVEL AUTO SHTR PROG. Advanced Recording Operations Shooting with manual adjustment Setting the gain values for the H position. The value changes between 0 dB and 18 dB. (6) Press the SEL/PUSH EXEC dial. (7) Repeat steps 4 to 6 ... the SEL/PUSH EXEC dial to select H, then press the dial. (5) Turn the SEL/PUSH EXEC dial to erase the menu display. 1,8 CUSTOM PRESET MENU 5-7 MANUAL SET GA I N LEVEL H M L RETURN 18dB [MENU] : END 2-4 MANUAL SET SHTR SPEED GA I N LEVEL H M L [MENU] : ERNEDTURN 18dB [MENU] : END 39
... GA I N LEVEL AUTO SHTR PROG. Advanced Recording Operations Shooting with manual adjustment Setting the gain values for the H position. The value changes between 0 dB and 18 dB. (6) Press the SEL/PUSH EXEC dial. (7) Repeat steps 4 to 6 ... the SEL/PUSH EXEC dial to select H, then press the dial. (5) Turn the SEL/PUSH EXEC dial to erase the menu display. 1,8 CUSTOM PRESET MENU 5-7 MANUAL SET GA I N LEVEL H M L RETURN 18dB [MENU] : END 2-4 MANUAL SET SHTR SPEED GA I N LEVEL H M L [MENU] : ERNEDTURN 18dB [MENU] : END 39
Operating Instructions
Page 40
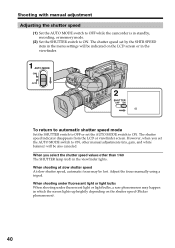
...shooting under fluorescent light or light bulbs, a rare phenomenon may be also canceled. However, when you select the shutter speed values other manual adjustments (iris, gain, and white balance) will be indicated on the shutter speed (Flicker phenomenon). 40 The shutter speed indicator disappears ...from the LCD or viewfinder screen. Adjust the focus manually using a tripod. When you set the AUTO MODE switch to ON. Shooting with manual adjustment Adjusting the shutter speed (1) Set the AUTO MODE switch to OFF while the camcorder is in standby, recording, or memory mode. (2) ...
...shooting under fluorescent light or light bulbs, a rare phenomenon may be also canceled. However, when you select the shutter speed values other manual adjustments (iris, gain, and white balance) will be indicated on the shutter speed (Flicker phenomenon). 40 The shutter speed indicator disappears ...from the LCD or viewfinder screen. Adjust the focus manually using a tripod. When you set the AUTO MODE switch to ON. Shooting with manual adjustment Adjusting the shutter speed (1) Set the AUTO MODE switch to OFF while the camcorder is in standby, recording, or memory mode. (2) ...

Operating Instructions
Page 41
... MANUAL SET SHTR SPEED GA I N LEVEL AUTO SHTR PROG. SCAN SETUP RETURN [MENU] : END When you turn the dial, the shutter speed changes as follows: 1/4 y 1/8 y 1/15 y 1/30 y ... SCAN SETUP MANUAL SET... SHTR SPEED 60 GA I N LEVEL [MENU]A:UETNOD SHTR PROG. SCAN SETUP RETURN MANUAL SET SHTR SPEED 30 GA I N LEVEL [MENU]A:UETNOD SHTR PROG. y 1/.../PUSH EXEC dial to select the desired speed. Advanced Recording Operations Shooting with manual adjustment Adjusting the shutter speed value (1) Push the CUSTOM PRESET/MENU switch in...
... MANUAL SET SHTR SPEED GA I N LEVEL AUTO SHTR PROG. SCAN SETUP RETURN [MENU] : END When you turn the dial, the shutter speed changes as follows: 1/4 y 1/8 y 1/15 y 1/30 y ... SCAN SETUP MANUAL SET... SHTR SPEED 60 GA I N LEVEL [MENU]A:UETNOD SHTR PROG. SCAN SETUP RETURN MANUAL SET SHTR SPEED 30 GA I N LEVEL [MENU]A:UETNOD SHTR PROG. y 1/.../PUSH EXEC dial to select the desired speed. Advanced Recording Operations Shooting with manual adjustment Adjusting the shutter speed value (1) Push the CUSTOM PRESET/MENU switch in...

Operating Instructions
Page 42
... pattern appears in the portion of the picture on the LCD screen or in the portion of a subject by displaying the zebra pattern. Shooting with manual adjustment Shooting with the zebra pattern You can set to "100"). The portion of the picture where zebra pattern appears is an area of high... brightness and overexposure (when the ZEBRA selector is set the camcorder to display a zebra pattern (diagonal stripes) in the viewfinder with a subject whose brightness exceeds a certain level.
... pattern appears in the portion of the picture on the LCD screen or in the portion of a subject by displaying the zebra pattern. Shooting with manual adjustment Shooting with the zebra pattern You can set to "100"). The portion of the picture where zebra pattern appears is an area of high... brightness and overexposure (when the ZEBRA selector is set the camcorder to display a zebra pattern (diagonal stripes) in the viewfinder with a subject whose brightness exceeds a certain level.
Operating Instructions
Page 43
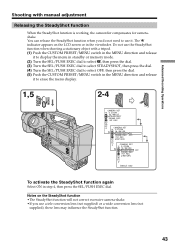
... ON FRAME REC OFF I NT. Do not use it to use the SteadyShot function when shooting a stationary object with manual adjustment Releasing the SteadyShot function When the SteadyShot function is working, the camcorder compensates for camerashake. REC RETURN [MENU] : END To activate the SteadyShot function again Select ON in the viewfinder. The...
... ON FRAME REC OFF I NT. Do not use it to use the SteadyShot function when shooting a stationary object with manual adjustment Releasing the SteadyShot function When the SteadyShot function is working, the camcorder compensates for camerashake. REC RETURN [MENU] : END To activate the SteadyShot function again Select ON in the viewfinder. The...

Operating Instructions
Page 44
.... 44 The AE shift indicator appears on the LCD screen or in the direction of the arrow and release it again. AE SHIFT Shooting with manual adjustment Adjusting the AE shift You can adjust the AE shift in accordance with shooting conditions and a subject. (1) Push the AE SHIFT switch in the...
.... 44 The AE shift indicator appears on the LCD screen or in the direction of the arrow and release it again. AE SHIFT Shooting with manual adjustment Adjusting the AE shift You can adjust the AE shift in accordance with shooting conditions and a subject. (1) Push the AE SHIFT switch in the...

Operating Instructions
Page 45
...is not effective when shooting - To focus in recording, standby, or memory mode. (2) Turn the focus ring to sharpen the focus. 2 1 FOCUS AUTO MANUAL INFINITY PUSH AUTO To return to the autofocus mode Slide FOCUS up to AUTO to focus on the LCD screen or in the following cases... even though you want to focus on the LCD screen or in the viewfinder in infinity Slide FOCUS to MANUAL. The auto focus functions while you release FOCUS PUSH AUTO, manual focusing resumes. 45 subjects through glass coated with auto focusing momentarily Press FOCUS PUSH AUTO. When you are ...
...is not effective when shooting - To focus in recording, standby, or memory mode. (2) Turn the focus ring to sharpen the focus. 2 1 FOCUS AUTO MANUAL INFINITY PUSH AUTO To return to the autofocus mode Slide FOCUS up to AUTO to focus on the LCD screen or in the following cases... even though you want to focus on the LCD screen or in the viewfinder in infinity Slide FOCUS to MANUAL. The auto focus functions while you release FOCUS PUSH AUTO, manual focusing resumes. 45 subjects through glass coated with auto focusing momentarily Press FOCUS PUSH AUTO. When you are ...


