
Operating Instructions
Page 2
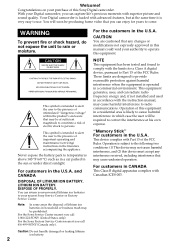
... at the same time it is intended to alert the user to use. These limits are cautioned that any changes or modifications not expressly approved in this manual could void your Digital camcorder, you call 416-499-SONY (Canada only). Operation is likely to cause harmful interference in household ...residential area is subject to persons. Operation of the FCC Rules. "Memory Stick" For customers in the literature accompanying the appliance. Your Digital camcorder is loaded with Part 15 of this Sony Digital camcorder. LITHIUM ION BATTERY. You can enjoy for a Class...
... at the same time it is intended to alert the user to use. These limits are cautioned that any changes or modifications not expressly approved in this manual could void your Digital camcorder, you call 416-499-SONY (Canada only). Operation is likely to cause harmful interference in household ...residential area is subject to persons. Operation of the FCC Rules. "Memory Stick" For customers in the literature accompanying the appliance. Your Digital camcorder is loaded with Part 15 of this Sony Digital camcorder. LITHIUM ION BATTERY. You can enjoy for a Class...

Operating Instructions
Page 3
... 116 Erasing the cassette memory data 118 Customizing Your Camcorder Advanced Recording Operations Changing the menu settings 120 Shooting with all the pixels - Table of DVCAM and Using the fader function 67 DV formats 156 Using special effects - END SEARCH / EDITSEARCH / Rec...a tape - Title search 79 Quick Function Guide 191 Searching a recording by Identifying the parts and controls 177 title - Digital program editing 88 Using with digital effects ......... 84 Step 1 Installing the microphone 7 Step 2 Preparing the power supply 8 Step 3 Inserting a cassette 13...
... 116 Erasing the cassette memory data 118 Customizing Your Camcorder Advanced Recording Operations Changing the menu settings 120 Shooting with all the pixels - Table of DVCAM and Using the fader function 67 DV formats 156 Using special effects - END SEARCH / EDITSEARCH / Rec...a tape - Title search 79 Quick Function Guide 191 Searching a recording by Identifying the parts and controls 177 title - Digital program editing 88 Using with digital effects ......... 84 Step 1 Installing the microphone 7 Step 2 Preparing the power supply 8 Step 3 Inserting a cassette 13...
Operating Instructions
Page 4
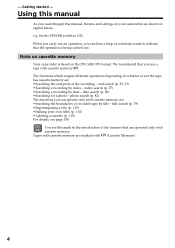
... For details, see this manual, buttons and settings on the DVCAM/DV format. Set the POWER switch to indicate that are shown in the introduction of the recording - Getting started - Note on cassette memory Your camcorder is being carried out. You see page 158. When you ...carry out an operation, you read through this mark in capital letters. The functions you use a tape with cassette memory.
... For details, see this manual, buttons and settings on the DVCAM/DV format. Set the POWER switch to indicate that are shown in the introduction of the recording - Getting started - Note on cassette memory Your camcorder is being carried out. You see page 158. When you ...carry out an operation, you read through this mark in capital letters. The functions you use a tape with cassette memory.
Operating Instructions
Page 5
... materials may be contrary to point the viewfinder or the LCD screen or lens toward the sun. Getting started Using this malfunction cannot be repaired [a]. •Never leave your camcorder exposed to temperatures above 60 °C (140 °F), such as in a car parked in the sun..., there may cause your recordings on the LCD screen and in any way. •Do not let your camcorder get wet may be copyrighted. These phenomena are manufactured using high-precision technology. These points do not affect the recorded picture in the viewfinder. Copyright precautions Television programs,...
... materials may be contrary to point the viewfinder or the LCD screen or lens toward the sun. Getting started Using this malfunction cannot be repaired [a]. •Never leave your camcorder exposed to temperatures above 60 °C (140 °F), such as in a car parked in the sun..., there may cause your recordings on the LCD screen and in any way. •Do not let your camcorder get wet may be copyrighted. These phenomena are manufactured using high-precision technology. These points do not affect the recorded picture in the viewfinder. Copyright precautions Television programs,...

Operating Instructions
Page 8
... the usable time, store the BP-L40 (A) in a warm place, and power on using the battery pack •A warm battery pack may break after recharging. •To prolong the life of the camcorder as a BP90A contained in a DC-210 Battery Adaptor to the DC IN 12V connector ... time shown below , when power consumption of battery packs decreases. Notes on the camcorder before recharging. 8 There is recommended. This extends the battery life. •It is recommended that the BP-L40 (A) be used with accessories which is operated at low temperatures. •Carrying a spare battery pack...
... the usable time, store the BP-L40 (A) in a warm place, and power on using the battery pack •A warm battery pack may break after recharging. •To prolong the life of the camcorder as a BP90A contained in a DC-210 Battery Adaptor to the DC IN 12V connector ... time shown below , when power consumption of battery packs decreases. Notes on the camcorder before recharging. 8 There is recommended. This extends the battery life. •It is recommended that the BP-L40 (A) be used with accessories which is operated at low temperatures. •Carrying a spare battery pack...
Operating Instructions
Page 10
... NI-CD [MENU] : END When the battery capacity is low The BATT and REC lamps (red) in the viewfinder and the TALLY lamps on the camcorder will not indicate the correct capacity. (1) Push the CUSTOM PRESET/MENU switch in the MENU direction and release it to display the menu. (2) Turn the... press the dial. Setting Meaning LI-ION NI-CD When using a lithium-ion battery pack (BP-L40 (A)/L60A/L90A) When using a nicad battery pack (NP-1B/BP-90A) (5) Push the CUSTOM PRESET/MENU switch in the MENU direction and release it to the camcorder, using the menu. If you do not set the type...
... NI-CD [MENU] : END When the battery capacity is low The BATT and REC lamps (red) in the viewfinder and the TALLY lamps on the camcorder will not indicate the correct capacity. (1) Push the CUSTOM PRESET/MENU switch in the MENU direction and release it to display the menu. (2) Turn the... press the dial. Setting Meaning LI-ION NI-CD When using a lithium-ion battery pack (BP-L40 (A)/L60A/L90A) When using a nicad battery pack (NP-1B/BP-90A) (5) Push the CUSTOM PRESET/MENU switch in the MENU direction and release it to the camcorder, using the menu. If you do not set the type...
Operating Instructions
Page 11
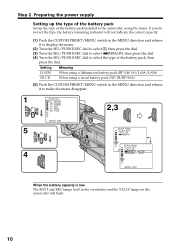
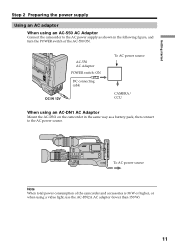
...switch: ON LOCK DC connecting cable DC IN 12V To AC power source CAMERA/ CCU When using a video light, use the AC-DN2A AC adaptor (lower than 150 W). 11 To AC power source Note When total... the AC-550 ON. Getting started Step 2 Preparing the power supply Using an AC adaptor When using an AC-550 AC Adaptor Connect the camcorder to the AC power supply as shown in the following figure, and ...turn the POWER switch of the camcorder and accessories is 38 W or higher, or when using an AC-DN1 AC Adaptor Mount the AC-DN1 on the camcorder in the same way as a battery pack, then...
...switch: ON LOCK DC connecting cable DC IN 12V To AC power source CAMERA/ CCU When using a video light, use the AC-DN2A AC adaptor (lower than 150 W). 11 To AC power source Note When total... the AC-550 ON. Getting started Step 2 Preparing the power supply Using an AC adaptor When using an AC-550 AC Adaptor Connect the camcorder to the AC power supply as shown in the following figure, and ...turn the POWER switch of the camcorder and accessories is 38 W or higher, or when using an AC-DN1 AC Adaptor Mount the AC-DN1 on the camcorder in the same way as a battery pack, then...
Operating Instructions
Page 12
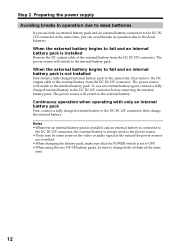
...12V connector. Continuous operation when operating with only an internal battery pack First, connect a fully charged external battery to the external battery. To use both an internal battery pack and an external battery connected to the DC IN 12V connector at the instant the power sources are switched. •...connected to the dead batteries. When the external battery begins to fail and an internal battery pack is always used as the power source. •There may be sure to the camcorder, then remove the DC output cable of them at the same time. 12 The power source will switch...
...12V connector. Continuous operation when operating with only an internal battery pack First, connect a fully charged external battery to the external battery. To use both an internal battery pack and an external battery connected to the DC IN 12V connector at the instant the power sources are switched. •...connected to the dead batteries. When the external battery begins to fail and an internal battery pack is always used as the power source. •There may be sure to the camcorder, then remove the DC output cable of them at the same time. 12 The power source will switch...
Operating Instructions
Page 13
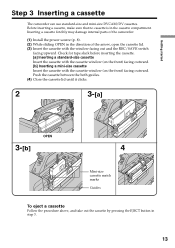
Inserting a cassette forcibly may damage internal parts of the camcorder. (1) Install the power source (p. 8). (2) While sliding OPEN in the direction of the arrow, open the cassette lid. (3) Insert the cassette with the cassette window (on ... the EJECT button in the cassette compartment. Before inserting a cassette, make sure that no cassette is in step 3. 13 Getting started Step 3 Inserting a cassette The camcorder can use standard-size and mini-size DVCAM/DV cassettes.
Inserting a cassette forcibly may damage internal parts of the camcorder. (1) Install the power source (p. 8). (2) While sliding OPEN in the direction of the arrow, open the cassette lid. (3) Insert the cassette with the cassette window (on ... the EJECT button in the cassette compartment. Before inserting a cassette, make sure that no cassette is in step 3. 13 Getting started Step 3 Inserting a cassette The camcorder can use standard-size and mini-size DVCAM/DV cassettes.
Operating Instructions
Page 14
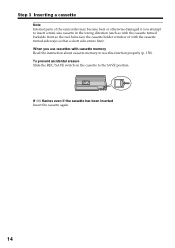
If Q flashes even if the cassette has been inserted Insert the cassette again. 14 Step 3 Inserting a cassette Note Internal parts of the camcorder may become bent or otherwise damaged if you use this function properly (p. 158). When you attempt to insert a mini-size cassette in the wrong direction (such as with the cassette... cassette memory Read the instruction about cassette memory to the SAVE position. To prevent accidental erasure Slide the REC/SAVE switch on the cassette to use cassettes with the cassette turned sideways so that a short side enters first).
If Q flashes even if the cassette has been inserted Insert the cassette again. 14 Step 3 Inserting a cassette Note Internal parts of the camcorder may become bent or otherwise damaged if you use this function properly (p. 158). When you attempt to insert a mini-size cassette in the wrong direction (such as with the cassette... cassette memory Read the instruction about cassette memory to the SAVE position. To prevent accidental erasure Slide the REC/SAVE switch on the cassette to use cassettes with the cassette turned sideways so that a short side enters first).
Operating Instructions
Page 15
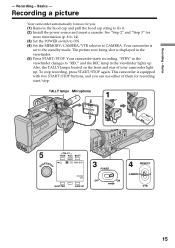
Your camcorder is ...Install the power source and insert a cassette. Recording a picture Your camcorder automatically focuses for you can use either of your camcorder light up . See "Step 2" and "Step 3" for recording start/...stop recording, press START/STOP again. This camcorder is set ...The picture now being shot is displayed in the viewfinder changes to the standby mode. Your camcorder starts recording. "STBY" in the viewfinder. (5) Press START/STOP. To stop . Recording ...
Your camcorder is ...Install the power source and insert a cassette. Recording a picture Your camcorder automatically focuses for you can use either of your camcorder light up . See "Step 2" and "Step 3" for recording start/...stop recording, press START/STOP again. This camcorder is set ...The picture now being shot is displayed in the viewfinder changes to the standby mode. Your camcorder starts recording. "STBY" in the viewfinder. (5) Press START/STOP. To stop . Recording ...

Operating Instructions
Page 16
...even after ejecting the cassette if you record a tape in standby mode for five minutes The head drum of the camcorder automatically stops rotating. SCAN to ON in the DVCAM format and the DV format on one tape. To enable smooth transition Transition between scenes when you change the battery ...start recording, press the START/STOP button. However, check the following: •When you change the recording format on one tape. •If you use a tape with cassette memory, however, you can be smooth. It may not be written properly between the last scene you recorded and the next ...
...even after ejecting the cassette if you record a tape in standby mode for five minutes The head drum of the camcorder automatically stops rotating. SCAN to ON in the DVCAM format and the DV format on one tape. To enable smooth transition Transition between scenes when you change the battery ...start recording, press the START/STOP button. However, check the following: •When you change the recording format on one tape. •If you use a tape with cassette memory, however, you can be smooth. It may not be written properly between the last scene you recorded and the next ...
Operating Instructions
Page 17
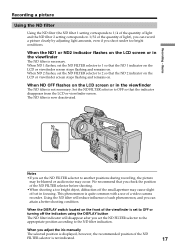
... position is displayed, however, the recommended position of the ND FILTER selector is not indicated. 17 This phenomenon is quite common with a use of the viewfinder is necessary. When you set in focusing. When ND 1 flashes, set the ND FILTER selector to the appropriate position... before shooting. •When shooting a too bright object, diffraction off the small aperture may occur. Recording - Basics Recording a picture Using the ND filter Using the ND filter (the ND filter 1 setting corresponds to 1/4 of the quantity of light and the ND filter 2 setting corresponds to...
... position is displayed, however, the recommended position of the ND FILTER selector is not indicated. 17 This phenomenon is quite common with a use of the viewfinder is necessary. When you set in focusing. When ND 1 flashes, set the ND FILTER selector to the appropriate position... before shooting. •When shooting a too bright object, diffraction off the small aperture may occur. Recording - Basics Recording a picture Using the ND filter Using the ND filter (the ND filter 1 setting corresponds to 1/4 of the quantity of light and the ND filter 2 setting corresponds to...
Operating Instructions
Page 18
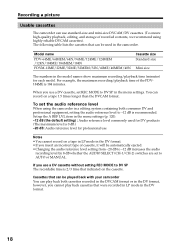
...CH-2) switches are set the audio reference level When using highly reliable DVCAM cassettes). Cassettes that indicated on the cassette. Recording a picture Usable cassettes The camcorder can record on a tape 1.5 times longer than the DVCAM format. For example, the maximum recording/playback time ...of recorded contents, we recommend using the camcorder in the model names show maximum recording/playback time (minutes) for professional use standard-size and mini-size DVCAM/DV cassettes. (To ensure high-quality playback, editing, and ...
...CH-2) switches are set the audio reference level When using highly reliable DVCAM cassettes). Cassettes that indicated on the cassette. Recording a picture Usable cassettes The camcorder can record on a tape 1.5 times longer than the DVCAM format. For example, the maximum recording/playback time ...of recorded contents, we recommend using the camcorder in the model names show maximum recording/playback time (minutes) for professional use standard-size and mini-size DVCAM/DV cassettes. (To ensure high-quality playback, editing, and ...
Operating Instructions
Page 19
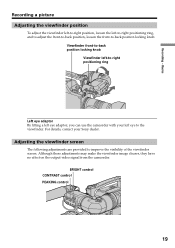
...Although these adjustments may make the viewfinder image clearer, they have no effect on the output video signal from the camcorder. Adjusting the viewfinder screen The following adjustments are provided to the viewfinder. Viewfinder front-to-back position locking knob ...Viewfinder left-to-right positioning ring Left eye adaptor By fitting a left eye adaptor, you can use the camcorder with your Sony dealer. Recording - Basics Recording a picture Adjusting the viewfinder position To adjust the viewfinder left-to-right position, loosen the left...
...Although these adjustments may make the viewfinder image clearer, they have no effect on the output video signal from the camcorder. Adjusting the viewfinder screen The following adjustments are provided to the viewfinder. Viewfinder front-to-back position locking knob ...Viewfinder left-to-right positioning ring Left eye adaptor By fitting a left eye adaptor, you can use the camcorder with your Sony dealer. Recording - Basics Recording a picture Adjusting the viewfinder position To adjust the viewfinder left-to-right position, loosen the left...

Operating Instructions
Page 20
... viewfinder image varies. The adjustment range is from -3 to 0 diopters1). 1) Diopter: A unit to get the clearest viewfinder image for your Sony dealer. 20 Eyepiece focusing knob To modify the adjustment range Using an optional part allows you to modify the adjustment range to -2 to +1 diopters or -0.5 to +3 diopters. whether longsighted or shortsighted -
... viewfinder image varies. The adjustment range is from -3 to 0 diopters1). 1) Diopter: A unit to get the clearest viewfinder image for your Sony dealer. 20 Eyepiece focusing knob To modify the adjustment range Using an optional part allows you to modify the adjustment range to -2 to +1 diopters or -0.5 to +3 diopters. whether longsighted or shortsighted -
Operating Instructions
Page 22
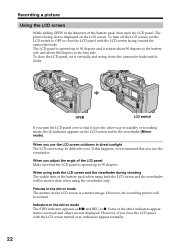
... switch to OFF or close the LCD panel with the LCD screen facing toward the camcorder body. When using both the LCD screen and the viewfinder during shooting The usable time of the other...normal. Some of the battery pack when using the viewfinder only. However, if you turn off the LCD screen, set it vertically and swing it into the camcorder body until it clicks. 180°...the LCD panel. However, the recording picture will be difficult to the lens side. Recording a picture Using the LCD screen While sliding OPEN in the mirror mode The STBY indicator appears as Xz and REC...
... switch to OFF or close the LCD panel with the LCD screen facing toward the camcorder body. When using both the LCD screen and the viewfinder during shooting The usable time of the other...normal. Some of the battery pack when using the viewfinder only. However, if you turn off the LCD screen, set it vertically and swing it into the camcorder body until it clicks. 180°...the LCD panel. However, the recording picture will be difficult to the lens side. Recording a picture Using the LCD screen While sliding OPEN in the mirror mode The STBY indicator appears as Xz and REC...

Operating Instructions
Page 23
buttons The recorded picture will not be affected. Lift up the viewfinder or rotate the LCD panel with the screen facing up to get an interesting recording angle. LCD BRIGHT + To darken To brighten Even if you do the LCD screen adjustment using the LCD BRIGHT +/- Recording - Basics Recording a picture Adjusting the brightness of the LCD screen To adjust the brightness of the LCD screen, press LCD BRIGHT + or -. - Recording in a low position You can record in a low position to record from a low position. 23
buttons The recorded picture will not be affected. Lift up the viewfinder or rotate the LCD panel with the screen facing up to get an interesting recording angle. LCD BRIGHT + To darken To brighten Even if you do the LCD screen adjustment using the LCD BRIGHT +/- Recording - Basics Recording a picture Adjusting the brightness of the LCD screen To adjust the brightness of the LCD screen, press LCD BRIGHT + or -. - Recording in a low position You can record in a low position to record from a low position. 23
Operating Instructions
Page 24
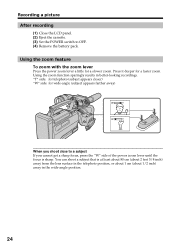
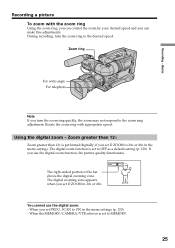
Press it deeper for a slower zoom. Using the zoom feature To zoom with the zoom lever Press the power zoom lever a little for a faster zoom. Recording a picture After recording (1) Close the LCD ...) "W" side: for wide-angle (subject appears farther away) W T W T W T When you shoot close to OFF. (4) Remove the battery pack. You can shoot a subject that is sharp. Using the zoom function sparingly results in the wide-angle position. 24
Press it deeper for a slower zoom. Using the zoom feature To zoom with the zoom lever Press the power zoom lever a little for a faster zoom. Recording a picture After recording (1) Close the LCD ...) "W" side: for wide-angle (subject appears farther away) W T W T W T When you shoot close to OFF. (4) Remove the battery pack. You can shoot a subject that is sharp. Using the zoom function sparingly results in the wide-angle position. 24
Operating Instructions
Page 25
... 12× Zoom greater than 12× is set to the desired speed. Using the digital zoom - You cannot use the digital zoom function, the picture quality deteriorates. When the MEMORY/CAMERA/VTR selector is performed digitally, if you turn the zoom ring to OFF as a default setting (p. 120).... If you set PROG. When you use the digital zoom: - During recording, turn the zoom ring quickly, the zoom may not ...
... 12× Zoom greater than 12× is set to the desired speed. Using the digital zoom - You cannot use the digital zoom function, the picture quality deteriorates. When the MEMORY/CAMERA/VTR selector is performed digitally, if you turn the zoom ring to OFF as a default setting (p. 120).... If you set PROG. When you use the digital zoom: - During recording, turn the zoom ring quickly, the zoom may not ...


