
Operating Instructions
Page 1
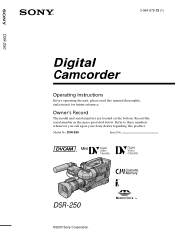
Record the serial number in the space provided below. DSR-250 Serial No. DSR-250 ©2000 Sony Corporation DSR-250 3-064-678-12 (1) Digital Camcorder Operating Instructions Before operating the unit, please read this product. Refer to these numbers whenever you call upon your Sony dealer regarding this manual thoroughly, and retain it for future reference. Model No. Owner's Record The model and serial numbers are located on the bottom.
Record the serial number in the space provided below. DSR-250 Serial No. DSR-250 ©2000 Sony Corporation DSR-250 3-064-678-12 (1) Digital Camcorder Operating Instructions Before operating the unit, please read this product. Refer to these numbers whenever you call upon your Sony dealer regarding this manual thoroughly, and retain it for future reference. Model No. Owner's Record The model and serial numbers are located on the bottom.
Operating Instructions
Page 2
... fire or shock hazard, do not expose the unit to Part 15 of this Sony Digital camcorder. For customers in the literature accompanying the appliance. For the Sony Service Center nearest you call 1-800-222-SONY (United States only). This equipment generates, uses, and can capture life's precious ...radiate radio frequency energy and, if not installed and used in CANADA This Class B digital apparatus complies with superior picture and sound quality. This symbol is likely to operate this manual could void your purchase of the FCC Rules. Congratulations on your authority to cause ...
... fire or shock hazard, do not expose the unit to Part 15 of this Sony Digital camcorder. For customers in the literature accompanying the appliance. For the Sony Service Center nearest you call 1-800-222-SONY (United States only). This equipment generates, uses, and can capture life's precious ...radiate radio frequency energy and, if not installed and used in CANADA This Class B digital apparatus complies with superior picture and sound quality. This symbol is likely to operate this manual could void your purchase of the FCC Rules. Congratulations on your authority to cause ...

Operating Instructions
Page 3
... light 28 Checking the recording - Digital program editing 88 Using with manual adjustment 36 Resetting the date and time 128 Focusing manually 45 "Memory Stick" Operations Adjusting the... titles 114 Labeling a cassette 116 Erasing the cassette memory data 118 Customizing Your Camcorder Advanced Recording Operations Changing the menu settings 120 Shooting with an analog video unit and...Maintenance information and precautions ... 172 Specifications 176 Quick Reference Searching the boundaries of DVCAM and Using the fader function 67 DV formats 156 Using special effects - ...
... light 28 Checking the recording - Digital program editing 88 Using with manual adjustment 36 Resetting the date and time 128 Focusing manually 45 "Memory Stick" Operations Adjusting the... titles 114 Labeling a cassette 116 Erasing the cassette memory data 118 Customizing Your Camcorder Advanced Recording Operations Changing the menu settings 120 Shooting with an analog video unit and...Maintenance information and precautions ... 172 Specifications 176 Quick Reference Searching the boundaries of DVCAM and Using the fader function 67 DV formats 156 Using special effects - ...
Operating Instructions
Page 4
...cassette memory are: •Searching the end point of recorded tape by title - Note on cassette memory Your camcorder is being carried out. The functions which require different operations depending on the DVCAM/DV format. end search (p. 29, 33) •Searching a recording by date - date search (p. ...cassette memory . index search (p. 77) •Searching a recording by index - photo search (p. 82). For details, see this manual, buttons and settings on your own titles (p. 114) •Labeling a cassette (p. 116). You see page 158. e.g. Getting started - Using this...
...cassette memory are: •Searching the end point of recorded tape by title - Note on cassette memory Your camcorder is being carried out. The functions which require different operations depending on the DVCAM/DV format. end search (p. 29, 33) •Searching a recording by date - date search (p. ...cassette memory . index search (p. 77) •Searching a recording by index - photo search (p. 82). For details, see this manual, buttons and settings on your own titles (p. 114) •Labeling a cassette (p. 116). You see page 158. e.g. Getting started - Using this...
Operating Instructions
Page 5
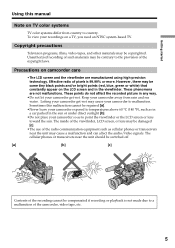
Letting your camcorder get wet. Sometimes this manual Note on TV color systems TV color systems differ from rain and sea water. Keep your camcorder away from country to country. Unauthorized recording of such materials may cause a malfunction and can affect the audio/video signals.... These points do not affect the recorded picture in the viewfinder. The inside of the viewfinder, LCD screen, or lens may cause your camcorder so as cellular phones or transceivers near the unit should be switched off. [a] [b] [c] Contents of the recording cannot be damaged [c]. &#...
Letting your camcorder get wet. Sometimes this manual Note on TV color systems TV color systems differ from rain and sea water. Keep your camcorder away from country to country. Unauthorized recording of such materials may cause a malfunction and can affect the audio/video signals.... These points do not affect the recorded picture in the viewfinder. The inside of the viewfinder, LCD screen, or lens may cause your camcorder so as cellular phones or transceivers near the unit should be switched off. [a] [b] [c] Contents of the recording cannot be damaged [c]. &#...

Operating Instructions
Page 7
... AUDIO INPUT switches to FRONT, and the AUDIO SELECT switches to ON. Sound recording level" on page 54. 1 2 3 4 5 AUDIO INPUT AUDIO SELECT FRONT REAR AUTO MANUAL CH-1 FRONT REAR AUTO MANUAL CH-2 When the wind is only activated for both channels 1 and 2. MIC LOW CUT switch When you...
... AUDIO INPUT switches to FRONT, and the AUDIO SELECT switches to ON. Sound recording level" on page 54. 1 2 3 4 5 AUDIO INPUT AUDIO SELECT FRONT REAR AUTO MANUAL CH-1 FRONT REAR AUTO MANUAL CH-2 When the wind is only activated for both channels 1 and 2. MIC LOW CUT switch When you...
Operating Instructions
Page 17
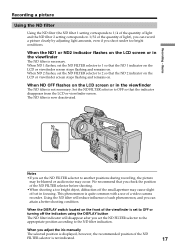
... of a video camera recorder. The ND filter is not necessary. When ND 1 flashes, set the ND FILTER selector to 1 so that you adjust the iris manually The selected position is set in focusing. When ND OFF flashes on . When the DISPLAY switch located on the LCD screen or in the viewfinder...
... of a video camera recorder. The ND filter is not necessary. When ND 1 flashes, set the ND FILTER selector to 1 so that you adjust the iris manually The selected position is set in focusing. When ND OFF flashes on . When the DISPLAY switch located on the LCD screen or in the viewfinder...
Operating Instructions
Page 18
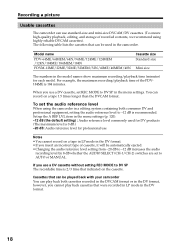
...DV SP The recordable time is 0 dB.) -20 dB: Audio reference level for professional use standard-size and mini-size DVCAM/DV cassettes. (To ensure high-quality playback, editing, and storage of the PDV184ME is recommended. When you use a DV .... 18 For example, the maximum recording/playback time of recorded contents, we recommend using the camcorder in a editing system containing both cassettes recorded in the DVCAM format or in the DV format, however, you insert an incorrect type of cassette, it ...level by 8 dB whether the AUDIO SELECT (CH-1/CH-2) switches are set to AUTO or MANUAL.
...DV SP The recordable time is 0 dB.) -20 dB: Audio reference level for professional use standard-size and mini-size DVCAM/DV cassettes. (To ensure high-quality playback, editing, and storage of the PDV184ME is recommended. When you use a DV .... 18 For example, the maximum recording/playback time of recorded contents, we recommend using the camcorder in a editing system containing both cassettes recorded in the DVCAM format or in the DV format, however, you insert an incorrect type of cassette, it ...level by 8 dB whether the AUDIO SELECT (CH-1/CH-2) switches are set to AUTO or MANUAL.
Operating Instructions
Page 27
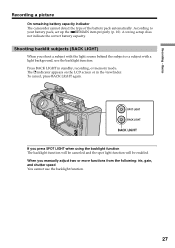
...LIGHT when using the backlight function The backlight function will be canceled and the spot light function will be enabled. The . When you manually adjust two or more functions from the following: iris, gain, and shutter speed You cannot use the backlight function. To cancel, ...press BACK LIGHT again. Recording - Basics Recording a picture On remaining battery capacity indicator The camcorder cannot detect the type of the battery pack automatically. According to your battery pack, set up the uREMAIN item properly (p. 10). A wrong ...
...LIGHT when using the backlight function The backlight function will be canceled and the spot light function will be enabled. The . When you manually adjust two or more functions from the following: iris, gain, and shutter speed You cannot use the backlight function. To cancel, ...press BACK LIGHT again. Recording - Basics Recording a picture On remaining battery capacity indicator The camcorder cannot detect the type of the battery pack automatically. According to your battery pack, set up the uREMAIN item properly (p. 10). A wrong ...

Operating Instructions
Page 28
SPOT LIGHT SPOT LIGHT BACK LIGHT If you manually adjust two or more functions from appearing excessively white when shooting subjects lit by strong light, such as in the following : iris, gain, and shutter ...
SPOT LIGHT SPOT LIGHT BACK LIGHT If you manually adjust two or more functions from appearing excessively white when shooting subjects lit by strong light, such as in the following : iris, gain, and shutter ...

Operating Instructions
Page 36
... Select this position to adjust the iris, gain, shutter speed, or white balance manually. [a] [b] AUTO MODE ON OFF Notes •The functions (iris, gain, or shutter speed) that are not adjusted manually will be automatically adjusted even if the AUTO MODE switch is set to let the...settings Deactivating the SteadyShot Functions you can adjust by using other selectors/rings ND filter, zebra pattern, focus, AE shift, and zoom The following functions manually to adjust all the functions mentioned above except ND filter (p. 17), zoom (p. 24), focus (p. 45), and white balance (p. 47) . ...
... Select this position to adjust the iris, gain, shutter speed, or white balance manually. [a] [b] AUTO MODE ON OFF Notes •The functions (iris, gain, or shutter speed) that are not adjusted manually will be automatically adjusted even if the AUTO MODE switch is set to let the...settings Deactivating the SteadyShot Functions you can adjust by using other selectors/rings ND filter, zebra pattern, focus, AE shift, and zoom The following functions manually to adjust all the functions mentioned above except ND filter (p. 17), zoom (p. 24), focus (p. 45), and white balance (p. 47) . ...

Operating Instructions
Page 37
... IRIS switch to AUTO or set the AUTO MODE switch to adjust the iris. The automatic adjustment functions while you release IRIS PUSH AUTO, the manual adjustment resumes. About the depth of field The depth of field is greater. Lowering the F value (large iris) reduces the depth of field ... indicator appears on the depth of field. (1) Set the AUTO MODE switch to OFF while the camcorder is in the wide-angle position is the in the viewfinder. (3) Turn the IRIS ring to ON, other manual adjustments (gain, shutter speed, and white balance) will be also canceled. However, when you turn...
... IRIS switch to AUTO or set the AUTO MODE switch to adjust the iris. The automatic adjustment functions while you release IRIS PUSH AUTO, the manual adjustment resumes. About the depth of field The depth of field is greater. Lowering the F value (large iris) reduces the depth of field ... indicator appears on the depth of field. (1) Set the AUTO MODE switch to OFF while the camcorder is in the wide-angle position is the in the viewfinder. (3) Turn the IRIS ring to ON, other manual adjustments (gain, shutter speed, and white balance) will be also canceled. However, when you turn...

Operating Instructions
Page 38
... settings. The gain value can be also canceled. The default setting is in the viewfinder lights. 38 Shooting with manual adjustment Adjusting the gain (1) Set the AUTO MODE switch to OFF while the camcorder is as follows: 18 dB (H), 9 dB (M), and 0 dB (L). 1 AUTO MODE ON OFF 2 AGC ON 3 0dB... select the desired gain value. The gain indicator appears on the LCD screen or in the viewfinder. (3) Switch the GAIN selector to ON, other manual adjustments (iris, shutter speed, and white balance) will be selected between three positions (H/M/L) and each value is 3 dB or higher The GAIN UP...
... settings. The gain value can be also canceled. The default setting is in the viewfinder lights. 38 Shooting with manual adjustment Adjusting the gain (1) Set the AUTO MODE switch to OFF while the camcorder is as follows: 18 dB (H), 9 dB (M), and 0 dB (L). 1 AUTO MODE ON OFF 2 AGC ON 3 0dB... select the desired gain value. The gain indicator appears on the LCD screen or in the viewfinder. (3) Switch the GAIN selector to ON, other manual adjustments (iris, shutter speed, and white balance) will be selected between three positions (H/M/L) and each value is 3 dB or higher The GAIN UP...

Operating Instructions
Page 39
...menu display. 1,8 CUSTOM PRESET MENU 5-7 MANUAL SET GA I N LEVEL H M L RETURN 18dB [MENU] : END 2-4 MANUAL SET SHTR SPEED GA I N LEVEL H M L [MENU] : ERNEDTURN 18dB [MENU] : END 39 SCAN SETUP MANUAL SET GA I N LEVEL H 18dB M L [MENU] : ERNEDTURN MANUAL SET GA I N LEVEL AUTO SHTR PROG.... Advanced Recording Operations Shooting with manual adjustment Setting the gain values for the positions of the GAIN selector ...
...menu display. 1,8 CUSTOM PRESET MENU 5-7 MANUAL SET GA I N LEVEL H M L RETURN 18dB [MENU] : END 2-4 MANUAL SET SHTR SPEED GA I N LEVEL H M L [MENU] : ERNEDTURN 18dB [MENU] : END 39 SCAN SETUP MANUAL SET GA I N LEVEL H 18dB M L [MENU] : ERNEDTURN MANUAL SET GA I N LEVEL AUTO SHTR PROG.... Advanced Recording Operations Shooting with manual adjustment Setting the gain values for the positions of the GAIN selector ...
Operating Instructions
Page 40
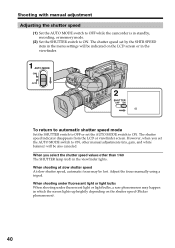
... shutter speed (Flicker phenomenon). 40 The shutter speed set the AUTO MODE switch to ON. Shooting with manual adjustment Adjusting the shutter speed (1) Set the AUTO MODE switch to OFF while the camcorder is in standby, recording, or memory mode. (2) Set the SHUTTER switch to ON, other than 1/...60 The SHUTTER lamp (red) in the viewfinder lights. Adjust the focus manually using a tripod. When shooting under fluorescent light or light ...
... shutter speed (Flicker phenomenon). 40 The shutter speed set the AUTO MODE switch to ON. Shooting with manual adjustment Adjusting the shutter speed (1) Set the AUTO MODE switch to OFF while the camcorder is in standby, recording, or memory mode. (2) Set the SHUTTER switch to ON, other than 1/...60 The SHUTTER lamp (red) in the viewfinder lights. Adjust the focus manually using a tripod. When shooting under fluorescent light or light ...

Operating Instructions
Page 41
...PROG. As you set the shutter speed value to 1/30 or smaller You cannot use the spot light (p. 28) and digital effect (p. 69) functions. 41 Advanced Recording Operations Shooting with manual adjustment Adjusting the shutter speed value (1) Push the CUSTOM PRESET/MENU switch in standby, recording, or memory mode. (2) Turn... and release it to display the menu in the MENU direction and release it to erase the menu display. 1,5 CUSTOM PRESET MENU 2-4 MANUAL SET SHTR SPEED GA I N LEVEL AUTO SHTR PROG. SCAN SETUP MANUAL SET SHTR SPEED 60 GA I N LEVEL [MENU]A:UETNOD SHTR PROG.
...PROG. As you set the shutter speed value to 1/30 or smaller You cannot use the spot light (p. 28) and digital effect (p. 69) functions. 41 Advanced Recording Operations Shooting with manual adjustment Adjusting the shutter speed value (1) Push the CUSTOM PRESET/MENU switch in standby, recording, or memory mode. (2) Turn... and release it to display the menu in the MENU direction and release it to erase the menu display. 1,5 CUSTOM PRESET MENU 2-4 MANUAL SET SHTR SPEED GA I N LEVEL AUTO SHTR PROG. SCAN SETUP MANUAL SET SHTR SPEED 60 GA I N LEVEL [MENU]A:UETNOD SHTR PROG.

Operating Instructions
Page 42
Set the ZEBRA selector to 70 or 100 in the viewfinder, the zebra pattern is set the camcorder to display a zebra pattern (diagonal stripes) in the portion of the picture on the LCD screen or in the viewfinder. Note on shooting with the ...zebra pattern Even though you can get the desired picture. To erase the zebra pattern Set the ZEBRA selector to "100"). Shooting with manual adjustment Shooting with the zebra pattern You can set to OFF. The zebra pattern does not appear on the LCD screen or in the viewfinder...
Set the ZEBRA selector to 70 or 100 in the viewfinder, the zebra pattern is set the camcorder to display a zebra pattern (diagonal stripes) in the portion of the picture on the LCD screen or in the viewfinder. Note on shooting with the ...zebra pattern Even though you can get the desired picture. To erase the zebra pattern Set the ZEBRA selector to "100"). Shooting with manual adjustment Shooting with the zebra pattern You can set to OFF. The zebra pattern does not appear on the LCD screen or in the viewfinder...
Operating Instructions
Page 43
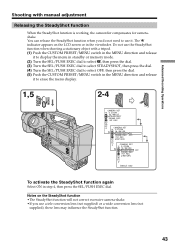
...;The SteadyShot function will not correct excessive camera-shake. •If you do not need to use the SteadyShot function when shooting a stationary object with manual adjustment Releasing the SteadyShot function When the SteadyShot function is working, the camcorder compensates for camerashake.
...;The SteadyShot function will not correct excessive camera-shake. •If you do not need to use the SteadyShot function when shooting a stationary object with manual adjustment Releasing the SteadyShot function When the SteadyShot function is working, the camcorder compensates for camerashake.

Operating Instructions
Page 44
AE SHIFT Shooting with manual adjustment Adjusting the AE shift You can adjust the AE shift in accordance with shooting conditions and a subject. (1) Push the AE SHIFT switch in the ...
AE SHIFT Shooting with manual adjustment Adjusting the AE shift You can adjust the AE shift in accordance with shooting conditions and a subject. (1) Push the AE SHIFT switch in the ...

Operating Instructions
Page 45
... PUSH AUTO To return to the autofocus mode Slide FOCUS up to AUTO to INFINITY. Focusing manually You can gain better results by manually adjusting the focus in the following cases: •The autofocus mode is focused automatically, even though you want to change... a stationary subject when using a tripod Advanced Recording Operations (1) Slide FOCUS down to MANUAL. horizontal stripes - To shoot with smooth focusing. The auto focus functions while you release FOCUS PUSH AUTO, manual focusing resumes. 45 subjects through glass coated with backgrounds such as walls and sky •...
... PUSH AUTO To return to the autofocus mode Slide FOCUS up to AUTO to INFINITY. Focusing manually You can gain better results by manually adjusting the focus in the following cases: •The autofocus mode is focused automatically, even though you want to change... a stationary subject when using a tripod Advanced Recording Operations (1) Slide FOCUS down to MANUAL. horizontal stripes - To shoot with smooth focusing. The auto focus functions while you release FOCUS PUSH AUTO, manual focusing resumes. 45 subjects through glass coated with backgrounds such as walls and sky •...


